This information may be useful to anyone who has ever encountered or will encounter the installation of socket boxes. We will describe as briefly and concisely what a socket box is , how to install it correctly and how much its installation may cost. You will also learn how to put back a fallen socket and what can be used instead.
- Installation Rules
- Socket sizes
- Installation in concrete
- Grilling
- Installation in drywall
- The socket doesn't stay in place
- Installing socket boxes in tiles
Remember three basic rules for a quality installation:
| Rule #1. A correctly installed socket box should not protrude or be too recessed into the wall, that is, it should be built flush with the finished wall. A finished wall is considered to be a wall that has already been prepared for painting. We will consider cases when it is planned to lay tiles or some other false panels on the wall below. |
| Rule #2. Socket boxes must be installed strictly level, even if there is only one socket box, it must be set level to avoid difficulties in the further installation of sockets or switches. |
| Rule #3. A correctly installed socket box should hold very tightly in the socket. |
You can also add a few nuances that will help you understand what kind of electrical outlets you need; how to prepare holes (sockets) for them; how to properly insert a cable into a socket box; and how to install it correctly.
Adviсe
- You cannot install points near the floor; you must raise the markings up the wall by at least 20-50 cm.
- The size of the crown for a standard socket box is 68 mm.
- If, having created a hole, there is a metal or wooden profile, it is “cut down” and drilled out.
- Before installing the box, you need to insert the cable into it. It can come out from the top of the plasterboard structure or from the side. Accordingly, remove the plugs on the box (top or side, bottom).
- If several holes fall on the profile. It is “exposed” with the same crown. Finally cut with metal scissors.
Installing a firebox into a plasterboard surface does not take much time and effort if the markings are done correctly, you have power tools and high-quality materials (crowns, boxes) at hand. Socket boxes are made from plastic by various companies.
It is worth paying attention to the quality of the plastic used, the thickness of the socket
Socket sizes
Everything about the size of the socket boxes is simple, the most common size of the socket box is 70mm in diameter. In the vast majority of cases, they all have the same size. And most modern sockets and switches are designed specifically for these sizes.
Types of socket boxes
It is important not to forget about such a parameter as the depth of the socket box . But even in this case, everything is simple, if you plan to connect several wires in the socket box, in addition to the socket or switch itself (for example, use a socket box instead of a junction box), then you will need a deeper socket box. If possible, use deep socket boxes; they are then easier to work with and install sockets in.
Switching wires in a socket box instead of a junction box
Remember! - Once installed correctly, the socket box never reminds of itself again.
Popularity of drywall
Nowadays, plasterboard sheets are very often used for interior decoration and leveling the walls of rooms and creating partitions.
This material greatly facilitates finishing work, has a fairly large list of positive qualities, for which it has become widespread.
After fixing the sheets of drywall, it’s time to complete the next stage of work related to the electrification part - installing sockets and switches in the walls.
The installation work is not complicated, so it is quite possible to do it yourself, without resorting to the help of anyone.
Installing a socket box in concrete
What needs to be done to install a socket box in concrete? Right! - Make a hole under the socket box! For this, it is best to use a drill with a diamond bit, but this is not the best option in terms of cheapness. A more convenient and practical option is a hammer drill with a concrete impact bit, or simply cut out the concrete with a grinder and a stone disc (but this is a very dirty method, and dust will be absolutely everywhere: in the ears, eyes and in the entrance).
It should be noted that when gating, a lot of fine dust is generated in the room, and first of all, installers should take care of their health and purchase standard protective equipment: masks, respirators, headphones and a construction vacuum cleaner.
Future holes must first be marked. We draw a line along the level and place marks on the wall. If you have 2 or more socket boxes, then the distance between the centers of the circles is 71 mm . This is a distance calculated empirically by professional electricians, tested with sweat and blood! Remember 71mm!
The easiest way to make marks is to attach a group of sockets to the wall.
Functions of mounting boxes
Despite the obvious advantages and safety, not all craftsmen use concrete sockets, being confident that any socket can be installed this way. But here it is worth noting that the absence of a socket box is always a risk of damage to the wiring and the absence of any guarantees of fire and electrical safety.
Main functions of mounting boxes:
- Strong fixation in the wall of a correctly and safely fixed socket (regardless of the material of the monolith)
- Protecting the socket from moisture, dust, small debris
- Ensuring electrical safety - any type of socket boxes have dielectric properties that are important in operation and do not allow current to flow from the contacts of the sockets to various metal wall structures
- Guarantee of localization of a possible fire inside the socket box housing, preventing the spread of fire beyond the element
- Simpler and more accurate installation of the socket - thanks to the sockets, the cover of the element is in contact with a flat surface, there are no gaps or cracks
Thus, installing a socket box in concrete is completely justified and allows for a higher level of safety and a long service life of the entire structure.
Hole cutting
After marking, in the marked centers of the circle it is necessary to make a hole using a drill with a slightly larger diameter than the crown drill (for example, an 8-10mm drill). We drill a hole with a margin, taking into account the length of the drill bit of the crown itself (but do not forget about neighbors and thin walls). This method is also suitable when working with a diamond core bit in drilling mode.
The process of gating. After drilling holes in the center of the future circle, you need to use a crown to go deeper into the wall a few millimeters (this only applies to the method of working with a hammer drill!). Along the intended circle, you need to drill the maximum possible number of holes to make it easier for the crown to “gnaw” the concrete.
With a diamond crown, you just need to drill - without chiselling, periodically letting the crown cool. It is worth noting that if a diamond bit gets on the reinforcement, its service life is significantly reduced.
When working with an angle grinder, the whole task comes down to making cuts in the wall to the required depth and hollowing out the area where the socket boxes will be located.
Difficulties that may arise and their solutions
One of the most common problems that arise when making a seat for a socket box is getting into the profile to which the plasterboard sheet is attached.
In this case, it will not be possible to install the mounting box, since its height is much greater than the thickness of the drywall.
That is, for installation you need additional space under the sheet so that the socket box goes all the way.
This problem can be solved very simply - using a chisel (chisel, screwdriver) and a hammer, we cut out the interfering section of the profile. This will not affect the bearing capacity of the profile in any way.
The situation is worse if the drywall is glued to the wall without using a frame made of a metal profile (such installation also occurs, although it is rare).
In this case, you will have to make a recess in the wall using a hammer drill with a chisel or a hammer with a chisel.
Another situation concerns the installation of a block of sockets (several of them are located in a row, one next to the other).
For reliable fastening of each socket box, it is necessary that there are jumpers between the holes for them.
And this is where correctly executed markings will help.
It is done like this: select the location for installing the outermost socket, and mark the center of the hole.
Then draw a straight horizontal line through the marked point.
Next, measure 72 mm from the center of the first hole and make a mark (this will be the center of the second hole).
We make a few more marks on the line (according to the number of sockets in the block), observing the specified length between the points.
It's simple - the diameter of the hole is 68 mm, and between the centers we have 72 mm, and after cutting the holes we will get jumpers 4 mm thick in the thinnest place.
POPULAR WITH READERS: Smart sockets, what they are, types, design and principle of operation, how to install and connect to mobile devices.
What to do if, while drilling, a drill or bit gets into the reinforcement?
There are several ways to remove rebar. One of the fastest and most painless is knocking out the reinforcement with a chisel - an attachment for a hammer drill. If the crown gets into the reinforcement (an indirect sign of it getting into the reinforcement is sparks or a clear slowdown in the drilling process), it is better to remove this reinforcement, otherwise you will ruin the crown.
The second less convenient way is to use an old crown. It doesn’t matter which way you do it, with a diamond or a drill bit, in both cases we simply drill out the reinforcement. The reinforcement metal is very soft and can be easily broken through with a hammer drill. And the third, dirty way, is to simply drill out the reinforcement using a grinder with a diamond disc on the stone.
Wall preparation
It is necessary to properly prepare the plane itself for installing the socket box into it. It is best to pre-putty the gypsum board so that the surface holds its shape well when drilling with a drill with a fitted crown of the appropriate size. You can also use a preliminary primer, since as a result, the drywall will not crumble during the work. We select the diameter of the crown for the socket box in accordance with the dimensions of the socket being installed.
And as soon as the coating dries after putty and primer, you can directly begin drilling the hole itself. Attention: drilling in plasterboard is best done with a special drill attachment called a crown. But if you are not such a professional, and this attachment simply was not at hand, then you can do the work using a regular drill and a construction knife
Then we use the product itself as a template for marking. The hole must be drilled and made end-to-end, without visible gaps (it is better to drill a millimeter smaller in diameter in order to drive the socket box into the hole that is drilled with some effort) - then installation of the box under the socket will be successful. Professionals recommend treating the hole made with putty and primer, which will allow the socket to better secure itself in the socket.
Embedding a socket box in concrete
The best way to secure socket boxes is to embed them in the hole using alabaster or rotband. A small life hack - so that the solution does not harden too quickly and you do not have to wait a day - you need to mix alabaster with rotband.
First, use a vacuum cleaner to remove all dust from the hole and moisten (prime) the hole with water. And only after this, we apply the solution with a small spatula, spreading it along the inner walls of the hole. The solution should be thick enough not to leak out of the wells. It is important to understand that the area of contact between the solution and the socket box should be maximum! Plus, coat the socket boxes themselves with the mixture. The solution will envelop the socket box from all sides and adhere well to the base of the wall, only then can we say that the socket box is installed efficiently!
Using a large spatula, remove excess mortar while leveling the surface of the wall. Before this procedure, it is necessary to remove or screw in all the screws of the socket box.
https://www.instagram.com/p/CU3DCTZqssQ/
Laying the cable in the socket box. It is best to lay the cable in an already installed socket box; the windows for the cable are easily knocked out with a screwdriver, and it is better to make channels for pulling the cable between the socket boxes in advance. When the solution has cooled, you can safely insert the cable into pre-made holes or recesses.
If you don’t have that much time and the cable needs to be installed together with the socket box, try to align the socket boxes as accurately as possible. You can insert the cable into any hole, but it is better not to use the side windows for this, so that there are no difficulties with the subsequent installation of sockets.
Important! The entry of the cable into the socket box should not in any way interfere with the future socket, especially from the side of the spacers. A very common mistake when installing socket boxes is to break the wires with a spacer from the socket - in this case, a dangerous potential may appear on the socket body, or a short circuit may occur when the electricity is turned on.
Drilling
The main condition for the correct production of concrete with a hammer drill is that the direction of the centering drill must be strictly perpendicular to the plane of the wall. If you don’t have enough experience, then it’s better to practice on unnecessary areas of concrete fences.
This video clearly shows the design of socket boxes:
The dimensions of the standard crown coincide with the external dimensions of the concrete sockets. Therefore, when drilling, the crown is completely recessed into the wall. At the end of the work, a concrete cylinder with a hole in the middle remains in the hole. It is easily knocked out with a chisel installed in the hammer drill in jackhammer mode.
If there is no crown, proceed as follows:
- The socket box is leaned with its bottom against the central marking point and the body of the box is outlined with a pencil;
- I lean the socket box against the drill and mark the height of the glass with insulating tape;
- inside the marking contour, drill the maximum number of holes in perforation mode, recessing the drill to the insulating mark;
- knock out the opening with a chisel in the same way as in the previous case.
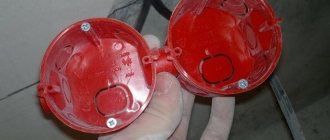
Drilling out a seat for a socket box Source electrikmaster.ru
This video shows the installation of socket boxes:
Preparing socket boxes
Before installation, the side window is broken out in the box. Wires are pulled through the resulting opening to a length of about 10 cm. The ends of the wires are stripped and crimped with a terminal block. Contact elements are necessary for stranded conductors. Shaggy twists often lead to a short circuit and, even worse, can cause a fire in the wiring.
Perforated openings in the glass are located on four sides on the side of the PR. This is done so that you can pull the wire into the box from any direction without creating unnecessary twisting of the wiring.
PR installation
- The hole in the concrete is cleaned of dust and moistened with water to increase the adhesion of the concrete surface of the nest.
- Gypsum or alabaster is diluted with water in a ratio of 1:2.
- The solution is applied with a spatula in a circle inside the hole.
- The box with the stretched wire is inserted into the seat.
- The squeezed out solution is removed.
Removing excess solution Source www.sibelektrika.ru
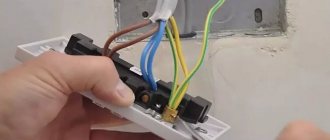
Connection and installation of fittings
After the alabaster hardens, the following actions are performed:
- the stripped ends of the wires or terminals are secured to the switch block or socket;
- Usually the terminals are secured with screws and washers.
- There are fittings with self-clamping fasteners. The ends of the wires are inserted into the holes, and spring-loaded bars clamp them;
- the wire is laid on the bottom of the socket box and the fittings are inserted;
- The pad pad with the holes is put on the PR screws and turned until it is level. The screws are tightened with a screwdriver;
- the side screws of the block are tightened until the sliding legs reach maximum contact with the surface of the glass;
- The switch keys are inserted into the sockets of the block. Then the front frame is attached. The front panel of the socket is screwed to the block with a screw.
Fastening the socket fittings in the socket box Source sense-life.com
Watch the video to see how to install the socket:
At what stage of repair (finishing) is it better to lay a socket box?
This is one of the most pressing issues that not everyone thinks about at the beginning, but understands how important it is in the end. Ideally, you need to follow RULE No. 1 , but this does not always work out.
Therefore, you need to know in advance how much the layer of plaster or other layer (plasterboard, tiles, etc.) will protrude before installing the socket box. As a last resort, you can break this rule and install the socket box flush with the bare concrete wall. But in this case, when plastering the walls, the socket boxes will be recessed into the wall, to the depth of the plaster layer. It will not be easy to properly install sockets in such a socket box, but our electricians know how to do it correctly.
Choosing a location for installation
In the absence of specific wishes, specialists usually use existing standards when installing sockets on drywall. They describe the distance that should be from the structure to the wall or floor of the room.
Today the standards consist of the following data:
- from floor to socket 30 cm;
- from the floor to the switch - 90 cm;
- from the nearest wall to the socket - 18 cm.
If there are other installation options, they are not prohibited. The main installation rule is to install the outlet in such a way that it is convenient to use and does not have to connect additional tees or extension cords.
Therefore, electricians with many years of experience have identified a number of rules that will work win-win in any apartment or house:
- in the kitchen, sockets along the work area should be made at a height of 1.2 m, while taking into account the required number of possible appliance connections;
- the socket for the refrigerator, freezer or dishwasher is mounted at a height of 30 cm;
- the structure for the washing machine is installed at a height of 1 meter;
- The microwave outlet should be at a distance of 1-1.2 m from the floor.
All sections of the wall where it is planned to cut out the socket should be outlined at the repair stage, until the wiring is laid out.
Installation of socket boxes in gypsum board
When working with drywall, the cable is laid in advance or pulled through using technical holes and broaches. In the places of future switching (connections) of the cable, or in those places where there should be a socket box, leave a supply of cable, and mark outside where this cable is located. Mark the location of the future hole for the socket box in any way convenient for you, for example, screw in a self-tapping screw in this place.
Markings for socket boxes are made in the same way as markings on concrete. The distance between the centers of the circle is the same 71mm . It is important to consider that a drilled hole cannot be fixed (or rather, nothing is impossible for a good electrician), but before you call an electrician, you need to try to do it yourself.
Holes in drywall can be made with a regular wood bit, 68mm , using a screwdriver or drill.
After drilling the hole, you need to find the necessary wires, which should be right behind the wall. It happens that they are hidden in a junction box, or hang on a cable, with the help of which the wires can be pulled to the hole. Each master has his own way of pulling wires into hidden cavities, but that's a different story.
You need to insert the wires into the socket box BEFORE installing the socket box itself, otherwise it simply cannot be done.
Now comes the fun part. The most painful procedure is the correct installation of the socket box in the drywall. This is due to the fact that different manufacturers of socket boxes for plasterboard (or wood) have lugs for securely fixing the socket box to the ceiling wall (plasterboard, plywood, or whatever you have). In some cases, because of these ears, the rosette does not fit into the prepared hole, but this problem does not occur on all rosettes!
It is best to take care of this in advance when buying socket boxes. Make sure that the ears, when open, do not go beyond the circumference of the socket itself, for example, like here
If, nevertheless, you manage to buy the “wrong” socket box, then you can use one little trick: eyelets are made in plywood or drywall at a slight angle (it is enough to make them only on one side), after which the socket box can be installed normally. The socket box should fit into the hole normally at an angle. The main thing is not to overdo it and not to make a hole with a larger diameter than the outer edges of the socket box.
After all the procedures, we fix the socket box by tightening the screws
Laying additional wiring for ready-made gypsum board finishing
How to stretch the wire and install a socket box under the mounted drywall? It all depends on what is between the wall and the sheets.
- If the drywall is glued to the wall, you will have to cut through the finishing surface and make shallow grooves. In this case, it will be necessary to restore the front layer (paint or glue a strip of wallpaper).
- When mounted on a profile, the task is simplified. Of course, you need to know the layout of the metal guides. In order not to spoil the upper part of the wall, the power cable can be routed from below, from under the baseboard. First, a hole is drilled for the socket box. Then, the plumb line determines the location of the cable entry (the plinth in this place is temporarily dismantled). A rope with a plumb line is lowered into the prepared hole, which is pulled out from the lower hole for entering the cable. The wire is attached to a rope and pulled up.
Next is the usual scheme: installing the box in any way. The input cable is pulled under the baseboard to the distribution panel.
If there is soft insulation between the drywall and the wall, you can use steel wire instead of rope (which remains after installing the corrugation). This method does not work with rigid insulation boards.
Considering the uncontrolled position of the cable under the plasterboard, it is recommended to use corrugation. As a last resort, a wire with three layers of insulation.
After installing additional wiring, be sure to make changes to the current power supply circuit. Otherwise, during repairs you will damage the new cable.
What to do if the socket box pops out of the wall
In cases where you are faced with a dropped or poorly secured socket, there are several ways you can correct the situation. The simplest and most reliable is to screw a self-tapping screw into the base of the socket box (if it is concrete, a self-tapping screw with a dowel). The second method is to use a glue gun. Before gluing, it is necessary to remove all dust from the hole. More complex situations, when, for example, the base is gypsum and it crumbles. A plaster solution will help here ; the base must first be primed, for example with PVA glue.
The mortar method can also be suitable for plasterboard structures. In general, the solution is, in principle, a panacea for fallen socket boxes. In some severe cases, you can screw the socket or switch itself to the base of the wall.
Installation of socket boxes in tiles or wall panels
It is better to lay the cable and install the socket boxes in advance, before laying the tiles. But if the tiles are already there and you need to make an outlet or switch, then crowns for ceramic tiles will help. The drill bits will help you carefully drill holes in the tiles.
The hardest thing is if there is concrete under the tiles that needs to be tapped. In this case, it is best to use a diamond crown, otherwise there is a chance of damaging the tile (when chiselling with a regular crown).
There is a cheaper and dirtier way, this is drilling a hole with a grinder, the main thing is to drill everything out as carefully as possible so that the hole is covered by the frame from the socket.
Preparatory work
Sockets are installed according to the socket arrangement plan. According to the same plan and single-line design diagram, electrical wiring around the room is carried out. Electrical wiring is carried out inside the partition structure or under the plasterboard wall sheathing. The wiring is carried out using an electric cable with copper conductors and double (VVG cable) or triple insulation (NUM cable). According to the technology, the cable must be enclosed in electrical installation corrugation or special plastic pipes for electrical installation work.
The places where it is planned to install overhead sockets must be reinforced inside the structure with transverse wooden blocks. The bars will serve as a support on which the sockets will be attached.