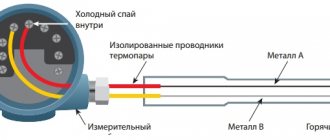
What is DIN rail
DIN rail is an imported invention, and that is why it is often called DIN rail. The abbreviation DIN stands for the German standard, DIN 43880-1988 “Built-in electrical appliances. Overall and corresponding installation dimensions”, where this rail was first standardized. In Russia, this product is standardized in GOST R IEC 60715-2003 and is often called a mounting rail. Expanded name: mounting rail for installation (fastening) of electrical devices in low-voltage distribution and control devices for electrical networks (electrical circuits).
Item Description
So, din rail is a generalized name for a metal profile that is used in electrical engineering. This rail can be galvanized steel or simply aluminum.
It all depends on parameters such as:
- weight;
- strength;
- the strength of the current passing through the ground terminals.
The lath can be either continuous or with a regular perforation step. In addition, there are options with preliminary notching, which greatly facilitates cutting to a certain length.
The very origin of the abbreviation “din” is very simple - it is an abbreviation for the German Institute for Standardization: Deutsches Institut fur Normund. To be fair, it is worth noting that this abbreviation applies not only to rails, but also to other products - connectors, fasteners, etc.
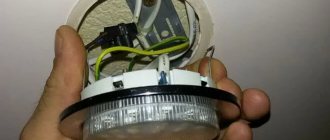
About the installation method
Let us briefly consider the DIN rail mounting method. In cross-section, it has protrusions along the edges. They are designed to hold the device, which is installed on the rail. But at the same time it can be moved relatively freely along it. If such “freedom of action” is not welcomed, then it can be completely eliminated. To do this, you simply need to install special locking elements on the sides of the device, which are also designed for installation on DIN rails.
It is worth noting that in panels that are used for mounting modular equipment, fixation is often performed by creating external holes in the cover, taking into account the actual number of switching equipment. That is why the windows for the outer part of the equipment do not open completely. Some of them are usually covered with curtains, which can be easily removed if necessary. If it so happens that there is less equipment in the panel than could be installed, then all the free spaces that remain are closed with special plugs.
It is worth adding that all modular machines, circuit breakers and RCDs are equipped with special latches. They are designed to hold the element on the DIN rail. To install, the upper groove of the device is fixed on one of its lower edges. In this case, the lower edge of the device is pressed against the rail with slight force until an obvious click is heard.
If the element needs to be removed, you will need a flat-head screwdriver. With its help, you need to carefully move the latch down and remove the device from the groove. It is worth adding that there are elements of equipment in which the latch is fixed in the open position.
What can be installed on a DIN rail?
In addition to protection devices, other elements that are standardized for it can be installed on the DIN rail. These can be electricity meters, relays, automation devices, terminals, signaling and control devices, and zero buses. Many elements of electrical circuits have double fastening points. Due to this, they can be installed both on a DIN rail and on a regular classic surface.
Briefly about the types
It would be wrong if we did not mention that DIN rails come in different types. The most common type is the TN-35-7.5 rail. How to understand these numbers? Very simply, the rail is thirty-five millimeters wide and seven and a half high. There is also another modification - with a height of fifteen millimeters, that is, the TN-35-15 DIN rail. This option is quite often used in wall-mounted and floor-mounted panels. It is worth noting that such slats are also called Ω-type slats. It’s easy to understand where this name comes from if you carefully examine this element in profile.
If we talk about the length, then according to the standard it is two meters. But this is not always convenient, so in most stores DIN rails are sold in pieces of twenty centimeters.
Types of din rails
According to GOST 60715, mounting rails are available in three types:
- TN type (TN 15, TN 35, TN 75);
- C type (C 20, C30, C40, C50);
- G type (G 32).
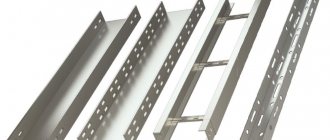
You can read in detail about the types of slats in GOST, it doesn’t matter. For practice, it is important that you will be dealing with TN type slats, the profile of which is visible in the pictures. For electrical circuits of apartments and houses, a DIN rail with a width of 35 mm (TN 35) is used, with a shelf height of 7.5 mm. The types of slats differ in profile thickness (from 1 to 1.5 mm) and the diameters of the installation holes (4 mm, 5 mm), which are clearly visible in the figures.
Kinds
And before moving on to the types, it is worth describing the differences that they may have. Mainly changed:
- weight;
- strength;
- the strength of the current carried through the terminals;
- material: steel and aluminum;
- perforation: continuous and regular;
- notch: either there or not.
And if we are talking about standards, then you need to understand that it is impossible to unify the fasteners of electrical devices and rails. Therefore, there are three varieties used depending on the situation:
- Omega type. The most popular type and enshrined in Russian GOST, which is often referred to as TH35. Its width is 35 mm, although there is also a version on the market with a smaller format in thickness and width. Basically, such smaller versions are used for terminals, not devices. In addition to the material, there is also its processing, the most popular of which are anodizing, galvanizing and galvanizing.
- C-type. It has dimensions similar to Omega - 32 mm. The ends in this form are bent inward, which visually resembles the letter C. Mainly used for clamps and terminal blocks, however, there are a number of devices for which the C-type is also the most suitable.
- G-type. The model is identical to the C-type, with the exception of one difference - one of the ends is smaller and narrower than the other. Visual association with the letter G. Also used for clamps, but the difference in shape is necessary for flexibility in installation in inaccessible places and specific equipment.
If you need to install a terminal, then the omega type is often useful. All the rest are mostly used by builders. If you make repairs, you will have to either choose the slats responsibly from the beginning, or get advice from experienced builders.
How to assemble a shield for an apartment. Do-it-yourself electrical panel for an apartment. One of the options
Material for making DIN rails
Depending on the purpose of the slats, namely the planned load, slats are made of steel or aluminum. You can see the aluminum slats above.
Steel slats are more durable and can withstand maximum loads with a minimum thickness of 1 mm. While aluminum slats can be loaded to the maximum (installation of frequency converters, soft start devices, powerful contactors, three-phase power circuit breakers) only with a thickness of 1.5 mm.
Kinds
They are produced in different sizes and shapes. It is clear that you need to install a short rail in a small shield. And the long one is sometimes even called DIN rail. The rail is fastened with screws or bolts, for which the manufacturer has already drilled a series of oblong holes on it. They are also produced without holes, which, in general, gives a little more hardness. During installation, you will then need to accurately drill where the rail will be attached to the base. Material - aluminum or steel, galvanized or stainless steel
Actually, reliability is important, and not physical lightness, so that the rail firmly holds the modules installed on it, because this is most often very important for powering the apartment, and for its safety, and for the equipment. Something that needs to be installed once, but with 100% confidence in the results. The manufacturer plays a role
Actually, its production culture. This can always be seen by the absence of burrs, strictly maintained linearity of shape, as well as the size, thickness and quality of the metal. There are several popular manufacturers: ABB, IEK, DKS. But many well-known companies are engaged in the production of electrical accessories, so it is better to be guided by considerations of a fundamental nature when choosing
The manufacturer plays a role. Actually, its production culture. This can always be seen by the absence of burrs, strictly maintained linearity of shape, as well as the size, thickness and quality of the metal. There are several popular manufacturers: ABB, IEK, DKS. But many well-known companies are engaged in the production of electrical accessories, so it is better to be guided by considerations of a fundamental nature when choosing.
Three profiles are available.
Ω-shaped (omega). We use it most often. Machines and metering devices are attached to it.
Omega DIN rail
C-shaped. Hardware clamps and terminal blocks are placed on them.
DIN rail C
G-shaped profile. Almost the same as a type C rail, only for specific clamps.
DIN rail type G
Load characteristics of DIN rails
As you can see in the photo above, a DIN rail is a profile product and is a priori designed for high weight loads compared to a simple plate. However, there are load characteristics of DIN rails that you need to know.
- Aluminum slats 1 mm thick, designed for the installation of individual modular devices, such as circuit breakers, ouzo, power supplies. Before use, cut into short pieces.
- Aluminum slats with a thickness of 1.1 mm are designed for the installation of single modular equipment in rows.
- Aluminum slats with a thickness of 1.4 mm are designed for the installation of modular equipment of any weight.
Steel slats with a thickness of 1.0 mm, a load analogue of an aluminum slatted 1.5 mm, can withstand maximum loads and have no restrictions on installation.
I note that manufacturers of electrical panels can equip the panels with rails with other profiles. Let's look at the photo:
Purpose
Din rail is a device for reliable and durable mounting of electrical equipment modules. If previously the fastening process required labor-intensive manipulations of drilling holes, creating threads, it was necessary to operate with nuts, bolts and other fastening components, now the fixation is carried out on a special metal plate.
It can be perforated or solid. The presence of notches makes separation easier, as can be seen in the photo of the din rail.
How to choose
- In practice, the most popular, sold and in demand are steel DIN rails with a thickness of 1 mm and a length of 1000 meters. They are universal and slightly cheaper than aluminum rivers.
- Often they are cut into plates suitable for the size of electrical boxes (panelboards) being sold. Actually, you need to choose a rail according to its installation method. If a DIN rail is needed to assemble a new panel, you need to measure from the mounting points of the rail plus a margin.
- If a DIN rail is needed to install one (two) modules, say in a floor panel, then it is enough to buy a 10-15 mm rail, with a margin.
- The assembled panels come with ready-made slats cut to size.
Modules
In cases where the entire structure has been successfully installed and none of the required minimum is needed, it can be improved with additional modules. They are optional, but will be very useful for those who want to spend a little of their time. So, these can be distinguished:
Limiter. It is necessary in cases where the movement of the machines is not needed and will become more of a problem than a useful function. Installation is possible as long as there is free space. Rosette group. Only professional builders or those who see the point in this will need it. This is far from a necessary improvement, but quite useful if you know why to use it. Voltammeter. Allows you to monitor power consumption in real time. Useful in cases where you need to keep records. Distribution blocks. Needed for power distribution
The three-phase shield is of particular importance. Counter. Thanks to it, you can track the total shield consumption. The only problem may be the size, since even compact ones are often large.
The only problem may be the size, since even compact ones are often large.
However, you should always remember that the distinguishing feature of modules is their versatility. Therefore, if there is a possibility that the installed innovation cannot be promptly dismantled in the future, it is recommended to refrain from using it.
Knowledge about slats is not difficult to access and non-specific - it is available to everyone. However, such simple information about the types and methods of fastening will save time and money on repairing or building your own home.
How to install slats in an apartment (country) electrical panel
The slats are installed on the mounting bolts at the installation site. The rail is attached in two places along the edges. It is not recommended to allow the edges of the slats to droop, so the slats must be cut to size before installation.
In difficult places where direct installation of modular equipment will be difficult, special holders for DIN rails are used, which allow you to rotate it at a certain angle.
Installation of blocks and connection of wires
The pads are installed on the installed DIN rails by pressing. The block is attached to the rail at the attachment point and snaps into place. The block moves almost freely along the DIN rail. There are pads with a latching mechanism, like circuit breakers.
To connect the wires in the block, 10-12 mm of insulation is removed from the end of the wire. The block screw, if it is a screw type, is usually unscrewed. The protected end of the wire is inserted into the block, the screw is firmly tightened. In spring blocks, to insert the wire into the socket, you need to pull the clamp, insert the wire into the contact socket and release the clamp. A swing lever can be used instead of a clamp.
Replacing the circuit breaker in the panel
If you open the electrical panel cover, you will see that all the modules are fixed on a metal strip called a DIN rail. The width of the plate is 3.5 cm, each module occupies 1.75 cm.
To install you will need the following tool:
- pliers;
- screwdrivers - Phillips and straight;
- cable cutting tool, such as wire cutters;
- indicator screwdriver;
- stripper for removing insulation;
- crimper for multi-core cable only.
The first thing you should always do before any manipulation in the electrical panel is to turn off the power and make sure that no one accidentally connects the power during operation. To be on the safe side, use an indicator screwdriver and check that there is no voltage.
Next, take the circuit breaker you purchased in advance and attach it to the DIN rail so that it fits in line with similar devices. If there is free space left at the edges, then it is better to fix the module with special stops - metal brackets with screws.
Installation does not require special fasteners, since the latch is located directly on the device body; just lean it against the rail and press a little. To remove a failed device, you will have to loosen the latch with a screwdriver
Connecting elements with several poles has differences:
- 2-pole - left side: top - phase, bottom - phase of the circuit; right side: top and bottom – zero;
- 3-pole - upper parts - phases in order, lower parts - phases of the circuit in the appropriate order;
- 4-pole - like 3-pole, but the rightmost module is zero.
As you can see, the main connection principle is that the input is connected to the upper terminals, the output to the lower ones. The wires are usually routed into the panel. For ease of use, they are grouped using ties.
It is important to correctly distribute the cable connection locations. For single-pole devices: the phase coming from the RCD or input device is connected to the upper terminal, the circuit phase to the lower (+). Having stretched the ends of the wires to the corresponding terminals, position them freely, without tension, and remove the excess with wire cutters
Use a construction knife or stripper to remove part of the insulation - the length of the exposed wire is about 1 cm
Having stretched the ends of the wires to the corresponding terminals, position them freely, without tension, and remove the excess with wire cutters. Use a construction knife or stripper to remove part of the insulation - the length of the exposed wire is about 1 cm.
If you use a handy tool, try not to damage the cable in the transverse direction, so as not to cause a crease.
When stretching the wires in the shield, try not to bend them, do not make as many turns and creases as possible, and also do not stretch them like a string
The phase connection can be equipped using a comb - a special bus with the required number of poles. Instead of a comb, homemade jumpers made from PV3 wire are also used.
Two wires cannot be placed in one terminal, so they must be crimped with an NShVI tip.
Stranded wires must be crimped - attach the NShVI tip. The tool at hand is not suitable, it is better to use a special device that resembles wire cutters - a crimper
We insert the prepared wires into specially designed holes.
After the wires are stripped and inserted into the terminals, they must be secured by carefully tightening the fasteners with a screwdriver
According to the rules, the device must be marked to indicate its belonging to a specific circuit. Similar markings should be present on the protective cover of the shield.
Let's make a project
It is better for a non-professional to do this when all the wires have already been laid and all the circuits have been taken into account. At the development stage, we must create working drawings for ourselves, according to which subsequent work will be carried out, and also find suitable specifications for components and accessories.
Consumer accounting, group creation
You need to start by compiling a complete list of consumers, if this was not done during installation of the wiring. This will not include the iron or sconce in the hallway, but each wire coming to the switchboard, which must be recorded and designated with a number.
Residential power supply systems follow the same principles and are therefore similar to each other. The power sockets of each room are powered separately and the lighting of the rooms is separately powered. Some household appliances do not connect to junction boxes; their wires go directly to the panel. This is not always explained by their increased power, like that of an electric stove, for example. Isolation may be a consequence of increased protection requirements (the boiler must be connected through a very sensitive RCD), or the need to turn off the device locally (an air conditioner for maintenance).
Sockets for each room must be powered separately
So, here is a typical list for a modern three-room apartment:
- sockets in the bedroom;
- sockets in the living room;
- sockets in the nursery;
- sockets in the bathroom;
- sockets in the kitchen;
- sockets in the corridor and hallway;
- connecting a washing machine;
- boiler connection;
- air conditioner connection;
- connecting an electric stove;
- lighting in the bedroom;
- lighting in the living room;
- lighting in the nursery;
- lighting in the kitchen and bathroom;
- lighting in the corridor, hallway and balcony.
Of course, if each circuit is “put” on its own machine and run through an RCD, it will be both more reliable and more convenient. But issues of compactness and efficiency are also important. We can combine some of the circuits listed above if the load is moderate and separate automation is not needed. For example, points 1 and 2, combinations 11+12+13 and 14+15 are also possible.
After combining, we transform the list into a simple table, where we will then enter data on the ratings of machines and RCDs.
Separation of consumers into groups
The electrical panel has a general input circuit breaker. From it, the wires disperse to group circuit breakers, of which there are up to several dozen in a three-room apartment.
Group circuit breakers are designed to divide consumers into separate, independent circuits. For example, sockets in the living room are connected through the QF3 machine. From QF4 - bathroom. And QF5 is apartment lighting. For a private home, separate protection of lighting circuits on the street or in the garage can be performed in a similar way.
Dividing consumers into groups makes it possible to make apartment protection selective. If there is a short circuit in the living room outlet, only the electrical appliances in that room will turn off. The lighting and voltage in the sockets of other rooms will remain intact.
Screw jumpers
After assembling and fixing the terminal block, before directly connecting the wires, it may be necessary to combine several terminals into one.
For example, you need to connect many outgoing wires to one circuit or phase. There is no need to use homemade pieces of wire, such as shunts, in this case.
Screw jumpers are used for this. They can contain a different number of circuits combining from 2 to 10 poles. It's better to order right before ten.
Then, as you work, cut off the required amount with metal scissors. Just tighten the adjacent screws first. If you cut the assembly, the jumper will bend.
The merger happens very quickly. Just lower the jumper into a special channel in the middle of the terminal (where there is empty space), and after tightening the screws, everything holds together perfectly.
Both insulated and non-insulated jumpers are available.
If you are shunting several terminals in a row, and at the same time you have wires of different circuits and phases collected on the terminal block, it is best to separate the terminals in the middle of the block from each other.
To do this, you will need the end insulator discussed above. Only it is mounted not from the very edge, but inside the entire assembly.
On power models, special circuit separators SCFD are used. They differ from plugs in their larger width.
Which end clamps, insulators, and jumpers are suitable for a particular model is largely determined by the cross-section of wires for which the terminals are designed.
If you ordered a 4mm2 jumper for a 2.5mm2 terminal, it will not fit your pitch or size.
Please note that on some current terminal blocks, due to the presence of a special breaker inside, it is no longer possible to install standard jumpers.
You will have to use other types, like the comb bus, which many are familiar with from modular machines.
However, there are options for current terminals for internal shunts, but of a slightly different shape.
The most important thing to remember about such jumpers is that they are designed for a certain current, equal to the current of the terminal itself.
Therefore, when assembling several terminals together, make sure that the total current passing through this shunt does not exceed its rated value!
End insulator
Another important point is that the insulated part of the terminal should always be on the left, the non-insulated part on the right.
That is, the exposed contact part should be located on the right side. When the terminal block is assembled, most installers stop at this design. The wiring begins.
However, do not forget about one of the exposed sides. All manufacturers make their equipment so that it is protected from accidental contact with live parts.
Therefore, when purchasing terminals, do not forget about the insulated end caps.
They are rarely sold individually; you will have to buy a whole set in a bag. Although often the entire assembly in the shield may require no more than 3 pieces.
Technically, such a product is called an end insulator. With a slight movement of the hand, it snaps into place thanks to its protruding parts.
End insulators can also be produced in various colors. But what if you don’t have end insulators, but you need to insulate the last right terminal?
The easiest way out is to place an additional empty terminal nearby. There is no need to connect wires to it. Although she will be naked, she will be without tension.
Or forcefully remove all metal insides from it. Another option is to use the ground terminal as the outermost terminal.
Popular manufacturers
Many retail outlets offer a chic assortment of electrical devices, including sockets. Having set out to purchase a high-quality socket on a DIN rail, the question arises: what to choose?
Let us note a number of brands that occupy a leading position in the market of electrical goods manufacturers:
- French company Legrand. For more than 100 years, it has been manufacturing information and electrical products.
- A large French engineering company, Schneider Electric, which has an excellent reputation as a manufacturer of equipment for the distribution and transmission of electricity.
- The Swedish-Swiss company ABB, which produces automatic protective equipment for electrical networks for various purposes. It is recognized that ABB is the leading manufacturer of such products on the CIS market.
- Italian company Bticino, which produces electrical goods of the highest quality.
The only disadvantage of all the listed manufacturers is their high pricing policy. For those looking for a budget option for electrical goods, the following list of brands is recommended:
- Makel;
- TDM Electric;
- Anam;
- Lezard;
- Wessen;
- GUSI.
These manufacturers produce high-quality electrical products at affordable prices. Thus, when buying a DIN rail socket, you will not incur any special costs, but will be able to ensure ease of maintenance and repair of the electrical equipment of the switchgear.
Gallery [ edit | edit code ]
DIN rail mounted terminals
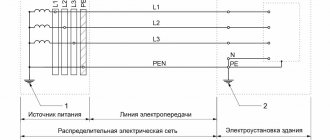
Examples of fixing equipment on a DIN rail in the electrical panel of a three-phase power supply system, from left to right: terminal blocks (5 white for phase wires, 1 blue for neutral wire, 1 yellow-green for protective grounding wire), three-phase modular package automatic phase current limit switch , three-phase differential current device (RCD) with a leakage current threshold of 30 mA, relay and contactor for phase control and voltage protection]]
When installing wall-mounted kitchen drawers on a DIN rail, does it need to be cut?
IMHODom › Forums › hands from shoulders › When installing wall-mounted kitchen drawers on a din rail, does it need to be cut?
This topic has 13 voices and 18 replies.
When installing wall-mounted kitchen drawers on a DIN rail, should it be cut into pieces for each drawer, or one piece for the entire length?
It’s just that if there is one for the entire length, then the drawers hang at an angle.
Tilt left, right or forward?
rather to the right and forward
The cabinets are mounted on short sections of these same strips. Their length is approximately 7-10 cm. If there is some kind of defect in the wall with a void inside (well, like a window closed with plywood between the kitchen and the bathroom), then a larger plank is taken, well 10-20 cm. Two drawers are mounted on one plank (one on the right, the other on the left). Then the cabinets are adjusted in height to each other so that they are level. To do this, they twist something with a screwdriver INSIDE the cabinets on a suspension that is already installed at the factory. Then the cabinets are also bolted together; for this purpose, there are holes made at the factory on the side walls.
how complicated everything is. All my life I’ve hung it directly on the wall, it’s like they’re hanging nothing.
Admin Pensioner
As a simpler option: instead of DIN rails, buy 90 degree hooks. (about 80mm long) with dowels. There are grooves in the hangers, on the cabinets, they are about 5mm wide, and the hooks will go into them.
Moscow
There are slats that are not smooth, but with a notched border between each hole - they are not sawed, but simply broken... the length of each segment is 4-5 cm..
then 7-10 are 2 such sections.. they can be fixed with 2 dowels and hang 2 cabinets.. if you need to hang 1 cabinet in this area, one segment will be enough (the screw should be under the fastening point, and screw it in well - so as not to spinning under load)..
Just in case, I also make a mini-bend of the top corners of a piece of the plank towards the wall - then the cabinet cannot move to the side..
the “standard suspension” has two twisters inside
higher lower - to align the top/bottom of the cabinets and further/closer from the wall - to level the plane of the facades.
“at the factory” or not - it doesn’t matter... you can screw it on yourself and make a hole for the intersection screed (after leveling).
Veteran-3
DIN rail cabinet?! what can’t these Russians come up with...))))
The science
psm, it's not quite a DIN rail. Just similar to her, a little bigger and a little thicker than a piece of iron. Modern fastening of cabinets is designed for it - it allows you to move any side of the cabinet vertically and tilt the cabinet away from the hanging point
When installing wall-mounted kitchen drawers on a DIN rail, should it be cut into pieces for each drawer, or one piece for the entire length?
It’s just that if there is one for the entire length, then the drawers hang at an angle.
Let me tell you how it is necessary and how it is possible
The mounting strip (fastening strip) is indeed similar to a DIN rail. It looks like this (you can see the notches that Akor talked about):
If you do it wisely, then the drawers should be sealed on the back side and the DVPO should be inserted into these grooves. The groove runs at a distance of 16mm from the rear edge of the part. What does this give? This makes it possible to press the entire upper module against the wall to avoid that same tilt. In this case, the mounting strip is broken into sections of 6 centimeters (in the photo above, these are two divisions) and each box is hung separately on two such strips. This is more labor-intensive, but much more aesthetically pleasing and, as they say, straight to the point.