Today in the article we will deal with a rather complex topic - electrical wiring in the garage. The topic is complicated because today a garage is not only a haven for a car. This is almost a full-fledged workshop where they use various power tools. Therefore, we will tell you how to correctly create an effectively working electrical wiring diagram, what parameters to pay attention to when choosing materials, and the rules for the installation process.
How to properly install electrical wiring in a garage Source tirez.ru
Types of voltage
In most garages, the electrical voltage is 220 V. This is enough for lighting and a power outlet group. Such an electrical network allows the use of most power tools and appliances.
Sometimes a network with a voltage of 380 V is installed in garages. This may be necessary for the operation of electric heating devices, machine tools and welding equipment that require three-phase power with a voltage of 380 V.
How to apply for connection via the Internet?
This service is provided on the website “https://portal-tp.rf”. Here you need to register, submit an application, send scans of documents (the list is indicated above).
There is also the possibility of a preliminary application with a calculator, indicating the amount of the bill for connecting to the electrical network. On this site you can also find out what documents are needed to provide electricity to the site, even if the garage has not yet been built, as well as the cost of electrifying the site.
Many owners have a question: “To install light into the garage from a pole, who should I contact?” We answer: you need to contact the company that supplies energy resources in your area. The procedure in this case will consist of the same steps as described just above.
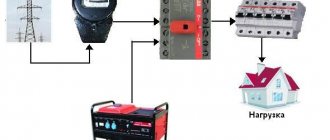
The electrical company will run their cable from the line on the pole to the entrance panel on the wall of the garage. True, this method is not entirely acceptable, since meters on the outer wall of the garage are often simply broken by vandals. Therefore, there is a second option, which involves underground laying of the power cable in a metal pipe from a pole with a power line.
To do this, you will need to dig a trench 80 cm deep, place a pipe there and run a cable from the electrical panel to the pole. In this case, the pipe must rise above the ground by at least 2.5 m.
What's included in a garage wiring diagram?
The electrical wiring diagram in the garage should include the following basic elements:
- distribution board at the input;
- accounting, protective and automatic devices;
- cables and wires;
- switches and lamps;
- socket group.
If necessary, you can add other elements to the circuit, such as heating, cooling and other systems. Examples of circuits can be studied from photos of electrical wiring in the garage. They will help you understand the basic requirements, wiring methods, installation options and other nuances.
Connecting wires
ATTENTION! All work is carried out with the input machine turned off! Don't put your life in danger.
The wires are connected to each other in panels, junction boxes, sockets, switches or lamp shades. For example, in a socket the connection looks like this:
Connecting wires in a socket
The color of the wires in a cable indicates its purpose. You can read more about wire colors and types of designations here.
It is important to follow the rules for installing wires by color, if only because it facilitates installation and further extension and/or repair of wiring, and also potentially reduces the risk of electric shock.
Power input
A distribution panel is installed at the input. In some cases, it is mounted on the outside of the building, which may be due to the peculiarities of the electrical supply to the garage.
«> «> «> «> «> «>
Usually the shield is mounted next to the entrance for easy shutdown when leaving the facility. The panel must allow placement of all required protective and distribution devices. The panel also houses an electricity meter (meter) if the garage is located on the territory of a garage cooperative. In suburban areas, one meter is usually used for all buildings.
You can make the shield yourself from a profile and sheet metal or purchase a finished product.
Garage shield device
When installing an electrical panel with your own hands, you need to clearly understand its structure. The incoming electrical cable must be connected to the input circuit breaker, which acts as a switch. It is advisable to use a two-pole circuit breaker as an input circuit breaker. In this way, two cable conductors are disconnected at once. This is done for safety purposes when carrying out repair and installation work inside the panel or in the garage. The fact is that in garage cooperatives, there is often no proper control over the state of electrical equipment and it is possible that on the incoming line the neutral and phase conductors will be swapped.
If the incoming zero is connected bypassing the machine, a situation may arise when, when the machine is turned off, a high potential will be present at the panel components. This is true if single-phase voltage is supplied to the garage. When supplying three-phase voltage, it is optimal to use a four-pole circuit breaker.
After the introductory machine, an electricity meter is connected. Usually this is a household meter, for example, Mercury 201. The phase and neutral conductors coming out of the meter are connected to an RCD (residual current device). The presence of an RCD is necessary to protect people from electric shock. When a person touches a bare live conductor, a leakage current begins to flow through his body. To prevent the leakage current from reaching a life-threatening value, the RCD turns off the voltage supply.
Correct operation of the RCD is impossible without the presence of grounding in the panel. Grounding must be installed in the garage, regardless of the presence of a grounding conductor in the input cable.
From the output terminals of the RCD, the phase is supplied to group circuit breakers, from which voltage is supplied to each electricity consumer separately. The neutral conductor is connected to a metal bus. All neutral conductors from cables going to consumers are connected to the same bus. This bus connects all the grounding conductors present.
All elements of the shield circuit are mounted on a metal plate called a DIN rail. The design of the DIN rail is such that it allows you to quickly attach all elements to it or, conversely, dismantle them. For the zero and ground buses, there are also options for mounting on a DIN rail.
A possible option for placing all components inside the shield.
After installing the components inside the shield, all parts are covered with a protective screen from the shield kit to prevent accidental contact with live parts. The screen must have windows through which switches are made and readings from the electricity meter are taken.
Differential machines
Designed to automatically shut off power supply in case of overload to protect against fire. They also allow you to quickly turn off the power supply if it is necessary to modify the electrical wiring. It is customary to divide the premises into groups of consumers, for each of which their own machine is installed. At a minimum, install one circuit breaker for lighting and socket group.
If there are many consumers, and accordingly there are several outlet groups, a separate machine is installed for each of them. The rating of the machine is determined based on the maximum load and wire cross-section.
Designed to protect against leakage current. The latter occurs when the circuit insulation is damaged. The use of RCDs is especially important in garages with inspection pits, where work with power tools is carried out. There is usually high humidity in the pit, which increases the likelihood of a leakage current.
«> «>
Garage Wiring Diagram: Planning Tips
Lighting in a garage plays a very important role, especially if the garage is used not only for storing the car, but also for regular maintenance. The electrical circuit of a garage should not only provide comfortable working conditions with electrical appliances and the correct placement of lighting elements, but also be safe for the owner.
In this article we will tell you how to correctly draw up an electrical circuit and describe the basic rules for placing important elements.
Safety Key Points
- Safety rules should not be neglected, since the life and health of the person installing and implementing the garage’s energy supply with their own hands depends on it.
- All work on live parts is carried out after disconnecting it from the electrical network and checking for the presence of dangerous potential. Use only serviceable and tested voltage indicators.
- Before working with a hammer drill, angle grinder, or other electric tool, you should visually check the power cord for damage to the insulation.
- Wear safety glasses when working with power tools.
Thus, connecting electricity, distributing cable products, as well as organizing a workplace and lighting in the garage is a simple procedure if you comply with electrical safety requirements and also listen to the advice of professionals on choosing the cross-section of wires, switching and protective equipment.
Electrical Design Principles for Garages
A simple garage wiring diagram provides for the external location of all elements, such as cables, sockets, electrical distribution panels and lights (see Garage Lights). Many people try to hide cables by laying them in the walls before plastering or covering them with finishing materials.
But practice has shown that such a garage wiring diagram is not practical and the best option would be surface wiring. To protect the wire in the most likely places of damage, plastic or metal corrugated tubes are used, and special plastic boxes are used for decorative concealment.
For your information. The electrical circuit of the garage should be laid out in such a way as to provide quick access to all elements for their convenient replacement, since very often, with active and varied use of the garage, there is a need to move sockets or lighting elements to another place. Open wiring eliminates the possibility of damage when drilling into walls.
How to connect to electricity in GSK?
Installing lighting on the terms of a garage cooperative is as easy as shelling pears. You need to contact the chairman of the cooperative and coordinate the issue with the GSK electrician.
A specialist will come to your garage, check the garage connection and wiring for the presence of illegal sockets, and if everything is in order, he will simply connect the cable contacts in the distribution box from the common line to the input breaker or meter.
After sealing the input and the electric meter, a payment book and registration card will be issued at GSK. Next, the garage owner pays monthly receipts for consumed electricity.
If you are thinking about how to connect a garage to electrical networks without a power grid, then this method cannot be called legal. It is possible to join the power grid without going through the cooperative, but the secret will still become apparent and then the violator will be held accountable.
Clause 17 of the RF PP No. 861 interprets the norm for connecting to electricity in the GSK as a collective one. A simplified approach in this case can result in very serious problems, from fire to regular accidents on the line.
How much does it cost to connect to electricity at GSK? In relation to gardening and garage cooperatives, the fee for the technical connection of power receiving devices should not exceed 550 rubles, provided that no more than 15 kW is connected by a member of the GSK from one source of power supply.
Step-by-step plan for building an electrical network
The procedure for drawing up an electrical diagram for a garage is as follows:
- First of all, you need to draw a plan of the garage space and graphically indicate the location of the main distribution board, indicating the distance from the walls. Next, the electrical wiring in the garage is distributed, the diagram of which should contain cable routing and installation locations for lighting fixtures.
- The plan then indicates the exact location of the workbench and other stationary electrical appliances, such as a lathe, welding machine, compressor, and so on.
- Then a diagram is made of each wall on which the outlet will be placed. The diagram shows the location of electrical appliances, their height and the plan for connecting the socket to them.
For your information. The correct type of electrics in the garage would be the design of which would include both general lighting of the entire room with ceiling lamps and local lighting. The switch for general lighting should be installed at the exit at such a distance that you can reach it with an outstretched arm, while taking one step from the entrance. Switches for local lighting are mounted directly on site, at eye level.
- An electrical distribution board is also installed at the entrance, so that the room can be completely de-energized when leaving it.
- A distribution box must be installed near the general lighting switch so that each of the lamps has a separate power cable. If all lamps are connected in parallel from one cable, then a junction box is not needed.
- Garage wiring diagrams should include instructions for using the right type of cables depending on the load. Copper cables with a core cross-section of 1.5 mm are designed for a load of 3 Kilowatts, cables with a cross-section of 2.5 mm can withstand a load of up to 5 Kilowatts. When choosing a cable, you should always make a load reserve of 20-25%.
- It is strongly recommended not to connect sockets in series, one from the other. The best option would be to run a common cable from the panel and connect each socket to it separately through a distribution box, as shown in the photo below. Usually the cable with wiring and boxes is laid under the ceiling.
- It is recommended that the electrical connection diagram in the garage for sockets provide for the presence of an RCD device with a separate circuit breaker. Such a device will protect the user from accidental electric shock resulting from damage to the wiring or electrical appliance. In addition, the price of such a device is your life. The overload current to cut off the power supply should not exceed 16 Amps for a cable with a cross-section of 1.5 mm, and 25 Amps for a cable with a cross-section of 2.5 mm.
Important. The electrical wiring diagram for a garage with a wooden or other combustible base should include the installation of protective metal boxes for laying cables. These boxes will prevent the casing from igniting in the event of overheating and fire of the cable.
Basic mistakes when connecting wires to devices
Note! An important point is the quality of the electrical connections in the panel. Most fires occur precisely because of poor contact between wires and electrical installations.
Basic mistakes when connecting wires to devices
Therefore, it is important to know the most common mistakes that can be made when assembling an electrical panel.
- Insulation coming into contact. The optimal wire stripping depth is 1 cm. However, carelessness or lack of knowledge on the part of the installer may result in the stripping depth being insufficient. When you tighten the mounting screw, it will hit the wire insulation and crush it. The contact area between the screw and the wire core will be much less than the calculated one. If a load is applied to such a connection, heating will occur at the point of contact.
- Connecting wires of different sections to one terminal. This mistake is fraught with the fact that a conductor with a smaller cross-section will be fixed worse than a conductor with a larger cross-section. Poor mechanical contact leads to increased electrical resistance. The result is heating of the wire, melting of its insulation and melting of the body of the modular device.
- Incorrect formation of stranded wire ends. The frequent choice in favor of stranded wire is explained by the ease of working with it in the limited space of the electrical panel. It bends easier than single-core wire. However, stranded wires require the use of pin lugs for crimping the stripped ends. When trying to secure an unpressed stranded wire in a terminal, the thin wires are crushed and broken. The total cross-section of the wire decreases, which is fraught with heating and melting of both the wire and the device. It is also unacceptable to solder stranded ends before connecting to the terminal. Over time, the solder will change shape, pressing under the clamping screw.
- Connecting a phase to the lower terminal of the circuit breaker. Polarity reversal does not affect the performance of the device and this point is not regulated in any way by law. However, this can cause difficulties for an electrician who is not aware of the deviation from generally accepted rules.
Video - Errors during electrical installation
The presence of these problems can be determined by the number of false alarms of protective devices. If they operate when one incandescent lamp is working, this is already a reason to inspect the condition of the terminals. At a minimum, the fixing screws should be tightened. Another sign is that the protection is triggered when the load on the network increases. The more current begins to flow through the machine, the more the poor-quality connections at the terminals heat up. As a result, the circuit breaker protection is triggered.
Advice! The use of connecting combs will help simplify the task and improve the quality of connections. With their help, you can provide power to a whole group of devices with the same connection diagram at once. For example, to a group of circuit breakers.
Structurally, the comb is a copper plate (bus) with taps located on one side. Bends can be made in two forms: pin and fork. The peculiarity of fork ones is the need for a special clamp on the connected device. Therefore, fork combs are not so widely used.
Types of fork combs
The cross-section of the comb bends is 16 sq. mm. This allows the conductor to remain operational at currents up to 63A.
The pitch of the taps depends on the width of the devices that the comb will connect. For single-module devices, models with tap pitches of 17.5 mm are used. For devices with 1.5 modules – 27 mm.
The number of taps on the connecting busbars can vary from 12 to 60. As a rule, such a number of consumers is not found in a garage. Therefore, the comb should be cut to the required length. It is most convenient to cut with a hacksaw for metal. In this case, the length of the plastic casing of the comb should be several millimeters longer than the length of the copper busbar. This is required to ensure electrical safety. But it is best to use special end caps.
In addition, sawing should be done before installing the comb into the shield. This will get rid of metal filings, the presence of which in the electrical panel can lead to a short circuit.
The difference in circuits for 220 and 380 volts
Many garage cooperatives, in addition to the standard 220-volt electrical network, can provide garages with separate 380-volt wiring to power high-power electrical equipment. The safety instructions assume that there is one incoming socket in each room of the garage cooperative, but if necessary, you can make additional wiring for several sockets in the right places.
With a 220-volt electrical circuit, two or three cables are brought into the garage: phase, neutral and grounding (see Grounding in the garage and rules for performing work). In some cases there may be no grounding.
As can be seen from the diagram, the phase passes through the main circuit breaker to the electricity meter, then goes to the lighting through conventional 25 or 32 Ampere circuit breakers, or to sockets through an RCD device. If you do the electrical wiring in the garage yourself, the circuit must include two automatic devices for lighting the room and the inspection pit separately.
When using a 380-volt line, there may be 4 or 5 wires entering the room, three of which are phase, one is a neutral wire, and possibly a fifth ground wire. In this case, you will need a three-phase machine to enter the room and install a three-phase meter.
The photo shows that a common circuit breaker after the meter divides the network into 220 and 380 volts. With this connection, 220 volts are diverted to regular sockets and lighting, and 380 volts are diverted through a separate three-phase circuit breaker to high-power sockets, which must be marked with the appropriate pictogram.
In this article, we looked at how to do wiring in a garage with your own hands, the diagrams clearly showed the connection features, and the video material presented will show the practical part of this work.
Do-it-yourself electrical wiring in the garage
Even in the simplest garage box you need to install lighting. Cars should be periodically inspected, oil changed, and tinted. And getting in and out of a dark room is inconvenient and unsafe. You can connect lights and sockets in the garage yourself.
- How to properly plan your garage's power supply
- Rules for creating a schema
- How to make a project
- Selection of wires and cables by power
- Required tools for installation
- Installation of electrical wiring
- Safety regulations
Lightning protection
Any buildings must be protected from lightning strikes, and the garage is no exception.
Protection of large residential and industrial buildings is carried out permanently during the construction phase of buildings. When the garage is located near some high-rise building, then, in principle, nothing bad will happen if it does not have a lightning rod. It is unlikely that lightning will hit it. In the case where a garage cooperative is being built, lightning protection is also carried out centrally. But if it is located separately, away from tall buildings, take care of installing a lightning rod even before you begin installing electrical wiring in the garage.
You won't have any particular difficulties here. The whole system consists of three main elements:
- lightning receiver;
- a conductor that drains current to the ground;
- ground electrode.
A steel rod with a diameter of at least 1 cm and a length of at least 20 cm is used as a receiver. It is mounted in a vertical position at the highest place in the garage. The use of a steel rod is due to the fact that at the moment of a lightning strike, the material of the receiver must withstand mechanical and thermal load.
The rod is connected to the current-carrying conductor; this is done by welding, soldering or a bolt with a nut. The shortest path must be chosen between the receiver and the ground electrode.
Grounding electrodes can be artificial or natural. In the case of a garage, the option of a natural ground electrode is unlikely to be suitable, since various pipelines are most often used as it. Old springs, metal rods and corners are suitable for installing an artificial ground electrode.
The ground electrode must be buried in the ground. The distance from it to the entrance gate to the garage and the paths along which people constantly walk should be no less than 5 m.
According to the rules, within a radius of 4 m, the ground electrode must be fenced so that in the event of a lightning strike, a person does not fall into the action zone of the step voltage.
Most often, metal rods are used as a grounding conductor. Their size depends on the type of soil in a given place and how close the groundwater comes to the surface. In the case when the soil is dry and the water level is low, it will be enough to take rods 2-3 m long. They are driven into the ground, and at a depth of 0.5 m they are tied together using a metal jumper.
How to properly plan your garage's power supply
To service 1-2 cars, it is enough to install several lighting fixtures and a power outlet group to connect power tools. The power of the latter is small, so single-phase power supply with a voltage of 220 V is installed in the garage.
If the garage is a car repair shop and powerful equipment is installed here - heating boilers, welding devices, machine structures - you need to install three-phase power with a voltage of 380 V.
It is also necessary to correctly calculate the number of lighting fixtures; this depends on the size of the box, the presence or absence of a basement and inspection hole. It is also important to keep in mind the type of garage. If it is, for example, part of a garage cooperative, its own substation is installed to service the garages. If the building is located on a summer cottage, the cable connection is carried out from the house.
Surge suppressors
Usually installed if the garage is powered by an overhead power line. A lightning strike on the latter can lead to a sharp surge in voltage up to tens of thousands of volts, which can lead to failure of all equipment.
Surge suppressors protect the entire circuit by diverting the discharge to ground. They are also mounted in the panel in front of the meter. If limiters are not installed, it is recommended to turn off the power automatically during a thunderstorm.
Retro wiring in a wooden house: calculation of parameters, design, installation and selection of vintage elements. 165 photos of stylish ideasHeating cable for gutters and roofs: choosing and installing a self-regulating anti-icing heater with your own hands (135 photos + video instructions)
Types of electrical cables and wires: device, purpose, marking and characteristics of the main types of cables used in houses and apartments (150 photos)
Rules for creating a schema
DIY garage wiring includes the following components:
- power distribution board, preferably with an RCD;
- metering devices;
- wires;
- lighting devices - lamps, spotlights, and switches;
- sockets
If there are other consumers in the garage, such as a heater or heat gun, they are also included in the circuit.
How to make a project
The electrical wiring diagram is developed taking into account the dimensions of the room and the vehicle, the installation location of electrical appliances and the location of the panel. The plan is displayed on the drawing, where the true dimensions are indicated.
To calculate the correct scheme, a step-by-step algorithm is used.
Draw up a plan for the garage to scale. For each wall, floor and ceiling they make their own sketch.
- Mark the coordinates of each lighting fixture. If the garage has a basement or inspection hole, they are equipped with their own lamps. It is taken into account that an ultra-low voltage current of 42 V or less can be used to illuminate them. To do this, step-down transformers are included in the circuit. Lamps or tools that are intended to be used in the inspection pit must be designed for this voltage.
- Mark the installation location of the distribution panel and use the diagram to find the optimal routes for laying the wires. Here they also determine where it is more convenient to install sockets and switches.
- Depending on the number of electrical appliances, a protection system is developed: RCD, voltage control relays, voltage limiters, step-down transformers.
- If the garage is a separate building, provide grounding along the circuit and indicate this on the plan.
Typically, car owners are limited to installing an RCD in the distribution panel. But if overhead wiring is installed in the garage, you need to introduce voltage limiters into the circuit - they prevent a sharp increase in voltage. If the garage box is located in a long row of cooperative ones, it is better to install a control relay.
Home craftsmen experimenting in their garages sometimes cause their neighbors to break zero.
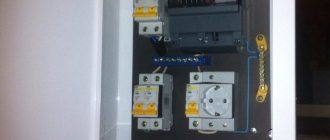
Connection diagram inside the shield
A typical version of the garage panel diagram is presented.
The ratings of the circuit breakers are selected so that in case of a short circuit in the line or the permissible load on the cable is exceeded, the load is disconnected before the conductors heat up to the melting temperature of the insulation. The RCD parameters indicate a leakage current of 30 mA, this corresponds to a safe value to prevent electric shock.
Automatic machines rated 16 A are used on lighting lines or sockets for connecting hand-held power tools. A line with a 32 A automatic machine is designed to use a more powerful load, for example, a welding machine or a heat gun.
You will notice that connecting and installing a garage electrical panel yourself does not pose any particular difficulties if you follow safety precautions and adhere to the connection diagram.
Selection of wires and cables by power
To make the correct electrical wiring in the garage, the total and individual power of the consumer is determined. The main supply cable must match the total value. In addition, the way in which electricity is conducted is taken into account. So, for a private house, a SIP is enough - aluminum for 16-24 square meters. mm or copper for 8–10 sq. mm.
To illuminate the main room, you need lamps with a power of up to 500 W; a copper cable of 1.5 square meters is enough for this. mm.
The sockets are designed for 16 A, so they use a 2.5 sq.m. wire. mm.
The more powerful consumers are in the garage, the larger the cable cross-section needs to be used. General recommendation: install only wires with copper cores.
In cooperative garages
In auto cooperatives, each garage has a power supply, the condition of which must be taken care of by an electrician, but as for indoor wiring, here you can improvise, of course, within the permissible limits. Therefore, you will have to develop an individual wiring diagram, taking into account the allocated or maximum permissible power.
Find out what power the machine is installed at the input. If 10 A, then you can only count on the fact that in the garage, in addition to lighting, it will be possible to connect a low-power drill, grinder and the like to the network, and even then not at the same time. When the input machine is designed for an operating current of 16 A, then it will be possible to use low-power household electric welding for a short time. With a 25 A circuit breaker installed, there will be no special power restrictions.
Required tools for installation
For wiring in a private garage according to a 220-volt circuit, you will need:
- hammer drill and electric drill, grinder;
- hammer, chisel;
- pliers, side cutters, screwdrivers;
- electrical tape and an indicator screwdriver.
To work with wires, it is better to use tools with rubberized handles.
Installation of electrical wiring
Installation of electrical wiring in the garage begins with preparation. They check the circuit, making sure, for example, that the cables are placed only vertically and horizontally, the sockets are placed at a distance of 60 cm from the floor, and so on. Installation locations are marked on the walls and ceiling. Before installation, flammable materials and large objects are removed from the premises.
- The wire to the garage is laid underground at a depth of 30 cm below the freezing level of the soil. The cable is laid in a corrugated plastic pipe. You can connect the garage to the electrical network by air: in this case, the wire is stretched between the support posts.
- The cable is inserted into the box through a hole in the wall with a diameter of 20–30 mm. The hole is made with a hammer drill, and the wire is laid through a PVC pipe.
- In the garage, grooves are made using a chisel and hammer according to the marks in the walls. The wires are laid in plastic tubes. If the garage is wooden, the cable is laid openly.
- For the shield, 4 holes are drilled in the wall and the device body is secured. Before this, all modules are removed from the device. After installation, install the DIN rail and secure the modules back. It is recommended to label them.
- The upper contacts of the modules are the input for phase wires, the lower ones are for outlets and lighting.
- Connect the neutral wires leading from the meter and the RCD. The last thing to connect is the power cable.
- Install lamps, sockets and switches. Connect the wires to the consumers.
- Check the insulation and correct connection of devices. Apply power and test the system.
The 380 V line is made of 4- or 5-core copper cable.
Internal wiring
Electrical wiring in a garage, as in any other room or building, is carried out in two ways: hidden and open. The first is installing the cable into grooves. The second is on the walls, but in special boxes-channels.
Hidden way
The installation of the cable begins with cutting it into pieces, the length of which is equal to the length of the cables, plus 10%. Then the distribution boxes are installed. They are recessed into nests, where they are secured with screws to plastic dowels or with plaster mortar. Many people use a combined version, although two self-tapping screws are often enough.
The cable is laid in grooves, where it is secured with plastic clamps and self-tapping screws. Previously, alabaster was used for fastening. Many masters also use it today. But it is better to use modern fasteners.
An important point is the connection of the electrical wiring between the loops. Wires protected with electrical tape have gone into oblivion; instead, terminal blocks of various types are used today. This is, first of all, high security of the connection, the tightness of the connection of the wires to each other.
So, the internal electrical wiring in the garage is almost complete. All that remains is to seal the grooves with plaster mortar, install sockets and switches and connect them to electrical wires.
Hidden electrical wiring in the garage Source giropark.ru
External method
If the garage is a wooden or metal structure, then electrical wiring can only be done in an open way. This will require special devices - the so-called cable channels. These are two-meter-long boxes, consisting of two parts: the base (box) and the lid.
The base is secured with self-tapping screws along the marked lines of the wiring diagram, having previously cut them along the length of each section. Their final installation point is sockets and switches. The intermediate element is unzipping boxes. All elements, like cable channels, are attached to the walls with self-tapping screws. They are not recessed into the thickness of the walls, so this method of electrical installation will require external sockets, switches and distribution boxes.
External electrical wiring in the garage Source woodinmetal.ru
Safety regulations
When doing wiring in a garage, follow the following safety rules:
- the cable inside the garage is installed in a groove or protective box;
- insulating corrugations are used in a metal box;
- the lighting and power group lines are routed to different circuit breakers;
- The electricity supply line of the inspection pit is equipped with its own protection;
- When choosing lamps, devices and wire insulation, the destructive effects of dampness, low temperature and aggressive substances are taken into account.
Installing electrical wiring in a garage is quite a difficult job. It is important not only to actually lay the wire, but also to calculate the correct circuit, select cables with the required cross-section, and organize a protective system.
How to do electrical wiring in a garage. Basic principles
There is no point in building a garage without supplying electricity to it. What should a garage wiring diagram include and what electrical appliances should be used? Let's look at how to do electrical wiring in a garage . The standard electrical circuit for any garage includes:
- Laying cables.
- Installation of means of protection against electric shock.
- Lighting connection.
- Placement of sockets.
What is an electrical panel in a garage and what needs to be included in it?
An electrical panel for a garage is a panel on which devices are mounted to ensure the reception and distribution of current in the network. Having a shield in the garage, you can turn off the power during a long absence, minimizing the chance of a short circuit and spontaneous combustion.
Device functionality includes:
- provision of the entire electrical network;
- calculating the amount of energy consumed;
- ability to control energy supply;
- protection against overloads and power supply system failures.
To ensure the normal functioning of the system, it is necessary to determine in advance the amount of electricity consumed in the garage.
Wiring
If at the time of construction or reconstruction of the garage hidden wiring was installed in the walls and it was not damaged, then you can use it. If you don’t have one, you shouldn’t waste your energy on stripping. External wiring can be done. Cables should be laid in a metal corrugation, cable duct or in a self-extinguishing tube. It is advisable to use non-flammable cable VVGng or NYM.
For lighting, a copper cable with a cross section of 3X1.5 mm² is suitable; for sockets above the workbench - 3X2.5 mm²; for sockets with heavy loads - 3X4 mm².
Since they not only park a car in a garage, but sometimes also work, it is necessary to ensure electrical and fire safety. To do this, a differential circuit breaker or RCD is used together with grounding.
A grounding wire with a cross-section of at least 3 mm² leads from the common panel. If there is no grounding bus in the shield, point grounding is done.
At the entrance to the garage, a panel is usually installed in which an RCD with a rated current of no less than that allowed for a garage in a cooperative is installed. If the garage is private, then the optimal current will be 32 A. When using a separate 32-40 A RCD, after it a regular 25 A machine is installed on the sockets, and 10 A for lighting. This is quite enough to connect basic power tools to the sockets.
Methods for connecting a garage to electricity
There are several ways to run electricity into your garage. This can be done legally or illegally. But we will tell you how to legally install electricity into the garage.
Today, even experienced car enthusiasts have abandoned dangerous experiments with illegal taps and connections. In addition, power engineers have learned to easily identify unauthorized burglars. Therefore, we act according to the law.
If the garage is cooperative, then the easiest way to solve the problem is to write a statement addressed to the chairman of the GSK and resolve the issue with the cooperative electrician.
If you connect to electricity bypassing the cooperative, for example, by running a cable from a neighbor in the garage, then sooner or later this fact will come to light and the offender will not have any trouble.
Owners of individual garages need to privately conclude an agreement to connect to electrical networks, issue a personal account, a book and pay for the electricity consumed.
Lighting organization
The more light in the room, the better, but you shouldn’t fill the entire ceiling with lamps. To obtain uniform lighting, you need to correctly position several lamps.
For optimal lighting, it is more than enough to have the following in the garage:
- General lighting that allows you to clearly see what is happening in the room.
- Local lighting in the workbench area.
- Lighting in the inspection hole, if available.
All lamps must be protected from damage due to mechanical stress and have a safety level of IP65. As one of the lamp installation schemes, we can recommend the placement of linear fluorescent lamps under the ceiling. these lamps will provide general lighting. Lighting of work areas is carried out using protected LED directional lamps with an operating voltage of 12 V. Such lamps do not heat up, and a voltage below 36 V prevents them from causing electric shock in the event of a breakdown. Plus they are energy efficient.
Lighting fixtures and switches
Lighting is usually divided into general and local. The latter is intended for lighting, for example, a workplace. For basic lighting it is worth using large fluorescent or LED lamps; they are durable and economical.
The general lighting switch is usually located at the entrance. Local lighting switches should be placed near workplaces. In places with high humidity, lighting fixtures with moisture protection should be installed; the recommended protection class is IP65.
Use of electrical equipment
If you like to stay in the garage for a long time and make something with your own hands, then you will certainly have the necessary minimum of power tools. To be prepared for this, it is better to plan the load on the electrical network in advance and take it into account before wiring the garage. And in order to correctly calculate the cable cross-section, it is necessary to accurately determine which electrical appliances will be used indoors. The total power of all electrical appliances must be multiplied by a factor of 1.2 to ensure a power reserve of 20%.
Approximate power of power tools:
Equipment selection
Wiring for the equipment planned for installation
Work on an electrical panel project begins with determining the list of electrical equipment that will be used in the garage. These are the following consumers:
- lighting;
- ventilation;
- Appliances;
- power tools (battery charger, welding machine);
- signaling.
After compiling a list of equipment that will be connected to the garage electrical panel, you can begin designing the circuit.
It is important to take into account the maximum permissible load current for which the electrical network is designed. You may have to abandon devices that consume high current.
Advantages and disadvantages of a three-phase power supply system
It is no secret that three-phase power supply to a private home is becoming more and more relevant, and this is connected not only with the voltage level. Let's look at all the advantages of 380 Volts and here is a list of them:
- Connection of the most common asynchronous electric motors with a squirrel-cage rotor in everyday life and in production. When connected to a single-phase circuit, their power, torque, and efficiency are lost. After all, they were originally designed for three phases. The use of such electric machines in a private home may be necessary when installing a grinding, drilling or woodworking machine and other types of equipment. An owner who has the skills to operate such equipment will always find a use for it. A powerful pump is always useful at the dacha, so running 380 Volts won’t hurt here either.
- By connecting three phases, the owner of a private house receives, by and large, three independent single-phase networks at once, which he can dispose of at his own discretion. To do this, in order to obtain a single-phase voltage of 220 Volts, you need to connect one wire to the phase and the other to zero. It will be called phase. The voltage between two phases is 380 Volts and is called linear. You can read more about phase and line voltage in the article: https://samelectrik.ru/linejnoe-i-faznoe-napryazhenie.html.
- In the event of a breakdown or emergency at a distribution substation, one or even two phases may burn out. At the same time, the owner of a private house with three phases will at least have lighting and a refrigerator working. It must be remembered that for three-phase motors, operation on two phases will entail its inevitable failure.
Keep in mind that there are pitfalls here too. A three-phase network is needed if the power of a single-phase network is not enough. And even if single-phase is not enough, there is no need to rush to connect three phases, it is better to clarify the possibility of increasing the power limit for a single-phase network - this procedure is much simpler than coordinating and connecting three phases.
Three phases must be connected if it is necessary to power three-phase electric motors that cannot operate in single-phase mode, or if a large number of electrical appliances and equipment are used simultaneously, for example, if the house has a large household or some small-scale production has been established.
Several other disadvantages of the three-phase power supply system should also be noted. One of the disadvantages is the need to distribute loads evenly across each phase. The second drawback is the great difficulty in connecting, purchasing another shield, protective devices, etc. The third drawback is a great danger from the point of view of electric shock, since the house will have not only a single-phase voltage of 220 V, but also a linear voltage of 380 V
As you can see, the advantages of powering the consumer from a 380 Volt network are not always obvious. Now it’s worth figuring out what documents are needed to connect a three-phase network. This is what we will talk about now.
How to connect three phases
Of course, before moving on to the technical side of the issue and directly to the connection, you need to contact the company that is the electricity supplier in this particular region. To do this, the customer must clearly understand and agree on the following points:
- Network power.
- Meter type and tariff. This can be a multi-tariff meter or a single-tariff one.
- Number of phases (in this case 3).
- Connection diagram.
- Organization of grounding, which is extremely necessary to protect people from electric current in the event of breakdown or deterioration of insulation resistance.
Important! Self-connection to power grids is prohibited by law! The procedure for connecting and organizing power supply must be performed by highly qualified personnel. In order to connect a private house to a three-phase network, it must be completely de-energized, and doing this without an energy service is also prohibited.
Suppliers adhere to clear requirements and rules. Therefore, if the distance from a private house to 380 Volt networks, most often passing through poles, is more than 300 meters within the city (500 outside the city), then in order to conduct electricity you will also have to pay for the installation of a support.
It is also important to note that it is often necessary to provide information about the condition of the home's electrical wiring before connection. If the house has old electrical wiring, then there is a high probability that representatives of the electrical networks will not only not give permission to connect three phases, but will also reduce the limit on a single-phase network to the minimum for safety reasons, since the wiring cannot withstand a heavy load.
The next key issue in connecting a home to a 380 Volt network will be the power that the consumer will take from the network.
There are three degrees:
- first - no more than 16 kW;
- the second - from 16 to 50 kW.
- the third - from 50 to 160 kW.
Of course, it is better to organize power supply with a power reserve, especially since the increase in the number of devices that operate on this type of energy is still obvious. However, the cost of this system will be higher.
It is also important to note about the power limit - most often up to 15 kW is allocated for the average consumer. And in this case, everything depends on the state of the electrical networks, the power of the transformer in the transformer substation or transformer substation. If the power is small, then the supplying organization distributes approximately the power to houses and above this power it is impossible to connect, especially three phases. In this case, to connect three phases of the required power limit, a separate transformer is needed - this is a more complicated procedure, since you need to purchase a package transformer substation and connect it to a high-voltage network of 6 (10) kV. Therefore, the average consumer has to be content with a certain power limit of a single-phase network.
The list of documents required to connect 380 Volts (in addition to the application itself) includes:
- Identification.
- Law-abiding taxpayer identification number.
- Title documentation for residential or non-residential premises (in case of connecting a garage).
- Approved complete residential plan (if available).
A copy is made of these documents and submitted to the company's electricity supplier. However, verification with the originals is also required.
Some suppliers may also request additional documents, just in case, you should also take them with you:
- Information about power and a list of all available electrical equipment in a private home, garage or country house. Depending on where three-phase electricity needs to be routed. If the connection is made to an area that does not have electrical equipment, then you will have to indicate its estimated types and power.
- Information about their maximum power.
- Approximate time of commissioning of housing, if it is not yet a residential property.
Installing multi-tariff meters is very profitable, since if you do not use powerful devices during peak hours, you can save significantly. For example, at night the cost of electricity is several times cheaper than during the day.
Procedure for registering a multi-tariff meter:
- Preparation of an application requesting the installation of an electric meter.
- Obtaining technical specifications for this meter, which must be purchased if the electricity supply company does not have this equipment. Often they themselves provide services not only for connection, but also for the sale of metering devices.
- Purchase and programming of an electric meter.
- Calling a representative of the energy supply company to check that the meter is connected correctly, as well as its sealing.
- Making changes to the agreement or drawing up a new one, when organizing a new connection of three phases.
- Obtaining permission to connect 380 Volts.
By the way, there is also such an option as converting single-phase voltage to three-phase. You can find out how to make 380 Volts from 220 by following the link.
The rated characteristics of circuit breakers must fully correspond to the load connected to them. There is no indicated power on the machines; only the voltage and current for which it is designed are indicated on the case. We talked about how to choose a circuit breaker in a separate article.
As for the technical part, namely connecting three-phase voltage to a private house, it is better to entrust this matter to specialists, because In the absence of experience and skills, it will be almost impossible to carry out the three phases on your own.
So that you understand how serious everything is, below is an approximate connection diagram for 380 Volts in a private house, with wiring to machines:
To familiarize yourself with the technology of carrying out the three phases, we recommend studying the following block of articles:
- How to connect SIP with copper cable
- How to install electrical wiring in a house
- How to make grounding in a house
- How to assemble a three-phase shield
- How to divide electrical wiring into groups
- Connection diagram for three-phase RCD
Of course, in order to get a profitable, fairly powerful and universal three-phase voltage in a private house, summer cottage or garage, you will have to spend some effort, time and money. Documents, approval, connection, a more complex wiring diagram and, accordingly, more expensive electrical installation, so think again carefully about whether you need three phases.
Finally, we recommend watching useful videos that explain the feasibility of connecting the three phases, as well as the nuances of preparing documents:
Now you know how to install 380 Volts in a private house and what documents are needed for this. We hope our step-by-step instructions were useful for you and helped you connect your house to a three-phase network yourself!
A garage is a room in which powerful electrical equipment and light sources are often connected. For all these devices to work, you need wiring in the garage, done by yourself or with the help of specialists. Installation is quite simple, you just need to follow the connection instructions and observe safety precautions.
Which meter should I choose for my garage?
The question of which electricity meter is best to install in the garage is quite pressing. At the time of connection, the owner must have an energy consumption meter on hand, so it must be selected in advance.
When choosing an electric meter, consider which devices will be used with what power. For example, if a workshop is set up in a garage, the power consumption will be higher.
Experts advise in this case to focus on a total power of at least 15 kW. If the garage is powered from the same network as a residential building, and a workshop is located in it, an electric current of 100 Amps should be distributed at the input.
In addition, the meter must withstand temperature changes and cold, since the garage is usually not heated.
When purchasing, make sure that the metering device complies with modern standards. The electricity meter must have a stamp in the passport, seals indicating the year of testing. The manufacturer's stamp and the date of inspection must also be included in the passport. The energy supplier will then put another seal on the meter.
It is also worth paying attention to the operating principle of the meter. Induction models, which are distinguished by their low price, reliability and durability, are considered classics of the genre. But their disadvantage is low accuracy, which can result in overpayment for electricity. Electronic products are more expensive, but they are quite compact and can be configured to several tariffs.
In addition, you need to take care of arranging an electrical panel with a machine. This is necessary in case of a short circuit. The machine will automatically turn off the power supply, securing the room. It is recommended to install it closer to the entrance.
Connection cost
The financial aspect is also important. How much does it cost to install electricity in a garage? The cost of funds depends on the price of the electrician's services. The average cost of connecting light to a private room is about 5,000 rubles. But the amount may increase if additional work is necessary.
In conclusion, it is worth adding that you need to connect electricity to the garage only by legal means, no matter how troublesome it may be. Unauthorized cable laying is fraught with unsafe consequences.
December 9, 2017
Electricity tariffs for owners of garages, garage-building cooperatives, cellars and sheds will be reduced in Kamchatka. The Governor of the Kamchatka Territory, Vladimir Ilyukhin, stated this during the “Direct Line” on the Russia-1 TV channel. Elizaveta Efimova, a resident of the city of Elizovo, addressed the head of the region with a complaint about the high cost of electricity for garage owners in garage-building cooperatives during a live broadcast.
“The electricity tariff for the population has decreased, but for garage owners in garage-building cooperatives it is 6 rubles 69 kopecks per kilowatt. In our GSK there are mostly pensioners; they store personal vehicles and crops in garages. How can you use a garage at such a price for electricity? Please help us!” - noted Elizaveta Efimova.
According to the head of the region, the Regional Service for Tariffs and Prices of Kamchatka has already worked on this issue.
“The question is really on the topic of the day. But what about those who today carry out individual labor activities in garages? You know, in some garages sometimes life is in full swing, they are repairing something, producing something, consuming a huge amount of electricity... Of course, this should not concern the majority of the population, especially pensioners who store their workpieces in garages. This instruction has been given to our Regional Tariff Service. They have already calculated our capabilities. From January 1, 2022, for this category of people - owners of garages, sheds and cellars - we will reduce the cost by about 30%. The tariff will be 4 rubles 86 kopecks per kilowatt-hour. This is at the level of tariffs established for residential buildings. I think this is a very reasonable price. But I say again: this will not affect those who are engaged in some kind of commercial activity in garages,” said Vladimir Ilyukhin.
The governor also recalled that in 2022, the implementation of the initiative of Russian President Vladimir Putin to equalize electricity tariffs for enterprises in the Far East to the Russian average level will be continued.
“Indeed, the decision regarding the equalization of tariffs in the Far East to the average Russian level was one of the most anticipated. For our enterprises, for our business, tariffs this year decreased to 4 rubles, an average of 40%. This year we have already received a significant increase in the energy sector for these purposes. The following year we defended our numbers. The Russian Ministry of Energy had some questions regarding the fact that so-called isolated consumers joined this program. You know, we have a fairly large number of companies both in the fishing industry and in the mining sector that have local networks. They use diesel generation. The same picture emerged in Yakutia and Chukotka. But we were able to explain our position why this happened and today the tension has been lifted,” said Vladimir Ilyukhin. — This measure will help business development. We really feel this help here, thanks to the decision of our President, this help is felt by business.”
Let us remind you that the average Russian tariff for 2022 for legal entities in the Far East was approved at the level of 4.30 rubles on average for the year (excluding VAT).
Nowadays, we cannot do without a high-quality and well-thought-out power supply system. If, when purchasing an apartment, this problem is solved not by the owner of the property, but by a construction company, then there is a choice for supplying electricity to a private home. The apartment has already been supplied with single-phase power, and this voltage is quite sufficient there. However, in the private sector, a three-phase network may be quite relevant. In this article we will tell you which electrical network is better: three-phase or single-phase, as well as how to supply 380 Volts to a private house according to the law and what documents are needed for this.