01/16/2017 master
Many people today do their own tuning of their vehicles. Lighting tuning organized using LED strips is quite popular among car enthusiasts.
Car illumination with LED strip
Using this product as a backlight, you need to know how to connect an LED strip to a car. But here difficulties can arise not only with installation, but also with the choice of product. Our article will tell you how to do everything correctly and ultimately get high-quality and beautiful lighting.
Why LED strip?
Today, a car's lighting system can be organized using various lighting devices. But many car enthusiasts prefer to illuminate their iron horses with LED strips. The reason for such popularity lies in its advantages:
- A fairly simple installation that can be easily done with your own hands, which is very important for people who like to tinker with the car in their free time. Installation here does not require professional knowledge of an electrician. Anyone who follows the step-by-step instructions given below can install such a tape;
- such a backlight can glow in different colors (blue, green, yellow, purple, etc.). This allows you not only to make the lighting of the interior or exterior of the car high-quality, but also to set off the color of the body;
External car tuning
- the LED strip creates a high-quality and fairly bright luminous flux, which perfectly illuminates the interior elements or the road surface;
- long period of product operation;
- minimal energy consumption;
Note! Led can have a voltage of 12 and 24 volts. To illuminate a car, a product with a voltage of 12 volts is most often used.
- high resistance of LEDs to vibration and various types of mechanical stress. This is especially important for a car that constantly vibrates while driving on the roads;
- environmental friendliness. All components are made from environmentally friendly materials and do not contain toxic or poisonous components. Therefore, such lighting can be safely installed in the cabin even in situations where children are frequently transported.
Despite this, the LED strip has certain operating and connection features:
- due to the fact that such products have a voltage of 12 volts, you will need to follow specific installation instructions;
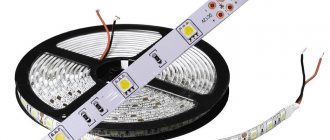
Appearance of LED strip
- You need to cut only in strictly defined places. They are placed with a black dotted line and a scissors icon;
- Due to the wide variety of LED products of this type, it is not always possible to choose the optimal model option.
In addition, such lighting products are not very cheap. Although, if only the interior (dashboard) or headlights of the car are illuminated, then installation costs will be insignificant. It will cost much more to install lighting tuning on the outside around the entire perimeter of the car.
How to avoid a fine (allowed types of lighting)
It is necessary to make illumination of the underbody of the car so that the following requirements are met:
- In the front of the car, you can install devices that illuminate the space in white or orange. Yellow is also acceptable. All other options are prohibited and, accordingly, cannot be used.
- The back may be illuminated in orange, red or yellow. It is prohibited to use white in this case. The same applies to other colors.
These rules apply exclusively to the underbody of the car. You cannot use neon to illuminate, for example, license plates (according to the rules established by GOST, license plates can only be illuminated in white).
Important! The light from installed devices should be directed downwards and not to the sides. Failure to comply with this rule increases the chances of a fine being imposed.
Even if the lighting is installed in accordance with the rules described above, it is necessary to ensure that the red light does not protrude beyond the front and the white light does not protrude beyond the rear of the vehicle.
Also, you should not use too bright colors that make the car stand out and distract other drivers. You cannot use the illumination of the rear and front bumpers, radiator grille and other elements of the car.
From the point of view of legislation, lighting that does not protrude beyond the contour of the car is not a lighting device. Accordingly, the inspector will have nothing to issue a fine for.
If this rule is not followed, the backlight can be identified as a side light. Since certain requirements are put forward for the latter, a traffic police officer can use this circumstance to impose administrative sanctions.
Installed lighting fixtures must operate continuously or be turned off. That is, installing a flashing backlight is unacceptable.
This effect distracts other road users, which can lead to an emergency, and can be interpreted by a traffic cop as a special signal, the installation of which is prohibited without obtaining special permission.
Where can I place the ribbon?
An LED strip with a voltage of 12 volts (as well as 24 volt models) can be used as illumination for any vehicle for several purposes:
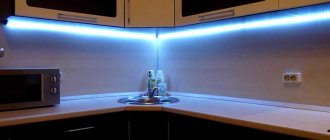
- interior dashboard lighting. This kind of interior lighting is very common, since using an LED strip you can illuminate any area of the dashboard well. What products should be chosen for interior lighting will be discussed in the next section;
LED instrument panel lighting
- You can install an LED strip in your car headlights yourself. Popularly this type of tuning is called “angel eyes”. Here you need to use either separate LEDs, or simply run a strip around the headlight. In this case, LEDs can occupy different locations in the headlight. In this case, it is possible to increase the lighting capabilities of the headlights several times, due to which they will begin to refresh the roadway much better in the evening and night hours;
Note! Many foreign car models are often already equipped with angel eyes tuning. But for cars of the domestic auto industry they are made with their own hands.
Tuning "angel eyes"
- full tuning of the car body. In this case, the 12 volt tape will be installed at the bottom of the body. As a result, the car will be illuminated from below, which will create the effect of “floating”.
Body tuning
Any type of lighting can be done independently. The main thing here is the correct connection of the lighting product. In this case, the connection for all options will be carried out almost identically. In order for your homemade car lighting, implemented using a 12-volt LED strip, to work for a long time and with high quality, you need to choose the right light source.
The root of all evil
First of all, you need to understand exactly how such optics are designed and work. So, the reflector with mounting holes for LEDs should always be hermetically sealed into the headlight housing. Each diode is attached to the rear wall of the reflector on the control board. Many other important components are also located there, including resistors and traces. Much less commonly, optics consist of transparent bent tubes with notches that contain LEDs. They are needed mainly to “introduce diversity” into the design of optics.
In general, the design of LED optics is simple. And when they talk about the “eternity” of LEDs, they forget to explain that we are talking directly about the LED itself. It rarely breaks directly. However, this also happens in practice. Much more often, the LED simply loses contact with the seat. This happens due to constant shaking, which one way or another begins when the vehicle reaches 30 thousand kilometers.
What follows is dry mathematics and probability theory. The more mileage the car has, the higher the likelihood that the LEDs will begin to come off and “burn out.” For most “Germans,” problems with optics begin after 100 thousand kilometers of driving. The soldering on the printed circuit boards actively cracks, the control element begins to overheat (which leads to burnout of resistors), moisture penetrates into the LED flashlight - all this spoils the optics. Of course, “delicate” optics can fail as a result of an accident.
To justify LED headlights, we can only add that the same problems: dampness, overheating and burnout, disconnection of contacts are quite relevant for conventional optics.
Making the right choice
Today, models with LEDs designed for 12 volts are specially sold on the market. They are offered in a wide range and in order to choose the most suitable model for your car, you need to rely on the following selection criteria:
- placement location. As we have already found out, such lighting can be installed inside the cabin on the dashboard, in the headlight and outside the body. In all three cases, the conditions under which the device operates will differ, which must be taken into account when choosing;
- what type of glow should there be;
Note! To illuminate the car interior and for external tuning, you can use strips that produce a color luminous flux (red, blue, etc.), but the headlights need to be connected to light sources with a white or yellow glow.
Light from LED headlights
- product power;
- degree of protection against moisture. Naturally, lighting for the car interior and headlights should be organized using standard products with a not too high level of moisture protection. At the same time, only waterproof 12-volt models can be used for outdoor lighting.
In order to make exactly the right choice and quickly install the LED strip in your car with your own hands, you need to have an idea of its range.
Connection
There are several suitable options for how to make the lighting in your car yourself to ensure an original glow in your legs.
Each motorist will decide for himself how it will be more convenient and easier for him to connect the LED footlights in the car. But there are 3 main options:
- to the lighting of the interior itself;
- through the cigarette lighter;
- from dimensions.
The choice depends on the format in which the driver wants to see the backlight. After all, each scheme provides its own version of when and how the glow will be activated.
Through interior lighting
Some motorists prefer to install footwell lighting in their car by connecting to the main lighting system of the vehicle interior.
If you connect LED lighting for the footwell area in a car through interior lighting, then the light source will need to be connected according to the following algorithm:
- remove the interior lamp;
- connect the wires, observing polarity;
- the white wire usually goes to the plus;
- the negative wire is connected to the red wire;
- the wires are hidden under the interior trim;
- It’s most convenient to stretch them directly along the side post;
- Next, connect the wires of the installed LED strips to each other;
- connect them to a power source;
- check the system for functionality;
- if everything is functioning, perform high-quality insulation;
- return the lampshade to its place.
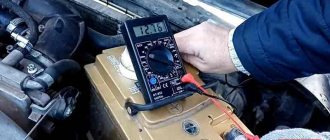
If you are not sure about the polarity of the wiring, use a tester or multimeter. This will make it clear where is the plus and where is the minus. However, the wires may differ in color, depending on the car.
In this way you can connect to functioning interior lighting, but this is not the only option.
Through the cigarette lighter
You can also activate the LED strip from the cigarette lighter, which is done quite often.
Not the worst option, since most drivers do not need backlighting while driving. They use it for comfortable getting in and out of the car.
The connection itself is performed according to the following algorithm:
- plus the LED strip connects to the cigarette lighter;
- the minus must be connected to the limit switch on the door;
- the tape wiring is brought out together with the rest of the wires, connecting into a single bundle;
- All contacts are insulated and secured with a tie if necessary.
How exactly to remove and hide the wires depends on the specific car and the driver’s ideas.
Through dimensions
If you connect from the dimensions, then the backlight will function constantly, in parallel with the operation of the dimensions. That is, this is the most relevant option for many, since the system will turn on at night while traveling.
You can connect the plus from any backlight bulb. For example, the glove compartment or dashboard. The minus is thrown onto the body.
Here, each motorist decides for himself how and in what situations he needs the LED strip in his legs to work. Therefore, you can choose different connection options.
By installing the tape in the legs, you can achieve the original appearance of the interior, as well as get some practicality from such a solution. Having chosen the appropriate work option, all that remains is to implement the scheme. Moreover, you can do this yourself, without having a wealth of experience and special specialized education.
Nuances of choice
LED products for cars are mainly represented by single-color 12-volt models. This makes it much easier to choose a color to match the body. It is best to choose products that have a self-adhesive backing. This greatly simplifies installation, as well as do-it-yourself connections. Such products can easily be installed on the dashboard of a car.
Self-adhesive tape
In addition, these products are divided into two groups according to the type of LEDs:
- SMD 3028 - LEDs have dimensions of 3 by 2.8 millimeters;
- SMD 5050 - LEDs have dimensions of 5 millimeters.
Another important connection point that plays a role in calculating the total power of the strip is the density of LEDs per meter.
Note! Often sellers say the density for the entire tape (5 meters in a skein), and not for one meter. An incorrectly specified density parameter can lead to serious problems during the operation of the backlight.
For SMD 3028 the density can be 60, 120 or 240 LEDs, and for SMD 5050 - with 30, 60, 120 LEDs per meter. Remember that the higher the density, the brighter the 12 volt LED strip will shine. Another point in installing this product is the correct calculation of the product’s power. Since the tape can be cut into pieces of almost any length (the minimum cutting pitch is the distance between two adjacent contact pads), this parameter will vary. To calculate power you need to use a special formula.
Contact pads on the tape
Since the tape has a voltage of 12 volts, a power supply is required to connect it. We select it based on the power obtained during mathematical calculations and add 20% of the reserve. The last aspect of the choice will be the determination of the moisture resistance class. This indicator is referred to as IP. Today there are three classes of water resistance for vehicles:
- 20 – tape without insulation, so it can only be installed inside the car on the dashboard;
- 65 – the product is protected from moisture and can be used under a canopy. Such products are best installed in headlights;
- 68 – tape of a fully insulated type. It can be safely installed under the car body, where it can be in contact with water and dirt for a long time without any problems.
Based on the selection parameters listed above, you can choose an LED strip for any occasion without any problems.
Installation option without interfering with the electrical network
You can install and connect LED lighting in your car yourself without interfering with the vehicle’s electrical network. Let's look at this method using the example of connecting a waterproof RGB strip to four contacts. Here you will need:
- four connectors or terminals;
- controller designed for 12 volts (for passenger cars). It is installed to make it possible to control the backlight;
- stranded wire. It should have the same colors as the controller;
- silicone sealant.
The installation process will be discussed using the example of installing the tape under the dashboard inside the cabin. All subsequent actions look like this:
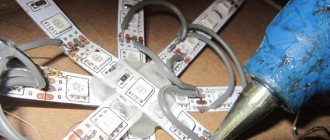
- The tape is cut into the required fragments and then soldered using a soldering iron. You can also use connectors for connections, this method will be many times more expensive;
Tape soldering process
- then all places that have been soldered should be treated with silicone glue;
- we install the tape where it should be to illuminate the required area;
- all wiring must be carefully soldered and then hidden under the skin of the car;
- the ends of the tape should be connected to the controller. To do this, you can follow the following diagram;
Controller connection diagram
- To connect a lighting product to the cigarette lighter, you can simply upgrade your car charger for your mobile phone. To do this, one of its wires needs to be soldered to the fuse, and the second to the right metal ear. As a result, the stabilizer will be bypassed. After that, close the charging case and insert it into the controller;
- Then we insert the charger into the car's cigarette lighter.
Note! This type of backlight will only work when the engine is running or the ignition key is turned on.
Ready backlight
Now you can control the light and music using the remote control.
Second installation method
This method can be used by installing lighting in the interior, trunk and under the hood. Here you will need:
- LED strip with two contacts;
- wire having two different colored wires. The red one will be soldered to its “plus”, and the black one to the “minus” of the tape.
The preparation of the lighting device follows the same principle as in the first method. After installing the product, we perform the following manipulations:
- connect the black wire to the battery (to the negative terminal);
- We attach the red one to the toggle switch, and then connect it to the positive terminal of the battery;
Diagram of connecting wires to the battery
- Then in the cabin we install the toggle switch in a place convenient for you.
That's all.
Ready backlight
If the product does not light up with this connection, then you need to check that the polarity of the wires is correct.
Connecting car LEDs
The connection process is quite simple. The ice tape has contacts marked “V|R|G|B”. Wires are soldered to them for connection. Connecting single-color tapes to the on-board system is quite simple - the plus is powered to the battery terminal with the “+” sign.
The negative is either output to the car body, or is also connected to the battery to the “-” terminal.
The diagram clearly shows how to install lighting elements on the car body:
The principle of connecting multicolor (RGB) LED strips is the same, but with one exception. The circuit contains a controller that is responsible for automatically changing the color mode.
At the output of the RGB strip there are four wires with symbols, which allows you to connect it correctly:
- V – food,
- R – red,
- G – green,
- B – blue.
The terminals are connected to the corresponding pins on the controller, on the other side of which there are the same standard plus and minus. Colors can be changed either automatically or using a remote control.
The tape itself is laid along the car body and secured using special plastic brackets or clamps. For installation directly into the headlights, the LED strip has an adhesive base covered with a protective film.
Installation Rules
When starting installation and connecting the LED strip, you need to know and remember the following rules:
- diodes can be connected either from a resistor (power supply) or from a cigarette lighter;
- The tape can only be cut in strictly designated areas;
Tape cut location
- The length of the backlight must be determined before starting the connection. In this case, all pieces of the product must be soldered into a single electrical circuit;
- Do not bend the tape too much. If it is bent with a radius of less than 80 mm, the conductive layer of the flexible board may rupture;
- Some wiring diagrams for this product may contain a voltage stabilizer. It will make it possible to create a voltage of the required 12 volts;
- installation is carried out only with the negative terminal disconnected from the battery.
Follow these rules and everything will turn out well for you.
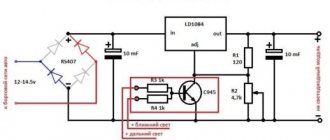
Voltage regulator
Therefore, the best option is to use a stabilizer. If you know a little about electronics, you can assemble the circuit yourself.
And through it connect all LED lighting sources. However, do not confuse the driver with the power supply.
The main task of the driver is to stabilize the current. The voltage on it can either increase or decrease.
And the block is primarily a source of stable voltage.
To connect an LED strip in a car, you need a power supply.
Previously, such a stabilizer was assembled on a KREN 7812 type chip.
The connection is quite simple. On the left is the positive input. Middle contact – total mass. Right – exit to the tape.
However, due to constant overheating, pulsed sources are now being used. They no longer require huge cooling radiators, and they have more power.