What almost always gives away amateurs when decorating a bathroom on their own? Practice shows that most often people forget about several levels of lighting in the bathroom, even if the light is correctly set throughout the house.
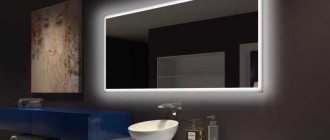
In the bathroom it is not necessary to make the general lighting bright. In some cases it gets tiring. But to perform individual procedures, such as applying, removing makeup or styling hair, it is enough to illuminate the mirror. Regardless of what style we want to create in the bathroom, and what type of lamps we are going to use, the light around the mirror should be distributed evenly and not create shadows on the face. This is the main function of bathroom mirror lighting.
Touch button and light strips
The first thing you need is, of course, the mirror itself. Each one will have individual sizes and shapes.
If possible, order a mirror with a facet.
In addition to beauty and the play of light on the sides, this beveled edge will add safety.
At the bottom of the mirror you will need to visualize a button.
To do this, you will need to remove the amalgam or reflective layer from the back side.
Mistake #1
Without removing it, the touch button will not work.
Even if you know exactly where it is located and will point your finger at this area.
Choose the appropriate button shape yourself - a square or a circle.
How to make it on an initially solid mirror base? There are three ways.
Mistake #2
The simplest and cheapest is to carefully drill out the protective coating from the back side with a diamond core bit or grind it off with a diamond cutter for a Dremel.
Although the method is working, the result is a “collective farm”.
The most difficult method is sandblasting. This service is usually provided by those who professionally deal with mirrors (cutting, processing, drilling holes).
How to remove amalgam at home without resorting to outside help? Chemistry will help in this matter.
Removing amalgam on a mirror without sandblasting
Look for a special gel in stores, such as Satinglass or Zenfi ZF-10S. These may be other brands.
To begin with, you create it in Photoshop or simply manually draw a stencil for the future button. The simpler the design, the easier it will be to cut with a blade.
Transfer the picture to tape and stick it at the bottom of the mirror with an indentation of at least 5 cm. It is better to take colored tape so that the outlines are clearly visible.
Mistake #3
You cannot place a button on the very edge of the mirror.
There will be a frame made of aluminum profile. Miss by a couple of centimeters and you will have to partially cut out this profile.
Otherwise, it will prevent the button from getting into place. The button is not that small!
Also cover the space around the button with protective tape. Only its contours should remain open.
After all the preparatory work, use a PLASTIC spatula to rub the gel over this area and wait a certain time according to the instructions (usually from 15 to 30 minutes).
Mistake #4
Do not smear anything with an iron spatula, otherwise you will leave scratches on the glass.
A plastic spatula can be taken from a set of children's plasticine.
Mistake #5
You cannot work with chemicals without protective rubber gloves and goggles.
This gel is a very aggressive material. After 20-30 minutes, the amalgam is easily removed along with the gel using the same spatula.
As a result, you will get a perfectly transparent outline of the touch button, clearly visible from the mirror side.
The touch switch, which will be hidden behind this button, has a light display. When turned off it lights up red, when turned on it lights up blue.
Very often, such chemicals are used to etch not only the button, but also the frame frame – the light strips.
Many masters prefer to make not a “floating mirror,” but a mirror that will shine, what is called “from the face.”
Floating Mirror
Backlight from the face
To do this, smooth strips of amalgam are removed along the perimeter, after which they are made translucently matte using stained glass paint or a special paste.
As a result, the LED strip does not shine from the back of the mirror, spreading light to the sides, creating a sort of floating effect, but comes directly from it. Just from these translucent strips.
Here the entire process of etching the mirror layer with subsequent matting of these strips is shown in detail.
How and from what to make a frame?
So, we’ve sorted out the surface preparation and contours, let’s move on to the frame.
In order for the mirror to have rigidity and be easy to wash, wipe, and hang on something, it is necessary to form a frame.
Mistake #6
Most often it is made from a profile, but not iron, but aluminum.
It is lighter, cools the tape better, and does not rust. This one is sold in construction stores, such as Leroy Merlin.
Some people use a single piece of chipboard. Then they sculpt an LED strip directly onto the end of this piece of wood.
Mistake #7
This way, of course, you will ensure the rigidity of the structure, but the cooling of the LED strip will not!
As a result, the LED strip will often fail and little depends on its quality.
And laminated chipboard can swell over time due to constant moisture, so an aluminum profile is the most successful solution for a bathroom.
For small mirror sizes, a 25mm*25mm profile is suitable.
Mistake #8
You shouldn’t take less, since this width provides the necessary gap between the wall and the mirror.
In this space you will have to hide both the touch button and the power supply, the minimum thickness of which is slightly more than 20mm.
If your block is much thicker or the mirror is larger, then accordingly choose a profile of a different width.
Top best manufacturers
The modern market offers a wide selection of mirrors with built-in lighting. But not all manufacturers should be trusted, since quite high requirements are placed on this item.
According to customer reviews, models from the following companies have reliability and quality:
AM-PM
A brand that has gained popularity all over the world. The products of this company are appropriately labeled, their price is proportional to the quality of the products, which are represented by collections of furniture, bathroom fixtures and accessories, including mirrors.
AQUANET
Well-known manufacturer of accessories and furniture for bathrooms. The products are practical and functional. The company offers models in different price categories. Mirror surfaces are resistant to mechanical stress, have interesting shapes and different sizes.
Alavann
The company produces high-quality mirror surfaces according to individual sketches. The production uses wear-resistant materials, harmless paint, and fittings from well-known European companies.
Aquaton
It produces products from cast marble and high-quality three-layer mirrors that are resistant to temperature changes. The manufacturer guarantees strength, moisture resistance, and a 3-year warranty.
Triton
It produces bathtubs with acrylic coating of complex configurations and mirrors: ordinary, decorated, with shelves and cabinets, adapted for the “climate” of bathrooms. Provides a 5-year warranty on its models.
Jacob Delafon
A French company that produces durable mirrors that are resistant to mechanical damage. They have a thick layer of glass and reflect light efficiently.
Moidodyr
A proven domestic company with excellent recommendations on the market. Offers a wide selection of bathroom mirrors with built-in cabinets and lighting fixtures, convenient shelves and eye-catching decor.
Diffuser for LED strip
In addition to the aluminum profile for the frame, it is advisable to purchase a special profile for the LED strip + a diffuser for it.
Mistake #9
Many people stick the tape directly onto the side edge of the frame without a diffuser.
However, without this matte cover, you will not get even light distribution. Bright dots from LEDs will be visible along the entire perimeter of the bathroom tiles.
With a matte diffuser cover, you get perfect illumination.
Also, the plastic diffuser can be glued directly on top of the LED strip directly onto the frame, without an additional special profile.
The only inconvenient point is that in this case it will not be removable.
Peculiarities
In the bathroom, the level of humidity is almost always high, the temperature often changes, and condensation forms. Therefore, you should comply with the relevant requirements not only for furniture and plumbing, but also for accessories and mirrors. A low-quality product becomes cloudy over time and becomes covered with mold or mildew.
Thanks to the development of technology, it has become possible to produce mirrors that are not susceptible to external factors. Often they are additionally equipped with a heating system.
Mirror lighting plays a practical and decorative role. In the first case, correctly installed lamps make applying cosmetics or shaving much easier. In the second, they create an unusual atmosphere, while focusing attention on some interior detail.
Assembling the frame frame
So, let's move on to assembling the structure. First, measure and draw all the dimensions.
Step back 1.5-2cm from each edge of the mirror and draw straight lines with a pencil.
This is where the matte diffuser cover, screwed to the profile, will end. Using these dimensions, form a frame square.
Another U-shaped profile is screwed onto the inside of the frame in its upper part. It makes it easier to install and hang the mirror on the wall.
You can do without it by simply making furniture holes for the dowel heads in the frame itself.
The entire structure is assembled on furniture corners and self-tapping screws.
Pay special attention to the corners.
When making mirrors with floating lighting, it doesn’t matter how they are assembled - with or without a 45-degree cut (90 degrees).
But if you have lighting along the entire perimeter “from the face”, through luminous strips, then the corners already play a significant role.
Firstly, you need to collect them with a cut at 45 degrees. Secondly, cut off the corners themselves - like this.
Mistake #10
Without this cut, the corners in the light stripes on the mirror will be too dark.
Such uneven illumination immediately catches the eye. Even factory products from the store suffer from a similar defect.
When assembling at right angles, you simply will not have LEDs at these points.
Mounting method
The best option is to hang the mirror with your own hands on self-tapping screws installed in the wall, through the holes in the tape box. This is the most convenient option, since the box will still have to be made. 2 holes are made in the top bar of the box, the distance between which corresponds to the distance between the screws (or hooks) fixed to the wall. It is necessary to accurately measure the height so that the mirror is located in the correct and comfortable position for all family members.
There are various types of ready-made mirror mounts available for sale. If necessary, you can use them, but it is advisable to choose a design that best matches the size and other features. It is important to remember that the box located on the back side will create a gap between the glass and the wall.
Important! The mount must be selected taking into account this distance, otherwise it will be impossible to use it and you will have to make the brackets yourself.
Illumination from the face and reflective box
For the uninformed, it is worth knowing that making illumination “from the face” is much more expensive than making a “floating mirror”.
In addition to etching the strips, you will need a large plastic box made of PVC foam (3mm) that will completely cover the back.
The sides of the box are made of matte acrylic.
Thus, the light will not randomly go out, but will be evenly scattered through acrylic and light strips.
In this case, a diffuser with a special profile is not required; it is enough to stick the tape on the frame itself.
Here is a good video from a competent master in this matter. He explains in detail and shows what and how such boxes are made from.
There is a simpler method. This is when individual matte strips are closed from the inside with a plastic cable channel.
And the LED strip is mounted not in the center, but along the edge of this cover.
Mistake #11
But here again the acute issue of LED overheating and the need to periodically replace the strip arises.
The second method is a mini-box not covering the entire mirror, but directly under the translucent strips.
As you can see, a floating mirror with an LED profile and diffuser is an easier option to make yourself than one with face lighting.
Mistake #12
And mirrors with a matte finish (stripes treated with sandblasting) last much less in damp rooms than without a matte finish.
First of all, the edge that is located closer to the bathroom or shower begins to “bloom”.
Mistake #13
If your mirror is built into a niche and not hung on a tile, there is no need to make a light box to illuminate the face.
The niche itself plays the role of such a box.
New for 2022
The range of bathroom mirrors with LED, built-in or external lighting is amazing. Everyone can choose what best suits the interior, desires and preferences.
How to glue a mirror?
The formed frame is glued to the mirror using liquid nails.
You should only use glue specifically designed for working with mirrors (glass-metal).
Tytan 930 works well.
Mistake #14
The composition of regular glue or epoxy will eventually pull out the amalgam and dark spots will appear on the front side.
Mistake #15
Liquid nails must dry for at least 72 hours.
After this, a grip point of even 1 cm2 can withstand a weight of up to 30 kg! Despite the fact that a square meter of a mirror with a thickness of 4 mm weighs only 10 kg.
Using gentle hand pressure , glue the frame to the back.
Mistake #16
No need to put large weights on top of the frame or substrate!
There have often been cases when, due to uneven distribution of weight, the canvas was bent, followed by a distortion effect in the mirror.
This is especially critical for large sizes and thickness of mirrors up to 6mm.
Material
Severe demands are placed on the frame, since a large load is placed on it. That is why you need to choose a material that copes well with it. It must be resistant to corrosion caused by high humidity. Stainless steel and plastic fit the description best.
The second option is used more often. Transparent and opaque frames are made from this material. The former play an exclusively protective role. The latter not only frame the mirror, but also softly illuminate the walls. This creates the effect of no frame.
Expert opinion
Olga Kovalenko
Since 2010 I have been engaged in interior design and architectural design.
According to many people, plastic is not suitable for bathrooms designed in a classic style and requiring elegance and luxury. However, it is not. It is enough to purchase a model with elaborate decorations or fancy patterns.
How safe the product will be to use depends on the material, quality of fittings and fasteners. Therefore, when purchasing, you need to pay special attention.
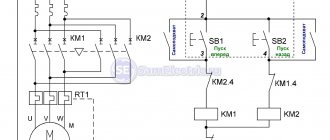
Connection diagram for touch button and LED strip
Let's move on to the electrical part. The general connection diagram with the touch button shown below is as follows.
The 220V voltage from the cable laid in the wall first goes to this touch switch (it also has its own power supply).
More details
Next, the wires go to the 220V/12V step-down unit, and the LED strip is connected from it.
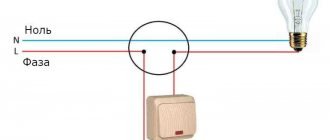
If you forget to bring out the cable directly behind the mirror, you will have to pull it to the nearest outlet and connect it through a plug. It doesn't look very nice, but what can you do?
By the way, connoisseurs of perfect cleanliness and fans of the touch button should know that after each press, ugly fingerprints remain in this place.
And there is no escape from them. You will have to constantly keep a cloth next to the mirror and use it after each time you turn the light on and off.
Another option is to install a mechanical button directly on the mirror frame instead of the sensor.
Well, or put a low-voltage non-contact hand wave sensor there, which is used to illuminate the work area in the kitchen.
More details
The backlight connection diagram will change a little.
In this case, you will have to rack your brains about where to put the power wires to the sensor so that they do not obscure the light or interfere with the LED strip.
The main advantage of this connection is that there is no need to remove the amalgam to create a visualization of the button.
The downside is that the power of such a sensor is only 40W. This is a little more than 2.5 m of not the brightest LED strip (SMD 5050/60 14.4 W/m).
All blocks and wires are hidden behind the mirror. To prevent the wires from dangling or hanging down, use self-adhesive pads.
The power supply and button are also glued on the back side.
Mistake #17
Before gluing the sensor to the area where the amalgam has been removed, check its functionality.
The sensor does not respond well to touch over its entire surface. Its sensor is not always centrally located.
It is quite possible that you will have to “play around” a little and move the button up and down, left and right, in order to find the best position.
What should all these devices be glued to - double-sided tape or the same liquid nails? The question is not entirely clear-cut.
The tape may fall off over time, because... The power supply will become hot during operation. Often, a trace of it clearly appears on a foggy bathroom mirror.
However, any blocks are consumables. Alas, they burn much more often than LED strips.
In a few years the block will have to be replaced anyway. If you have firmly glued it to the substrate, then you will not be able to tear off the body without breaking the amalgam.
Therefore, if an old unit burns out and there is free space, it is much easier to put another one next to it without dismantling the burnt one.
If you don’t have enough space and the mirror is small, initially place it on tape.
Kinds
One of the main differences between the different models, apart from the shape, which can be varied, will be the type of lighting used. For mirrors, white cold, daytime and familiar warm spectrums are used. There are also models with color backlighting. Usually they perform purely decorative functions and have a separate switch.
Bathroom mirrors are available with the following types of lighting:
Internal
The light is directed from the mirror, evenly illuminating the face of the person standing in front of it. This is achieved using a frame through which rays of light of varying degrees of brightness pass.
External
The light is directed to the sides and scatters, reflecting from the walls. Looks like an even glow around the frame, this effect greatly decorates the bathroom interior.
Combined option
Uses both types of light direction. This achieves the highest quality lighting in combination with visual design.
Decorative
A type of internal illumination, only the glow is directed directly through the surface on which the ornament or design is made.
In addition to various options for light sources, several methods of equipping the switch are used:
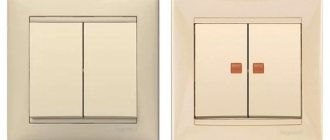
A regular push-button one is located on the wall or on a frame - this option is convenient and familiar.
More expensive models are often equipped with a touch switch. The light comes on after touching any area on the surface of the mirror itself. There are models with a non-contact infrared sensor that reacts when your hand approaches the sensor. There is no need to touch the sensor, it works at a distance of up to 5 cm.
Mirrors can also be equipped with additional functions:
Watch
They are installed directly on the mirror surface so that you can monitor the passage of time in any room.
Heating
This is a system consisting of a film on which a thin heating cable is attached. Heating is used to prevent the mirror from fogging up while taking a shower.
Thermometer for monitoring room temperature
Vector image
To make them more decorative, mirrors are often complemented with an original design or logo, which also glows. There are a lot of options from inscriptions to complex compositions.
Mirror ends
This element of the mirror design hides part of the frame. If you look at the mirror from the side, you can see nothing but the reflection. A mirror with mirrored ends looks simply amazing.
Built-in magnifying mirror
This is very convenient and practical because it does not take up space as an additional separate element.
Socket
It can be built into the side part or into the visor and adjacent to point spots. If the mirror is combined with a cabinet, there may be several sockets. This solution will make the use of electrical appliances more convenient and will avoid the need to mount an outlet in the wall.
Radio
A godsend for those who like to soak in a bubble bath while enjoying melodic compositions. During morning procedures, you can also cheer yourself up with cheerful rhythms. Such devices have built-in speakers and Bluetooth, which makes it possible to configure using a smartphone or tablet.
Sophisticated fans of advanced technology can purchase a mirror with a built-in monitor and speakers. It can connect to WI-FI, and you can shower while listening to your favorite video clips.
Gluing the LED strip
The LED strip is mounted on an aluminum profile around the entire perimeter.
Mistake #18
You cannot glue it directly onto the mirror itself.
The light should hit the sides, not the wall!
To bring out the wires, you will have to drill the frame in one place.
The tape is laid in such a way that its beginning and end converge at one point. Usually this is the bottom of the mirror near the touch button.
In this case, the power wires from the unit are connected to the contact pads on the tape both at the beginning and at the end, parallel to each other. Plus to plus, minus to minus.
To do this, you will need to solder two more wires to the end of the tape.
This is necessary to ensure that the illumination is uniform around the entire perimeter.
For long strips, the final diodes burn more dimly than the initial ones. On large mirrors this is immediately noticeable.
Power supplies are powered by 220V. And from the block to the tape there are already 12V wires.
There are two pins V+ and V-. The main thing is not to confuse the polarity.
Here, with all the pictures, the full cycle of connecting the LED strip . The algorithm is the same for any installation, be it a suspended ceiling, a mirror, or lighting a work area in the kitchen.
Care Tips
Mirrors, regardless of whether they have built-in lighting or not, require special care. There are a number of recommendations:
- To prevent the product from becoming dull, sometimes it is rinsed with cold water. To enhance shine, a small amount of blue is added to it.
- Once a week it is recommended to wipe the mirror surface with a soft cloth soaked in vodka. Alcohol cannot be substituted. Also, using cotton swabs, you need to carefully clean the corners.
- After each wash, wipe the mirror with a napkin.
- Onions will help remove fly stains. They need to walk through contaminated areas. Then wipe with paper.
- The back surface also needs cleaning. However, if there is no protection, you should not use a damp cloth. Dust can only be removed with a dry cloth. The movements must be careful, otherwise scratches and other damage will remain.
- It is not recommended to use glass cleaners. The ammonia they contain damages or completely removes the thin silver layer.
- Once every 2-3 months you need to wipe the mirror with table vinegar.
- Strong tea or milk will help enhance shine.
- To clean heavily soiled surfaces, use a special product. When preparing, 50 g of vinegar and chalk should be diluted in 500 ml of hot water. Let the mixture settle and filter. Use the resulting product to wipe the mirror as needed.
- Often traces of hairspray remain on the surface. You can remove them with a rag soaked in cologne.
The frame deserves no less attention than the mirror itself. No special products are used to clean it. It is enough to wipe regularly with a dry soft cloth.