Every spring, hardware stores offer a wide range of solar-powered garden lights. The price of lamps ranges from 37 rubles to 1500 - 2000 rubles. The operating principle of the lamp is simple. During the day, the sun illuminates the solar element of the lamp and charges the built-in battery. And at dusk, when the solar battery no longer provides energy, the electronics of the lamp turns on an electronic converter circuit that converts the stored energy of the battery into a higher voltage to power an ultra-bright LED. Let's look inside the lamp and determine its electronic filling.
Garden lantern
Design and principle of operation
In order to understand the operating principle of the equipment in question, it is necessary to understand the diagram of a solar-powered garden lamp. The components of this device are:
- lighting unit (LED, as a rule);
- energy converter;
- a device that controls switching on and off;
- battery;
- fastener
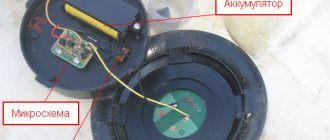
The lamp itself consists of a housing in which the LED is located. The control board and battery are located nearby. Above them is a photoresistor, solar panel and protective glass.
During the day, in sunny weather, the converter accumulates solar energy and converts it into electrical energy, which goes into the battery. This energy allows the garden lantern to function at night.
More expensive models of these devices have a motion controller that automatically turns on the lamp when a person approaches.
The design of a solar-powered garden lamp includes a transistor or microcircuit that acts as a sensor, with the help of which the LED turns off when the battery is completely discharged or can reduce the brightness of the lighting if part of the charge is lost.
Installation
The circuit consists of a minimum number of elements, so installation can be easily carried out using a hinged method. The length of the “legs” of the parts will be quite enough to perform soldering without the use of additional wires. After completing installation and checking the functionality of the manufactured luminaire, all joints should be insulated using a heat pencil or appropriate sealant.
For those who prefer to mount components on a printed circuit board, they can do so using a universal circuit board of suitable dimensions or one made independently.
Main characteristics
The quality of such a device is determined by the silicon used. In inexpensive lamps, polycrystalline or amorphous varieties are used. Monocrystalline silicon can work in any season, it is resistant to aggressive influences. If it is not possible to purchase a monocrystalline element, it is better to use multicrystalline solar cells.
To give durability to the products, they are covered with a special film.
Manufacturers began to invent marketing techniques to hide some of the flaws in their products. In particular, polycrystalline devices have come to be called LED street lights, but their normal service life will be only one season.
Branded devices boast a long service life. There is a fairly powerful photocell here; sunlight penetrates into the deep layers, which ensures stable operation of the lamps for a long time. In Chinese lamps, the thickness of the photocell is comparable to foil, so its service life is much shorter.
The structure of the glass also influences lighting. When days with cloudy weather prevail, it is better to use textured glass, since it accumulates radiation, while a smooth surface contributes to its partial reflection. The most expensive and durable coating is tempered glass.
Wiring diagram of a garden lamp
The operating principle of a solar lantern is very simple, regardless of the size of the device. For its operation, you will need a panel that will collect the sun's rays, a storage battery, a voltage converter, and a luminous element capable of receiving energy.
The elements are arranged in a chain that will work with the correct selection of LEDs and other parts.
Electronic circuit diagram for assembling an LED flashlight:
Positive aspects of devices
Solar-powered gardening lamps help improve recreational areas such as gardens, parks, and public gardens. These devices can be equipped with nickel-metal hydride batteries, allowing them to turn on when it gets dark, turn off and begin charging when morning comes.
Currently, lamps are produced in various designs. Mainly traditional columns of different heights are produced, as well as garlands. In addition, they began to produce lamps in the form of dogs, cats, gnomes, snails and other potential inhabitants of the green zone. Manufacturers also offer devices in the form of lamps, around which butterflies fly.
The devices in question do not require knowledge of the basics of installing electrical wiring, since the design of a solar-powered garden lamp does not imply the supply of electricity to it, which provides financial savings to their owners.
The light falling from these lanterns does not hit the eyes because it is not super bright.
These lamps are automatic equipment and can deceive thieves if they have malicious intent to attack your property.
They do not require grounding work and are completely safe for both people and the environment.
They do not require any special care.
At the same time, the service life of the types of lamps under consideration is quite long.
Since they are used in open areas, manufacturers provide them with a high level of protection from adverse weather factors.
Criteria for selecting parts and prices
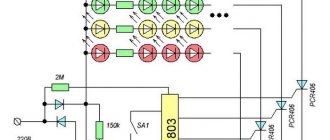
The choice of parts depends on how powerful the lamp you intend to make. We provide specific ratings for a homemade lighting device with a power of 1 W and a luminous flux intensity of 110 Lm.
Since in the above diagram there are no elements for monitoring the battery charge level, then, first of all, you need to pay attention to the choice of solar battery. If you choose a panel with too little current, then during daylight hours it simply will not have time to charge the battery to the required capacity. Conversely, a light panel that is too powerful can overcharge the battery during daylight hours and render it unusable.
Conclusion: the current generated by the panel and the battery capacity must match each other. For a rough calculation, you can use the ratio 1:10. In our specific product, we use a solar panel with a voltage of 5 V and a generated current of 150 mA (120-150 rubles) and a battery form factor 18650 (voltage 3.7 V; capacity 1500 mAh; cost 100-120 rubles)
Conversely, a light panel that is too powerful can overcharge the battery during daylight hours and render it unusable. Conclusion: the current generated by the panel and the battery capacity must match each other. For a rough calculation, you can use the ratio 1:10. In our specific product, we use a solar panel with a voltage of 5 V and a generated current of 150 mA (120-150 rubles) and a battery form factor 18650 (voltage 3.7 V; capacity 1500 mAh; cost 100-120 rubles).
Also for production we will need:
- Schottky diode 1N5818 with a maximum permissible forward current of 1 A - 6-7 rubles. The choice of this particular type of rectifier part is due to the low voltage drop across it (about 0.5 V). This will allow you to use the solar panel most efficiently.
- Transistor 2N2907 with a maximum collector-emitter current of up to 600 mA - 4-5 rubles.
- Powerful white LED TDS-P001L4U15 (luminous flux intensity - 110 lm; power - 1 W; operating voltage - 3.7 V; current consumption - 350 mA) - 70-75 rubles.
Important! The operating current of LED D2 (or the total total current when using multiple emitters) must be less than the maximum allowable collector-emitter current of transistor T1. This condition is met with a margin for the parts used in the circuit: I(D2) = 350 mA
Battery compartment KLS5-18650-L (FC1-5216) – 45-50 rubles
If, when installing the device, you carefully solder the wires to the battery terminals, you can refuse to purchase this design element
Battery compartment KLS5-18650-L (FC1-5216) – 45-50 rubles. If, when installing the device, you carefully solder the wires to the battery terminals, you can refuse to purchase this structural element.
- Resistor R1 with a nominal value of 39-51 kOhm - 2-3 rubles.
- We calculate the additional resistor R2 in accordance with the characteristics of the LED used.
Negative aspects
The design of a solar-powered garden lamp does not provide for the use of dimensionless batteries, so such devices have a limited lighting period, which, as a rule, does not exceed 8 hours. This figure is achievable if the weather was good and sunny all day. Cloudy weather significantly reduces operating time, bringing it to 4-5 hours.
The negative aspects include one of the positive aspects: dim light. Some areas may need to be well lit, which will require additional installation of electric lights.
In some cases, there are reviews from customers that the lamps do not work well or do not shine at all during precipitation.
When winter comes, they require dismantling, since subzero temperatures can damage the battery.
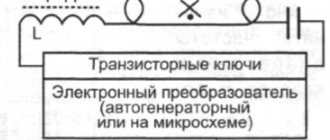
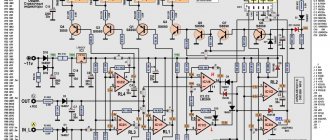
Electrical diagram
Shown here is the simplest diagram that even a novice craftsman who has never created garden lamps and other similar products can figure out. The system has only 7 components.
Using this diagram, assembling a garden lamp will not be difficult.
To understand the diagram and understand why certain parts are needed, you need to consider how the finished product works:
- When sunlight hits the surface, the transistor is in the off state. Therefore, the accumulated energy is supplied to the battery and charges it.
- After sunset, when no light reaches the photocell, the transistor opens and voltage is supplied to the LEDs. That is, the equipment is charged for as long as possible during the day, and turned on at dusk.
- The operating time of the lamp directly depends on the battery capacity and the power of the LEDs used in the design. Usually the components are selected so that they are enough for 6-8 hours of work.
Types of Equipment Considered
The most practical lamp for a garden is one with a shortened leg. In this case, installation is carried out by simply pressing the device into the ground using your hands.
Among the rather dimly luminous lanterns there are spotlights. If the power of a solar lamp is 10 kW, then the power of the floodlights is equivalent to a 100-watt incandescent lamp.
There are pendant types of lamps. They are used as an element of garden decor, placed on tree branches or gazebos. Most often, such solar-powered garden lamps are balls arranged in a garland.
Wall models are used to illuminate the facade of a house. Operated when attached to it.
How much will the parts cost?
In cheap Chinese lamps costing about 500 rubles. Only one LED is used, which is clearly not enough. Moreover, the battery voltage is 1.5V, which is why the light is very dim.
In order not to waste time, it is recommended to assemble lamps with an optimal configuration, which includes:
| Elements | Price | Qty | total cost |
| Solar modules Eco-Source 52x19 mm | 675 rub. for 40 pcs. (for 4 lamps) | 1 set | RUB 675.00 |
| Battery SONY HR03 (1.2 V 4300 mAh) | 885 rub. for 12 pcs. (for 4 lamps) | 1 set | RUR 885.00 |
| LEDs BL-L513UWC | 10 rub./pcs. | 12 pcs. | RUB 120.00 |
| Resistor CF-100 (1 W 33 Ohm) | 1.8 rub./pcs. | 12 pcs. | 21.60 rub. |
| Transistor 2N4403 | 6 RUR/pcs. | 4 things. | RUB 24.00 |
| Diode 1N5391 | 2.5 RUR/pcs. | 4 things. | 10.00 rub. |
| Resistor CF-100 (1 W 3.6 kOhm) | 1.9 RUR/pcs. | 4 things. | 7.60 rub. |
| Total: | RUB 1,743.20 |
It turns out that to assemble one high-quality lamp you need approximately 435 rubles worth of components. But from these same parts, by purchasing the last 3 items, you can make 12 analogues of cheap Chinese lamps.
Improving garden lamps
The cheapest models are Chinese. Over time, the buyer of such products comes to understand that something needs to be done to improve their design or effectiveness. When improving, some elements of the lamps are replaced with more powerful ones. This way you can replace the battery or LED, as well as the choke used in tower lights. Installing a more powerful choke will help achieve a brighter glow coming from the lamp. This action automatically leads to replacing the battery, since its power will no longer be sufficient for a long time, or it may simply fail.
Instead of one LED, you can use three, but when installing them you need to ensure that the voltage spread is minimal, otherwise the illumination will be high in one place and low in another.
Thus, repairing a solar garden lamp mainly comes down to replacing individual parts.
Solar-powered floodlight with 54 LEDs.
Good day to all. Today I would like to present you with a review of a solar-powered LED street floodlight. In the review I will disassemble and measure some parameters. Anyone who is interested, I ask under cat. A friend once asked me to help order an LED floodlight to illuminate a small yard. Yes, so that it also has a battery and is charged from a solar panel. I agreed to help, on the condition that I disassemble the lantern and do a review of it. We chose the cheapest flashlight at the time of purchase from the Banggood store. The cost, including delivery, was about $30. The order was placed and paid for on August 10, 2017. The next day, a message about the dispatch of the order and a track number to track it were received by email. The parcel was sent by registered delivery via Deutsche Post, DHL. On August 29, 2017, I received an SMS with delivery information and later received my parcel by Mist Express courier. The track number was not tracked all this time. Order, payment
The parcel was a large plastic bag containing a box with a flashlight. The box was packed in several layers of soft, protective tape. The box is made of glossy cardboard with images of a spotlight and solar panel.
Parcel, box
The contents of the box were as follows: - LED flood light (54 LEDs) - Solar panel included with 5m. cable; — Screws with plastic dowels for fastening; — Instructions.Product characteristics indicated on the website
:
Solar panel: 6V * 3W Light source: LEDs 3528 - 54pcs On/off mode: Manual and automatic according to illumination; Material: Metal body Charging mode: Solar energy Charging time: 5~8h. (depending on the intensity of sunlight) Floodlight operating time: 4000 mAh battery, up to 12-15 hours Cable length: 5 m Protection class: IP65 Battery: Li-polymer 3.7V/ 4000 mAh Solar panel size: 16*14* 1.7 cm Spotlight size: 9*11.5*6.6 cm
Let's take a closer look at the contents of the box and check whether the stated characteristics correspond to reality?
Spotlight.
The body of the spotlight is made of metal, which is painted matte black. The spotlight can be roughly divided into a “lighting part” and a “power part.” On the front side, under the protective glass, there is a panel with 54 SMD 3528 LEDs.
The back side of the spotlight is a compartment in which there is a control board and a 4000 mAh battery. Also on the cover there is a switch and a sealed gland with a power cable. I would like to note the presence of silicone gaskets and a rubber cap on the switch; their presence confirms the declared degree of protection IP65 (which will be seen later during disassembly).
IP degree of protection
There are several ribs on the body for better heat dissipation. There is also a bracket for fastening.
The overall impression of the quality of the spotlight is positive. Everything is put together very well.
Let's take a look into the “inner world” of the spotlight.
Let's first disassemble the rear “power” part. Unscrew the pressure seal cover and move the seal. Then unscrew the 4 screws on the rear compartment cover.
Under the cover there are: a control board, a Li Polymer battery 4000 mAh (assembled from two 18650 batteries), a switch.
Let's look at a simple floodlight control board.
To understand the algorithm of its operation, I drew a diagram. The algorithm is simple - there are two transistors on the board: a field-effect transistor (to turn on the LED panel, and a bipolar one (to control the field switch). When the solar panel supplies voltage (during daylight hours), the bipolar transistor closes the field-effect transistor and the LED panel turns off. At the same time, charging occurs batteries. When it gets dark and the solar panel stops producing voltage, the bipolar transistor opens the field switch and the LED panel lights up. Naturally, all of the above happens when the power switch is on. There is no driver for the LEDs on the board; instead, a current-limiting resistor is installed. Read more about the battery.
Battery was glued with double-sided tape to the back cover of the compartment. Assembled from two 18650 batteries. There is an overcharge and overdischarge protection circuit. There is neither time nor desire to measure the actual capacity. If testing reveals a clear lack of capacity, it will be easy to replace with new batteries with proven characteristics.
The protection board consists of two dual field-effect transistors and a controller. And it serves as a simple charge/discharge controller. I will give an approximate diagram of it.
Lighting part.
Let's look at the “lighting” part of the spotlight. Unscrew the 4 screws and remove the protective metal frame. Then remove the glass and the silicone gasket under it.
Next, unscrew the 2 screws and remove the LED panel. Someone decided to save two screws.
The LED panel is made on an aluminum substrate for better cooling of the LEDs.
Let's put everything back together in reverse order. During assembly, I added sealant to the holes between the lighting and power parts, in which the wires from the LED panel were laid.
Spotlight power.
By measuring the voltage on the battery and the current consumption, you can easily calculate the power of the spotlight. Battery voltage 4.24V.
Current consumption when the spotlight is operating is 0.47A. Therefore, the spotlight power: P=U*I =4.24*0.47=1.99 W.
From the complete flashlight circuit, we can calculate the current for the SMD3528 LEDs used.
In the diagram we see current-limiting resistors R2-0.5 Ohm and R4-1.5 Ohm, which at the above measured current of 0.47A will create a voltage drop: 2 Ohm * 0.47A = 0.94V. According to the characteristics, the supply voltage for SMD3528 is 2.8 - 3.2V. The current limiting resistor reduces the battery voltage from 4.25 V to approximately 3.2 V.
All LEDs are connected in parallel, we can calculate the current on each of them. With a current of 0.47A and the number of LEDs being 54, the approximate current for each LED will be 0.47/54 = 0.008A. The resulting current value is less than half the rated current for SMD 3528. Therefore, there is hope for a longer life of the diodes.
Calculation of a resistor for an LED panel
Calculating the resistor for an LED is a very important point before connecting the LED to the power source. After all, how the LED will work depends on this. If the resistor has too little resistance, the LED may fail (burn out), and if the resistance is too high, the LED will emit weak light. The resistor for the LED is calculated using the following formula: R = (Vs - Vl) / I
Vs
— power supply voltage (V).
4.24V Vl
is the LED supply voltage (let’s take an average value of 3 V).
I
- LED current (in our case 25 mA = 0.025 A)
Calculation for the rated power of a LED panel of 54 SMD3528 LEDs:
R=(4.24 V - 3 V) / (0.025 A * 54 pcs.) = 0.91 Ohm.
In our case, 2 resistors are installed with a total resistance of 2 ohms.
From the inverse we calculate the current on 1 LED: 2 Ohm = (4.24 V - 3 V) / (I*54 pcs.), hence I = 0.01A (2 times lower than the nominal value.)
A solar panel.
The solar panel is made in a sealed plastic case; you couldn’t even bother with it. Its characteristics are indicated on the panel.
The panel is connected to the spotlight using a 5m long cable. I would like to note the connector, which also provides the specified degree of protection IP65.
I checked the parameters of the solar panel on a not very sunny September day. Measured short circuit voltage and current. I took measurements at 14.30, although I read somewhere that it is recommended to do this at noon. The voltage produced by the solar panel was 6.79 V.
The short circuit current was 0.47A. Considering that the sun was no longer at its zenith, I think that the actual parameters of the solar panel are very close to the declared ones. And it can charge a 4000 mAh battery in 10-12 hours.
The next day I took measurements in the sun at noon. The parameters correspond to those specified by the manufacturer. The solar panel is very sensitive to contamination or obstructions in its lighting. Through the window glass, the short circuit current was almost 2 times less than just outside.
How it shines.
Unfortunately, I didn’t have a lux meter, but I can say that the flashlight shines with a wide angle of illumination and is very bright. Comrade, this is quite enough to illuminate a small yard. I took several photos without the spotlight and with it.
I checked the spotlight for autonomy. I turned it on with the solar panel disconnected at 19.50. There was no heating observed during operation. The next morning, at 7.50, the spotlight was still on. The brightness was naturally below nominal.
From morning to evening on a sunny day, the spotlight charged to 4.2 V and was ready for use again.
That's probably all I wanted to show you in this review.
Conclusion.
Since the product does not have optics, it is most likely better to call it a flashlight. The lantern will cope with the task assigned to it. The friend is happy. IMHO this kind of device can become a useful thing in a private home, in the country, on a hike, and will definitely find its buyer.
What I liked: — Solid assembly — Possibility of autonomous operation — “Gentle” mode of operation of LEDs — Real degree of protection IP65
What I didn’t like: - simple control scheme - perhaps in cloudy weather the spotlight will not be fully charged (I would like a larger solar panel) - you will have to make a collective farm mount for the panel.
All the best! Thank you for your attention.
Adding colors
Flashlights can also be improved by using colored LEDs. This replacement requires knowledge of whether this device is adapted to perform such actions or not. If it is not adapted, and color LEDs have been installed, the flashlight will work for about 2 hours, after which it will go out.
In order to prevent premature termination of the work of solar-powered colored garden lamps, it is necessary to make an additional track in the microcircuit, where another resistor is soldered.
How can you improve the finished model?
If the purchased garden lights do not work as expected, or their characteristics do not correspond to the declared ones, some modifications can be made. They will help improve the design and provide high-quality light:
- If the lamp produces dim light, it is worth disassembling it and removing one of the resistors. A jumper is placed in its place; everything must be done carefully so as not to damage other components. Usually this is enough for the brightness to increase by an order of magnitude.
- When the light starts out bright, but after a short period of time becomes dim and then goes out, you need to add a resistor of about 50 kOhm. This will allow the system to shine brightly for at least a few more hours.
- Another common problem is that the lights go out several hours after dark. Most often this happens due to the fact that the manufacturer saved on the battery and supplied an option with a small capacity. You need to disassemble the case and check the battery rating, if it is 600 mAh or less, change it to a model with 1000 mAh or more, it all depends on the performance of the solar module. Select a battery based on 8 hours of LED operation plus a reserve of approximately 30%.
- Some models have only one LED, which does not provide high-quality light. In this case, you need to clarify its power, then select 3 diodes, which in total will consume approximately the same amount of energy and place them around the perimeter of the lampshade at an angle of approximately 120 degrees.
- Instead of a standard LED, you can solder in an RGB version and then the light will be iridescent.
The design of ready-made lamps is simple; understanding it will not be difficult.
To save energy and turn on a garden lamp only when needed, you can solder a small switch into the circuit.
Anyone with at least basic soldering skills can make a garden lamp with their own hands. You can buy components online or in a radio electronics store. Also, using the recommendations, it is easy to repair or improve the operation of finished lamps.
Assembling a garden lantern yourself
Some lanterns are designed quite simply, so there are no difficulties in assembling them yourself.
To make it yourself, you need to draw up a diagram of a solar-powered garden lamp and calculate the required number of components.
First you need to purchase an energy converter, the best of which is a polycrystalline silicon battery, which has a low weight but good moisture protection and high power. Next we buy a lithium-ion battery. Next we buy a regular LED.
The last acquisition is the most important - an electronic control module, which consists of a pair of transistors and two pairs of resistors.
Connecting the solar battery, LED and battery is done separately. Assembly can be carried out on an inexpensive universal DIY PCB board 42x25mm.
List of required parts
There are only 7 elements in this list; most of the parts can be found in an electronics store. But to save money, you can order components through Aliexpress or other similar sites. The main thing is to select all the parts according to the markings so that you end up with a workable design:
- 3.6 kOhm resistor.
- 33 Ohm resistors (depending on the number and power of LEDs).
- Diode 1N5391 or analogues (there are both imported and domestic options).
- Transistor 2N4403 (there may be other types with suitable characteristics).
- Rechargeable battery 3.6 V. It is better to choose lithium-ion ones, since nickel-cadmium ones are not reliable.
- Solar photopanel, monocrystalline options are best suited as the most productive and durable. Polycrystalline elements can also be used. The main thing is to choose products of grade A or B, do not take options C and especially D, since their characteristics are much worse and their service life is shorter.
- LEDs. You can use 1 element with a power of 3 W, but it is better to take 3 pieces with a power of 1 W. In this case, it is good to use DIP diodes as they perform better in open air conditions than SMD.
Parts you need to have on hand when assembling a garden light.
It is worth deciding in advance in which housing to arrange all the nodes. Any options that provide a convenient arrangement of parts are suitable. You also need to purchase a soldering iron and all materials for soldering if they are not at hand.