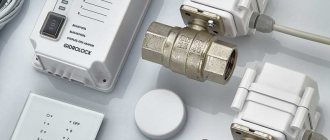
There are three ways to protect your apartment and neighbors below from possible floods and water leaks if water pipes or fittings on them are damaged:
- Every time you leave the apartment, turn off the water at the riser
Although the method is free and the most reliable, at the same time, in real life no one uses it, since it is quite stupid.
- AquaStop valves
These are mechanical type valves with a spring and a diaphragm. They are mounted directly in front of the water consumer - sink, toilet tank, washing machine, etc.
In the event of a hose break, the valve monitors water leakage and, if the volume exceeds 10-12 liters per minute, automatically shuts off the supply.
The main problem of the device is that for it to work correctly, it requires stable pressure, otherwise the valve simply will not work.
The third method, which we will consider in more detail, is the most common. We are talking about specialized leakage protection systems.
Why Xiaomi?
There are quite a lot of similar systems today. However, setting up and connecting most of them (AquaStorh, Neptune, Hydrolock) causes real problems for ordinary users.
This is, for example, how the connection of the control unit from Gidrolock looks like.
The further you get into the jungle of documentation and familiarize yourself with the instructions, the faster you will understand that it is better to invite a professional craftsman for this matter.
At the same time, a very simple system has appeared that can be assembled from components from the popular company Xiaomi. The result is fairly reliable leakage protection, but most importantly, it is intuitive and easy to connect.
What elements to collect from?
The Xiaomi leakage protection system is built on the following elements:
- electric crane
- wireless water sensor
- two-channel relay Aqara
- gateway or hub for a smart home
At the moment, this option is the most optimal for the tasks at hand, both in terms of price and ease of installation and configuration. 6-7 thousand rubles for a set of two inexpensive faucets, two sensors, one relay and a hub for MiHome, this is significantly cheaper than all ready-made systems presented on our market.
Homemade options
If you have time, opportunity and desire, you can make a water leakage sensor with your own hands.
The simplest design
Let's start with the simplest option.
The figure below shows the circuit diagram. It is not at all complicated and easy to assemble yourself.
It is assembled on the basis of transistor VT1 (BC515, 517 or 618).
Power from a 9 V battery is supplied to transistor VT1 and then along the circuit to a simple speaker B1 (tweeter).
It is in this circuit that a 9-volt Krona battery is used.
An ordinary soap dish is used as a body.
With sensitivity control
If you complicate the previous scheme a little, you can supplement it with adjustable sensitivity. In the diagram, this function is performed by the variable resistor RES60. It can be configured to trigger when steam appears or when the sensor is completely immersed in water.
In both versions, a getinax plate is used as a sensor for large water leaks.
There is no speaker in this circuit. The current from the battery passes through the plate. In the normal state, the circuit is open, but if water closes the contacts, then electricity flows to the RES60 transistor (acts as a key), and from it goes to the emergency valve.
Selecting and connecting an electric crane
The most important element is the electric tap, which, upon command, must shut off the water supply. Plumbers do not advise saving on this water shut-off valve.
Naturally, the faucet is not supplied complete with a relay or sensor. You'll have to choose it yourself.
It is best to pay attention not to Chinese consumer goods, but to the products of reputable companies. For example, Neptun full bore taps for 220V.
These are supplied complete with the corresponding system, but you can also buy them separately.
All such fittings consist of two elements:
- the ball valve itself
- drive motor
The latter is connected to the tap through a special coupling. You can find out whether the tap is open or closed through the limit switches.
If you do not want to change the valve already installed in the riser, you can use actuator motors or a manipulator.
True, they all run on a constant low voltage of 12V, and our system under consideration operates on 220V, so in front of the tap you will have to additionally install a sealed low-voltage step-down unit, like those used in LED strips.
Mistake #1
Please pay special attention - the electric tap must be located after the main shut-off valve; it cannot be installed instead of it!
This is necessary to be able to manually shut off the water supply to replace or repair the electric tap.
The 220V electric crane drive is connected with a three-wire cable. Zero is supplied to one core, and the control phase is supplied to the other two for closing and opening, respectively.
If you have a four-core cable on the valve (like the Neptune brand), then the fourth core is used as grounding.
In order for everything to work correctly, you need to check the phasing in advance with a voltage indicator. Next, by connecting the faucet through the temporary structure, find out which core is responsible for what.
Mistake #2
What happens if a phase is applied to both control wires at the same time?
Don't be afraid, a short circuit will not occur, but the tap will close and open an infinite number of times. You won't get normal work from him.
What can cause leaks?
A flood can be caused by dozens of reasons. Let's look at the most common of them:
- Negligence of the owner of the apartment or office. Overflowing of the sink or bathtub as a result of carelessness of household members. In the case of a multi-story building, such a flood causes damage to the owner of the affected apartment and the property of neighbors living below.
- Failure of the water supply system. Buying and renovating an apartment is rarely complete without replacing pipes and radiators. But the expired service life of pipes in the risers of residential buildings will also lead to an accident. Sewerage breakdown due to blockage or wear of pipes.
- Installation of pipes and fittings in a hurry. Experience shows that when finishing premises you should not skimp on plumbing equipment and competent repairmen. Unprofessional installation of pipes can lead to disaster: damage to property.
It is always easier to prevent than to eliminate, so timely monitoring of water supply and heating systems significantly reduces the risk of leaks.
Connection and setup
General control of the crane is carried out via a two-channel ZigBee relay Aqara.
In terms of dimensions, it is slightly larger than a matchbox.
On one side it has 8 contacts, on the other there is an external zigbee antenna.
The two contacts “L” and “IN” are initially shorted with a jumper.
Mistake #3
Be sure to check how well the terminals are clamped in these connectors, otherwise if the contact disappears, you can burn the relay.
When the jumper is not tightened properly, power to the internal circuitry disappears. As a result, losing its shunt, the built-in power meter burns out.
L1 and L2 are the control phases through which the load is connected.
S1 and S2 – terminals for a mechanical two-key switch. Through them, you can manually turn off or open the water by simply pressing a key, similar to how you turn off the light in the bathroom.
The automation connection looks like this: The first step is to apply power to the relay.
Place the neutral conductor on the first contact, and the phase conductor on the fourth. Next, this zigbee relay needs to be connected to the gateway. To do this, use the connection wizard through the MiHome application.
In the gateway plugin, select the Device tab, click Add Childe Device and select the wireless relay in the windows that open.
After this, you need to press the button on the relay and hold it for 5 seconds until the LED starts flickering. After some time, the device will report successful pairing.
Open the first setup step - selecting a location (Select Room).
At the second stage, set the device name. The last stage is the successful addition of the device to the system.
As a result, it should appear in the list of gateway devices and the general MiHome list.
Connecting the tap to the relay
This relay has its own plugin, through which you can control two channels.
The crane is controlled through the Interlock mode.
To activate this mode, one of the relay channels must be turned on.
Those who are faced with the problem of enabling Interlock via a Wi-Fi network, try doing everything through a mobile connection (i.e., actually through Chinese servers). Do this once and do not change these settings again.
Zero is a common conductor for both the relay and the electric tap. The valve control phases are connected to contacts L1 and L2.
Thanks to the Interlock mode, only one of the contacts can be active at a time.
You can check the performance “dry” through the Aqara application on your smartphone. The first channel should close the valve, the second should open.
In addition to the cold water tap, you can also connect a valve from the DHW (hot water supply) pipes in parallel. The relay power is enough for several taps at the same time.
The total load available for connection is 2.5 kW!
As mentioned above, in addition to a smartphone, the faucet can be controlled via a regular room two-key light switch.
To do this, voltage is supplied to the common input of the switch from the L-IN relay connector (where the jumper is). We connect the two outgoing contacts of the two-key switch to connectors S1 and S2.
When you press one key, the tap will open, the other will close.
Mistake #4
Power to the electric motor of the crane must be supplied briefly, only at the moment of opening or closing, it cannot be “on duty” there constantly.
Therefore, even before installation in the system, measure the operating time of the valve with a stopwatch. Usually it is within 20 seconds.
Mistake #5
It is also not recommended to supply phase to the relay through physical switches; it should only come from the relay itself.
There were precedents when a relay burned out and failed precisely for this reason.
It would seem much easier to power the switch from the nearest distribution box, and then connect it to a two-channel Zigbee relay. In fact, this leads to unpredictable consequences.
Xiaomi water leak sensor
We sorted out the connection of the shut-off valves. But the main task of the entire system is protection against leakage and it needs to be fixed somehow.
The Xiaomi wireless sensor helps with this matter.
It is very small, which means it will fit under any bathtub, shower stall, sink, etc. The declared range of action indoors is up to 20 meters.
By the way, some consider the absence of wires not an advantage, but a disadvantage.
They say that wireless devices can cause interference in certain cases. Wired copies do not have such false positives.
Where are they usually placed besides the bathroom? Where the likelihood of an accident is highest:
- in places where pipes or flexible lines are connected
- at the dishwasher
- under each radiator in the rooms
- under the heated towel rail
- in the water closet
The sensor comes with instructions, including in Russian.
A standard 2032 battery is hidden inside the case. To get to it, you need to unscrew the bottom cap using a coin.
All internal contacts are reliably sealed with a rubber seal.
One battery lasts for at least a year of continuous operation of the device. To find out when it needs to be changed, in MiHome, go to the section - Profile - Consumables. There, when the battery charge reaches less than 10%, the corresponding information will appear.
There is an “invisible” button on top of the sensor that allows you to start and reboot the device.
When pressed, the blue LED lights up.
By holding the button for 5 seconds, the device goes into a state of readiness for integration into the smart home system through the Aqara hub.
Setting up and connecting the Xiaomi sensor
In general, the sensor’s operation can be configured through three applications:
- Aqara Home
- Apple Home Kit
- MiHome
You can easily connect it to IOS or Android and read all the data.
In the application, select “add device” and the corresponding icon (Water Leak Sensor).
Then connect it to the hub by holding down the central button. The entire connection happens with just one click.
Many people encountered a problem when the sensor did not connect the first time and had to be connected again. In this case, the following instructions from xiaomi-smarthome.ru help.
There are two contacts at the bottom of the sensor. When water gets between them, they close and the sensor is triggered.
In order for your electric water faucet to automatically close when triggered in this way, create a separate scenario in the smartphone application (Add New Scene).
When a leak is detected, it carries out an action, namely, supplying power through channel No. 1. After 20 seconds, the power should be interrupted (remember that it is impossible to constantly have voltage on the taps).
If desired, you can create a second scenario. When the leak is fixed and the puddle has dried, voltage is applied through channel No. 2. As a result, the tap opens, after 20 seconds the voltage is turned off.
However, it is still recommended to open the tap only manually.
When the sensor is triggered, a notification is sent to your smartphone via the application.
It is better to make scripts automatic only. What could be the catch with manual scripts?
The fact is that the closing command in this case will go through the Chinese server and ultimately may not reach the recipient. If the Internet disappears, the faucet simply will not work.
With normal automation, even if communication with the cloud is lost, in the event of an accident, the hub itself will do everything and eliminate the leak.
Stop Flood "Rainbow"
The Rainbow protective kit contains three functional units:
- Leak sensor.
- Electromechanical water supply blocking valves. After eliminating the emergency situation, the valve returns to its previous state by mechanical cocking.
- The server is a monitoring device capable of checking up to 15 sensors simultaneously.
The response speed of the Rainbow locking mechanism is about 10 seconds. Radio waves are used to operate and transmit signals.
Connecting leakage protection through a socket
There are two more ways to build such a system. In one of them (the “collective farm” version), a smart socket from Xiaomi is used instead of a relay.
The wires from the tap are connected to a collapsible plug, and only the neutral and one of the phase wires, which are responsible for closing, . The second phase conductor remains free and is insulated.
In real life, the actual operation of the system may happen once over a period of several years. The tap will close the supply at this point and prevent leakage.
To open it, you will have to disassemble the plug, switch the phase wires in places, plug it into the socket, and then put everything back as it was.
Leakage protection in this case works similarly to the option discussed above. When there is a leak and the contacts on the sensor are closed, a command is sent to the gateway, which in turn turns on the smart socket.
Voltage appears on it, which means that the electric tap is activated, which is connected through a plug to this very socket. After 20-30 seconds, the gateway turns off the socket and the system, having successfully protected the apartment from the flood, awaits your arrival home.
Also, a leakage protection system can be built without an Aqara relay, but using an aqara two-key switch with a zero line.
Here are its connection diagrams.
Electrical safety of systems
We draw attention to such an important criterion as electrical safety standards; an example of their implementation is shown in the typical electrical diagram presented above in Figure 2. First of all, this is connecting the main elements of the system to the protective grounding, installing an RCD on the power line and ensuring galvanic isolation. In cases where the power supply is only autonomous, such safety measures are not necessary.
As for the shut-off valve drives, voltage is supplied to them only when an emergency occurs, when it is necessary to turn off the taps to turn off the supply of hot and cold water. The rest of the time, the electric drives of the ball valves are de-energized. On sensors (both wired and wireless versions) the voltage does not exceed 5 volts, which does not pose a threat at all. Accordingly, even the metal housing of the sensor does not need to be grounded.
