Accelerators of charged particles—electrons, protons, and ions—are used in various fields of science and technology. Such accelerators can be built on various principles. Including on the electrostatic principle. One type of generator built on this principle is the Van de Graaff generator. This device, which was invented in 1929 by University of Massachusetts professor Van de Graaff, used the principle of creating an ultra-high voltage field by electrifying a dielectric tape that moves with the help of a motor.
History of creation
American physicist Robert Van de Graaff (1901-1967), who worked at Princeton University, went down in history as the creator of the electrostatic particle accelerator.
The first description of a Van de Graaff generator was made in 1929, and two years later he created a high-voltage accelerator that could produce an electrical voltage of 1 MV. In 1935, the improved design already produced 7 megavolts.
The Van de Graaff generator later became the basis for a modern type of linear accelerator called a pelletron. The difference between them was the method of transmitting charged particles. If in the generator they were transmitted using a dielectric tape, then in the pelletron they were transmitted by a metal chain.
Operating principle
The design of the generator allows it to be made both horizontally and vertically. Its main part is a large metal sphere, on the surface of which charged particles accumulate. Inside the housing made of insulated material there are two rollers connected to each other by dielectric tape. It was originally made of silk and rubber, and was later replaced by a chain.
The lower roller is grounded and connected to the small sphere, and it also has a drive for rotation. The upper roller is connected to a large sphere through a metal brush.
As the lower roller rotates, the air ionizes, followed by the transfer of charged particles to the upper roller. Through a metal brush, a stream of ions is transferred to the surface of a large sphere, where it accumulates in the form of an electrostatic charge.
The power of the Van de Graaff generator is limited by the corona discharge, which creates a luminous shell around the charged electrode.
Design and principle of operation
The generator design can be vertical or horizontal. The most common is a vertical installation. This generator includes:
- an endless dielectric rubber or silk tape moving at a speed of 20-40 m/s on 2 rotating pulleys;
- 2 pulleys. The lower pulley is made of metal and is rotated by an electric motor, and the upper pulley is made of a dielectric, such as acrylic glass;
- a hollow metal electrode in the form of a hemisphere, inside of which there is an upper pulley. This electrode is mounted on an insulator;
- high voltage source.
The lower pulley is grounded. A high voltage is applied to the electrode located near this pulley. Electrodes made in the form of a brush or comb are installed at a short distance from the upper and lower pulleys. The upper electrode is connected to a hollow hemisphere.
Where is the generator used?
Initially, the device was used to accelerate charged particles, but over time, more advanced accelerators appeared, and the need for it disappeared. Currently, experiments with a Van de Graaff generator are carried out mainly to simulate the processes occurring during lightning discharges.
In modern schools, this device is standard equipment in physical classrooms. The generator was not produced in the territory of the former USSR. In schools, Wimshurst's electrophoric machine was used for experiments, which was later called “Discharge”.
The ability of the generator to produce discharges is used in various show programs and circus tricks. It can create a field that holds small objects in the air, and a powerful charge allows electrical devices to operate far from a source of electricity.
Usage
In the first case, they are used to carry out nuclear reactions and to introduce particles into accelerators.
Such installations are available in most nuclear laboratories, where researchers deal with particles of low and medium energies. In such accelerators, under the influence of the voltage created by the generator, particle beams are formed and accelerated. In the second case, generators are used for radiation therapy and research. In this case, beams of particles hit the target and create hard radiation.
In addition, such generators can be used as teaching aids for demonstrating electrostatic phenomena, as well as for studying lightning discharges and lightning strikes.
Precautionary measures
Like any device that produces high voltage, the Van de Graaff generator requires precautions when working with it. The discharge does not matter where it occurs: between oppositely polarized electrodes or between a charged electrode and the human body. A significant difference in potential is enough. Therefore, when working with a generator, a person must be on a rubber mat so that its potential remains neutral with respect to the accumulated charge.
If a person is on the floor, especially on a damp one, then he will become an excellent conductor for transmitting charged particles to the ground, and a discharge of several thousand, and maybe millions of volts will pass through his body. The only thing that can allow a person to stay alive is a low current strength.
People with pacemakers should not approach the generator. Electronic devices such as watches and cell phones may malfunction. Therefore, before starting experiments, you need to leave them aside.
Specifications
The first generator of this type produced a voltage of 80 kV. Subsequently, the inventor obtained voltages of 1 MV and 7 MV. In this case, the voltage of the primary source was 50 kV.
Modern installations make it possible to obtain a voltage of 20 million volts using this generator. Tandem installations are used for this. In this case, the current in the beams can reach several mA, and the particle energy can reach 40-50 MeV.
To produce particles with higher energy, more powerful installations are used - cyclotrons, colliders.
The most powerful Van de Graaff generator was used in the English Daresbury laboratory, where nuclear experiments were carried out from 1983 to 1993. The installation used a tandem generator developing a voltage of 20 MV. This generator was located in a building 70 m high. The most important discovery made with the help of this installation was the discovery of superdeformed nuclei.
Before the war, the Soviet Union also built a large generator of this type. Metal balls with a diameter of 5 m were installed on 2 porcelain insulators. The voltage between the balls reached 15 MV. During the discharge, lightning 15 m in size appeared. At the same time, the charging time reached 10 minutes, and the average power of the installation was less than 100 W.
Generators for experiments and education
Van de Graaff generators can be used to conduct experiments in the fields of physics and electrostatics. At the same time, a large number of generators are available for sale. There are also many different diagrams and designs on the Internet for making a generator yourself.
An example of such a device is a generator produced by the German company 3B Scientific GmbH. The price of such a device is 104,076 rubles.
Main characteristics of the device:
- the generated voltage is about 100 kV;
- short circuit current - 15 µA;
- motor power supply from AC mains;
- power consumption -13 VA;
- dimensions -240x120x620 mm;
- ball dimensions – diameter 90 mm, height 420 mm;
- generator weight -5.8 kg.
- This device may pose a danger to people who are close to the device and have a pacemaker.
- It may cause RF interference to computers and other electronic devices.
- Do not use the device in damp areas.
- Do not touch the device circuits.
- The device can only be plugged into a grounded power outlet.
- When replacing a fuse, be sure to disconnect the device from the mains.
Preparing and turning on the device:
- Before turning on the generator, remove the sphere by lifting it up.
- Clean the surface of the pulleys. If necessary, wash them and dry them with a hairdryer.
- Install the belt into the pulleys.
- Place the sphere in place.
- Ground the metal plate and electrode.
- Turn on the engine and select the required speed.
- To check the charge by producing a spark, slowly move the tape towards the metal sphere.
- In case of humidity, dry the device with a hairdryer.
Advantages and disadvantages
The advantage of Van de Graaff generators is that they can be used to obtain beams of charged particles that have the following qualities:
- continuity;
- high intensity;
- excellent energy stability. This beam characteristic reaches a value of 0.01%;
- low divergence (less than a thousandth of a radian).
Disadvantages of generators:
- restrictions on the magnitude of the resulting voltages and particle energies;
- increased requirements for the breakdown voltage of columns and strips;
- difficulties in measuring ultra-high voltages;
- the presence of rotating parts that reduce the reliability of the device.
Before starting work
Generator elements, such as belts, pulleys, and a sphere, attract dust to themselves like a magnet. Before starting work, you need to clean the mechanisms. To do this, you need to remove the large sphere and wipe the parts of the device with a damp cloth. If the accumulated charge does not allow you to get rid of dust, then you can use an antistatic hair spray.
The most important thing to do before starting to rotate the generator is to make sure that the small electrode is grounded. Otherwise, the discharge will hit an object with a larger mass, that is, a person.
Operating principle of the device
Under the influence of high voltage, positively charged ions are formed in the air layer located between the lower brush electrode and the lower pulley. These ions are attracted to the metal pulley, deposited on the dielectric tape and transported to the hollow hemispherical electrode. Using the top brush electrode, these ions are removed from the tape and fall onto the surface of the spherical electrode. Over time, charge accumulates and the potential of this electrode relative to the ground increases.
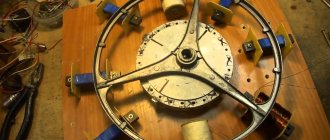
How to assemble a generator at home
Now that the operating principle of the Van de Graaff generator is known, you can independently assemble a working model for home experiments. After some testing, it turned out that PVC pipe for water supply is best suited for producing charged particles. If you rub it with a synthetic material, the charge that appears in it will allow you to attract small pieces of paper and deflect the stream of water falling down. Therefore, the PVC pipe will become a source of charged particles.
What will transfer electrons to the generator sphere? Experiments have shown that a Martens medical bandage is best suited. It is composed of polyester, latex and cotton fabric.
Now that we have decided on the main working parts, a complete list of necessary materials is compiled:
- Large metal sphere. It is made from two large salad bowls, sold in the nearest hypermarket.
- PVC pipe. You will need 2 pieces of different diameters. The first will become the generator housing, and the second must be selected in such a way that it fits tightly onto the pulley connected to the drive.
- Upper pulley. You can use any suitable object to hold the tape without coming off. For example, an old bicycle wheel hub or a large plastic spool with sides.
- A piece of copper stranded wire. Brushes will be made from it that remove and transmit the charge.
- Low-power electric motor. Required to rotate the lower pulley. However, if desired, the drive can be made manually.
- Metal strips for supporting the generator, as well as for fixing the pulleys on the PVC pipe.
- Metal ladle. It will act as a small electrode.
Do-it-yourself Van de Graaff generator assembly
When all materials are prepared, you can begin manufacturing:
- Make a rectangular base for the generator from metal strips. It must be done in the shape of a square. The dimensions must ensure the stability of the structure. It is also necessary to provide mounting for the electric motor.
- Attach the lower pulley to the motor shaft. Its working surface should be covered with a piece of PVC pipe, which is cut to the width of the Martens bandage.
- Attach the electric motor to the platform so that the pulley is in its center.
- Attach a PVC pipe with a diameter of 150 mm in a vertical position above the pulley. Its length should be 50-60 cm. To make it easy to remove and put on the tape, you need to make an axial cutout 4-5 cm wide on the pipe.
- A second pulley must be installed on the top of the vertical pipe. This is done using fastening brackets.
- Make a sphere from salad bowls. To do this, cut a hole in one of them in the lower part exactly according to the diameter of the pipe. To the same salad bowl around the perimeter you need to solder several staples that will hold the second half.
- Make a brush from stranded wire. To do this, remove the insulation on a length of 2-3 cm and separate the bundle into separate wires. One end of the brush must be secured so that it touches the upper pulley, and the other end must be soldered to the sphere.
- To make an electrode from a ladle, you need to connect the handle to the metal base of the generator and ground it. The handle must be insulated. The same PVC pipe of small diameter is suitable for this.
The prototypes of the Van de Graaff generator in the photo taken a hundred years ago differ little from the device made by hand. Now that the device is completely ready, you can begin the experiments.