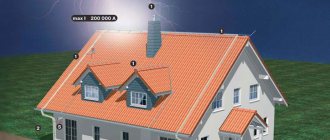
Lightning striking a building is a fairly common occurrence. The elements can cause irreparable damage to any structure. At the same time, animals, people, and equipment are at risk. The only way to avoid this is to install special protection. Let's look at how to make a lightning rod in a private house with your own hands: what materials, equipment and components are required for this, how to optimally choose the option that suits specific conditions, and also how to install it yourself.
DIY lightning rod Source roof-tops.ru
Design and principle of operation
The lightning rod is designed to receive and transmit to the ground an electrostatic discharge that occurs between a thundercloud and a receiver on the roof of a house. The device consists of three parts:
- Lightning rod.
- Current carrying conductor.
- Ground loop.
A lightning discharge occurring during a thunderstorm is immediately transmitted to the lightning rod. Then, through a conductive conductor, the electric current is transmitted to the ground loop. After that, it goes into the ground. According to this scheme, the electrostatic lightning charge is completely transferred to the ground, without damaging the building structure at all.
At the same time, there are several options for how to make a lightning rod in a private house. This can be a classic option - in the form of a metal pin rising above the roof, or in the form of a special mesh on top of the roofing material, or as a free-standing structure next to the structure.
Lightning protection on a house pipe Source izion.pro
Note! The presence of a lightning rod does not prevent lightning from entering the house. However, it reliably protects equipment, people, animals and the building itself from colossal electrical discharges. The most common consequence of such exposure for a structure is excessive heating of materials and, as a result, extensive combustion.
Structure care
Metal devices are sensitive to negative environmental influences. To avoid the development of corrosion processes and maintain the working properties of metals, it is necessary to regularly inspect the lightning protection system.
With the onset of spring - before the start of the thunderstorm season - it is necessary to conduct a visual examination of all components of the system. During operation, the metal can be so damaged that it is impossible to do without replacing parts.
Particular attention should be paid to contacts. Poor contact leads to system disconnection and fire. If necessary, they are cleaned of oxide.
The underground part of lightning protection also needs to be checked. However, due to the laboriousness of the process, it is allowed to do this not every year, but once every three years.
Lightning protection is such an important element of ensuring the safety of residents and the building that you should only undertake its creation if you have full confidence in your knowledge and experience. If this feeling is not enough, it is better to entrust the work to professionals.
Main components
To learn how to make a lightning rod in a private house, you first need to study its structure and the purpose of its main components. The lightning rod includes a receiver, a down conductor and a ground electrode. Let's take a closer look at what makes each of them special.
Lightning rod
The first element of a home's lightning protection system, where a lightning discharge directly hits, is the lightning rod. As a rule, it is made in the form of a metal rod rising 2 meters above the highest point of the roof (ridge). It can also have a linear design - in the form of a cable or mesh located on the roofing material.
Roof lightning protection Source buildup.ru
The main task of a lightning rod is to receive and transmit electric current to the next protection element in the circuit. The voltage in a lightning discharge can reach 1 GV. To ensure the safety of the material and, most importantly, safety for the entire environment, increased requirements are imposed on the device:
- The steel rod must have a cross-section of at least 70 mm², aluminum - from 50 mm², and copper - from 35 mm².
- The elevation of the rod above the highest point of the roof is from 0.5 to 2 meters.
- When using a cable on a skate, its thickness should not be less than 5 mm.
- For a mesh receiver, steel conductors with a diameter of 6 mm or more must be used.
- The mesh lightning rod must rise above the roof by at least 15 cm.
Important! Various metal roofing elements - pipes, fences, parts of drains - can be used as a lightning receiver. However, the cross-sectional thickness of their continuous layer for steel should not be less than 4 mm. At the same time, their structure must be integral, and the surface must not have an insulating layer, with the exception of anti-corrosion spraying.
Lightning weather vane Source roof-tops.ru
See also: Catalog of companies that specialize in electrical work
Down conductor
The part of the lightning rod that connects the receiver to the ground loop is called a down conductor. As with the system element discussed above, no less stringent requirements are imposed on the conductor:
- The path from the receiver to the ground electrode should be minimal.
- It is not allowed to mount the conductor with turns, sharp corners and other distortions - in order to avoid discharge breakdown in these areas.
- The cross-sectional area of the wire must be at least 16 mm² for copper, 25 mm² for aluminum, 50 mm² for steel.
Advice! In private homes, the down conductor is often rolled wire or metal strips. Conductors can be mounted directly inside the wall - from non-combustible materials (brick, concrete). For wooden buildings, it is better to use metal brackets that allow you to install the wire at a distance of at least 10 cm. In addition, in small residential buildings, various metal structures can be used to discharge lightning discharges - stairs, frames, reinforcement elements of reinforced concrete slabs.
Down conductor near the drain Source buildup.ru
Ground electrode
The caught lightning discharge is transmitted through the down conductor to the grounding circuit. Its design also has special requirements:
- The minimum cross-sectional area for steel is at least 80 mm², for copper – from 50 mm².
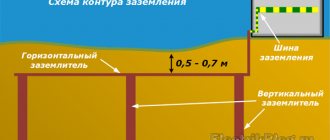
- The grounding rod is driven into the ground at least 0.8 m.
- The distance from the wall of the house is at least 1 meter, and from passage areas - from 5 meters.
The grounding circuit is made either in a linear form - two driven rods at a distance of 3 meters and interconnected by a bus, or in the form of an equilateral triangle - from three buried conductors. All connections are made by welding. In this case, it is recommended to immerse the entire structure to a depth of about 0.5 meters from the ground surface.
Ground loop Source hotel-a.ru
Preparation
At the preparatory stage, before installing lightning protection, it is necessary to calculate the parameters of the future lightning rod and select all the elements. This will make it possible to determine whether buildings will fall into the protection zone and what parameters need to be changed in case of shortcomings.
Calculation of the protective zone
If the lightning protection device provides a grille or roof surface as a receiver, then the protection zone will completely cover the building. But for cable and rod lightning rods it is necessary to calculate the protective zone.
Rice. 6: lightning rod protection zone
Look at the picture, the protection zone is a cone in space where the likelihood of being struck by lightning is significantly reduced. To determine the parameters of this cone in relation to the lightning rod itself and the building, a calculation is made. Methods for calculating the lightning rod area for each type are carried out on the basis of SO 153-34.21.122-2003.
How to calculate a rod lightning rod?
Rice. 7: parameters of the lightning rod protection zone
Look at the picture, the following parameters are shown here:
- h – the height of the lightning rod itself;
- h0 – height of the lightning rod protection zone;
- hx – height at a certain point (set at the level of the roof of the building);
- r0 – radius of the lightning rod protection zone on the ground;
- rx – radius of the lightning rod protection zone at the selected point;
- x and y - the distance from the installation site of the lightning rod to the building boundary contour.
Depending on the installation height of the lightning rod and the required reliability, a formula is selected for determining the zone that it protects. For this purpose, data from Table 2 is used
table 2
| Reliability of protection | Lightning rod height h, m | Cone height h0, m | Cone radius r0, m |
| 0.9 | From 0 to 100 | 0.85h | 1.2h |
| From 100 to 150 | 0.85h | (1.2-10-3(h-100))h | |
| 0,99 | From 0 to 30 | 0.8h | 0.8h |
| From 30 to 100 | 0.8h | (0.8-1.43 10-3(h-30))h | |
| From 100 to 150 | (0.8-10-3(h-100))h | 0.7h | |
| 0,999 | From 0 to 30 | 0.7h | 0.6h |
| From 30 to 100 | (0.7-7.14 10-4(h-30))h | (0.6-1.43 10-3(h-30))h | |
| From 100 to 150 | (0.65-10-3(h-100))h | (0.5-2·10-3(h-100))h |
To determine the radius of the lightning rod zone at a certain height, the formula is used: rx=r0×(h0-hx)/h0
How to calculate a cable lightning rod?
Rice. 8: cable lightning rod protection zone
The figure shows a schematic diagram of the protection zone for a cable lightning rod with its short length. At long distances, due to poor tension, sagging may occur at the midpoint, which will slightly distort the boundaries of the area protected by the lightning rod.
Rice. 9: Parameters of the protection zone of the cable lightning rod
Look at the figure, here the lightning rod area is characterized by the following parameters:
- h – the height of the lightning rod itself;
- h0 – height of the lightning rod protection zone;
- hx – height at a certain point (set at the level of the roof of the building);
- r0 – radius of the lightning rod protection zone on the ground;
- rx – radius of the lightning rod protection zone at the selected point;
- L – length of the lightning rod cable.
Based on the required reliability, depending on the height of the lightning rod, the parameters of the protection zone are calculated using the formulas from Table 3.
Table 3
| Reliability of protection | Lightning rod height h, m | Cone height h0, m | Cone radius r0, m |
| 0.9 | From 0 to 150 | 0.87h | 1.5h |
| 0,99 | From 0 to 30 | 0.8h | 0.95h |
| From 30 to 100 | 0.8h | (0.95-7.14 10-4(h-30))h | |
| From 100 to 150 | 0.8h | (0.9-10-3(h-100))h | |
| 0,999 | From 0 to 30 | 0.75h | 0.7h |
| From 30 to 100 | (0.75-4.28 10-4(h-30))h | (0.7-1.43 10-3(h-30))h | |
| From 100 to 150 | (0.72-10-3(h-100))h | (0.6-10-3(h-100))h |
The radius of the lightning rod zone at the height of the building is calculated by the formula: rx=r0×(h0-hx)/h0
Selection of material for lightning rod
It is customary to use three options as a material for a lightning rod: copper, aluminum and steel. Copper lightning rods are characterized by a long service life and are distinguished by their ability to maintain their parameters throughout the entire installation period, even in underground areas. But the main disadvantage of a copper lightning rod is its high cost.
Aluminum is characterized by much lighter weight, therefore it creates a slight load on the supporting structures of the building. It also has good electrical conductivity. But, over time, it is subject to destruction from atmospheric factors and is easily susceptible to mechanical deformation.
Steel ones are the most durable, they can easily withstand wind loads, and the elements of such a lightning rod can be connected by welding, unlike copper and aluminum. It is also characterized by low cost. The disadvantages of a steel lightning rod are high resistivity and susceptibility to corrosion.
Installation location
To install the lightning rod, the highest point should be selected. Therefore, it is placed on the roof of the building; if its height is not enough for the entire building to fall into the protection zone, special supports or nearby trees can be used. To determine the actual installation location of the lightning rod, it is necessary to plot the protection zone obtained during the calculation on the site plan.
Rice. 10: protection zone on the building plan
The roof is the most advantageous option, since the peak of the protection zone will be located above the building. A separate support or several allow you to move the area protected by the lightning rod to the desired point on the site, and is excellent for situations where buildings are dispersed throughout the site. Using wood as a support allows you to save on the purchase and installation of a metal or reinforced concrete structure, but causes a number of difficulties during operation and is therefore considered an undesirable option.
Lightning rod options
There are three options for making a lightning rod in a private house covered with corrugated sheets :
- Vertical rod.
The most common and effective lightning rod. Basically it is a steel pin with a diameter of about 10 mm and a height of up to 2 meters. Often, especially in home-made versions, metal structures of various rolled products are taken as the basis - a corner, a rectangle, a circle. It can be mounted either on the house itself or on a separate pole in the immediate vicinity. The lightning discharge is received only at one point, so the rod is suitable for structures with a small metal roof.
- Skate rope.
It is a cable fixed in parallel at a safe height (at least 50 cm) from the ridge using small pins on opposite gables. Well suited for roofing made of slate or other non-conductive materials. In this case, the cross-sectional area of the receiver conductor must be at least 50 mm². The peculiarity of such a system is that grounding is installed on each side of the house. However, the advantage of this is that the protection sector increases - along the entire length of the roof, and not at one point, as in the first case.
Cable lightning rod Source izion.pro
History of the lightning rod
The earth, in essence, is a huge capacitor. One cover is the surface of the planet and everything on it. The other lining is made of free charges in the atmosphere. Air in this system plays the role of a dielectric. It is its breakdown that constitutes lightning.
Having realized the essence of lightning as an electrical process, Benjamin Franklin invented and developed the first lightning rod. The talented physicist was unable to develop his gift in science due to his stormy political activities, which is why his portrait is depicted on the hundred-dollar bill.
Tesla realized that lightning strikes the highest point associated with the Earth due to the smallest thickness of the dielectric (layer of air). As a result of a series of experiments, the kite became the first lightning rod in history. In Russia, even earlier, similar experiments were carried out by Lomonosov together with another physicist Richman.
In general, a lightning rod is a device that removes the destructive energy of lightning from the protected object and dissipates it through grounding. The importance of lightning rods was known many centuries ago by observing how lightning struck tall trees, columns and towers. However, scientific experiments and valid conclusions were made only in the 13th century.
DIY making
There are many folk ways to make a lightning rod at your dacha with your own hands. It is best to entrust this matter to a professional team specially engaged in the installation of protective anti-lightning systems. However, for those who decide to act independently, it is recommended to follow a proven algorithm. First, you need to correctly calculate the design, then select the right materials, as well as determine the installation location, and only then proceed with the installation procedures. Let's look at each of these stages in detail.
Correct calculation
The first thing you should start building lightning protection with is determining the height of the top point of the receiver. The easiest way is to calculate it for the pin modification using the following formula:
H=(Rx+1.63Hx)/1.5
H – distance from the ground surface of the highest point of the receiver,
Hx – height of the ridge of the house,
Rх – protective radius of action,
The numbers 1.5 and 1.63 are calculated coefficients.
For example, if it is necessary to create protection within a radius of 15 meters on a site with a house 7 meters high, the height of the top point of the lightning rod, according to the formula, should be:
(15+7x1.63)/1.5=17.6 meters.
In this case, it is necessary to take into account that the protective zone in space has the shape of a cone with its apex at the receiver’s peak point and its base.
Components of an active lightning protection system
Lightning rod Satelit 3
| Lightning rod type | Leading bit initialization time T, s | Height of leading discharge D, m |
| Satelit 3-25 | 25 | 25 |
| Satelit 3-45 | 45 | 45 |
| Satelit 3-60 | 60 | 60 |
| Material: 304L stainless steel Weight: 4kg | ||
Remote control device Teletester-S3
Monitors the operation of the Satelit 3 lightning rod within a radius of 50 meters.
Every 90 seconds the lightning rod transmits a signal. This signal indicates that all electronic components of the lightning rod are working correctly, including its polarization.
Dimensions: 170x85x34 mm (IP54) Weight: 200 g Operating frequency: 433 MHz Charger: 9 V batteries, type PP3
Lightning strike counter
Thanks to its electromechanical design, the lightning strike counter is easy to use and does not require special maintenance.
According to the IP65 protection level, this device is suitable for operating in extreme weather conditions.
Video description
Watch the video on how to inexpensively make a lightning rod with your own hands:
Advice! The protective area in space is the shape of a cone with the apex at the peak point of the receiver and the base in the form of the calculated radius. Knowing this allows you to choose the only correct way to install a lightning rod in a private house so that it protects nearby buildings - a greenhouse, a bathhouse, a garage, a barn, a gazebo, etc.
Selection of materials
You can effectively solve the problem of how to make a lightning rod in a wooden house if you choose the right materials. It is recommended to use copper, steel or aluminum as conductors. For example, to build a standard pin lightning rod, you will need to purchase the following consumables:
- Steel rod for the receiver with a diameter of at least 50 mm².
- Copper wire for down conductor with a cross section of 16 mm².
- Asbestos cement pipe of suitable height.
- Copper pins for ground loop.
- Fastening elements.
It is cheaper to use steel to construct a lightning rod for a private house, but copper has the best conductive properties and requires a smaller cross-sectional area of conductors, which means the installation will be easier and faster.
Rod for lightning rod Source ytimg.com
Video description
Watch in this video how complex lightning protection for a cottage is designed and works:
DIY installation instructions
Self-installation of a lightning rod is carried out as follows:
- The installation height of the receiver is calculated based on the required protective radius.
- The material is selected.
- The installation location is determined.
- The lightning rod is being secured.
- A down conductor is being carried out.
- A trench or pit is dug, the grounding rods are driven in and connected to each other.
- The down conductor is connected to the ground loop.
Recommendation! Upon completion of installation and connection of all parts, it is recommended to check the lightning rod with an ohmmeter. The resistance on the device should not be more than 10 ohms.
Briefly about the main thing
A properly constructed lightning rod protects a house from fire, equipment from damage, and people and animals from the terrible consequences of electric shock. The device does not prevent lightning, but effectively catches and safely transmits it to the ground. There are several options for making a lightning rod at your dacha :
- Kernel.
- Cable.
- Net.
All of them consist of a lightning rod, a down conductor and a grounding circuit. When making a lightning rod with your own hands, first of all you need to correctly calculate the height of its installation, based on the required protective radius. Next, you need to choose the right materials for its main parts, correctly determine the installation location and perform installation in accordance with recommended safety requirements.
Cost of designing a lightning protection system
| Building type | Cost, rub. |
| Private houses | From 4 000,00 |
| Administrative buildings | From 10 000,00 |
| Industrial building | From 15 000,00 |
* in the absence of plans or drawings in *.dwg format, the cost of the project increases by 5000.00 rubles.
In our work we use only equipment from world manufacturers!
Design time - from 5 working days, cost - from 5 thousand rubles Warranty on the system - 2 years from the date of signing the acceptance certificate. We carry out installation not only in Moscow and the Moscow region, but also in the regions! In addition, we carry out measurements at sites with the issuance of a protocol.