Sooner or later, any owner of this device will have to replace a burnt-out heating element in a storage electric boiler.
Don’t think that it will serve you for decades, no matter how high-quality and expensive the model is. Heating elements fail for two reasons:
- scale formation and burnout of the working element (heating coil)
- corrosion and mechanical failure
How to extend the life of a water heater
For long-term operation of a storage water heater, certain rules must be followed. When connecting the water supply, it is advisable to install a reducer that can reduce the pressure to the required level. This value should not exceed 6 atmospheres. To clean the incoming water, you can install a special filter.
The boiler will work for a very long time if maintenance is performed on time. To prevent local overheating, scale can be removed from the surface of the heating element with citric acid. Additional services include a number of activities:
- check the condition of the magnesium anode and replace it;
- clean filters;
- do not allow maximum heating;
- check the operation of the check valve;
- turn off the device at night.
If the boiler will not be used for a long time (2-3 months), it is advisable to drain all the water and turn off the water supply.
Water heater Climate control technology
Checking the serviceability of the heating element using a tester
If a visual inspection of the heating element does not produce results, then do not rush to rejoice that everything is in order with the part. Most likely, a break in the spiral occurred inside the heating element, which is impossible to see, since the outer shell is intact and does not have any obvious defects.
A regular household tester will help you check this version; you need to use it to ring the heating element itself, as well as the thermostat, if this element is included in the design of the water heater. In most models, thermostats are required by manufacturers.
First, check the integrity of the nichrome spiral located inside the heating element. Having moved the tester to the bell position, connect its terminals to the terminals of the part being tested. The heating element coil is working properly if a bell is heard when the terminals are connected. If the tester does not make a sound, then the spiral has a break. This heating element cannot be repaired; it will have to be replaced.
The part must also be replaced if there is a breakdown. To detect a breakdown in the insulation, you need to disconnect one of the tester terminals and move it along the shell of the heating element. The presence of a sound signal will indicate that a breakdown is taking place. This heating element is also thrown away.
Diagnostics of the heating element (heating element) installed in the water heater using a tester or digital multimeter. The device allows you to accurately determine the faulty part
After checking the functionality of the heating element, proceed to testing the thermostat. Having inserted the part into the heating element, connect the tester terminals to the thermostat terminals used for supplying electricity. Having heard a characteristic call, they conclude that the thermostat is working. Otherwise, the burnt-out thermostat is replaced, and you don’t even need to drain the water. Remove the panel from the boiler that is disconnected from electricity, disconnect all connecting wires from the thermostat, install a new water heating temperature regulator, and restore all contacts.
Operating a faulty water heater is fraught with dire consequences, since there is a high probability of electric shock.
Let's consider connecting a three-phase heating element through a magnetic starter and a thermal relay.
Rice.
1 The heating element is connected through one three-phase MP with normally closed contacts (Fig. 1). The starter is controlled by a thermal relay TP, the control contacts of which are open when the temperature at the sensor is below the set one. When three-phase voltage is supplied, the contacts of the starters are closed and the heating element is heated, the heaters of which are switched on in a “star” configuration. Rice. 2 When the set temperature is reached, the thermal relay turns off the power to the heaters. Thus, a simple temperature controller is implemented. For such a regulator, you can use a RT2K thermal relay (Fig. 2), and for a starter, a third-value contactor with three opening groups.
RT2K is a two-position (on/off) thermal relay with a copper wire sensor with a temperature setting range from -40 to +50°C. Of course, using one thermal relay does not allow you to accurately maintain the required temperature. Turning on all three sections of the heating element each time leads to unnecessary energy losses.
Rice. 3 If you control each section of the heater through a separate starter connected to its own thermal relay (Fig. 3), then more accurate temperature maintenance can be achieved. So, we have three starters, which are controlled by three thermal relays TP1, TP2, TP3. The response temperatures are selected, let's say t1
Rice. 4 Relay-temperature sensors provide switching of the executive circuit up to 6A, at a voltage of 250V. To control a magnetic starter, such values are more than enough (For example, the operating current of PME contactors is from 0.1 to 0.9 A at a voltage of 127 V). When alternating current passes through the armature coil, a low hum of industrial frequency 50 Hz is possible. There are thermal relays that control the current output with a current value from 0 to 20 mA. Thermal relays are also often powered by low voltage DC (24 V). To match such an output current with low-voltage (24 to 36 V) starter armature coils, a level-matching circuit on a transistor can be used (Fig. 5)
Rice. 5 This circuit operates in key mode. When current is supplied through the contacts of the thermal relay TP through resistor R1, to the base VT1 the current is amplified and the MP starter is turned on. Resistor R1 limits the current output of the thermal relay to prevent overload. Transistor VT1 is selected based on the maximum collector current, which exceeds the contactor operating current and the voltage on the collector.
Let's calculate resistor R1 using an example.
Let’s assume that a direct current of 200 mA is sufficient to control the starter’s armature. The current gain of the transistor is 20, which means that the control current of the base IB must be maintained within the range of up to 200/20 = 10 mA. The thermal relay produces a maximum of 24V at a current of 20mA, which is quite enough for the armature coil. To open the transistor in the switching mode relative to the emitter, the base voltage must be maintained at 0.6 V. Let us assume that the resistance of the emitter-base transition of an open transistor is negligible.
This means that the voltage on R1 will be 24 - 0.6V = 23.4 V. Based on the base current obtained earlier, we obtain the resistance: R1 = UR1/IB=23.4/0.01 =2.340 Kom. The role of resistor R2 is to prevent the transistor from turning on due to interference in the absence of control current. Usually it is chosen 5-10 times more than R1, i.e. for our example it will be approximately 24 kOhm. For industrial use, relay regulators are produced that realize the temperature of the object.
Write comments or additions to the article, maybe I missed something. Take a look at, I will be glad if you find something else useful on mine.
How to check if the heating element in a water heater needs to be replaced
The manufacturer of any electrical device must indicate a certain warranty period in the instruction manual. After its completion, some parts of the water heater require replacement. Most often, the heating element stops working. To determine the condition of the heating element, it is necessary to conduct a preliminary check.
How to remove and check a water heater
When the heating element in the boiler stops working normally, the storage device stops responding to the switch-on signal, and the RCD is constantly knocked out. To accurately determine what is happening, first check the electrical wiring of the room, as well as the socket for connecting the water heater. If no damage is found, the internal electrical system of the device must be checked. It is performed in a certain technological sequence:
- First, the device is de-energized.
- Unscrew the bolts securing the housing cover to check the electrical unit.
- Visual contact may not always reveal a fault. If everything is visually in order, the heating element is diagnosed.
- First, the condition of the thermostat is checked. If it overheats, it may simply turn off. For it to start working normally again, just press the button.
- The water heater must be emptied of water. To ensure quick draining, technicians advise disconnecting the liquid supply pipes. Don't forget to place a basin to collect water
- Sometimes a standard drain is included in the installation diagram. To use it, you need to fully open the special taps and wait until the water is completely discharged.
- When installed vertically, the storage tank is disconnected from the water supply. The heating element is attached to the bottom of the housing. To dismantle it, you do not need to change the working position. It is easy to remove without removing the boiler from the brackets.
- With a different design, it is better to perform operations with the water heater by disconnecting the boiler from the wall.
How to get heating element
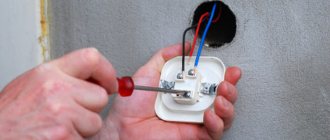
Before you start disassembling the boiler, you need to draw on a piece of paper or take a photograph of the electrical wire connections. This will help you avoid making mistakes when reconnecting.
Then the terminals are removed from the heating element. Sometimes you have to remove other parts to remove the heater. Often the thermostat prevents its removal. Many boiler models feature this design.
Use a wrench to unscrew the nuts securing the body of the water heater with the heating element. The released heater is carefully pulled out.
If, upon visual inspection, a layer of scale is visible on the surface of the heating element, or the insulation is damaged, then replacement will be required. It makes no sense to use an old part with such errors. It is not possible to return it to its original state.
Recommendations for home repairs
Regardless of the nature of the breakdown, before starting repair work, you first need to turn off the power supply, remove the protective cover, disconnect the wires, pipes and drain the water.
Wall-mounted models are usually removed from their brackets. The protective cover, which hides the connection point for electrical wires and the mounting of heating elements, may have a different position depending on the model.
On horizontal devices, this element is usually located on the left, on vertical heaters - at the bottom, and on small models - in front. In some devices, you first need to unscrew the main mounting bolt located in the center. Sometimes this element is hidden under a decorative sticker.
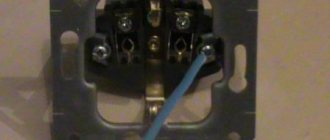
After this, you need to carefully remove the thermostat, and then remove the temperature sensor tubes. They must be handled very carefully. If the integrity of the temperature sensor tube is damaged, liquid filler will leak out of them. As a result, you will simply have to throw away the water heater and buy a new device.
The temperature sensor tubes highlighted in blue should be protected from any deforming influence; if they break, the entire device will have to be completely replaced
If the thermostat of a household water heater has become unusable, it will have to be completely replaced. The models of such devices are varied; it is best to choose an analogue with a similar device and characteristics
If there are stickers on the case that indicate the serial number, they must be preserved, even if they interfere with the maintenance and repair of the product. This may affect the manufacturer's fulfillment of warranty obligations, as well as make the work of service center employees easier.
Draining water and disassembling the water heater
And so, when you decide that you still need to open it, the first thing you do is turn off the power by unplugging the plug from the socket. Then drain the water from the titanium. To do this, turn off the hot and cold water supply taps.
Unscrew the cold water hose, placing a suitable container for drainage.
If water does not flow from the removed hose, this indicates an air lock. We need to remove it. To do this, just slightly loosen the nut at the point where the hot water pipe connects to the pipe.
Next, open the safety valve and release water through it. If the valve suddenly becomes clogged, you will have to twist the entire valve. Water will flow out of the boiler in a continuous stream.
After draining, completely unscrew both valves from the titanium (hot + cold) to open the bottom cover and gain access to the heating elements.
There are modern models where the bottom cover is collapsible and to remove it, it is not necessary to touch the valve. It comes in the form of a plastic insert secured with several screws.
Disconnect the power wires, first remembering or marking with a marker which one is connected where. Better yet, draw a diagram. As a rule, all wires are colored and this will be easy to do. Otherwise, you can get confused in such a pile of wiring.
If you don’t want to draw anything, then just take a couple of photos on your cell phone. You will know exactly the location of all elements and wires.
After this, unscrew the nuts or screws securing the heating element itself around the perimeter.
You can unscrew them in any order, but you need to screw them in the same way as the engine head or the wheels on a car, that is, crosswise.
If you immediately tighten a nut all the way, this will cause the flange to bend and there will not be the required tightness. Consequently, the gasket will not hold and will leak.
Carefully pull the heating element out. It will be all covered in rust, and from the magnesium anode, except for a thin burnt piece of iron, there may be nothing left at all.
Corrosion of the water heating element
Why does the heating element body corrode and collapse? The fact is that the heating element in the boiler is equipped with a magnesium anode.
Without it, a galvanic couple is formed inside the titanium:
- tank - heating element
And with a magnesium anode:
- heating element - anode
Through this anode, all stray currents flow to the ground, gradually taking with them some part of the anode body. When it is completely destroyed, these currents begin to flow down the body of the heating element.
The growths on the heating element do not form evenly. Because of this, different parts of its copper shell acquire different expansion coefficients. As a result, surface tension is created, which breaks the shell of the heating element.
In many service centers, if the boiler breaks down completely, you may even be denied a warranty if you do not have a receipt for timely replacement of the anode.
Ultimately, corrosion becomes through and the working element burns out.
By the way, with the anode intact, the water from the tank may have a slight odor. When the smell disappears, this may be some kind of sign of corrosion of the electrode.
Modern models have special sensors that monitor the condition of the anode.
With timely replacement of the anode and mandatory cleaning, your heating element will actually last several times longer. Grounding the housing also increases the service life of the heating element by at least two times.
However, for some reason many people lose sight of this point. Meanwhile, during intensive work, it is recommended to clean the boiler at least once a year.
It cannot be said with certainty that some models, for example Electrolux, Ariston or Gorenje, have a longer service life than Thermex or Indesit. It all depends on many factors:
- amount of water consumed
- the average heating temperature of this water, its chemical composition
- how the plug is inserted into the socket (where the phase comes and where the zero)
- is there grounding or not?
Step-by-step procedure for replacing the anode
First of all, you need to find out where the anode is located in the heater and how to properly remove and replace it. Information about this should be included in your device's instruction manual. If this manual is not available, the standard procedure for replacing a magnesium anode is described below, which is almost the same for all storage wall-mounted water heaters.
Step 1 – Turn off the power to the water heater and the water supply
First you need to disconnect the water heater from the network and shut off the cold water supply to the water heater, and then open the mixer. This is how we release excess pressure from the water heater.
Then we close the hot water inlet. We install a flexible liner on the cold water pipe, or on the drain pipe, or on a special outlet for draining water (you can use a drain hose instead) and stretch it to the sink.
Step 2 - Drain the tank
In order for the water to start draining, you need to unscrew the hot water outlet. So we let air into the water heater, and water begins to flow into the sink. In this case, a few drops may pour out of the hot water pipe, but the main flow of water will go through the drain hose. This is due to the different heights of the hot and cold water pipes in the water heater. The hot water pipe ends at the top of the internal tank, and the cold water pipe ends at the bottom, so we drain through it if there is no drain pipe provided.
After the water has drained, you can unscrew the drain hose. Now we unscrew the American connection at the cold water inlet, while a little more water may pour out of the tank. After this, you can remove the water heater. Since water is still present in the internal tank, albeit in small quantities, when removing the water heater from the wall, it is better to clamp the cold water pipe with your hand.
Step 3 – Remove the old anode
Let's start replacing the magnesium anode in the boiler. It is necessary to unscrew the screw that holds the cover and pick it up with a knife or screwdriver. Under the cover we will see wires. First of all, it is necessary to remove the contacts from the heating element. To do this, we unscrew them with a Phillips screwdriver. Next you need to remove the thermostat sensors. The number of sensors depends on the specific water heater model.
We unscrew the nuts that attract the heating element. The size of these nuts depends on the water heater model. It is better to remove the bolts and nuts after unscrewing them so that they do not get lost or fall inside.
Remove the flange and remove the heating element. The remains of the anode are visible on it. We wash the heating element from the anode residues under running water. After washing the heating element, it will be clear that only a pin remains of the anode. You can also wash the water heater itself. Pour water into it and turn it over to throw out the dirty water with the remains of the anode.
Unscrew the remaining pin from the anode. To do this, unscrew the nut and remove the old stud.
Step 4 - Install the New Anode
Since we have a thread in the anode socket, a new one can be installed without a nut - you just need to screw it into the heating element group. There is no need to tighten the anode all the way - just fix it.
After screwing the anode, we wipe the seat of the heating element and put the heating element back.
Next, we assemble everything in reverse order. We return the flange and screw it in. Be careful that the flange should not pinch the wires and temperature sensors. Do not over-tighten the flange nuts. We put back the temperature sensors, and then fix them with the mounting strip. Then we return the contacts of the heating element, lay out all the wires and screw on the cover. After this, you can hang the water heater back in its place.
Step 5 – Restore water supply and heat
We return the pipes to the water connections. After connecting the pipes, we open the faucet and turn on the water supply to the water heater, and then open the water supply from the water heater. This way we bleed air from the internal tank of the water heater. We wait until the water flow stabilizes and flows in an even stream.
After this, you can close the mixer, turn on the water heater and start heating.
Starting the water heater
Before full operation of the unit, you need to test the work performed. First you need to reinstall the taps and connect the equipment to the water supply. Then the tank is filled with cold water. In this case, the “hot” tap must be left open to expel air from the enclosed space of the tank. When the liquid begins to flow out, the tap can be closed. If the walls have not been washed, it is better to run some water for cleaning.
The first thing you need to monitor at this stage is leaks. This will take about an hour. Here you need to wait for the evaporation of condensate, which appears in any case. If there is no leak, you can test run the boiler. The absence of failures in the usual work indicates a high-quality repair. The water heater can be used as usual.
Checking the functionality of the heating element
In order for the water heater to work properly, it is necessary to check the serviceability of the heater during regular inspection. This can be done using one of 3 methods:
Heating element device.
- The first method is suitable if there is a spare element. If the boiler does not work, you will have to disassemble it, drain the water, and replace the heating element with a new one. If, after assembling the heater, the water is heated to the required temperature, no failure is observed, then the cause of the breakdown, i.e. lack of heating of water or too slow operation, was the old heating element. If the boiler refuses to work, then the reason is not in the heating element, then you will have to call a technician.
- The heating element can be checked using a special test lamp. To do this, the heating element and the lamp are connected in series, connected to an electrical circuit, after which current is supplied. If the lamp lights up, then the heater is working; you need to look for a breakdown elsewhere.
- The heating element in a water heater can also be checked using a multimeter, i.e., “ring” it. If the device shows “infinity”, then there is a short circuit.
Power measurement. Power measurement in direct and single-phase current circuits
The power in DC circuits consumed by this section of the electrical circuit is equal to:
and can be measured with an ammeter and voltmeter.
In addition to the inconvenience of simultaneous reading of two instruments, power measurement by this method is carried out with inevitable error. It is more convenient to measure power in DC circuits with a wattmeter.
It is impossible to measure active power in an alternating current circuit with an ammeter and voltmeter, because the power of such a circuit also depends on cosφ:
Therefore, in AC circuits, active power is measured only with a wattmeter.
Figure 8
Fixed winding 1-1 (current) is connected in series, and movable winding 2-2 (voltage winding) is connected in parallel with the load.
To correctly turn on the wattmeter, one of the current winding terminals and one of the voltage winding terminals are marked with an asterisk (*). These terminals, called generator terminals, must be turned on from the power supply side by combining them together. In this case, the wattmeter will show the power coming from the network (generator) to the electrical energy receiver.
How to change the heating element in a water heater
To repair a drive, you need to find the serial number in the operating instructions, which can be used to select a failed spare part. It is advisable to use heating elements designed specifically for your device model. Returning the part to its place occurs in the reverse order. First, the heater is placed inside the boiler and fixed with screws, after which all remaining elements are returned to their original place and connected.
The device is hung on the wall, after which it is connected to the water supply system and filled. If there are no leaks, you can supply electricity and turn on the heating.
Causes of heating element failure
Not a single manufacturer of washing machines produces all the components themselves; a significant part of them is made at related enterprises to order. As a result, the risks of supplying low-quality goods increase. Responsible manufacturers send their representatives to suppliers to monitor the entire process and check products on site, and hacks buy what is cheaper. As a result, the heating elements fail. This is the main cause of breakdowns. But there are also objective factors related to operating conditions.
- The heating element coil or control sensor has burned out. In villages, the voltage in the network often jumps; due to strong winds, wires on overhead power lines may overlap.
The result is that the voltage instead of 220 V is 380 V. Either the heating element, or the automation, or all together burns out. One of the causes of failure may be a burnt-out spiral - Poor water quality. Very often, water has a high concentration of calcium; at high temperatures it hardens and settles on the surface of the heating element.
Calcium greatly impairs heat transfer, which significantly reduces heating efficiency. But these are not all the problems created by calcium solids. They provoke a significant increase in the heating temperature of the nichrome spiral; it is not designed for such modes and quickly burns out. The high temperature of the heating coil causes the metal casing to overheat - it also burns out. Calcium deposits are most often the cause of heating element failure
Determining the malfunction
It is enough just to follow the technical recommendations for operation prescribed by the manufacturer. But the notorious human factor makes its own adjustments here too. One day the boiler stops working normally - it stops heating the water or does it very slowly.
Most often, the reason for this is problems associated with the electrical part of the device:
- broken switches;
- fuses, various sensors;
- heating units.
But before you start diagnosing and repairing them, you just need to check:
- availability of electricity in the supply network;
- availability of water supply sources;
- make sure that there are no consequences from children's pranks: closed ball valves;
- pulled plugs from electrical sockets;
- Are there any problems with the thermostat?
When all of the above has been checked and the listed reasons are excluded from the list of possible causes, we check the functional state of the heater itself:
- a decrease in its effectiveness due to scale formed;
- short circuit as a result of leakage;
- due to burnout of the spiral itself.
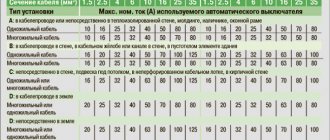
This procedure is most conveniently performed using a tester, by measuring the resistance of the product being tested. The technical data sheet of the boiler indicates the power of the installed heating element. Using the formula P = U2/R, Ohm's law, we determine its resistance.
For a heating element with a power of 2 kW, the resistance is about 27 Ohms. You should also check the possibility of breakdown of the spiral on the body of the water heater.
Let's consider connecting a three-phase heating element through a magnetic starter and a thermal relay.
Rice.
1 The heating element is connected through one three-phase MP with normally closed contacts (Fig. 1). The starter is controlled by a thermal relay TP, the control contacts of which are open when the temperature at the sensor is below the set one. When three-phase voltage is supplied, the contacts of the starters are closed and the heating element is heated, the heaters of which are switched on in a “star” configuration. Rice. 2 When the set temperature is reached, the thermal relay turns off the power to the heaters. Thus, a simple temperature controller is implemented. For such a regulator, you can use a RT2K thermal relay (Fig. 2), and for a starter, a third-value contactor with three opening groups.
RT2K is a two-position (on/off) thermal relay with a copper wire sensor with a temperature setting range from -40 to +50°C. Of course, using one thermal relay does not allow you to accurately maintain the required temperature. Turning on all three sections of the heating element each time leads to unnecessary energy losses.
Rice. 3 If you control each section of the heater through a separate starter connected to its own thermal relay (Fig. 3), then more accurate temperature maintenance can be achieved. So, we have three starters, which are controlled by three thermal relays TP1, TP2, TP3. The response temperatures are selected, let's say t1
Rice. 4 Relay-temperature sensors provide switching of the executive circuit up to 6A, at a voltage of 250V. To control a magnetic starter, such values are more than enough (For example, the operating current of PME contactors is from 0.1 to 0.9 A at a voltage of 127 V). When alternating current passes through the armature coil, a low hum of industrial frequency 50 Hz is possible. There are thermal relays that control the current output with a current value from 0 to 20 mA. Thermal relays are also often powered by low voltage DC (24 V). To match such an output current with low-voltage (24 to 36 V) starter armature coils, a level-matching circuit on a transistor can be used (Fig. 5)
Rice. 5 This circuit operates in key mode. When current is supplied through the contacts of the thermal relay TP through resistor R1, to the base VT1 the current is amplified and the MP starter is turned on. Resistor R1 limits the current output of the thermal relay to prevent overload. Transistor VT1 is selected based on the maximum collector current, which exceeds the contactor operating current and the voltage on the collector.
Replacing the heating element in a Termex water heater
Despite the shortcomings, these devices from the Russian manufacturer are popular due to their affordable cost. Here is the sequence of actions when replacing the heating element in a Thermex water heater.
Disconnect the equipment from the power source. Drain the water from the storage tank. When dismantling is required, remove the boiler from the wall. If the model allows, replacement can be made without dismantling it. Turn the dismantled boiler upside down. Remove the outer cover of the water heater
You should pay attention to the sticker that covers the screw (typical for Thermex). Unscrew the fasteners of the flange on which the electric heater is mounted. Remove the heating element. It should be remembered that there is water and scale left inside the tank, which can leak onto the floor
Provide a container in advance into which the rusty sediment will drain. If possible, clean the internal cavity of the water heater from residual scale and deposits. With Thermex devices, this looks like collecting water inside the tank and then draining it. Repeat until the liquid becomes clear. Carefully install a new electric heater that is suitable in power for this water heating device. If necessary, replace the used anode with a new one. Install the thermostat in its original place, making sure the wires are connected correctly. Install the boiler cover and tighten the screw. Connect the device to the water supply or electrical network. Do not put an empty boiler into operation. It is necessary to fill the container and let it stand for several hours to detect leaks. If there is a leak, fix it. If no leak is found, the water heater can be started to heat up.
Visual inspection of the heating element
Having disconnected the household electrical appliance from the network and drained the water from it, they begin to disassemble it. Having taken out the heating element, clean its shell from scale, if any.
When carefully examining the heating element, pay attention to the integrity of the part’s shell. If a visual inspection reveals the presence of cracks or ruptures in the outer shell, then the part can be safely thrown into the scrap yard, since it will not be possible to repair it
In this case, the water heater can be restored to service only by installing a new heating element.
The outer shell of the overheated heating element is torn to shreds. This is usually how heating elements made from low-quality materials fail.
What will be needed for repairs?
If the presence of a malfunction is still confirmed, then it’s time to start replacing the heating element. But before you get started, you need to acquire all the necessary tools. The list is small, but without it it’s unlikely that anything will be done.
For repair you will need:
- spanners;
- pliers;
- rags or napkins - they should absorb water well;
- screwdrivers - it is advisable to stock up on Phillips and straight screws;
- phase meter - the tool is a screwdriver with a special indicator built into the handle;
- new heating element.
Armed with everything you need, you can proceed directly to the repair. For everything to be successful, you need to follow a certain order of actions, which will be discussed below.
Although the vast majority of boilers differ from each other in appearance and characteristics, as a rule, they have an identical design
Disadvantages of dry heating elements
Like all heat-heating devices, these boiler modifications have their drawbacks. The most obvious is the high price of such modifications on the market.
Some users attribute the disadvantage of “dry” water heaters to the low power of heating elements, which is caused by their small dimensions to fit in the flask. This is true, the maximum power of such elements does not exceed 2.5 kW.
For larger tank volumes, the manufacturer eliminates this drawback by installing two heating elements, thereby not only increasing the total thermal power of the water heater, but also providing a two-variant operating mode, which also has a positive effect on increasing the service life of the equipment.
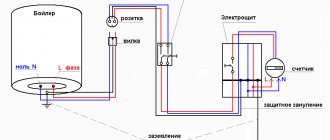
Examination
Storage water heater piping. (Click to enlarge)
Any danger has one amazing property - it appears as if out of nothing. Everything was so wonderful and suddenly there was a problem.
If it is as expected, it means something was done wrong.
Let's do everything right with the boiler:
- We check the presence of grounding. An RCD (residual current device) wouldn’t hurt either – life is more valuable;
- We install a safety valve against unacceptable pressure in the internal tank. It is also useful for draining water;
- We install a protective reducer against fluctuations in cold water pressure;
- We check the presence of a check valve on the cold side. It will help preserve heating elements in the event of a water supply cutoff, preventing water from draining back from the tank.
When purchasing storage type water heating equipment, you should check the availability of the above devices. Not all of them are fully equipped. The Ariston AM 50 SH2.0 Ei3 FE model takes into account all the tips in the article, including child protection.
Following these completely simple rules and advice will prolong the already flawless operation of Ariston equipment for many years.
Watch detailed video instructions for cleaning or replacing the heating element in an Ariston storage water heater:
A little more about the design of a storage water heater
There are two holes in the heating element, which are visible in the photo above.
Three temperature sensors are inserted into these two holes:
Thermal sensors for the operation of a water heating tank
The white substance on the sensors is thermal paste; it must be used so that the sensor “feels” the temperature better and measures it with less delay and error.
I wrote in more detail about the operation of sensors and thermal paste in temperature control systems in the article about the Diagram of a pneumatic press on a thermal controller.
We have already talked about one sensor above (emergency), another capillary (copper tube) - for the operation of the temperature controller, here is its rear view:
Manual temperature controller in the tank
Closer so you can see the name:
Manual temperature controller in the tank. Model name
And also a resistive sensor, which is needed to operate the indicator of the real current water temperature. Here is the front panel of the water heater, showing the indicator and regulator:
Front panel of storage water heater Oasis 50l
The indicator requires a separate DC power supply, filled with varnish:
This is where the description of the repair can end. If you have any questions or want to share your experience - as always, please comment!
Boiler malfunctions: the most vulnerable parts of the storage tank
After purchasing the device, you should carefully read the technical documentation before installing it. It will reflect the design of the device, the location of its individual parts, instructions for proper installation and operation.
To properly respond to the problem and eliminate it, it is necessary to find the location of the leak and determine the cause.
Possible malfunctions may be related to the following:
- The protective gasket in the housing is worn out
- The malfunction is caused by the operation of the heating element. It needs to be replaced.
- The thermostat and temperature sensor have failed. High quality boilers usually have several redundant devices installed that control each other's operation.
- The leak occurred in the area of connection of the cold water supply and hot water discharge pipes. Most likely the problem arose during the installation stage, due to poor sealing of the joints.
Often, to protect the drive, a safety valve is connected to the drive system. Thanks to this element, the number of device breakdowns is significantly reduced.
Conclusions and useful video on the topic
A detailed video on diagnosing the condition, maintenance and self-repair of household water heaters can be viewed here:
Repairing a water heater is not so difficult if we are talking about replacing some of its elements. In the event of a serious breakdown, it would be wiser to contact a specialized service center. Proper operation of the device and its timely maintenance will save you from many problems and expenses.
Have you been repairing water heaters for a long time and want to supplement our material with useful tips and professional secrets for eliminating various types of breakdowns? Or is this the first time you’ve encountered a malfunction and can’t find its cause? Write your comments, ask questions, share your opinion below the article.
How to remove and check the heater
Most often, heating elements in storage boilers break because they are constantly in the water. Regardless of the volume (50, 80 liters or more), the service life of the part can be influenced by various factors:
- Frequency of boiler use.
- Maximum heating temperature.
- Water quality.
Why do parts burn out? This happens when you turn on the equipment without water. Although most manufacturers prevent this point with the design features of the tank. Therefore, the main reasons for the heater to burn out will be water with a large amount of impurities and scale. The sediment covers the element in several layers, interfering with normal heat dissipation. As a result, the heating element overheats.
How to remove the heater with your own hands? First of all, unplug the boiler.
Regardless of the brand (Polaris, Elenberg or Termex), turn off the machine in the control panel. Now start draining the water.
Draining the boiler
There are several ways to delete content. Via check valve:
- Place a deep container under the valve or connect a hose and lower it into the chamber.
- Open the valve and let the water drain out.
- With a tank volume of 30 liters, the procedure will last at least 1 hour.
With a volume of more than 80 liters, there is no point in waiting that long. Drain through the boiler inlet.
Close the water inlet valve.
- Unscrew the cold water supply hose.
- Remove the valve.
- Unscrew the hose from the tank outlet.
- Open the boiler tap.
Place the container and the contents will drain in a few minutes.
How to get heating element
Now it’s time to start dismantling the part; for this it is better to remove the equipment from the wall. The exception is models where the elements are located below. Proceed sequentially:
- First, disconnect all hoses that are connected to the housing. Be careful: water may spill out of them.
- Remove the body from the hooks and lower it to the floor.
- Remove the lid. Depending on the model, it may be positioned differently. It's better to look at the instructions.
- Remove the decorative washers from the pipes. They are found in Thermex heaters.
- Using a Phillips or slotted screwdriver, unscrew the screws or unfasten the latches.
- First, disconnect the thermostat wiring. Take a photo of it first to make the correct connection.
So, the heater is in your hands. Proceed with diagnostics.
Checking an element
The first stage is a visual inspection. Assess the general condition, the amount of scale and the integrity of the body. If the insulation is broken, only replacement will help.
To diagnose using a multimeter, you need to determine the resistance of the element of your model. To do this, look in the instructions for the power of the device. Then make calculations using this formula:
Apply the multimeter probes to the heater contacts and see the result. If it matches the calculations, everything is fine. If 1-0 Ohm is displayed on the screen, a short circuit or break has occurred.
Next, the breakdown to the housing is calculated. The primary sign of such a breakdown is water that beats with electricity. A small discharge can be obtained by touching the tank.
Set the tester to buzzer mode. Place one probe on the contact of the part, the other on the body. Is the tester beeping? There was a breakdown.
For the next test you will need a megger. Set the range to 500 V. Connect the probes to the contact and body. Indicators of more than 0.5 Ohm are considered normal.
How to change the heating element? The new part must be selected in accordance with the model. The serial number can be found in the instruction manual. Installation is carried out in reverse order.
Flushing
After the heating elements are removed, the boiler itself must be rinsed with clean water to remove all the rust and dirt that has accumulated inside. Therefore, for a quality replacement, the water heater still has to be removed from the wall.
Rinse the insides with an ordinary tap hose. Pour only a little water, since the boiler with a volume of 50-80 liters will still have to be lifted manually to drain all the scraps. Some people add citric acid when washing, others don’t.
Washing tip: It is best to rinse the tank in the bathroom, placing it vertically on a linen board. Twist the watering can from the mixer shower and insert the hose into the hole where the heating element was.
How the device works
The heating device consists of two containers isolated from each other. The first barrel is usually made of high-quality steel coated with an anti-corrosion coating or stainless steel.
Innovative materials are used to organize insulation. Most often this can be polyurethane foam, basalt wool or their analogues. This solution allows you to keep water hot for up to two to three days.
If the liquid temperature drops below a user-specified value, an electric current is supplied to the heating element.
At the same time, in order to prevent mixing of hot and cold liquid, the latter is taken from the upper part of the device. In this case, the laws of physics apply. More precisely, cold water simply displaces hot water.
It is recommended to adjust the thermostat to t = 60. In this case, scale formation can be prevented, which will have a beneficial effect on the inner barrel and heating elements.
But in any case, every month you need to turn on the device to maximum. This solution will allow you to disinfect the container, killing all harmful bacteria.
Is it worth it to replace it yourself?
Water heating equipment has a fairly simple design and operates on a basic principle. Therefore, every home master will be able to cope with replacing the heating element independently, without calling a specialist.
The main disadvantage of hiring a professional is the high cost of repairs. Often this figure can reach $60 and this is only for work, without taking into account the cost of parts. Therefore, by spending a little of your own time, you can save a significant amount.
If the heating device is still under warranty, then you must contact the service center. In this case, repairs will be free if the user complies with the operating instructions
Do-it-yourself Termex boiler repair
Before you begin the repair, first gather the necessary tools: a set of wrenches, an adjustable wrench, electrical tape, various screwdrivers, pliers. After this, turn off the water by closing the inlet and outlet valves to the water heater. Then drain the water from the boiler tank and disconnect it from the power supply.
The next step is to remove the protective cover. If you have a vertically located boiler, then the lid is located at the bottom, and in the case of a horizontally located one, it is on the left or in front.
When removing the cover, pay attention to the stickers. Often the screws for fastening it are located under these stickers
If you have unscrewed all the screws and the cover still does not come off easily, check the stickers again.
Replacing the heating element
First, perform all of the above steps and remove the tank cap.
To make it more convenient to work, you can even remove the tank from the wall.
It is worth noting that most Thermex models have not one, but two heating elements. Therefore, it is imperative to remember how and in what sequence the parts need to be connected. It’s better to photograph the whole process.
To remove the heating elements from the Thermex water heater, remove the top cover by unscrewing the bolt; disconnect all plugs and unscrew the bolts securing the heating elements.
The heating element itself is turned off as follows:
- After removing the cover, find the protective thermostat, remove the tips from it;
- also remove the tips (3 pieces) from the heating element;
- cut the plastic clamp;
- Unscrew the screws, removing the sensor;
- now disconnect the cable and unscrew the four screws;
- then you need to dismantle the nut on the clamping bar and pull out the heating element.
After dismantling the heating element, it is necessary to clean the surface of the tank from dirt and scale. Only after this can you install a new heating element and put everything back together.
Do not forget that the heating element does not always need to be changed. If the water in the tank still heats up, but it happens slowly, then, most likely, scale has formed on the heating element. Then dismantle it and descale it. Then install. The problem should go away. Also, do not forget that it is advisable to clean the heating element with chemicals rather than scrape off the dirt. In the latter case, there is a possibility of damage to the part.
To clean the heating element, you can use a solution of citric acid or vinegar (its percentage in the solution should be about 5%). The part must be immersed in liquid and wait until the scale falls off. Then you need to wash the heating element.
Faulty thermostat
The thermostat in Termex water heaters is located under the cover, next to one of the heating elements, and its sensor is located inside the tank.
Sometimes the thermostat fails. This element cannot be repaired; it must be replaced. To perform the replacement, you need to do all the preparatory steps, remove the cover, then remove the thermostat. But before dismantling, we recommend checking this part. To do this, use a lighter to heat the tip of the sensor (copper). If the thermostat is working properly, you will hear a characteristic click, which means that the protection mechanism has activated and the circuit has opened. Otherwise, you will have to replace the part.
Tank leak
No matter how trivial it may sound, but first you need to find where the water is coming from. A lot depends on this, since if the tank is rotten, you will have to buy a new water heater. So:
- if water oozes from the side seam, then the container is rusty and repairs will not be possible;
- If water comes out from under the lid at the bottom, then you need to disassemble the tank.
If traces of leakage are found in the places where the heating elements are attached, then your water heater is not hopeless and can be saved by replacing the gasket.
In the case of the second option, complete all preparatory steps, then remove the plastic cover. Next, take a close look at where the water is leaking. If it comes out near the flange, then the rubber gasket has deteriorated (less often this is a problem with the heating element). Otherwise, the tank is rusty and the boiler can be thrown away. To replace the gaskets, you need to remove the heating element. But it is necessary to carefully examine the heating element itself. If it is cracked, it is also better to replace it.
Scale and cleaning of heating elements
Scale forms primarily in the presence of hard water. Just 1mm of scale gives 75% additional thermal insulation. Thus, the heating element under such a large layer of salts simply begins to overheat.
The first sign of scale formation is a distinct hissing or whistling noise.
When the noises become louder, but the boiler continues to work properly, do not delay cleaning, otherwise it may be too late.
Disassemble the boiler, as shown below, and begin cleaning. This can be done in two ways:
- a regular knife or wire brush
- if the scale is very hard, then use citric acid or special products
Cut off the neck of a 1.5 liter plastic bottle and dilute the solution in it:
- warm water 60 degrees
- 7 teaspoons citric acid
Soak the heating element in it overnight. After which, in the morning you clean off all excess. The result is sometimes simply amazing.