October 30, 2018
Most owners of not only city apartments, but also private houses have to regularly think about how to replace an electrical outlet. Sometimes this is due to the desire to install something more beautiful and modern, but most often the reason for replacement is the failure of the outlet or its failure to meet modern requirements.
It is not at all necessary that this work be carried out by a professional electrician. Anyone can cope with it if they work thoughtfully, slowly and follow basic safety precautions. And we will try to prove this to you with our story.
The main thing is safety!
Before you begin repairing an electrical appliance, you should remember simple safety rules.
First you need to find out what the reason for the replacement is. If the device simply doesn’t fit well into the wall, then just tighten the screws. A pungent odor, smoke or electric shock indicates that installing a new outlet is simply necessary.
Rules to avoid injury when changing sockets:
- Turn off the power to the entire apartment. This is quite easy to do. The shield is usually located in the corridor or entrance. If the meter is an old model and has plugs, then pressing them will cut off power to the entire apartment. Many homes now have electrical panels in the form of boxes. In this case, you need to find the levers on it and move them to the off position. Some craftsmen believe that they know all the wiring well and neglect this simple rule. Often the consequences in such cases are dire.
- Carry out all work during the daytime. The only exception is when repairs are necessary at a given time, and the normal functioning of the family depends on it. You can use a flashlight and rubber gloves. In other options, it is better to postpone dismantling until daylight hours.
- Both the installation tools and the socket itself must be of excellent quality.
- If you are installing electrical equipment for the first time , then you should definitely study the step-by-step instructions for replacement and installation. Detailed guidance is described in this article.
Replacement cost
If you are going to do all the replacement work yourself, then the cost will depend only on the cost of the outlet itself and consumables. Prices range from 80 rubles and above. The most expensive ones are usually waterproof for the street, which are not afraid of any weather conditions.
If you are going to entrust the work to professionals, then the cost of the work must be negotiated individually. On average, the price of installing one electrical point will cost you from 150 rubles.
Instructions for dismantling the socket
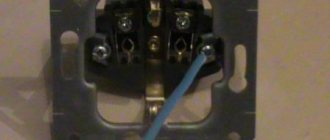
- Removing the protective cover of electrical equipment. To do this, you need to take a sacral or flat-head screwdriver. As a rule, there is always one screw and it is located between two holes for supplying electricity. If the socket is double, then there are two screws, unscrew both. Carefully remove the panel.
- The next step is to check for voltage. There are 2 types of wire: contact and neutral. We alternately connect the phase to each of them. Once you are completely sure that there is no voltage, you can continue working.
- Dismantling the mechanism. No matter which socket is on the outside, there are 2 screws on the internal equipment on 2 sides. They hold the legs that connect the two components. There are a couple more bolts at the top and bottom; they secure 2 wires. Unscrew all 4 bolts one by one. You can throw them away, because... Most likely they already scroll poorly. For a new installation, it is better to buy new screws.
- There should be 2 cables left in the wall hole. If they are bare, then you need to wrap them with electrical tape.
- The last step of dismantling will be to check the size of the new socket box. If it does not completely fit into the wall in depth, then you can trim it. This option is suitable for plastic samples. If the equipment is made of metal, you will have to deepen the hole in the wall.
It should be noted that during dismantling you may find that the socket box is missing. Such sockets were often installed in old houses in order to save money.
Of course, this is wrong and you should not repeat the mistakes of others. In this case, there is no need to get lost, you just need to carefully disconnect the outer part.
Connection
To connect an outlet, its internal mechanism must be connected to the terminals.
This process begins by freeing three wires (phase, neutral and ground) from the flexible tube. You need to work as carefully as possible, since the wires are not durable and can be damaged. Remember the wire markings:
- The phase is usually white, although it can be grey, red or black.
- The zero is colored light blue (sometimes blue).
- Grounding has a yellow-green insulating coating.
If the wires are painted white and black, it is recommended to find the power cable before starting the replacement. The phase must be marked in advance using a marker.
Preparing a new outlet
A socket box is not always required during installation.
This depends on the design of the new electrical equipment. Some modern designs use the central part itself as protection. Let's take a closer look at this option.
The appearance of this option is different in that there is a special metal frame around it, and the mechanism is initially attached to the rim itself.
Such equipment is sold whole, i.e. the outer panel, frame and mechanism are interconnected. To begin installation, you need to disconnect the outer part from the protective frame. The fastening is carried out using bolts, so you just need to unscrew them.
All that remains is the bezel and the mechanism.
Upon closer examination of the mechanism, you can see that it no longer has 4, but 5 screws. The latter is located at the top between the two contacts. This bolt holds a special plate.
It presses the contact wires more firmly, which allows you to install the plug firmly. This also serves as additional protection against electrical shock.
Carrying out repairs
When the preparatory work is completed, you can dismantle the outlet. To do this, unscrew the central bolt and remove the decorative cover.
Afterwards you can begin to inspect the contacts. If they change color to black or brown, you will have to change the entire outlet. Greening of the plates means they are oxidized - such contacts can be cleaned with sandpaper or a sharp knife. If the contacts are thinned down to holes, the socket also needs to be changed urgently.
Pulling up contacts
When there are signs of loosening of the contact plates, the actions will be as follows:
Remove the cover from the socket. Carefully remove the device from the recess in the wall without damaging the wires. Tighten the screw fastenings using a screwdriver. Cut off the charred wires with a sharp knife. Insulate the twisted areas with tape. Put the product in place.
If the contacts are too damaged, you should not take risks and buy a new electrical outlet. When the contacts are simply bent, they can be bent by gently pressing with a screwdriver.
Installing a new outlet
The need to install a new electrical outlet arises often. First you need to disassemble the old socket, and then do the following work:
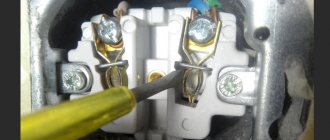
- Remove 1 cm of insulation from the wires.
- Bend the exposed wires into rings 0.5 in diameter.
- Connect the wiring in the wall and the socket wires in accordance with the diagram, clamp them with terminals with screws.
- Make sure once again that the grounding wire is connected correctly (not to phase or neutral, but to the ground wire).
- Seal the electrical outlet into the socket box (the device should not stick out beyond the wall, be skewed, or crooked).
- Gently bend the wires and hide them in a glass.
- Secure the electrical outlet itself using clamps on the sides or special screws.
- Screw on the decorative trim.
When the socket fell out
Usually the cause of this problem is improper operation of devices and pulling out plugs by the cord. To prevent this from happening, the petals of the rosette are screwed tighter. But even this method does not always protect the device from damage if it is not used carefully.
Some people put a piece of sandpaper or linoleum under the petals, but such methods are short-lived. It is better to carry out a complete repair by purchasing a high-quality socket box. The new electrical outlet will last a long time without any complaints.
Tools and materials for repairing a fallen socket
To work you will need:
- new socket box;
- dry gypsum or cement, alabaster;
- sharp knife;
- putty knife;
- primer;
- installation tools.
Socket restoration work
After turning off the electricity in the apartment, you need to remove the old socket. If there is a metal cup, it must be replaced with a plastic one. If the device is in a concrete niche without a glass, you will have to deepen it and also install a new socket box that matches the shape. You can expand the niche with a hammer drill, chisel and hammer.
Next, you should dilute the alabaster or gypsum to a thick paste, fix the socket box in concrete or drywall, and place it on the mixture. The wall must first be moistened with a primer, and the wallpaper around it must be covered with paper tape. After 10 minutes, level the glass and cut off excess plaster with a spatula. Then secure the socket box with the screws located on it. Then you can install a new socket.
Source
Installation instructions
device
Installing a European socket:
- Remove the electrical tape. We measure the depth of the hole intended for the cable. If the size does not match, you need to peel off the protective layer of rubber. The exposed cable should protrude quite slightly from the hole;
- Using the clamping screw, insert the first wire. The fixation must be very reliable. If this does not happen, the outlet will stop working quite quickly. To do this, the cable must be pulled carefully, it should not move from side to side;
- We repeat the same procedure with the second wire . We must not forget to be careful when exposing wires.
- If equipment with grounding was purchased, a special cable is required . It is not available in all homes. In new houses or apartments after renovation, such a cable is usually present. The cable is inserted into the upper hole of the mechanism. If the house is old and there is no grounding wire, then this step is not required. It must be taken into account that equipment without a grounding wire will not be able to supply electricity to all types of plugs. Therefore, it is worth thinking about carrying it out;
- The main network connection is complete. Next, you should install the mechanism in the hole in the wall and secure it using quick claws. A protective plastic panel is installed on the outside.
Installation requiring a new socket box:
- A new box is required when it is impossible to fix the tabs on the old socket. It was stated above that during dismantling it is checked whether the new box fits into the old recess. Therefore, at the installation stage, the new structure must fit perfectly into the wall. In order for the socket box to hold tightly, you need to fill it with a special solution, such as glue.
- The fixation of the new mechanism depends on the design. These will be quick tabs or screws that are screwed to the box itself.
- We expose the wires . This is done as in the first option.
- We connect the cables to the common mechanism. The protective frame is not removed and remains attached to the equipment.
- We fasten the screws on the top and sides. We install the outer plastic panel and frame. Installation is complete.
Loop creation technology
The loop method is the safest of all options. It involves not simply moving the old outlet up or down, but creating a new “point” in close proximity to the old one.
The main advantage of the daisy chain method is the ability to connect a new outlet, placing it on the section of the wall required for work, and at the same time keep the old one
The only drawback of this connection is that the cable from socket to socket is laid horizontally. Knowing that traditionally the branching to the same switches and sockets is laid in a vertical route, due to your forgetfulness you can inadvertently damage the wire.
In addition, if one of the cores is damaged at the switching point, then all the elements following it will stop working. Therefore, the fewer connection points the system includes, the more reliable it will be.
Selection of required materials
When using this method, material costs are minimized.
In addition to purchasing the newest outlet for work, you need to prepare:
- wire of the appropriate cross-section;
- plastic socket box;
- hammer drill with crown D70 mm;
- indicator screwdriver;
- pliers;
- hammer;
- flat screwdriver;
- braid removal tool.
The wire itself does not have to be laid in a groove, but can be laid openly using a cable channel.
To transfer the connection point to a new location and avoid the procedure of wall slitting, it is recommended to use an overhead cable channel model
The choice of socket box model depends on the base material into which it is supposed to be buried. For concrete and brick walls, ordinary plastic “glasses” are chosen, and for plasterboard bases, models equipped with spacer legs are chosen.
Making a niche and installing a socket box
Before moving the hidden socket to another place, you need to prepare a place for installing a socket box and make a groove for laying a section of the electrical network. Having outlined the location of the future connection point, use a crown to drill a hole.
In the absence of one, you can use a hammer drill equipped with an impact drill or a grinder. In this case, holes are first drilled along the marking contour, and then individual fragments of the wall material are chopped off using a chisel.
The depth of the niche is made such that the floor is completely recessed into it, and at the same time there remains a margin of 3-4 mm
A “glass” is immersed in the prepared niche. The electrical cable coming from the junction box is inserted through its back wall.
The socket box is fixed in a concrete wall using gypsum mortar. After the mixture has hardened, the product is cleaned of gypsum residues, and its inner walls are wiped with scraps of fabric. To secure the socket box into a plasterboard or wooden base, the “glass” is immersed in the made niche and fixed using the side spacer tabs
Connecting a new point
Having measured the cable of the required length to power the new point, one end of it is connected to the terminal blocks of the old socket, and the other to the contact part of the new “point”. The neutral, phase and ground wires are connected in parallel directly to the socket contacts.
To prevent short circuits between conductors, each core is insulated with a plastic braid. When connecting the cable, it must be removed. To make the task easier, use a cross-connecting knife, which can easily remove the insulation without damaging the core.
The work of stripping the braid should be done as carefully as possible, because if the core turns out to be damaged or defective, it will certainly “prove” itself very soon.
Neutral and phase conductors are allowed to be connected directly to the contacts of the socket, and the protective PE conductor only through a branch using a terminal block
When dealing with a PE conductor, keep in mind that according to the PUE, it is important to maintain its continuity. Indeed, if the grounding conductor on one of the sockets breaks, all other devices will be ungrounded
Having connected the neutral, phase and grounding conductors, all that remains is to fix the working part of the product in the installation box and install the decorative cover.
Features of installing a double socket
There are 2 mechanisms for connecting such equipment. The first implies 2 power outputs from one point. This is an extremely unsafe option.
This is due to the fact that the current remains unchanged, but the voltage and load increase. It follows from this that this option is short-lived. In addition, the mechanism has significantly fewer fasteners than the single version, so the contact with the fork will be weaker.
It is better to make double holes from different points. This means that the outer panel will be double and connected together, but the power sources inside will be different.
In this case, the risk of voltage surges and electric shock is the same as with single sockets, i.e. almost equal to zero.
It is also necessary to take into account where exactly such a mechanism will be installed.
So, for example, when installing in a concrete wall, a small number of mounting holes does not matter, because the base is very strong.
Walls made of chipboard, OSB or fiberboard will not be able to hold such equipment for a long time; over time, the mechanism will begin to fall out.
Required tools and materials
To do all the work without being distracted by searching for the necessary tools, you should prepare everything in advance. To simply replace the socket with your own hands you will need:
- Voltage indicator - single or double pole.
- Screwdrivers – Phillips and flathead.
- Pliers with wire cutters (or separately).
- Knife – even the smallest one will do.
If the question is how to replace an old-style outlet with a new one, then you will additionally have to prepare the following:
- A socket box suitable in size for the new device.
- Drill with a drill for the wall.
- Hammer and chisel.
- Plaster or other putty.
This is a necessary and sufficient set of tools to replace the socket yourself.
Necessary equipment
Socket
It is best to choose new samples. Namely European production. In them, the forks are held more firmly, and the structure itself is very stable. Devices made in Russia are also of good quality.
It should be noted that if the apartment has old Soviet-style sockets, then replacement must be carried out. Such equipment can fail at any time.
Socket box
As a rule, they have a standard diameter of 7 cm. Larger options are also available, but they are required for old-style sockets. Therefore, if drilling the wall is not included in the plans for repairing the socket, you need to measure the hole before purchasing the socket box.
The material used for using this electrical equipment varies. Is it plastic or metal. If the wall is concrete, brick or any other non-combustible material, then you can safely install metal socket boxes. Wood, plywood or plasterboard are very fragile. Therefore, to install an outlet in such rooms, you need to use a plastic base.
Screwdriver
Basic equipment for installation and dismantling. All sockets are attached with bolts and screws, which is why it is impossible to imagine such a repair without a screwdriver.
Insulating tape
Used as wire insulation to eliminate the risk of electric shock. Required for extending old wires.
Voltage indicator
It is necessary to check whether there is voltage left in the circuit. Both contacts need to be checked. If the indicator has not changed, then you can safely get to work.
Gloves
Both fabric and rubber samples are used. In the case where there is absolutely no voltage, you can use the first option. Rubber gloves are used if there is no voltage indicator available, because rubber practically does not conduct electric current. It is inconvenient to work in them.
Completion of installation
The last steps will be installing the cover, turning on the input circuit breakers and checking the socket with a voltage indicator. The checking procedure can be changed - first turn on the machines, check the socket contacts, the functionality of the grounding (if there is one), and then install the cover and decorative strip. This is done so that you do not have to turn off the circuit breakers again, turn off the power to the apartment and disassemble the outlet if it turns out that there is no contact with the wiring.
The last thing you can check is whether the socket is popping out of the socket. To do this, you just need to insert and remove the plug several times. If there is even the slightest displacement, the fastenings must be reviewed.
If everything is normal, then your debut as an electrician can be considered completed - the “creative mess” is eliminated and the replacement of the socket is completed.
Blitz tips
- If there is no grounding cable in your house , you should not refuse to buy a mechanism with such a hole. They cost a little more. But at the same time, the structure is installed more firmly in the wall, which extends its service life. The contact with the plug is also much stronger;
- You should carefully measure the contact of the bare wire. If it comes out of the hole too much or, conversely, is not visible at all, then the socket will not last long. You will have to repeat the procedure in the near future.
- If it is possible not to install a double panel from one point , then it is better to install two single mechanisms with different connections;
- When all the wiring in the house is changed , the height of the sockets should be changed. It should be about 20 cm from the floor.
Connection
To connect an outlet, its internal mechanism must be connected to the terminals. This process begins by freeing three wires (phase, neutral and ground) from the flexible tube. You need to work as carefully as possible, since the wires are not durable and can be damaged.
Remember the wire markings:
- The phase is usually white, although it can be grey, red or black.
- The zero is colored light blue (sometimes blue).
- Grounding has a yellow-green insulating coating.
If the wires are painted white and black, it is recommended to find the power cable before starting the replacement. The phase must be marked in advance using a marker.
How to install it yourself?
It’s not difficult to figure out the correct wiring and installation of wiring boxes. The main operations are carried out even before the finishing of the premises.
- Having decided on the consumers and locations for installing the sockets, they move on to marking them on the walls.
- The center is outlined, after which a hole 40–60 mm deep is made with a 63 mm crown for the “socket box”. If you don’t have a special tool, you can get by with a chisel and a hammer. Many professional electricians prefer to work with a grinder and a hammer drill.
- Then you can proceed to securing the mounting box with the wire passed into it. Usually fixation is done using building gypsum or plaster mixture. It is permissible to use special glue.
- After “cementing”, all voids and cracks around the perimeter of the box are sealed with plaster.
The length of the protruding wire must be at least 150 mm so that when connecting, you can easily install a socket or switch.
Working with drywall
To install a socket in drywall, you will need special socket boxes. They differ from ordinary ones in the grooves in which the screws are located.
Install it like this:
- The first step is to route the cable to the places where the sockets will be installed and lead it outside through the cut holes.
- Secure the socket box.
- Separate the front panel and the working mechanism by unscrewing the securing bolt.
- Connect the cable to the socket contacts. Tighten securely.
- Connect the ground wire to the terminal located in the center.
- Secure the device in the socket box.
- Install the decorative panel.
Working surface
How to properly remove power, and where is the best place to do it for small household appliances? Finding the answer to this question is a serious challenge for many.
Here it is necessary to take into account the possibility of simultaneously connecting the necessary kitchen appliances. For example, it is quite possible that you will need to turn on a kettle, toaster, coffee machine and mixer in one zone, so it is advisable to remove the block of 4 sockets in the appropriate place.
Naturally, it is impossible to provide for everything, so it is recommended to additionally provide for a reserve.
As practice shows, there are never too many sockets. It is considered normal to place blocks at 3–4 points at intervals of 1000–1200 mm along the entire length of the work area table top.
Please note that, for safety reasons, it is prohibited to install sockets closer than 500 mm from the gas pipe riser and wet areas, including the sink mixer.
In relation to the tabletop, electrical fittings should be placed at a height of at least 100–150 mm, which is 900–950 mm from the floor level. The final dimensions are determined taking into account the selected tile - so that the blocks fall on its center. If the electrical installation has begun, but there are no tiles, it is enough to simply separate the wires with a reserve, and install the socket boxes closer to the start of the tiling work.