Correct setting of the satellite dish has a key impact on the quality of satellite signal reception. Many people are afraid to install a satellite dish themselves, but after reading this guide, this procedure will no longer seem so difficult.
Let's figure out how to position the satellite dish and connect it yourself.
Materials and tools needed to install a satellite dish
You will need:
- Satellite dish with signal converter.
- Antenna mast or wall bracket (sold separately), depending on technical capabilities and installation location.
- External antenna cable designed for satellite installation (with a resistance of 75 Ohms). To assemble a Full HD set-top box with a recording device, you will need two cables. If you install a multiroom system, a correspondingly longer coaxial cable will be required.
- Type "F" connectors corresponding to the diameter of the coaxial cable, keys and tools necessary to attach the mast.
- Compass, protractor, ruler or corresponding application on your smartphone.
- Cable ties or glue, electrical tape, dowels, connectors for lightning protection . If it is not possible to make a hole in a window or wall for laying the cable, use a special flat cable with “F” type connectors.
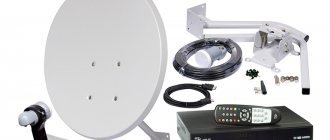
Set of equipment for satellite TV
Connecting to a TV via a receiver
TV panels with a built-in tuner have several advantages over connecting through a receiver. First of all, there are no wires. Another advantage is convenient control. In a particular case, you will have to control the channels with two remote controls (one for the TV, the second for the set-top box). At the same time, connecting through an external receiver is simpler. To connect the set-top box you can use:
- Antenna input;
- The familiar “tulip” (aka RCA) is used as an analogue television transmission;
- HDMI;
- Hardware connector;
- SCARD.
When connecting the receiver through the “tulip”, the user receives a low-quality picture. You can get a high-quality and clear image if you connect an antenna via HDMI.
Do not forget that in addition to its main purpose, the receiver can also perform additional functions. For example, it can easily play video or audio from a flash drive. With it you can view family photos in digital format. In addition, the set-top box allows you to connect your TV to the Internet. After connecting all the necessary cables to the receiver, the satellite dish will be installed. You need to turn on the TV and set-top box, after which you can start setting up.
Installing a satellite dish and laying cables
In stores that sell equipment for satellite TV and satellite dishes, you can buy various types of antenna holders that are attached with brackets to the wall or antenna mast.
- Select the bracket that suits your installation location.
- Attach it as firmly as possible to a rigid base.
Installing a satellite dish using brackets - Buy a quality cable of suitable length. It is best to take a section with a margin of at least 3 meters (a cable longer than 30 meters requires a signal amplifier), which will connect the antenna kit to the HD decoder.
Satellite cable - Route and secure the cable so that there is no risk of tripping over it or accidentally damaging it (avoid sharp bends).
- Cut the cable after installing it. .
- If the converter is equipped with a water guard, place it over the cable before inserting (draw-out converters do not require a guard).
- F-type connectors should be screwed tightly to the coaxial cable, using wire cutters if necessary (it is better to use a special wrench). It is important to carefully prepare the cable and ensure that the metal braid of the coaxial cable does not touch the center wire.
Important: in houses equipped with a lightning protection system, the mast must be connected to it with a copper cable with a cross-section of 50 mm² or 80 mm², and external wires must be connected to the mast with a cable with a cross-section of 40 mm². But these requirements are not mandatory if the antenna is located less than 2 meters above the roof and closer than 1.5 meters to the wall from the house, that is, on the balcony.
Choosing the right place to install a satellite dish is the first task
Installation instructions: choosing a location, calculating elevation angle, azimuth
Russian satellite TV operators are divided into two categories - southern (which includes NTV-plus and Tricolor TV) and eastern (Telekarta, MTS). In this case, we will give an example of installing a south antenna.
Read more about setting up a satellite signal from MTS in our material.
Map of satellites - you can start from it when setting up the satellite dish for the first time
Correct installation of a satellite dish depends on the correct setting of four parameters:
- azimuth is the angle between north and the desired direction;
- angle of inclination/elevation – angle of orientation of the plate in the vertical plane;
- elevation angle – a horizontal angle corresponding to the rotation of the plate left-right;
- converter rotation - the angle at which the antenna looks in a given direction of the world.
Adjusting the Azimuth Angle Using a Compass
Azimuth for different cities
Tilt adjustment:
If the converter has a scale or you have a protractor, turn the converter to the value in the table above that corresponds to your city.
The azimuth is set with a compass and measured in a clockwise direction. The antenna direction angle (azimuth – 180º) is measured from the south clockwise.
- use mounting bolts to secure the converter in the bracket;
- attach the antenna to the mast and adjust the angle;
- screw the wires to the converter and to the receiver;
- Connect the set-top box to the TV according to the instructions and launch it.
Installation, connection and self-tuning of a satellite dish - video instructions:
You can fine-tune the position of the satellite dish based on the measurement results of the received signal. You don't need a special counter for this. Modern decoders have sufficient functionality to measure the signal received from the satellite.
Calculation of elevation and azimuth when installing a satellite dish
Cable installation
Before installing the cable, you need to select a place where you can make a hole for it. If the antenna will hang on the facade of a building, it is recommended to drill in the following parts of the wall:
- in the corner of the window frame;
- in the wall at floor level.
If the antenna will be on the roof, the cable must be routed along the facade of the building. It must be secured both on the roof and near the window on the wall through the window frame. It is also allowed to run the cable through low-current risers of the structure.
Connecting the F connector
In order to connect coaxial cables, they must be stripped. After this you need to put on the F-connectors . This happens in the following order:
- cutting off the upper cable sheath at a distance of 2 cm without damaging the screen;
- carefully bending the wire onto the sheath;
- removing insulation from the central core protruding 2 mm from the screen;
- screwing on the F-connector;
- shortening the excess stock of the central core, leaving 2-5 mm from the plane of the connector.
The described method of connecting the F-connector is the simplest.
Multiswitch connection diagrams
The choice of a multiswitch should be made based on two important factors: the number of cables and the number of TVs in the house. The following basic connection diagrams for these devices are most often used:
- For the Amos 2/3 4.0w you only need 1 SAT cable. Reception of TV channels: horizontal polarization (H) and lower range (Low) – multiswitch input H, Low.
- The Astra 5.0E satellite requires 2 SAT cables. Reception of TV channels: horizontal polarization (H) and upper range (High) – multiswitch input H, High, vertical polarization (V) and upper range (High) – multiswitch input V, High.
- For the Eutelsat 36.0E , which has NTV+ TV channels, you need 2 SAT cables. Reception of TV channels: horizontal polarization (H) and upper range (High) – multiswitch input H, High, vertical polarization (V) and upper range (High) – multiswitch input V, High.
- For the Eutelsat 36.0E , which has Tricolor TV channels, you need 1 SAT cable. Reception of TV channels: horizontal polarization (H) and upper range (High) – multiswitch input H, High.
Signal setup
Signal quality is critical. When positioning the antenna, you should be guided by the maximum value of the quality parameter, even at the cost of reducing the signal power. If you find an antenna position with maximum signal strength and zero quality, it means the antenna is pointing at another satellite.
In this case, you should continue your search, first of all by changing the direction of the antenna. Once you have found the satellite you want, adjust the LNB settings to get the best quality.
Setting up a satellite dish:
- After connecting the device, a start screen will appear on the TV screen indicating the signal levels (if not, you can open it by pressing F1 on the keyboard or I on the remote control). Typically these are two parameters: signal strength/power and quality (these parameters are also displayed on the displays of some set-top boxes).
Signal quality - The force parameter must have a value greater than zero. For example, this could be 50%, depending on the type of converter and the length of the antenna cable, which confirms the correct connection. The quality parameter for the first time will most likely be at zero, because “hitting” the satellite in the initial settings is unlikely.
- To fine-tune the signal, you need to manually rotate the antenna 2-3 degrees in the horizontal plane, monitoring the signal level, and then move the converter closer and further away from the antenna, observing the signal quality indicator. After this, you need to tighten the screws securing the antenna to the mast (they need to be screwed in one by one, controlling the signal parameters so that deformations of the antenna fasteners do not change its position). The antennas are attached to the mast with two screws, and after tightening them, additional adjustments to the angle of inclination may be required
- The process may take some time, so it is better to have two people do this - one turns, the other watches the signal level change. The optimal signal level for normal video playback is from 70%. After this, start an automatic search for TV channels and save the settings. Even if the antenna becomes damaged, you will not need to repeat the procedure again.
An important point: in the factory state, many decoders automatically activate the download procedure after startup. If there is no signal reception from the satellite, the first startup process will stop on the settings screen with the signal measurement results, or it will be preceded by the antenna installation selection screen. If the decoder has already been launched previously (for example, at the seller's office to check its functionality), the startup procedure will stop at the screen already mentioned above with the strength and quality parameters.
Connecting a dish to a TV without a receiver
Connecting a satellite dish directly to your TV has both advantages and disadvantages. To connect, you need to connect a TV cable with an F connector to the LNBSatellite input. Immediately after this, you can configure the channels. On television devices of today's popular brands, such as Samsung, Philips, LG, etc., this process is very similar. Only the appearance of the menu and the names of items may differ.
After connecting the antenna, you need to turn on the TV, open the settings menu and select “Automatic channel search”. The satellite must be noted as the signal source. After this, the user will be able to select the desired satellite. Of course, to watch satellite TV you need an element such as a receiver. True, modern TV models are equipped with digital tuners. This tuner gives the user the opportunity to watch satellite TV without a receiver.
So, by going to the settings menu, you will need to specify which channels you need and which should not be shown. So, if the user plans to turn on and watch exclusively free channels, you should indicate that all encrypted channels should be skipped. Next, a search will be launched, during which channels are connected. Once it is completed, the user can immediately start watching satellite TV.
Software and programs for PCs and smartphones for setting up satellite television
Satellite Antenna Alignment
Using this free PC program, you can easily and easily calculate the azimuth and elevation angle for installing a satellite dish. The program is very easy to work with.
After launching the program, simply enter the latitude and longitude of your home in the “Coordinates of the antenna installation” section (you can find out by opening Google maps and entering your address). The left side of the screen will display the azimuth angles and locations for all possible satellites. Find the satellite you need and use the obtained coordinates. The program can be downloaded completely free of charge here: https://satellite-antenna-alignment.ru.uptodown.com/windows.
Advantages:
- many settings;
- completely Russian-language;
- works in all parts of the world.
Disadvantages: outdated interface.
SatFinder
A similar free smartphone app is called SatFinder. It allows you to configure a satellite dish using GPS navigation and operates in two modes:
- In camera mode.
- In "sight" mode.
In the first case, the location of the satellites is automatically displayed on the phone screen in the form of a special arc. All you need to do is point the antenna correctly.
In aim mode, the app will guide you using coordinates and arrows that will change as you move the antenna. If it is aimed exactly at the satellite, the arrows in the application will turn green. The application can be installed for free from the Google Play store https://play.google.com/store/apps/details?id=com.esys.satfinder&hl=ru&gl=US.
SatFinder program interface
Advantages:
- two satellite search modes;
- instant location determination via GPS;
- convenient interface.
Disadvantages: none found.
Dishpointer Pro
A good alternative application for a smartphone. It's not free, but it's considered one of the best satellite dish tuning apps in the world. It can be purchased for Android from the Google Play store https://play.google.com/store/apps/details?id=satellite.finder.comptech&hl=ru&gl=US.
Advantages:
- high-precision satellite identification;
- finding the user even in conditions with a poor GPS signal (using mobile operator data).
Flaws:
- the application is paid;
- menu in English.
Satellite set-top box
A receiver is a device for recognizing and decoding television signals received by a dish antenna. The main requirement for these devices is to ensure stable and high-quality broadcast of television programs. In addition, the receiver’s support for a number of advanced multimedia functions is important for modern users.
Basic criteria for choosing a tuner
The most important thing is the signal interface. Most modern satellite receivers are digital. It is believed that support for the “S2” standard is a mandatory requirement today. Very important from the point of view of ensuring picture quality in satellite tuners is the microcircuit for fixing the satellite coordinates, as well as the module for automatically selecting the antenna position.
Selection criteria: appearance, support for connectors, and ease of operation. It is advisable that the device have its own display, which would display all the data on the tasks being performed. For many users, a significant factor when choosing a tuner is the presence of buttons for controlling channels, adjusting the volume, and accessing the menu. Moreover, it is desirable that these buttons be located on the front panel of the device. They may be needed if the remote control is lost or malfunctions. Most modern models have front-facing slots for access cards to paid channels, various interfaces for decoding, as well as USB ports used for flash drives and external devices on which video content can be recorded. The rear panels of modern devices contain interfaces such as:
- RS-232, used to connect the device to a computer;
- S/PDIF – for connecting the tuner to various audio devices, as well as to home theaters;
- HDMI – for transmitting images in high definition format.
Popular receivers
The most popular devices in Russia today are produced by “World Vision”, “Gl”, “General Satellite”.
How to set a satellite dish to 75 degrees
Let's consider, as an example, the process of setting up a dish on the ABS 75E satellite.
Initially we need to determine the azimuth (antenna direction):
- Open Yandex maps, enter the name of the locality in which the installation is taking place. We take the coordinates from there and copy them.
- Turn on the receiver and enter the coordinates in the “Satellite Guide” tab and click “Calculate”
- Now we know the azimuth and tilt angle of the antenna. We determine the direction using a compass and fix the plate on the bracket.
Now you need to configure the signal:
- We turn on the tuner and in the “Installation” section we find the ABS 75E satellite.
- We return to the antenna and begin to slowly move it up and down until we catch the signal from the ABS 75E. Then we scan the channels.
Installing and configuring satellite antennas on ABS 75E, the language is not Russian, but everything is intuitive:
Once the signal is picked up and the channels are located, you can fasten all the screws and connect the dish to the tuner.
How to choose a satellite: review of models and prices
Before purchasing satellite equipment, it is important to first select an operator. The satellite variety of television operates from various orbiting satellites that pick up signals from stations and transmit them over large areas to Earth.
The design of such equipment is not as complicated as it might seem
The antenna detects the signal and then transmits it to the converter and then to the tuner. And only after this the decoding process occurs, and the signal is transmitted to the TV in the form of sounds and images.
Construction assembly option
Channels in Russian are transmitted from certain satellites. To receive a signal from a specific object, it is important to set the receiving frequency correctly. To do this, you need to know how to set up a satellite dish yourself.
About 30 channels in Russian can be received via the Yamal 201 satellite. From operators it is worth choosing among such as Tricolor - TV, NTV - plus or Raduga - TV.
The table shows prices for certain models of satellite dishes.
| Image | Models | price, rub. |
| Lumax 0.6 m with bracket | 1450 | |
| Tricolor STV – 0.55-1.1 0.55 | 1290 | |
| Tricolor FullHD GS-E501/C591 | 10300 | |
| Supral 60 cm with bracket | 1640 | |
| Option 0.6 m | 900 | |
| Wisi b/kr | 5900 |
Setting up a satellite dish for 3 satellites Amos, Astra, Sirius Hotbird
Installing satellite television from three satellites will allow you to watch many free Russian-language TV channels (more than 90) and a huge number of foreign ones (more than 2 thousand). Standard equipment:
- satellite antenna,
- three Ku-band converters;
- two plastic fastenings for side converters;
- antenna masts or brackets;
- DiSEqС (Disek) - converter switch;
- F-type connectors;
- coaxial cables 75 Ohm.
Astra
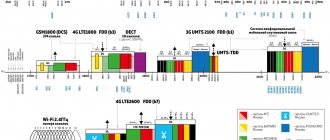
Transponders for satellites Astra, Amos, Hot Bird
Use a satellite tuner (receiver), for example Openbox X800. In the tuner menu, open the “Antenna installation” item and independently set the frequency for the Astra satellite, which will become central in our three-satellite connection:
- H – horizontal polarization;
- V – vertical polarization;
- position – 4.80 E;
- frequency – 11.766 GHz;
- symbol rate (S/R) – 27500;
- error correction (FEC) – ¾.
The antenna must be oriented towards the location of the satellite. When doing this, you must ensure that the antenna is pointed at the correct satellite. To check, you must enter the transponders shown in the table and turn on any channel. If no channels appear as a result of scanning, then the antenna is not configured correctly and the setup needs to be done again.
Amos
Setting up the Hotbird and Amos satellite is that you need to find the correct position of the converter relative to the center one. To do this, you must move it horizontally and vertically until you find an acceptable signal level.
- position – 13E;
- frequency – 10.815 GHz;
- symbol rate (S/R) – 30000.
Hotbird
Connect the cable to the converter, then open the tuner menu and set the following parameters:
- position – 4W;
- frequency – 11.139 GHz;
- symbol rate (S/R) – 27500.
Then connect DiSEqC to the appropriate converter and set the port numbers for each satellite in the tuner. For example, in our specific case:
- the first port is the Astra satellite;
- second port – Amos;
- third port – Hot Bird;
- the fourth port is free.
The so-called dragon is a satellite dish tuned to the three popular satellites Amos, Astra and Hotbird
So, what is an anchor bolt, what does it consist of?
The main parts of the structure are the so-called “glass” and the bolt itself located inside. On one edge there is a thread for a nut, on the other there is a cone with a thickening. The bolt must be driven into the hole with care so as not to destroy the threads. To facilitate this process, it would be wiser to slightly loosen the nut, but do not completely unscrew it. Otherwise, as a result, the bolt may simply fall through, and getting it out will become a big problem that is absolutely unnecessary.
The same is true for attaching the bracket to the installed bolts. You need to make sure that they, again, do not go too deep into the glass. There is one recommendation for this case: before hanging the bracket, it is better to pull the bolts forward or tighten them with a nut. This will allow them to stay tight and not wobble. Another rule says: the glass must be flush with the surface (i.e., the wall), the thread must be flush with the nut.
How do anchor bolts work?
The principle is elementary:
- When you start to tighten the nut, it pulls out the bolt due to the presence of threads.
- The cone on the tip of the bolt penetrates the glass and pushes it apart from the inside to the maximum.
- The result is that it is absolutely impossible to pull such a bolt out without destroying the wall.
To fix the brackets, many craftsmen recommend using self-wedging bolts. They, unlike ordinary screws and plastic dowels, are more durable and reliable. The choice is, of course, yours. But when purchasing anchor bolts, you need to carefully look at the quality of workmanship (material, wall thickness of the glass). The question of why is meaningless in this case, since weak bolts mean poor fixation! If you are installing a bracket on a balcony, you can use ordinary metal rods with threads, which are pulled through the wall and secured on both sides with nuts.
Again about installing the antenna...
The first was to set up an antenna with 3 converters for Sirius, Hotbird, Amos, the second was for Eutelsat 36E. At first the brackets were screwed to screw anchor bolts, later I changed them to nut ones.
- IMPORTANT: as practice shows, brackets secured with screw bolts (anchors) are not held firmly enough. The same cannot be said about brackets with nut bolts, which are more reliable in all respects.
The antenna installation process begins, naturally, with its assembly. Then the satellite antenna assembly is hung on the bracket. And only after that converters, cables and other structural elements are attached.
:
In the photo above, the antenna is already assembled, with converters, cable, etc. Initially, the antenna was simply assembled, hung on a bracket, and the converters and cable were attached only later. A thin metal cable - I just had extra one and I threaded it through the antenna mount and screwed it to the elevator shaft post in case the wind would tear out the anchors, so that the antenna would not dive from the roof. In fact, this is almost unrealistic, but so be it I thought. To adjust the antenna in the vertical and horizontal planes, you need to tighten the mount so that the antenna does not change its tilt on its own, but at the same time it can be moved in the planes with some effort. These nuts are not tightened much until final adjustment:
An unclamped left screw allows you to adjust the antenna in a vertical plane, 2 unclamped right screws allow you to rotate the antenna relative to the bracket in a horizontal plane.
Then you need to put 2 mutifeeds on the central holder of the converter. The remaining converters are fixed in multifeed holders. Next, everything needs to be tightened securely, but it is possible to rotate the converters in multifeeds in all directions and planes with some effort. The cable system is connected at the very end. The photo below shows what multifeeds are and how they are attached:
Setup: Steps in a painstaking process
Setting up equipment is quite a troublesome task and requires a lot of time. It all starts with screwing the F-connector to the central converter with a piece of cable at least 2 meters long. The other end of this cable is fixed to the receiver.
F-connector and how to screw it onto the cable correctly.
The receiver itself connects to the television receiver. Be careful: the power (220 V) must be turned on only after connection. Another important point to remember: when you screw on the F-connector, make sure that the shielding film and the thinnest conductors on the cable braid do not short-circuit with the central core. Otherwise, everything may end in a breakdown of the receiver!
Direct setup
Turn on the TV and receiver. Go to MENU - INSTALLATION, then to SEARCH CHANNELS. On the left you will see a list of satellites from which reception will occur. Select the desired one, for example, Sirius 2/Ku 4.8E, if the central converter is configured for it, which was previously firmly fixed.
Next, go to the menu on the right side and remember the following symbols:
- LNBP – turn on the converter.
- LNBP Type – select Universal (the type can be found in the documents for the converter).
- LNBP Freq – 10600/9750 (this data is also indicated in the instructions for the converters).
- 22Khz – select the AUTO (this is the signal that switches the dial).
- DISEqC – leave NONE (if you connected the signal reception directly without using DISEqC).
Then look for the yellow button on the remote: it will take you to the transponder submenu. This is where you will need to look for a satellite signal. TIP: mark in advance a couple of transponders from satellites with different polarizations and any channels (preferably free) that actually WORK (FTA). These are easy to find on the Internet on specialized sites.
Let's try to tune in to the following transponders:
| Satellite | Transponder | Visual inspection channel |
| Sirius 4.8E | 11766H | Novy Kanal, 5 Kanal (Ukraine) |
| Sirius 4.8E | 11996 H | Russia Today |
| Sirius 4.8E | 12073H | Inter+ |
| Sirius 4.8E | 12245V | Europe by Satellite |
| Hotbird 13E | 10971H | 3 Channel |
| Hotbird 13E | 11034V | RTR Planeta |
| Hotbird 13E | 11411H | Adjara TV |
| Hotbird 13E | 11766V | Rai Uno |
| Hotbird 13E | 12207H | Fashion TV Europe |
| Amos 4W | 10722H | K1, 1+1, Kino |
| Amos 4W | 10759 H | Telekanal STB, Tonis, MTV Ukraine |
| Amos 4W | 10925 V | Russia Today |
| Eutelsat W4 36E | 11727L | Gameplay TV, Ru TV |
| Eutelsat W4 36E | 12322 R | NTV Plus Infokanal |
- EXAMPLE: let's look at the option with transponder 11766H. It broadcasts at a frequency of 11,766 Mega Hertz (horizontal polarization). To make it more convenient to adjust the quality of the picture and signal, it is better to display all information in full screen mode. There is an INFO button for this. It will be convenient to navigate the quality using the microscale located below.
Don’t be alarmed if at first the “quality” of the signal is 0. The reason for this failure is quite understandable: at the very beginning we discussed options for directing the antenna and turned it in the right direction using the “scientific poke” method. And now the time has come to tune the antenna in all planes. Get ready immediately for a long and monotonous process that requires accuracy, attentiveness and self-control. Why? A couple of millimeters and the signal will be lost. It won’t even be a matter of its poor quality, but its complete absence!
Setting up a sat antenna in planes
First you need to find one ideal vertical position. Then slowly and smoothly try to rotate the antenna horizontally. In this case, you need to constantly monitor the signal quality scale. As soon as the number moves from 0, it means you are acting correctly. In this way, you should bring the scale to at least 15. It is possible that all manipulations with horizontal movements will be unsuccessful. Then you will have to return to the vertical position and change it a little. And then start all over again: careful movements left and right until a signal appears, at least a small one. Your task is to achieve the highest quality of reception. Doing this, of course, is not easy, but without this, as they say, there is nowhere. You can try turning the converter a little (around the axis). There are even special marks on the case for this.
The conclusion is this: to achieve better signal quality, you need to try ALL adjustment options. This is the only way the result will satisfy you completely.
- IMPORTANT: if you have double-checked everything a hundred times, tried to adjust the antenna, changed the receiver settings several times, but still haven’t found a signal, try replacing the converter. There is a possibility that it is simply broken.
Have you achieved the best possible reception quality?
Have you achieved the best possible reception quality? Congratulations! It seems like it's time to tighten the screws and enjoy a job well done?! Not everything is so rosy. Remember: the setup was carried out with a transponder broadcasting ONLY in horizontal polarization (there is a letter H in the picture at the end of the 2nd term), but you also need to configure some transponder in vertical (V) polarization:
In each specific case, completely different actions can help. A slight rotation of the converter software or COUNTERclockwise can help achieve better signal quality in vertical polarization.
After this, you can scan transponders (channel frequencies). A description of this process can be found in the documents for the purchased receiver. And then visually monitor the reception of certain channels and their correspondence to the desired satellite.
Let's tighten the nuts!
The long-awaited moment has arrived when signals in both polarizations produce the highest possible quality. Now you need to tighten the nuts very tightly and firmly. This must be done evenly on each side, extremely carefully and with great care, since by tightening the adjusting nut, you, without meaning to, slightly change the direction of the antenna. As a result, the signal quality again noticeably decreases!
So, the antenna itself and one of the converters are successfully configured. After this, you should turn off the receiver and transfer the cable from the central converter to the converter from the right multifeed when viewed from behind the antenna from its mount. Then turn everything ON again.
A familiar menu will appear in front of you, only now you should select Hotbird 13E and another valid transponder. As in the case described above, it is necessary to systematically achieve excellent signal reception. However, here it is not the antenna itself that will have to be moved, but the converter on the multifeed. By the way, it is capable of moving in any plane: up/down; right left; back forward.
If you see that the signal is excellent, tighten the nuts. But don't forget to check the polarizations. Scan transponders and check any channel broadcasting without payment from this satellite purely visually. Everything is okay?.
Then turn off all the equipment again and twist the cable, as before, to the converter installed on the multifeed on the left when looking from the satellite dish mount, that is, from the back of the mirror towards the multifeed. Then the process of setting up channels (scanning transponders) is repeated but with the selected Amos 4w satellite
FIRST ANTENNA tuned to 3 satellites INSTALLED SUCCESSFULLY!
Do you want to have an additional antenna at home tuned to Eutelsat W4 36E?
The process of installing it will seem like a piece of cake compared to the previous “feat”. This receiver has only one converter with circular polarization. This means that it doesn't really matter where exactly it is turned. The most reasonable option is to place it with the cable down to protect it from rain and snow.
The antenna must again be adjusted in two planes - horizontal and vertical. I turn everything off and reconnect the cable to this converter. The settings according to this converter are as follows:
I set up the second antenna, the test is carried out in two polarizations (on different transponders). Since the converter is designed for circular polarization, they are checked not for H (horizontal and vertical) V, but for L and R (left and right).
That's all. You can turn everything off. Now you need to switch the signal through the disk. It looks something like this:
Signal switching via DISEqC
My disc has 1 output to the receiver, designated REC, and 4 inputs for converters, called 1,2,3,4. I connect the converters like this:
1-Sirius
2-Hotbird
3-Amos
4-Eutelsat
The connection itself is quite simple. Each converter has its own piece of cable, which is fixed to the corresponding DISEqC input. In the case of installing one antenna (with one converter), DISEqC is not required at all. When there is one antenna for two converters, it turns out that the disk will have two ports unused. It's not scary. DISEqC itself is best placed close to the antennas in a special box protected from moisture to prevent short circuits and breakdowns during rain and snow (such products can be sold in some electrical stores, but are mainly sold in satellite equipment stores).
- IMPORTANT: There must be ventilation holes at the bottom of the box. Cable bends with sharp corners are NOT ALLOWED! F-connectors should be covered either with special nozzles included in the equipment kit or with heat shrink tube.
The photo shows the distances between the installed converters and their angles of inclination.
We configure the disk protocol in the receiver menu (in our case 1.0). Converters are distributed among DISEqC input ports. Their working condition must be checked separately, in other words, for each satellite.
The pictures show which converters are assigned to which inputs (ports) of the disk (to which satellite). 0/12V : On only for LanComBox. If you don’t have it, then you don’t need to turn on 12V. I save the changes and check if all the disk inputs are working (that is, all configured satellites have a signal).
Why can’t all converters be connected to DISEqC at the same time during setup?
This question arises for many people during the process of installing and configuring antennas. And the answer to it is very simple: if the disc DOES NOT WORK, then you will have to spend a lot of time, lose a lot of nerve cells in an attempt to optimally adjust the signal reception. But this very signal will never be found! In addition, in the absence of DISEqC, it will be easier and faster for you to determine whether the converter you purchased is working
All cables are secured with ties so that they do not sag or dangle. Finally, you just need to attach the cable to the cable without pulling it. Lower the cable itself and only then tighten it. All other steps for laying cables in the apartment, connecting a TV, and a receiver are not at all difficult to perform.
As a result, what we got on the roof:
What should I do if the antenna is out of reach after installation?
“One antenna - one converter” is the simplest case: the signal receiver is attached to a bracket and suspended on a balcony (an external wall of a house, outside a window, etc.). Later it is configured according to the above scheme. But what should you do if you need to configure additional converters, for example, on a multifeed? You can go this way: take some unnecessary old cabinet and screw a bracket to it. The main thing is that the stand is high enough. Then put on the antenna, install this entire “picturesque structure” on the balcony or near the window and start tuning. Chances are you'll get lucky the first time. But in some cases you will have to try hard to properly configure the converters.
After which they simply need to be carefully re-hung onto a bracket pre-fixed in the right place. And there is only one thing left to do - work with the planes (adjust the antenna in horizontal and vertical positions for the best signal).
- IMPORTANT: If you install the antenna at a high altitude, REMEMBER SAFETY! Be sure to insure yourself and the antenna itself. It’s enough to imagine what would happen if the antenna accidentally fell off. Impressive weight can cause harm to both people and property, for example, expensive cars.
In conclusion, a few words about grounding. Most professional installers recommend grounding antennas. But there are also opponents to this approach. In any case, it will take a few minutes and will not be superfluous.
And finally:
List of the most popular channels according to the information I found today from the trinity Hotbird, Sirius, Amos (be prepared for the fact that some rotation and coding of channels may occur from time to time):
Ukrainian channels (Sirius satellite)
Inter+, Enter–Musical, Enter–Film, One-on-one*, Channel 5, Rada, Glas, Star TV Ukr, UBC, OCK, Tisa 1
Ukrainian channels (Amos satellite)
1+1, 1+1international*, 1+1-cinema, Tonis, Kiev, M1, M1-international*, O-TV, MTV Ukraine, K-1, K-2, KTM, channel 7, 24-news, Megasport*, STB, Music Box UA
Russian channels (Hot Bird satellite)
ORT international, RTR-Planeta, Euro News in Russian, CNL Christian Satellite - the first Christian channel in Russian, Russian music channel
Russian-language channels (Sirius satellite)
1 Baltic Music Channel, TV Center, TV5-Latvian Channel, Romantika-1*, Romantika-2*, Travel (travel)*, Department Store
Russian-language channels (Hot Bird)
RTR-Planet, RTR-Sport, ORT-international, Russian music channel, RBC TV, R1, TBN Russia, Ajara TV - Adjara television channel, news and the latest films in Russian, National TV of Armenia - Armenian television channel, Euro News - a 24-hour news channel in Russian, CNL Christian Satellite TV Channel - the first Christian channel in Russian, Caspio Net - Kazakh TV channel of Khabar Agency CJSC, Caspio Net carries out 24-hour news broadcasting with hourly blocks in three languages: English, Kazakh and Russian, Lider TV, AZE-TV of Azerbaijan - films in Russian.
English speaking channels (Hot Bird)
Euronews, CNN, BBC, Russia Today, Jetix*, Supreme Master, Word Network, MRTV, Gog TV, Gospel Channel, I'm on TV, Get Green Card TV, Al Jazeera English, Pentagon Channel, The Prophetic Word, Denaro TV , TBN, The Church Channel, JCTV, Smile of a Child, Inspiration Network, Daystar TV, MTA International, EWTN, DW, Bloomberg, Dub Sports, Real Madrid TV, Words of Peace, Caspio.net, 3ABN, TCT, VoA ( Voice of America), Rainbow, The Spirit Word, Cool TV, Luxe TV, Derby Race TV, Jame-Jam Network, Jame-Jam Network 2, Europe by Satellite, Love World, Nile TV, Hope Channel
Sports (Hot Bird)
Planet Sport, Prima, Rai Sport Sat, Dub Sports Channel, *, AB Moteurs*, Action*, Motors TV*, Sailing Channel*, English Premiere League*, Equida Outlist*, GlobalDraw Greyhounds, Equida*, ESPN Classic Sport*, Real Madrid TV
Cartoons (Hot Bird)
Baby TV* - for the youngest, Jetix*, AJ - Children's Channel, Mangas*, Super RTL, Smile of a Child, MI TV, Boomerang*, Children's - for the youngest, Berbere TV*
Music channels (Hot Bird):
RU TV, Mezzo (Muzik)*, MCM Europe*, Music Box Russia, Deejay TV, Viva Polska, 102.5 Hit Channel, 123 SAT, Magic, Countdown, Music Box Italia, Video Italia, Onyx, Khalifa TV, Gay TV, Krisma TV
Erotic: (Hot Bird, Sirius, Amos)
Hustler TV*,Blue Hustler TV*, Sexy Sat 1, Sexy Sat 2, Sexy Sat 3, Eurotic TV, Eurotic Plus, Eurotic Dreams, E-Sat TV, Arab Girls, Supreme Master TV, Sexy Arab, G Point, Gay TV , Top Sexy TV, Free Sex Sat, Free Sex Zone, Sensuality, 4sexTV, All sex, AAA sex channel, Xstream TV, Full-X 4Free, Hot Love, Hot Chili, MCT (6 channel, XXX, encoded), (Red Licht (5 ch., XXX, encoded), SexView (14 ch., XXX, encoded)
Fashion: (Hot Bird)
Fashion, Fashion men, World Fashion, TV Moda
News: (Hot Bird)
Vesti, 24 News, Euro News, Fox News, BBC World, NBC Europe, EBS, World Net Europe, Bloomberg TV Europe, DW TV, Nile News, Canal 24 Horas, Rai News 24, Al Jazeera, Al Arabia, Khalifa News
German channels:(Hot Bird)
4 Fun TV, Euronews, Vox, Das Vierte, ZDF, EWTN, ARD Das Erste, DW, RTL2, Super RTL, Arte, Bloomberg, Words of Peace, SF Info, Europe by Satellite, Terra Nova, Luxe TV
French channels:(Hot Bird)
MTA International, Euronews, Meteo Express, Home Shopping, Demain, MTV France*, Boomerang*, TV5 Monde FBS, TV5 Monde Europe, France 24, BFM TV, EWTN, NRJ 12, Arte, Best of Shopping, NT1, La Locale, Words of Peace, Gulli, Mezzo, Europe 2, Luxe TV, Europe by Satellite, Direct 8, TV8 Mont Blanc, Nile TV, 3A Telesud, Liberty TV, JET, KTO, Walf TV
Spanish channels:(Hot Bird)
Euronews, Bethel TV, Arcoiris TV, Enlace TBN Europa, EWTN Europe, TVE, Canal 24 Horas, TVE, International, Words of Peace, Europe by Satellite
Italian channels:(Hot Bird)
Administra.it, All TV, Arte & Atre, Blu, Calabria Channel, Camera dei Deputati, Canale 10, Canale 5, Canale Italia, Canale 8, Carpe Diem, Cartomanzia Lotto, Ceramicanda, Challenger TV, Cinquestelle TV, Coming Soon TV, Cortona Notizie, Count Down TV, Diva Futura Channel, Diva Futura Live, Diva Futura Plus, Elite Shopping TV, E-TV Emilia Romagna, Euroconference, Euronews, Europe by Satellite, Expo Club, Family Life TV, Forte Rosso Sat, Free Channel , Future Sat, GBR, Gioielli D'Anna, Italia 1, Italia Channel, Italiamia, Italiani nel mondo Channel, Italiasat, Italy & Italy, Jolly Sat, Julie Channel, La 9, Lazio Channel, Libera, Libera, Magic TV, Mare TV, MediaShopping, Mediatel, Mediolanum Channel, Mediterraneo Sat 1, Mediterraneo Sat 2, Milano TV Sat, Motori TV, Music Box Italia, Napoli International, Napoli Mia, Napoli TLA, Nessuno TV, New TV, Nostradamus, Nova mosaic, Oasi TV , Odeon Sat, People TV, Planet Italia, Play TV, Puglia Channel, Punto Sat, Puntoshop, Radio Italia TV, Radio TV, RAI Doc, RAI Due, RAI Edu 1, RAI Edu 2, RAI Futura, RAI Med, RAI Nettuno Sat Due, RAI Nettuno Sat Uno, RAI News 24, RAI Sport Satellite, RAI Tre, RAI Uno, RAI Utile, Rete 4, Rete Oro Sat, Rete Capri, Roma Sat, Roma Uno, RTB International, RTL 102.5 TV, S 24 , Sardegna Uno Sat, Sat 8, Sat 9, Sat 2000, Senato Italiano, Sensuality, SET, Sicilia Channel, Sicilia International, Sixty Nine, Sky Meteo 24, Sky Meteo 24, active, Sky Meteo 24 active, Sky On Air, Sky TG 24, active In primo piano, Sky TG 24 active mosaic, Sky TG 24 active, Scienza, Sky TG 24 active Sport, Sportitalia, Star Sat, StarMarket, Studio 100 Sat, Studio Europa, Taxi Channel, TBM, TBN Italia, Tele A, Tele A piu Sat, Tele Padre Pio, TeleCampione, Telecolore, TelefortuneSat, Telelombardia, Telemarket, Telemarket 2, Telenord, Telepace, Teletirreno, Tiziana Sat, Tiziana Sat 2, Toscana Channel, TR 2 Sat, Trentino TV, TRSP, TV 7 Lombardia, TV Koper Capodistria, TV Moda, TVA Vicenza, UnoSat, Varese Sat, Veneto, Venice Channel, VideoBergamo, Videolina, Videolook Channel Italy, Vip TV, Words of Peace, Xex
Polish channels:(Hot Bird)
4 Fun TV, Baby TV*, Edusat, Europe by Satellite, ITV, Mango 24, Podroze TV, Polonia 1, Polsat 2, Polsat Zdrowie i uroda, Tele 5, TMT, TV Biznes, TV Polonia, TV Puls, TVN Gra, TVP Kultura, Viva polska
Arabic channels:(Hot Bird)
123 Sat, 2M Maroc, Abu Dhabi TV Europe, Al Aqariya TV, Al Arabiya, Al Baghdadia, Al Fayhaa TV, Al Forat Network, Al Hayat, Al Hiwar TV, Al Jazeera Channel, Al Jazeera Children's Channel, Al Jazeera Documentary, Al Jazeera Mobasher, Al Masriyah, Al Mustakillah TV, Al Ordoniyah, Alalam News Channel, AldiyarSat, Alhurra Europe, Al-Iraqiya TV, Alkawthar TV, Almaghribya, Alsharqiya TV, Al-Zahra TV, ANB, ANN, Arab 69, Arrabia, Arriyadiya , Assadissa, Canal Algerie, Dubai Sports Channel 2, Dubai TV Europe, Galaxy Sat TV, Infinity, Iqraa, Ishtar TV, Jamahirya Satellite Channel, Kuwait Space Channel, MBC Maghreb Al-Arabia, Medi 1 Sat, Miracle, Mlive, MTA International , Nile News, NourSat, Oman TV Satellite, PTV, Qatar TV, Salaam TV, Sama Dubai, Sat 7, Saudi Arabian TV 1 Satellite, Shahrazad, Sharjah TV, Spirit Channel, Strike, Sudan TV, Syria Satellite Channel, Thalitha TV, The Healing Channel, Tunis 7, TVM Europe, TVM Middle East, Victor Chandler, VoA TV, Words of Peace, Yemen Satellite TV
Indian channels:(Hot Bird)
TRT Tamil, Ceylon TV, AsiaNet, Maharishi Open University
National channels:(Hot Bird)
Armenia – National TV of Armenia. Bangladesh - ATN Bangla. Bulgaria - TV Bulgaria. Holland - BVN TV. Greece - OTE, Magic Peiraia, ERT SAT, Extra Channel, Tele Asty, Alpha TV. Georgia - Ajara TV. India - Maharishi Open University. China -CCTV. Korea - Arirang TV. Kurdistan - KurdSat. Macedonia - MKTV Sat. Poland - TV Polonia, TVN. Romania -TV Romania International, Pro TV International. Thailand -Thai TV. Yugoslavia -TV Montenegro, BK Sat, RTS Sat.
*-channel can be received if there is an emulator in the receiver, but not guaranteed. The remaining channels are open (FTA).
Links:
— coverage of regions by satellites
- a very decent site with tables and parameters of ALL satellites and channels
— table of free Russian channels on satellites
Enjoy watching!
Tips and tricks
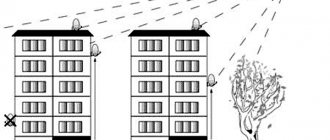
Choose a location to install the antenna - it should provide a view of the sky in a southern direction. Check to see if any of your neighbors use satellite TV. If yes, then point the antenna in the same direction as him. It should be directed to the Eutelsat 36B satellite and/or Express-AMU1.
It is important that there are no obstacles blocking the signal (wires, trees, buildings) on the path from the antenna installation site to the satellite.
The satellite dish installation procedure will be easier if you:
- take a second person as an assistant.
- The antenna installation location is within walking distance;
- the premises are your property, or you have permission to install an antenna system from the building manager;
- The distance from the antenna to the decoder is small (no more than 30 m) and there are not many obstacles on the way, such as walls or windows.
Common connection errors
If, after installing the equipment, the image leaves much to be desired, it means that errors were made during setup, which led to a deterioration in the quality of signal reception. In most cases, users make the following mistakes:
- insufficient diameter of the antenna mirror - leads to loss of signal in bad weather conditions;
- errors when choosing the polarization of the converter - do not allow the equipment to tune to the desired satellite;
- lack of a protective casing - at low temperatures the irradiator will become covered with ice;
- connection via an unsuitable cable - the core must be copper: a steel core noticeably worsens the reception quality;
- poor-quality cable crimping at the connection points.
In addition, most users make mistakes when connecting two or more TVs to a satellite dish.
If you are not confident in your abilities, you should not install the equipment yourself. In the best case, specialists called to fix the malfunction will require partial compensation for the cost of damage; in the worst case, the repair is completely carried out at the user’s expense.
Search channels
Setting up channels depends mainly on the device the user is working with. Thus, the Tricolor module without a receiver allows subscribers to watch satellite television at absolutely any time. Such a device replaces additional equipment. However, in order to connect such a module to a TV, the latter must have the appropriate connectors. It should be noted that all modern TV models are equipped with such a connector. But in older models it may be missing. You can determine the presence of a connector, as well as its location, using the instructions from the TV.
To manually tune channels using the Tricolor module (without using a receiver), you need to select and enable manual tuning on the TV. In addition, you need to enter the following parameters: modulation - QAM 64, transmission speed - 6900 ks/s. After this you need to enable search.
Don’t forget that the Tricolor module has several significant advantages:
- Allows you to unblock channels;
- Protects against illegal viewing attempts;
- Transmits only high quality signal;
- Allows you to save space;
- Significantly reduces energy consumption.
Thanks to fast and easy connection, as well as the above advantages, the Tricolor module is becoming increasingly popular. Moreover, with its help you can watch satellite TV without a dish. How is this possible? Initially, the phrase “satellite television broadcasting without a dish” seems absurd. However, in the common understanding of citizens of our country, “satellite television” does not mean receiving a signal from a satellite at all, but a set of channels that cannot be received on a simple antenna.
Tricolor without a dish will allow you to watch your favorite channels using Internet access. Movies and any TV shows in high quality are available to everyone at a network transmission speed of more than 10 Mb/s. It is very easy to access satellite channels in high quality. You just need to connect the input port of the Tricolor receiver and the output port of your home router. After this action, an automatic connection to the Internet will occur.
It should be noted that the Tricolor module was initially installed on a broadcast source such as a satellite. However, he can show without a plate. To do this, using the control panel through the installation menu, you need to set “Internet” as the broadcast mode. A general list of programs available for viewing will appear. You need to select one from the list and press the desired button on the remote control. Throughout the test period, Tricolor TV channels will be broadcast free of charge without a dish.