The article will talk about how electricity is supplied to a house from a pole using a SIP wire through a pipe stand or underground. It is worth paying attention to the fact that the total power of all consumers located in the house can be very impressive. For this reason, the input is the most vulnerable point; installation errors must not be made. In our article you will learn how to lay a cable, and most importantly, which one to use. It will also be mentioned how the electricity distribution scheme is properly organized.
Electrical distribution principle
First you need to decide what an electrical input is. This is the border between two spheres of power supply - external and internal. This is the same line that connects the home and municipal parts of the power supply. Therefore, knowing how to introduce electricity into a house from a pole with your own hands is extremely important. After all, this is the area where the load is highest. Consequently, the requirements for input design are the highest. The input resource is three times lower than the electrical wiring in the house itself.
Judging by the experience of electricians, there are several connection points:
- In 95% of cases, private houses are connected to power supply from overhead power transmission poles.
- No more than 1-2% of cases - to collector nodes of underground cable routes.
- In approximately 3-4% of cases, the connection is made to low busbars of transformer substations.
DIY wiring
Modern construction trends provide for hidden wiring. It can be laid in specially made grooves in the walls - grooves. After laying and securing the cables, they are covered with putty, comparing them with the surface of the rest of the wall. If the erected walls will then be lined with sheet materials - plasterboard, gypsum plasterboard, etc., then grooves are not needed. The cables are laid in the gap between the wall and the finish, but in this case - only in corrugated sleeves. The shell with laid cables is attached with clamps to the structural elements.
How should internal wiring be laid? In a private home, when installing it yourself, you must follow all the rules
When installing, you need to remember that the internal electrical wiring of a private house is done according to all the rules and recommendations. This is the only way to guarantee safety. The basic rules are:
- laying wiring only vertically and horizontally, no rounded corners or beveled routes;
- all connections must be made in installation junction boxes;
- horizontal transitions must be at a height of at least 2.5 meters, from which the cable runs down to the socket or switch.
A detailed route plan, similar to the one in the photo above, must be saved. It will come in handy during repairs or wiring upgrades. You will need to check with him if somewhere nearby you need to ditch or make a hole or hammer a nail. The main task is not to get caught in the cable.
Wire connection methods
A large percentage of electrical wiring problems come from poor wire connections. They can be done in several ways:
- Twisting. Only metals that are homogeneous or do not enter into a chemical reaction can combine in this way. It is strictly forbidden to twist copper and aluminum. In other cases, the length of bare conductors must be at least 40 mm. The two wires are connected to each other as tightly as possible, the turns are laid one next to the other. The connection is wrapped on top with electrical tape and/or packed with heat-shrink tubing. If you want the contact to be 100% and losses to be minimal, do not be too lazy to solder the twist. In general, according to modern standards, this type of wire connection is considered unreliable.
- Connection via terminal box with screw terminals. The housing is made of heat-resistant plastic and contains metal terminals that are tightened with screws. The conductor, stripped of insulation, is inserted into the socket and secured with a screw or a screwdriver. This type of connection is the most reliable.
- Connecting blocks with springs. In these devices, contact is provided by a spring. A bare conductor is inserted into the socket and clamped by a spring.
Still, the most reliable connection methods are welding and soldering. If it is possible to make the connection like this, you can assume that you will not have problems. At least with connections.
Installing electrical wiring in a house with your own hands requires careful fulfillment of all requirements. This is a guarantee of your privacy and the safety of your private property.
After the wires from the machine to the connection point of the socket or switch are laid, they are checked for integrity with a tester - the wires are connected to each other, checking the integrity of the conductors, and each individually to the ground - checking that the insulation is not damaged anywhere. If the cable is not damaged, proceed with the installation of the socket or switch. Once connected, everything is checked again with a tester. Then they can be started on the appropriate machine. Moreover, it is advisable to sign the machine immediately: it will be easier to navigate.
After finishing the electrical wiring throughout the house and checking everything yourself, they call electrical laboratory specialists. They check the condition of the conductors and insulation, measure grounding and zero, and based on the results they give you a test report (protocol). Without it you will not be given permission to put into operation.
Connection to the meter
Electrical wiring that goes directly to the meter must be visible; no connections are allowed. This is due to the fact that it is not possible to remove voltage by bypassing the electricity meter. In order not to do hidden work reports and not to seal boxes with connections, metering devices are installed on the facade of the house.
At this location, the person performing the inspection has easy access to the meter. The continuity of the input wire is also very easy to check. Electricians recommend performing installation this way.
Connecting electricity - where to start?
Those who need to connect their home to electricity often have no idea where to start. As in most cases, this process begins with the preparation of appropriate documentation.
Registration of work permits and issuance of technical conditions
The main document that allows you to start connecting electricity is the technical conditions for this type of work. To obtain such a condition, you must contact the government organization responsible for supplying the population with electrical energy, that is, Energonadzor. This organization necessarily has a special department that deals with such issues, where you can find out what is needed to connect electricity to the house and what documents need to be provided. Often the list of documents includes the following:
- photocopy of the passport and identification code of the owner of the house;
- a photocopy of the title document for the object;
- inventory file at this address;
- site plan.
Depending on the need, this list may be supplemented with other documents. Next, you should fill out the appropriate application, which is drawn up in two copies. After completing the application, an agreement with the organization is drawn up within thirty working days. According to the legislation of the Russian Federation, Energonadzor does not have the right to refuse customers connection to the power grid, therefore in 99% of cases, this procedure proceeds without problems.
After receiving the technical specifications, you must study them carefully, as they contain important information. This document indicates exactly where the light meter should be located, namely whether it should be installed on a pole, on the very facade of the house or on one of its walls. Through this, the organization attempts to ensure uninterrupted access to the site at all times. However, the owner of the house himself can choose a place to install the unit, the main thing is that access to it is provided.
Features of the process of connecting from a pole after issuing technical specifications
It is imperative that after the technical specification has been handed over to the client, it should be read carefully. This is due to the fact that it may contain unnecessary requirements that are not required to be fulfilled. According to the legislation of the Russian Federation, if the distance from the border of the site to the nearest pole is no more than three hundred meters (and in rural areas no more than five hundred meters), then a state organization must deal with the connection of electricity. This means that in this case it is not necessary to hire a special team for this, and all work will be carried out by Energonadzor employees. This is quite convenient, because the cost of connecting electricity to a private home from private installers today is quite high, so not everyone can afford to hire workers. At the same time, employees of a state organization must complete all work within a period of no more than six months.
In addition to the technical conditions for connecting electricity, sometimes they require a power supply project for connecting up to 15 kW, however, by law, it is not at all necessary to submit this document.
After agreeing on all the documentation, you can begin connecting. It should be remembered that the process of obtaining technical specifications itself can be significantly delayed, due to the fact that in a state-owned company there is always a shortage of personnel and at the same time a large flow of applicants. To speed up the paperwork process, you can contact a private connection company.
Section of Responsibility
It is through the meter that responsibility can be divided between the electricity supplier and consumer. The metering device and all lines that connect to it belong to internal supply projects. But supplying electricity to a house from a pole using a SIP wire or any other wire is the scope of servicing city electrical networks.
Disputes may arise at this point, since the electricity supplier does not allow supply until the meter is sealed. And since meters are installed exclusively by distribution network employees, the consumer has difficulties installing the outgoing line. The ideal option is to install all the internal wiring and lead the cable to the façade of the house to connect to the central power supply line.
Interior work
When installing internal power supply, it is necessary to make a temporary connection in order to carry out gating, drilling and commissioning. Therefore, you first need to make a so-called temporary input, and only after completing the installation of all internal connections can you open the meter and connect to the line through it. Of course, after commissioning, the metering device must be sealed.
By the way, sealing is paid and may be accompanied by various bureaucratic delays. To simplify things, an IP55 junction box is placed next to the metering device, into which the wiring is routed. Sometimes it is possible to install a distribution unit directly from the meters. In this case, it will be convenient to make several entries. For example, one for the house, the second for street lighting, the third for the garage or summer kitchen.
Activities for technological connection carried out by the applicant
After you have received the technical specifications from the network company for connecting 15 kW electricity, within the specified time frame you need to carry out the technological connection measures carried out by the applicant, that is, you.
- Prepare a power receiving device (electrical installation) for connection - namely, an electricity metering panel. It can be installed both on poles and on the house. And, of course, hang a SIP wire from the existing line to the metering panel. Connection to the line (piercing) is not carried out in this case; only a representative of the network company has the right to do this!
- If your building (house, cabin, bathhouse) is located more than 25 m from the existing line, then you need an additional pole or several. The technical specifications state that it is required to “lay the required number of 0.4 kV power lines to the applicant’s power receiving devices.”
The number of additional supports is calculated as follows: the distance between the main supports should not exceed 35 m, and between sealing and consumer supports - 25 m.
After all the conditions have been met on your part, you need to call the network company and call them for acceptance and sealing. At the appointed time, a “receptionist” will come to you, seal the meter, connect the electrical installation to the line and issue all the necessary documents and certificates.
How to choose a cable
It is worth noting that it is impractical to supply electricity to a house from a pole using a very large cross-section cable if there are few energy consumers. Therefore, let's decide which wires can be used and which cannot. Let us immediately note that it is forbidden to lay aluminum wires in a hidden way indoors. Therefore, to organize the input and internal electrical wiring, wires with solid copper cores are used, for example PV-1 or VVG. They are conveniently laid in plastic or steel pipes.
Many people believe that the internal cable should have a conductivity equivalent to the input line that is connected to the municipal network. But this approach cannot be called correct, since with a total power of 3-4.5 kW, duplication of 16 sq. mm (this is the minimum cross-section for SIP wires), frankly speaking, it is unprofitable. Therefore, you need to ensure that the reliability factor is about 1.3 when calculating the current cross-section of the wire.
When laying the input, electricians advise using wires with a cross-section of 2.5 or 4 square meters. mm, maximum – 6 sq. mm. Accordingly, the setting currents for input circuit breakers are 25 A, 32 A, 40 A.
How to choose a cable management system
It must be taken into account that the cable that supplies electricity to the house is subject to high loads and heat. Therefore, it is necessary to protect it by all means from exposure to atmospheric phenomena and damage. And if the installation is carried out on a flammable base, then it will be necessary to protect the wire from ignition. Be sure to follow the rules when introducing electricity into your home underground.
As for the route, it depends on where the house panel or distribution center is located. If the end point is located on the external wall, then it would be more reasonable to run the cable along the facade from the meter. It is most convenient to do this under the roof overhang. It is recommended to tighten the cable into a polyethylene pipe or corrugation.
As for laying in the attic or in the foundation of the basement, this can only be done after the cable is protected with a plastic or steel sheath. It is allowed to carry out installation both openly and in walls or ceilings.
If the metering node is removed
Some electricity supply organizations have recently practiced installing metering units outside households. As a rule, this happens when preventing energy theft. Sometimes, of course, the reason is the long length of the line extending from the meter. In this case, by the way, it is necessary to take into account all the losses that may be in the conductors.
Electricity transmission with a voltage of no more than 1 kV is carried out using 0.4 kV overhead power lines with self-supporting insulated wires. It is quite rare to lay cables underground. This is done only when it is impossible to make an overhead line (or undesirable).
Please note that bringing electricity into the house from a pole underground is quite practical - the wires will not spoil the appearance of the building. There is also no chance of cable breakage in strong winds. By the way, cables that are laid underground are allowed to be installed indoors. But SIP cannot be used in buildings. The reason lies in the fact that the polyethylene shell copes very poorly with overheating. But laying an underground line will not be difficult - a trench in the ground, a 20 cm cushion of sand and a shell as protection (HDPE pipe) will suffice. And then the sheath is needed only if the cable does not have its own armor.
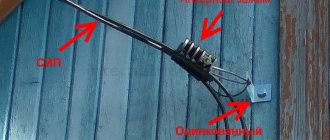
When working with overhead lines, it is necessary to make a smooth transition to the wire used for laying indoors. Please note that SIP is an aluminum wire, while copper wires should be used inside the house. To prevent the formation of oxides, terminal connections with insulating lubricants are used. It is also possible to use open screw blocks.
Connection procedure
To make it clearer to you where to start in order to install electricity on your own plot of land, we will divide the actions into two stages: organizational measures (collecting documents, submitting an application, etc.) and technical ones (in particular design and electrical installation work).
Getting permission
Organizational arrangements involve the submission of a package of documents to the energy supply organization, such as:
- A copy of the passport of a citizen of the Russian Federation - the owner of the site (if the application is submitted by another person, a power of attorney is attached).
- A copy of the document confirming ownership of the house or summer cottage.
- A plan diagram of the site with the location of power receiving devices and indicating the nearest power transmission line support, as well as indicating the exact location of all engineering systems on the site, including gas pipelines and water supply pipes.
- Single-line diagram of the applicant's electrical networks.
- Consent to the processing of personal data (in accordance with the requirements of the Federal Law “On Personal Data” No. 152 of July 27, 2006.
It is better to clarify the list of required documents and the procedure for their execution and submission in the Distribution Zone.
Plot data can be provided from a public cadastral map, in which a plot can be found by the cadastral plot number indicated in the title deeds.
There is a point that if the pole from which you can connect electricity is located further than 25 meters from the border of the site, then in order to provide light to the site, you will have to install an additional pole, and most likely at your own expense.
If everything is in order with this and the distances are within normal limits, there will be no difficulties, and following our recommendations you will be able to conduct electricity to the site. Based on these documents, the energy supply company must issue technical conditions, thanks to which you can already install light.
According to Decree of the Government of the Russian Federation No. 861 dated December 27, 2004 (clause 12), the energy supplying organization does not have the right to refuse you, and if it is not possible to connect electricity on time, for technical reasons, inform the deadlines for their implementation. This may be a lack of technological connectivity, this line is operating at the limit of its capabilities, and the connection of a new subscriber will lead to an accident in the network. And in order to bring light to your home, you need a partial or complete modernization of the power supply network, which can take years of waiting.
If the answer is positive, in a month you will have in your hands a document, a connection agreement and technical conditions, with an allowed power of up to 16 kW (for a country house and a residential building they differ), the name of the electricity meter, the input switch, the RCD protective device and the sealed box for outdoor installation.
Technical events
We take the technical specifications and go to a specialized electrical goods store. We purchase a meter, machines, a sealed box for external installation of an electricity meter.
We go to our personal plot, install the box on the outer wall of the house or a prepared support, make switching in the box in accordance with the PUE and the diagrams in the technical specifications, or a specialist will carry out the electrical installation for a fee.
Then the wires from the street box need to be routed to the switchboard in your home (the article assumes the presence of ready-made electrical wiring for turning on the light, or a prepared switchboard with an RCD and automatic circuit breakers in the room). If the metering board is on a separate support, far on the border of your personal plot, you can run the cable in the ground in a trench to the house being electrified. We talked in detail about how to install electrical wiring underground with your own hands.
The connection of electricity from the pole to the subscriber's input panel will be made by the company's specialists, who will also seal the meter and draw up a subscriber connection certificate. The layout and installation of electrical wiring must be carried out in accordance with current standards and regulations in compliance with safety precautions.
It is imperative that you also install a protective grounding circuit; in our age of technology and electrical devices, this would not be superfluous at all. We talked about how to make grounding in a private house in the corresponding article.
Additionally, we recommend watching a video that shows how to connect the light from the pole to the house:
Supply of electricity to the panel
How to serve input
The very first thing that needs to be done after installation is to test the resistance of the insulating layer, as well as the zero-phase loop. If the tests give a satisfactory result, then the main switchboard and input can be allowed to operate. Six months after installation, it is imperative to tighten absolutely all screw connections - start from the circuit breaker, which is installed before the meter, and end with the clamps on the ASU.
Once every five years it is necessary to reupholster, and if oxidation is detected, cleaning must be carried out. At approximately the same frequency, you need to inspect the wires to identify damage. The input can last about 30 years. After this period, it is necessary to conduct a thorough examination of the cable. If there is melting on the insulating layer, drying out, or crunching in the cable, this indicates that the conductors are not coping well with the load that is placed on them. Therefore, it is recommended to replace the input with a more powerful one.
These are approximate inspection times. If you notice damage early, it is recommended to check the condition of the entire cable and, if necessary, replace it. The best way out of the situation would be to calculate and install a new input. Moreover, you need to make a power reserve of about 25-30% so that the wires can cope with any peak loads.