From our article you will learn how to introduce electricity into a wooden house with your own hands. The need for this arises not only when building a new house, but also when renovating an old one. Although, of course, in recent years, wood has begun to enjoy enormous popularity among summer residents - the material is environmentally friendly, much warmer than brick or cinder block, and most importantly, living in a wooden house is more pleasant. The problem only arises with fire safety and electrical wiring.
Wood is a combustible material; in order to improve its safety indicator, it must be properly processed. But we will talk about electrical wiring further. No subtleties, just the basics of installing power supply systems typical for wooden houses. All the details can be learned from specialized collections - PUE (this is the abbreviated name for the rules of electrical installations).
Electricity input
Before considering the features of installing electricity input into a wooden house (it is quite possible to do this with your own hands), you need to answer one question. What is input, exactly? This is the most critical section of electrical wiring. This is the distance between the distribution box of a private home and the power line. Please note that the installation of this section should be trusted only to specialists who have permission to carry out all work. It is also worth paying attention to the fact that cable laying can be carried out both over the air and underground. Let's look at each option separately. And most importantly, we will tell you about the rules for introducing electricity into wooden houses.
Selecting the cable cross-section and connecting it
The cross-section of the cable cores is selected depending on the planned load (in kW) and the core material. It is not at all necessary to do all the wiring with a cable with the same core. You can save money without compromising safety. To do this, a cross-section is selected for each section depending on the power of the devices that will be connected here. Their power consumption is summed up, about 20% of the reserve is added, and the cross section is selected based on this value in the table.
Table for selecting electrical cable cross-section depending on the load
To connect the power supply in a wooden house, fire safety requirements are also added. The main thing is that the wire sheath must be non-flammable. Such wires have the letters “ng” in their names. To ensure the required degree of protection, double (VVG) or triple (NYM) cable insulation is also required.
To ensure that electrical wiring in a wooden house is done correctly with your own hands, it is best to use cables with multi-colored cores. Then you will definitely not confuse zero with phase or ground. Typically the colors are distributed like this:
- “earth” - yellow-green;
- "zero" - blue;
- “phase” – brown.
One of the options for triple insulated electrical cable (NYM)
If you buy a cable made in Europe, the colors are different:
- “earth” - yellow-green;
- "zero" - white;
- "phase" - red.
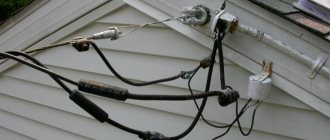
Air line
Let's look at the advantages and disadvantages of this input installation option. There are not so many advantages, but they are significant - installation is very cheap, and the design of the line is simple to the point of disgrace. The design has many more disadvantages. And the most important thing is low aesthetics. In addition, the line can be damaged by trees and snow. It should also be noted that there must be a distance (according to the PUE) of at least 2.75 m between the ground and the input point. The situation will not always allow for the correct input of electricity into a wooden house.
The connection to the power line is carried out using a SIP cable and special fittings. For fastening, it is necessary that the house and the support have hooks on which this reinforcement can be hooked.
Features of electrical wiring
After arranging the distribution panel in a wooden house, you can carry out wiring to connect switches, sockets and lighting fixtures. To do this, you first need to draw up a wiring diagram.
At this stage, it is necessary to carefully consider the location of all electrical appliances in the house, which will allow you to plan the optimal location of sockets. This approach will allow you to avoid future alterations and the use of extension cords.
Open Wiring Example
As for the laying of the wires themselves, in wooden houses they are usually installed in the following ways:
- Open - the simplest, but at the same time unaesthetic, wiring option, in which the wires are simply fixed to the walls and ceiling using special fasteners. In addition, this method is far from the safest, because according to the PUE, the wires should not touch the surface of the walls.
- In cable channels, this option of doing the wiring yourself is somewhat more complicated, however, it has a number of advantages. It takes on a neater appearance, in addition, all wires are protected by flexible casings, which makes wiring safer.
Wiring in cable channels
Note! The instructions for wiring in a wooden house strictly prohibit the implementation of “twists”. All wires must be connected using special clamp terminals.
After wiring is completed, it should be connected to the distribution panel. Before doing this, it is advisable to invite a professional electrician to check that all the work has been completed correctly. (See also the article Leveling wooden floors: features.)
Underground power line
First, let's look at the advantages of such arrangement of entrance to the house:
- High degree of aesthetics. No “foreign” objects are visible, everything is hidden from view.
- Operation is as safe and convenient as possible. Wires and cables do not interfere with repairs or other work in the building. It’s worth noting right away that it is very difficult to damage the input cable.
You can also mention the disadvantages of introducing electricity into a wooden house underground:
- Some input components can cost a lot of money. The cost of laying an overhead line is significantly lower.
- Difficulties arise when laying cables underground. The problem is that you will have to think in advance about the route along which you will run the cable. Then you need to dig a trench and lay a cable in it in accordance with all the requirements of the PUE.
In addition, it should be noted that when laying the cable in a trench it is necessary to carry out several more manipulations. For example, it is necessary to arrange a sand cushion at the bottom, and, if necessary, lay the entire line in a steel pipe.
House wiring diagram
According to current standards, when connecting electricity without a transformer, the power consumption for a private home should not exceed 15 kW. It is found by adding up the power of all electrical appliances that can be turned on at the same time. If the found figure is less than 15 kW, the input circuit breaker is set to 50 A. If the power is greater, another transformer is needed. Its parameters will be indicated to you in the project, since in this case you cannot do without it.
It is necessary to think over the wiring so that it is convenient to use and so that the same consumers are on the same machine
Where to install the input shield, requirements for the housing
Recently, representatives of energy supply organizations have been demanding that meters (and input machines, respectively) be installed on the street. This is done so that it is possible to control consumption even if the owners are not at home. But this requirement is not supported by anything, and, if you wish, you can install everything inside the house. But more often, in order not to argue with the inspectors, the requirements are fulfilled, and a machine and a meter are installed on the street.
Option for building a house power supply diagram
For outdoor installation, the circuit breaker (AZ) and the meter must be in a sealed housing, protected from dust, dirt and moisture. The protection class for installation must be at least IP-55. To make it easier to monitor readings, there should be a window in the door of the electric meter box. For installation inside a wooden house, the requirements are somewhat lower: IP-44, but the housing must be metal.
Organization of entry into the house
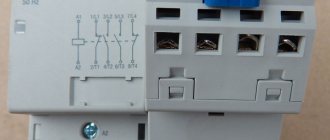
After the introductory circuit breaker, an electric meter is installed, then another RCD is installed - for an emergency shutdown of the power supply in the presence of a short circuit, and then the cable is connected to the electrical panel inside the house. The rating of the machine inside the house should be one step lower than that set outside. In this case, if there are problems, the machine in the house will work first and you will not have to climb the wall to the input machine installed there every time.
Electrical wiring diagram in a wooden house with a single-phase connection (220 V)
Single-pole circuit breakers are installed in the panel, to which wires are connected, diverging throughout the premises. They are mounted on DIN rails, their number depends on how many separate “branches” of power supply are required. To find out how many machines should be in your dashboard, count the number of required groups, adding two or three free machines “for development”. These will be the “branches”. Based on the quantity received, select the electrical panel according to its size.
We divide consumers into groups
When planning the electrical wiring diagram in a wooden house, all connection points are divided into separate groups (they are often called consumption groups). For example, all sockets on the ground floor are powered from one machine, a separate device is installed on the lighting fixtures in the house, and another one is installed on the street lighting. If some powerful electrical equipment will be used - a boiler, electric boiler, electric stove, etc. — it is advisable for them to conduct separate power supply branches and install personal automatic machines. Separate protection devices are also installed for power supply to outbuildings (if you do not want to draw separate inputs to them and install a separate meter, but only on the condition that the power of all electrical appliances does not exceed 15 kW).
You can imagine the wiring diagram in a wooden house in this form. This makes it easier to understand what devices and cables you will need. If you add the length of the cables, you can also calculate the footage of cables/wires
From a safety point of view, it is better to make as many separate power branches as possible. This will increase the number of machines and increase the cost of the project, but will reduce the number of potentially dangerous connection points. It is in the places where conductors tap out that problems most often arise: the contacts oxidize, heat up, and then begin to spark. Therefore, it is better to make the number of connections as small as possible.
An example of an electrical wiring diagram drawn on a plan in a wooden house
And, at the last stage, it is advisable to draw a diagram of the electrical distribution throughout the premises on the house plan. In this case, it is easier to draw consumer groups in different colors. This way you can more fully imagine what the electrical wiring diagram in a wooden house will look like, and it will be easier to do it yourself. For example, everything may look like the photo below.
Safety is the most important thing
If you follow all the recommendations and requirements of the PUE, it is necessary to lay the cable as efficiently as possible. After all, the fact is that the gap between the switchboard in the house and the cable entry is the most dangerous, responsible and complex. And if something is done incorrectly, it will affect safety.
The reason for this is that there is no protection of the electrical wiring section from power surges. There is also no short circuit protection - no circuit breakers or RCDs are provided. In other words, any emergency situation can turn into a tragedy. Not every village or microdistrict has electrical network protection; in some cases it works with a long delay. During the activation time, the house may catch fire.
Wiring around the house
The next unsafe place is the part of the line from the entry into the premises to the distribution panel (VUR). The problem is that the shield is triggered by short circuits that occur in the part of the electrical circuit laid from it, and the specified area remains unprotected.
There are three methods to secure this place:
- The first is to place the entire cable inside the pipe, as in the case of penetrations through the wall.
- The second method is much simpler. Outside the building, directly in front of the entrance, an additional circuit breaker is installed, located in a sealed box. The activation threshold of the additional AZ should be one step higher than the main one located in the panel.
- The third method is the most reliable, but also the most inconvenient. Energy company employees place electricity meters and ASUs on an external wall or on a power line pole.
Installation of the ASU panel
The next stage is the installation of the distribution panel. Let us briefly describe its constituent elements.
Types of ASU
So:
- The ASU housing can be metal or plastic. It is a box, inside of which there are places for mounting an electricity meter, a strip (DIN) for installing circuit breakers, neutral buses and a ground loop. You should not skimp on the size of the shield; always take it with a reserve, so that if you need to install additional equipment, there is a place for it.
- Electricity meter sealed by the energy company.
- Main introductory AZ. It can be two- or three-pole. It also has a seal from the energy supply company.
- Next in the chain are single-pole circuit breakers. Their power must correspond to each area allocated for them inside the house. Dividing into zones is very convenient and safer, since if necessary, you can not de-energize the entire circuit, but only the required part.
Attention: The power of each machine is calculated separately and must ensure operation when the network is overloaded in its weakest section. That is, if the socket rating is 16 A, then the power supply should not exceed this value.
Among the optional additional devices, it is recommended to install an RCD. This device reacts to current leakage and automatically turns off the electricity. This device is especially relevant in the presence of electrical lines in wet rooms - baths, bathrooms.
What safety requirements must be observed?
We frightened you with what can happen if installation is incorrect, and now let's figure out how to avoid troubles? There are no difficulties, just follow simple recommendations:
- The cable should only be used with insulation marked with the abbreviation “ng”. This literally means that the insulation is not flammable or that it makes it difficult to burn. A good example is the VVGng cable. Before choosing a cable, you need to inspect it, check the certificates of conformity and letter designations.
- To protect the area where electricity enters a wooden house, thick-walled steel pipes must be used. Please note that you need to hide the entire cable in the pipe. Of course, this requirement does not apply to the overhead line. But the section that runs along the walls of the building needs to be hidden.
- At the entrance to the building, you need to install automatic switches - they will protect the wiring section from short circuits and overloads. The machine is installed from the outside of the building into the main cable break. To prevent circuit breakers from being affected by precipitation, they must be enclosed in a housing that does not allow moisture and dust to pass through. Be sure to install sealed seals at the outlet and inlet of the box. Please note that in the event of an emergency, the circuit breaker installed in the house must first trip. And only after that the street one. Therefore, the outdoor operating current should be higher.
- Another level of protection is the installation of a protection device on a power pole. Exactly in the place where the cable is routed to the house. But this option should be carefully considered before the installation of the input cable is carried out. The specialists who will install the input must prepare all the materials and install the necessary components on the power pole.
After completing the installation of the input, you can begin connecting the internal wiring. It’s worth noting right away that electricity should be supplied to a wooden house (at a dacha, for example) only when the internal wiring has been manufactured and tested. Do not connect it if there are short-circuited wires or other damage.
Supplying electricity to the distribution panel
First of all, it should be said that the most difficult section of the network is the gap from the power line to the distribution panel of the house. Moreover, the connection of the house wiring to the power line must be carried out exclusively by specialists who have permission to carry out such work. However, all other actions can be carried out independently, which will significantly reduce the cost of connection.
There are two ways to bring the cable to the house and enter it:
- Air - this installation method is the simplest and cheapest. However, it is not without some disadvantages, namely, the cable can be damaged by branches, snow from the roof, a strong gust of wind, etc.
- Underground - such installation is much more reliable, safe and aesthetically pleasing. However, the labor intensity of the work in this case increases significantly. If you entrust cable laying to specialists, the price for their services will be quite significant.
Below we will take a closer look at the features of entering each of these methods.
Air
The aerial method involves hanging the cable from a pole to the entry point. In this case, the connection to the line, as well as the entry of the electrical cable into the wooden house, is carried out using porcelain fittings.
Note! When laying the cable overhead, the distance between the entry point into the house and the ground must be at least 2.75 meters.
To supply electricity to a wooden house, a SIP cable (self-supporting with insulation) is usually used. Its main advantage is strength.
Air power input circuit
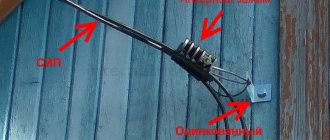
In addition, the cable insulation is made of high-quality polyethylene, which does not deteriorate when exposed to the sun. Thanks to this, the wire can last for many years. However, it should be taken into account that the introduction of SIP cables into a wooden house is prohibited by the PEU.
Therefore, before inserting it is necessary to switch to VVGng, KVVGng cables through porcelain fittings. Otherwise, the introduction of SIP into a wooden house will be considered a violation of fire safety.
It should be noted that when supplying electricity by air, cable installation is carried out by specialists from the power supply service, so you can only prepare the switchgear and entry point yourself.
To arrange the passage of wires, holes are made in the wall and metal sleeves from thick-walled pipes are inserted into them. The location of the hole is chosen taking into account that moisture and ice do not form in the area of the cable entry in winter.
Note! You can make a technological hole in a wall or attic floor, but not in the roof, window opening or drainage devices.
The photo shows the electricity input point
According to SP 31-110-2003, the wall thickness of the pipe used as a sleeve should be as follows:
| Cable cross-section, mm2 | Wall thickness, mm |
| 4 | 2,8 |
| 6-10 | 3,2 |
From the outside, the tubes should extend 20-30 cm from the wall. In the house itself, as additional protection, a VVGng cable is placed in a corrugated plastic pipe that has a fire safety certificate NPB 246-97.
After entering the cable, all that remains is to connect it to a standard metering panel with automatic protection.
Underground electricity supply diagram
Underground
For installation in a trench, VVBShv cable should be used. It is laid in pipes at a depth of at least half a meter and no more than two meters from the surface of the earth. Moreover, no more than one power cable is allowed to be pulled into one pipe.
Note! According to the PUE rules, the input cable must have a cross-section of at least 16 mm 2.
The pipes are laid up to the room in which the input distribution device is located. In trenches they should be laid with a slight slope towards the street. To prevent the penetration of moisture and gas into the room, the ends of the pipes and the place where they pass through the wall must be carefully sealed.
Note! Cable entry into a wooden house underground is allowed through a hole in the foundation or above it. Entering cables under the foundation is strictly prohibited!
Input cable protection
The section of the network from the input to the distribution panel is the most dangerous, since it is not protected from voltage surges, short circuits, etc.
Input shield
All this work must be carried out in advance. You need to start from the panel at the entrance, in which you install circuit breakers, a metering device, an RCD, etc. Please note that a separate machine must be installed for each consumer. For example, for one room you need two circuit breakers - for lighting fixtures and sockets.
Before you begin wiring, you need to draw a diagram on paper and indicate the location of all the main components. It is advisable to make a diagram in electronic form and print it, so that later you do not have to guess which machine or RCD is responsible for what.
When you begin to determine the number of RCDs required for full protection, install backup circuit breakers in the panel. This will allow you to avoid alterations to the panel when changing electrical wiring or rebuilding the house.
Preparation of a power supply project
An example of two electrical circuit diagrams in a wooden house
Electrification of a residential building begins with the development of an individual project. To do this, you must fill out an application at the branch of Regional Electric Networks OJSC at your place of residence.
After reviewing the application, the governing body will prepare an agreement and technical conditions necessary for connection to the local electrical network. Then you can begin designing the power supply, which is performed in the following sequence:
- Total power - based on existing household electrical appliances, the total power consumption is calculated with a margin of 30%.
- Project - taking into account the plan of a residential building, a diagram is drawn showing the input cable, electrical panel, wiring, socket groups, lighting, etc.
- Cable cross-section - for each group in the electrical network, the type and cross-section of the conductor is selected.
Electrical supply diagram for a residential building according to European standards
- Distribution boxes - for apartment buildings, the ideal location of distribution boxes for socket groups and lighting fixtures is selected.
- Cable laying - the project indicates the optimal path for laying the conductor. Additionally, at each site the distance from the main elements of the building is indicated: floor, ceiling, doorway, windows.
When drawing up a project, you should be guided by the PUE. According to this document, electrical wiring is laid strictly in a vertical or horizontal direction. The optimal rotation angle is 90o.
The socket group, switches and distribution boxes must be located in open areas with free access. Typically, switches are mounted 80–150 cm from the floor level, and a socket or socket group is 50–80 cm. The number of sockets varies from 1 to 6 pieces. The exact quantity depends on the size of the room, but at least one piece per 6m2.
When designing a cable route, it is worth considering that the minimum distance from the openings should not be less than 10 cm. If the cable may come into contact with metal elements along the route, then it is removed 15–30 cm in any convenient direction.
Selecting wires and devices
Electrical wire cross-section taking into account the total power of the electrical network
When installing private electrical networks, two types of cables are used: NYM and VVGng. NYM type cable is a power cable that complies with the European standard and is used for laying electrical networks with a rated voltage not exceeding 660 V. VVGng cable is a bare power cable, double vinyl braided, operating in networks with a constant voltage of no more than 1 kW.
The cable cross-section for laying electrical networks is determined in “mm2”. For identification, the marking is applied to the cable insulation and is indicated by two numbers. The first number indicates the number of wires inside the single insulation. The second number is the cross-sectional area of the conductor. For example, when an electrician says that you need a three-core copper cable one and a half square, this means NYM cable 3x1.5 mm.
The easiest way to determine the minimum cross-section of a power cable core for a specific section of the network is a special table. This method is proven, as it is used in the design of electrical networks in apartment buildings. The table for selecting the cross-section of the core can be found in the photo above.
As a rule, a copper cable with a cross-section of 2.5–4 mm is used for socket groups, and an aluminum cable with a cross-section of 1.5–2.5 mm is used for lighting. In the case of wooden houses, it is recommended to use only copper wiring, as this will protect the electrical network from overheating.
Wire of various sections for installing electrical wiring in a wooden house
According to the PUE, each section of the electrical network is equipped with a residual current device and a circuit breaker designed for the corresponding current values. To calculate the current strength, use the standard formula –I = P/U cosφ, where:
- I - current strength;
- P is the total power of electrical appliances connected to one section of the electrical network;
- U is the voltage in the electrical network;
- cosφ – constant coefficient. In household networks it is almost always equal to 1.
For example, it is necessary to determine the current strength for a section of the network to which household equipment with a total power of 3 kW will be connected. I = 3000 / 220 = 13.64 A. Taking into account a small margin and rounding, it turns out that for this section you will need an RCD and a diphatomat, designed for a rated current of 16A.
RCD and circuit breaker for electrical wiring
To determine the type of circuit breaker, it is necessary to calculate the minimum current during a short circuit: Is = 3260 x S/L, where S is the cross-section of the conductor in mm2, L is the length of the conductor in m. As a rule, in networks with a mixed load, which will be presented in most private houses, type “C” machines are used.
Sockets are selected taking into account the power of electrical appliances. Typically, these are grounded sockets rated for 16 A current. It is worth remembering that if you plan to use several electrical appliances in a particular room, then it is better to install an outlet group for 2-3 products than to use a “tee” in the future.
Selection of input cable and automation
On the left is an electric meter, on the left is an RCD with an input cable.
The selection of the input cable and difavtomat is carried out by analogy with the conductor for local sections of the electrical network. To do this, you will need to calculate the expected load on the network by summing the maximum power of all connected electrical appliances. The power of the device is indicated in the specification or operating instructions.
The input diphatomat is selected taking into account the phase of the network and rated currents so that during peak load the building does not lose power, but only breaks the circuit in the electrical panel.
For electrical wiring in private wooden houses, a one- or two-pole circuit breaker is used, which is installed after the electric meter. The calculation of current strength for selecting an RCD and a diphatomat was described in more detail in the previous section.
Single phase power type
Diagram of a single-phase power supply network
A single-phase electrical network is the most common method of electrifying private houses and standard apartments. The rated current voltage in a single-phase network is 220 V with a frequency of 50 Hz.
To power the building, a two- or three-core power cable is used, which is supplied from the local substation to the electrical distribution panel inside the building.
In the first case, a two-core cable without grounding is used. In the second case, a three-core cable is used with a working “phase” (L), a reverse “zero” (N) and a protective ground.
You might like the idea of arranging electrical wiring in a retro style. More details about installing the system in a wooden house in our next material:.
External electrical wiring
This is the simplest design, can be used in wooden buildings, it has the following advantages:
- Installation is incredibly simple - even a person with little knowledge of electrical engineering can do it.
- The cost of materials and work is minimal.
But there are also disadvantages of such a system:
- Low degree of aesthetics. Especially for cases when several wires are laid along one route at once. The disadvantage can be eliminated if the wiring is done in an “antique” manner. The wires are twisted and fixed on ceramic insulators. Oddly enough, this option for arranging electrical wiring is currently popular.
- The question of the safety of such wiring remains open - if there are children in the house, then it is worth considering whether it is necessary to lay the cable this way. What if a child decides to pull on the wires to tear them off the wall? It’s worth playing it safe and considering a different installation option.
Wiring test
Measuring voltage using a multimeter
To test electrical wiring, we use precision electrical measuring instruments certified for use in electrical laboratories. During the test the following work is carried out:
- visual inspection;
- resistance measurements on the insulating coating of the cable;
- resistance measurement on the ground loop;
- correct operation of the phase-zero circuit;
- RCD and automation testing;
- measuring readings in the device-grounding section.
Testing and commissioning of the electrical network is carried out by the governing body to which the application for electrification of the house was submitted. Upon completion of the inspection, the specialist confirms the correct operation of the electrical wiring in all areas. This guarantees that the specialists have done their work efficiently, and the consumer can use the electrical network without fear of damaging the equipment or causing harm to their health.
Cable channels and flexible boxes
Essentially, it is something between closed and open wiring. The following advantages can be highlighted:
- All necessary precautions are observed. For example, the wires do not touch the walls, they go at a certain distance from them. These requirements are specified in the PUE.
- The appearance after finishing the installation work is very neat. And most importantly, it is possible to make changes to the wiring configuration. You can change the path along which the wires are laid, add a new cable,
But there is also a drawback to this type of electrical wiring installation - it is ideal for offices and other buildings in which owners often change. Everyone's requirements for installing switches and sockets are different, so office owners come to this compromise - wiring in cable channels allows you to quickly move electrical appliances to other places. In a private house, such wiring is rarely used.
Read on to find out more!
Lamps: types, pros, cons
How to choose the right chandelier
EuroEnergoService is a reliable supplier of energy equipment in Belarus
Lighting system control using bus technology
Basics of photovoltaics
Marking of circuit breakers
- 2.56
Rating: 2.6 out of 5 Votes: 165
- 6
Reply
6 years ago
Alexei
6 years ago
Quote
A month ago I brought a barn owl to a country house. It turned out that everything is very simple. The main thing is maintaining distance. And although I’ve been working for so long, I only now found out that I could conduct it through the foundation. If I had known, I would have done it better this way.
Michael
6 years ago
Quote
During the construction of the house, I brought the electrical cable into the house according to the technical specifications. The cable was laid in plastic pipes. Subsequently, it was necessary to replace the cable with a more powerful one due to an increase in load. The new cable was easily pulled into the old plastic pipes using the old cable.
Anton
6 years ago
Quote
Many stores sell SIP wire piercing clamps without rubber insulating tips (electricians may also not install them during installation), which reduces the tightness and service life of the air input. You should pay attention to this!
Igor
6 years ago
Quote
Actually, before reading this, I had a general idea about supplying electricity to a private house. The article provides descriptive overview material for already trained specialists, since it is replete with specific terminology without the necessary comments (trench T-1, characteristics “B”, “C”). You need to delve into the theory yourself.
Installation of hidden wiring in wooden houses
The article describes how to organize wiring inside a building and supply electricity to a wooden house in the country. Photos of examples are provided throughout the article for clarity. Slowly we come to the most common type of electrical wiring - hidden. It has only one plus - the wires are hidden from view, they are securely hidden inside the walls.
But there are also disadvantages to this option:
- Wiring installation is complicated, since all cables must be hidden in a steel pipe. Of course, it is permissible to use tubes made of other materials that are not subject to combustion.
- It is necessary to plan the wiring diagram during the construction of a building in order to comply with all norms and requirements.
- Making changes to the scheme is accompanied by a lot of complex work.
It should also be noted that when laying hidden wiring, twisted connections should not be allowed. Be sure to purchase self-clamping terminal blocks and use them during installation.
Cable entry through a wooden house wall or foundation
If a self-supporting insulated wire or other conductor with aluminum conductors is laid from a pole to a wooden house, according to the PUE it cannot be introduced into the house: “laying cables with aluminum conductors over combustible structures is not allowed.” A switch to copper is needed. Most often, VVGng cable is used for this purpose - in non-flammable insulation.
It must be remembered that terminal boxes are used to connect these two conductors; ordinary twisting is unacceptable. Directly connected copper and aluminum enter into an active chemical reaction, quickly and strongly oxidize, which worsens the contact. As a result, even with minor loads, a spark appears at the connection point, and this is a direct path to a fire. Therefore, the use of terminal boxes is mandatory. They are available in a sealed case, and some are open. For outdoor use, of course, sealed ones are better; you can also install open ones in the house.
How to connect copper and aluminum wire
But that's not all. The power cable can only be routed through a wooden wall through a thick-walled steel pipe. The diameter of the pipe must be at least 4 times the outer diameter of the wire. The wall thickness is standardized (SP 31-110-2003) and must be no less than:
- 2.8 mm for a cable with a core cross-section of 4 sq. mm
- 3.2 mm for cables with conductors 6-10 sq. mm.
It is advisable to position the entrance with a reverse slope so that water does not flow inside. To seal entry and exit points, as well as to ensure electrical safety, you can use asbestos, rubber or plastic plugs. The edges of the pipe will need to be carefully processed and sanded until completely smooth so that the cable does not fray and its sheath is not damaged.
Entering an electrical cable through a wooden wall of a house
To calm down and increase reliability, the section that will be inside the pipe can be wrapped with asbestos thread or other insulating material. It can also fill the space inside the pipe to prevent insects from settling there. Another option is to fill the pipe with cement or alabaster mortar.
Read about how to make wiring in a wooden house here.
When entering through the foundation, the situation is slightly different: the structure is no longer considered combustible, so plastic embeds can be used. They are installed at the stage of manufacturing the strip foundation. In this case, the passage for the cable differs depending on whether the cable enters a wet or dry room.
Entering an electrical cable through the foundation of a house
The spare parts necessary for organizing the safe entry of electricians into the house do not cost very much, but significantly increase the reliability, electrical and fire safety of your home. The designs are quite simple; you can handle their construction with your own hands.
Bottom line
When carrying out work on arranging the input of electricity into a wooden house, you must remember that wood is a highly flammable material. You should not deviate from the recommendations that are specified in the requirements of the PUE. By deviating from these requirements, you create the risk of property loss. According to statistics, the main cause of fires is a short circuit in the electrical wiring. You should not skimp on materials; do not miss even small details when arranging the electrical wiring of a wooden house.
General wiring requirements
The main difference between wooden houses and reinforced concrete and brick structures is their high degree of fire hazard. This means that increased requirements apply to the selection of electrical devices, cables and the conditions for their installation.
According to statistics, about 1/2 of fires or ignitions in wooden houses or in houses with wooden trim occur due to gross errors by electricians.
If you install the socket incorrectly, do not connect the wires in the junction box carefully enough, or ignore the grounding rules, a fire may occur, followed by a fire.
Undemanding owners of a wooden house entrust electrical installation work to neighbors, acquaintances, or do it themselves, without thoroughly knowing the PUE standards. The sad result of gullibility and unprofessionalism - in the photo
It is necessary to know the basic rules of electrical installation for two reasons: to be able to carry out some of the installation or repair work yourself and to control the actions of unscrupulous “specialists”.
The following requirements should be remembered:
- The technical characteristics of cables and electrical equipment must correspond as closely as possible to the power consumption of the devices of each individual group.
- The operation of sockets, switches, and emergency shutdown devices must be carried out taking into account the load placed on them.
- It is prohibited to use cables, wires, and terminal connections when they are regularly heated.
- It is necessary to completely prevent the transfer of fire from the cable to structures made of wood or other flammable materials using fireproof protection.
Electrical wiring must be completely safe for home owners, their families (especially small children) and pets.
Strict requirements come to the fore, and sometimes aesthetics have to be sacrificed. For example, owners of a wooden cottage need to come to terms with external sockets and enhanced protection for both hidden and open electrical wiring (NPB 246-97)
Material from video reviews and instructions posted on the Internet is very contradictory, so you should not rely entirely on the opinion of people in work overalls. You should focus on excerpts from regulatory documentation - sections of PUE, SNiPs, GOSTs.
Overhead or underground
There are two ways to supply electricity from a power line pole to a house - overhead and underground. You need to decide on the type first; in addition, it is important to decide on the type of cable and its cross-section.
About the features of choosing a method from a cost point of view - in the video:
Both methods are approved by the Ministry of Energy and are prescribed in the “Rules for the Construction of Electrical Installations”; each has its own pros and cons.
The air method is simpler and cheaper, the underground method is more reliable and lasts longer.