Batteries play an important role in any mechanism that does not operate from the mains. Rechargeable batteries are quite expensive due to the fact that you need to purchase a charger along with them. Batteries use different combinations of conductor materials and electrolytes - lead-acid, nickel-cadmium (NiCd), nickel-metal hydride (NiMH), lithium-ion (Li-ion), lithium-ion polymer (Li-Po).
I use lithium-ion batteries in my projects, so I decided to make my own charger for 18650 lithium batteries rather than buy an expensive one, so let's get started.
How to charge lithium-ion batteries yourself
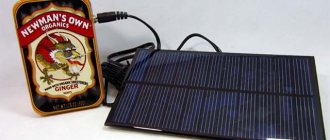
The simplest option is to use a mobile phone charger. The devices produce a voltage suitable for restoring the power of 18650 batteries. The method is used only in emergency cases. Its frequent use leads to a decrease in battery capacity.
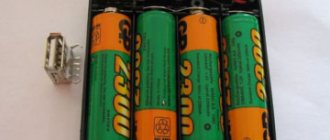
Homemade charger for a lithium-ion 18650 battery, made from an old phone charger.
To charge the battery, do the following:
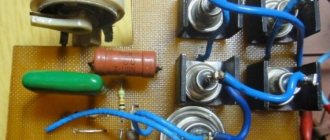
Complex circuits are used to assemble advanced charging. Before starting work, prepare a soldering iron, solder, flux and glue. Separately, purchase the board necessary for the normal functioning of the homemade charger.
The assembly is carried out like this:
During the manufacture of the device, short circuits must not be allowed. The above diagram allows you to assemble a simple but reliable charger in a few hours. Using a USB cable, it is connected to an electrical outlet or computer. The battery is installed in the resulting socket. After the green indicator turns on, the device is turned off.
Precautions: overcharging is prohibited
It is extremely important to remember one simple thing before starting to assemble a battery for batteries - lithium batteries are strictly prohibited from recharging. They have very strict requirements for the charging mode and operation, so they cannot be charged to a voltage greater than 4.2 V. It is even better to be guided by information about the safe threshold for each individual can. By the way, even a lower threshold may be indicated there, which is considered acceptable for this instance.
It’s even better if you’re going to do your own lithium battery charging, check the materials and equipment used several times. If you have doubts about the accuracy of your voltmeter readings or the origin of the cans, as well as the maximum permissible power of their charge, it is better to set the threshold even lower. The optimal range will be within 4.1–4.15 V. In this case, charging batteries that do not have a built-in protection board will be safe for you.
Otherwise, there is a high probability of strong heating and swelling of the cans, copious release of gas with a strong unpleasant odor, and even their subsequent explosion. Check everything several times before proceeding with assembly and charging.
What are lithium batteries?
Depending on what material the positive electrode of a lithium battery is made of, there are several varieties:
All of these batteries have their own characteristics, but since these nuances are not of fundamental importance for the general consumer, they will not be considered in this article.
Also, all li-ion batteries are produced in various sizes and form factors. They can be either cased (for example, the popular 18650 today) or laminated or prismatic (gel-polymer batteries). The latter are hermetically sealed bags made of a special film, which contain electrodes and electrode mass.
The most common sizes of li-ion batteries are shown in the table below (all of them have a nominal voltage of 3.7 volts):
| Designation | Standard size | Similar size |
| XXYY0 , where XX is the diameter in mm, YY is the length in mm, reflects the design in the form of a cylinder | 10180 | 2/5 AAA |
| 10220 | 1/2 AAA (Ø corresponds to AAA, but half the length) | |
| 10280 | ||
| 10430 | AAA | |
| 10440 | AAA | |
| 14250 | 1/2 AA | |
| 14270 | Ø AA, length CR2 | |
| 14430 | Ø 14 mm (same as AA), but shorter length | |
| 14500 | AA | |
| 14670 | ||
| 15266, 15270 | CR2 | |
| 16340 | CR123 | |
| 17500 | 150S/300S | |
| 17670 | 2xCR123 (or 168S/600S) | |
| 18350 | ||
| 18490 | ||
| 18500 | 2xCR123 (or 150A/300P) | |
| 18650 | 2xCR123 (or 168A/600P) | |
| 18700 | ||
| 22650 | ||
| 25500 | ||
| 26500 | WITH | |
| 26650 | ||
| 32650 | ||
| 33600 | D | |
| 42120 |
Internal electrochemical processes proceed in the same way and do not depend on the form factor and design of the battery, so everything said below applies equally to all lithium batteries.
How to charge lithium batteries?
The fact is that any lithium battery (for example, the common CR2032 in the form of a flat tablet) is characterized by the presence of an internal passivating layer that covers the lithium anode. This layer prevents a chemical reaction between the anode and the electrolyte. And the supply of external current destroys the above protective layer, leading to damage to the battery.
How to charge lithium batteries (be it a phone battery, 18650 or any other li-ion battery) was discussed at the beginning of the article.
How to assemble a charger for lithium batteries with your own hands
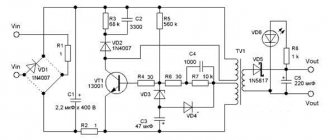
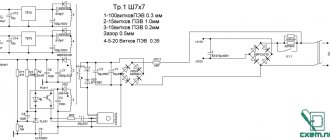
Charger circuit for lithium batteries
One of the simplest, if not the simplest, option for creating a charger. It involves the use of the LM317 chip. It is cheap and widely available, plus it is equipped with a charge indicator.
The setup comes down to setting the output voltage to 4.2 Volts using trimming resistor R8. Just be sure to not have the battery connected. The charging current is also set by selecting resistors R4 and R6. The recommended power of resistor R1 should be at least 1 Watt.
When the LED on the circuit goes out, this signals the completion of the battery charging process. In this case, the charging current will never decrease to zero.
In such charging, it is not recommended to keep the battery for too long after the charging process is completed.
Microcircuits of the LM317 type, like its analogues, are very widely used in all kinds of current and voltage stabilizers. At the same time, you can buy them at any radio market, and they will cost mere pennies.
The disadvantage of the circuit can be considered the supply voltage, which must be from 8 to 12 V. This is due to the fact that for the normal functioning of the microcircuit, a difference between the voltage on the automatic transmission and the supply voltage is required to be at least 4.25 V, that is, power the device using the USB port will not work.
The sequence for collecting lithium battery charging with your own hands is as follows:
- select a suitable case;
- attach the power supply (5 V) and the elements of the specified circuit to it (necessarily in the correct order);
- take brass and cut out two strips from it, attach them to the sockets;
- using a nut, set the distance between the contacts and the battery that you are going to connect;
- attach the switch if you want to later be able to change the polarity on the sockets (if not, leave everything as is).
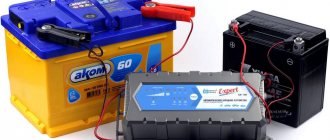
But if the task is to assemble a charger designed to work with 18650 batteries, then you should immediately move on to more complex circuits, or buy a ready-made device. Without the appropriate technical skills, it will not be possible to assemble the unit. Sometimes it’s really easier to spend a little more money, but take a factory charger with the necessary parameters and protection.
The danger of overcharging and complete discharge, which threatens
If we talk about lion batteries, they should not be allowed to be completely discharged or overcharged. For example, nickel-cadmium batteries have a memory effect. This means that improper charging leads to loss of capacitance characteristics. It is wrong to charge a battery that is not completely dead. If you start recharging it at a temperature other than zero, it may lose its capacitive characteristics.
Chargers for such batteries are created with special operating modes, which first drain the battery completely, then begin to fill it with energy. Lithium batteries do not require such attention. They do not have a memory effect, but they cannot withstand a full discharge.
Therefore, they should be filled with energy immediately, without waiting for zero. But recharging is also not the best option. This only applies to batteries without protection. If the batteries have a charge controller, then it will control the processes itself.
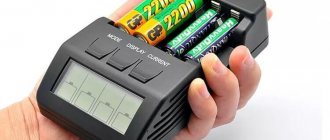
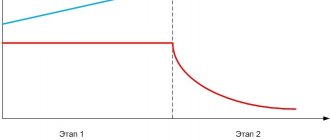
Li-ion battery charging algorithm
Li-ion elements are characterized by a linear change in current and voltage. Therefore, to replenish their charge via USB or a regular power supply, a module with the TP4056 chip is perfect. Diodes indicate the charging process. Safe recharge is carried out at a stable current of 0.2–0.7 C. When Uout reaches 4.2 V, charging begins at U=const with a smooth decrease in current to 10% of its original value.
The charging current is regulated by a resistor connected to the PROG pin. Sold modules of this configuration usually have a 1.2 kOhm resistor and provide a charging current of 1 A. To recharge, just apply a voltage of 4–8 V to the input connector and connect the plus and minus of the charged “can” to the contacts of the TP4056 module.
Assembling a charger for a lithium 18650 battery according to the diagram
To complete the assembly of electrical components, you need to solder them according to the diagram:
- Connect the positive contact of the power connector to an arbitrary contact of the switch, and the negative contact to the GND terminal of the stabilizer.
- Combine the free contact of the switch with the Vin terminal of the stabilizer.
- On the breadboard, in the range between Vin and GND pins, place 3 capacitors in parallel.
- Place the remaining 1 capacitor between the Vout and GND points.
- Connect the pins Vout and IN+, GND and IN-.
- Connect the positive contact of the battery compartment to terminal B+, and the negative contact to terminal B-.
When using a 5-volt power supply instead of a stabilizer and capacitors, charging the 18650 yourself is even easier. You just need to connect the poles of the power supply to the IN+ and IN- pins of the TP4056 module. After soldering is completed, all that remains is to place the assembled circuit in a plastic case. Using a hot knife, you need to make windows in it along pre-drawn lines to compactly accommodate all components: a USB port, diodes, a switch and a connector.
All components are housed in a homemade housing. The battery compartment is secured with hot melt adhesive. The TP4056 module is installed so that the diodes and USB connector fit into the slots prepared for them, and are glued. At the end, the stabilizer, connector and switch are placed and fixed with glue. Then all that remains is to screw the lid on and sand the edges of the windows with sandpaper. Similarly, you can do it yourself and charge three 18650 batteries using the appropriate circuit.
Previously, our blog provided the main technical characteristics of uninterruptible power supplies.
What is the TP4056 module and what is the difference between a module with protection and a module without protection
The TP4056 module is a small board based on the TP4056 controller, which is designed to charge 3.7V lithium batteries. Such lithium battery charging boards can be of two modifications: TP4056 modules without battery protection, and TP4056 modules with battery protection. Sometimes such boards can be found with the designation TC4056.
The TP4056 charge module without protection is intended only for charging lithium batteries up to a nominal voltage of 4.2V. On the charge board without microcircuit protection there is only a TP4056 controller. To connect the supply voltage, the very first boards had a Mini-USB connector installed; the latest versions have the popular Micro-USB connector.
The TP4056 charge module with protection can not only charge the lithium battery to a rated voltage of 4.2V, but also protect it from excessive overdischarge, short circuit, and limit the maximum discharge current. Additionally, on the protected charge board, in addition to the TP4056 controller, there is also a DW01 chip and an S-8205A mosfet for load control. The DW01 microcircuit prevents the battery from being discharged below 2.5V, and turns off the loads using a mosfet in the event of a short circuit and when the discharge current increases above 3A. Charge boards with protection can be found with a Micro-USB and Type-C connector for connecting the supply voltage.