To conveniently control lighting devices and reduce the cost of using electrical energy, users increasingly began to resort to the use of automatic control devices based on motion sensors of various configurations. The installation of such devices is carried out according to certain schemes, which we will consider in this article.
Sensor selection
To correctly select a recorder for automatically turning on lighting devices, you should familiarize yourself with the technology of their operation, namely:
Application area. It is necessary to first determine the installation location of the device (in the interior or exterior of the room) due to the fact that dust- and moisture-proof options are available on the market, and according to the mounting method - mounted, built-in and on support holders.
The power of the lighting device to which the connection will be made. This is due to the fact that recorders have an operating voltage of 200 W or more. So, it is advisable to install a recorder with a maximum viewing angle to a street lighting device, and install a cheaper option in an apartment
Particular attention should be paid to the power when planning to combine the device with an energy-saving lamp. Before purchasing, you need to calculate the total load and if the load specified in the instructions is exceeded, you will need to install an intermediate relay or distribute the load between devices.
Viewing angle
Indoors or on the outside of the building (installation is carried out on any wall), a standard sensor with a horizontal viewing angle of 180 degrees or even less is best suited. You can also install a device that has two sensors, the total viewing angle of which will be equal to 180 degrees. To ensure the maximum viewing angle, a device with three sensors is installed, in this case the viewing angle is 360 degrees. Such devices are mounted on the ceiling.
Type of lamp and lighting fixture. The use of sensors is possible with any type of lamps and lighting devices. The market provides sockets and switches with built-in recorders that are ideal for home or office use.
Radius of action. This indicator characterizes the maximum distance of an object from the device at which a moving object can be detected. For infrared sensors, the coverage area is 12 meters.
Two-pole or three-pole. The first type of recorder is used in combination with incandescent lamps. They are connected in series. The latest models are more universal and can be used with any type of lamp.
Power circuits
We don’t delve into the intricacies of operational amplifiers yet; we continue to explore the most obvious and probable.
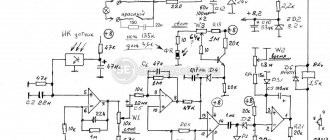
In this case, this is checking the operation of the power board relay. This relay turns on, that is, a 24V voltage is supplied to its coil, if the key transistor opens. In this case S9013, npn.
It is better to check with the low-current board completely disconnected. We just turned it off when checking the power supply in step 4.
To check the operation of a transistor, its base must be connected to the emitter, preferably through a resistor. It is there (R21, 20 kOhm), or use your own, about 2 kOhm - 33 kOhm. The transistor in this case will be closed (no current flows through it), and the relay should be turned off.
Next, we check the opening of the transistor and, accordingly, the activation of the relay. To do this, through the same resistor (a resistor is required, the jumper will burn the transistor) we connect the base of the transistor to +24V. The relay should turn on.
If the transistor does not work, it must be checked with an ohmmeter by turning off the power (you can check it before manipulating the resistor). How to check a transistor - is it possible, I won’t write?
The relay may also be faulty.
Types of motion sensors and their operating features
Before you start setting up the motion sensor parameters, you need to decide on its type. Recommendations for the place of use and adjustment of its characteristics will largely depend on this. All detectors are divided according to the mechanism for identifying a moving object into the following types:
- Infrared.
- Acoustic.
- Microwave.
- Ultrasonic.
- Combined.
According to the principle of operation, they are all divided into active and passive. The first type includes combined, ultrasonic and microwave. They consist of a transmitter that sends a signal into space within the coverage area, and a receiver that receives them in the event of reflection from an object. The second (infrared and acoustic) are based on reading thermal radiation from a motion source.
Infrared models have become most widespread in everyday life. their main advantages are optimal cost, wide coverage area and the ability to be configured with three regulators. In long premises it is recommended to install acoustic and ultrasonic devices (switched on from a great distance), and for security systems - microwave devices, as they work even through walls.
Assembly diagrams
This can also be used in alarm systems. One option is to use a special thermal switch that will turn off the coffee maker. This is explained by cheap components, a simple assembly scheme, the absence of additional complex settings, and a wide temperature range of operation. Microwave assembly circuits To control open spaces and monitor the presence of objects in the desired area, there is a capacitive relay. Scheme 3. All work is carried out only after removing the general voltage B.
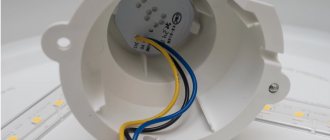
Video 2. The MGTF wire is used to connect the sensor with fluoroplastic insulation.
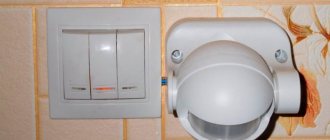
We connect the wires as follows: we connect the phase wire of the power cable together with the brown and white phase wire from the sensor.
Related article: how to open an electrical laboratory up to 1000v
Settings
To optimize the process of turning on the light, it is very important to correctly adjust the sensor depending on the nature of the movement and the parameters of the object itself. As a rule, four main characteristics are taken into account - installation angle, sensitivity, illumination and delay time after actuation
Let's look at them in detail.
Installation angle
According to the rules, the angle of installation of the sensor to turn on the light must be such that the center of the action field falls on the point of the most intense or most likely movement of the object. This can be achieved by observing:
- Installation rules specified in the instructions. Their implementation is especially important for devices that do not have any mechanical settings. In them, the viewing angle is completely determined by the technical features of the device itself, as well as the height and location of it. For example, a sensor with an angle of 180 degrees is installed on the wall, 360 degrees is installed on the ceiling, and 90 degrees is installed in the corner.
- Practical adjustment. A detector with a pan-tilt mount allows for more precise adjustments to be made experimentally. Such devices make it possible to change the field and range of the sensor. This, for example, is necessary in a protected or large area adjacent to a building or next to a busy pedestrian or highway in order to prevent the movement of objects on them from entering the lens field.
Sensitivity
Adjusting the sensor according to the level of sensitivity allows you to exclude the inclusion of light in response to the movement of small objects and foreign objects in the far region of the tracking zone. Setting this parameter is done experimentally:
- First you need to set the maximum sensitivity.
- Next you need to check how it will work at the optimal distance.
- It is necessary to gradually reduce the level until it stops responding to a person of average parameters.
- Then check how he reacts to small animals or foreign objects.
- Set the found sensitivity threshold.
Ideally, the degree of sensitivity of the sensor to movement should be such that the light turns on at the border of sufficient illumination from a lantern or chandelier when a person with average anthropometric data passes by.
Anyone who installs a motion sensor should know how to independently reduce the sensitivity of the sensor. During operation, unforeseen circumstances may arise and the light will turn on unplanned. Before or immediately after installing the device, you need to make sure how to do it yourself in the fastest and most correct way without calling an installer.
Illumination
In order for the sensor to stop sending a signal to turn on the lights during the day, late morning and early evening, it is necessary to adjust it according to the illumination parameter - LUX. The setup consists of the following steps:
- Turn the regulator arrow to the maximum level (where it increases).
- With the onset of a sufficient level of darkness, slowly turn it in the reverse position until the sensor triggers and starts to turn on the light.
The sensitivity sensor configured in this way will then always (until changing its position) turn on the light when the same level of darkness occurs.
Delay time
How to correctly configure the sensor to turn on the light based on movement for a delay after activation worries those who make such an adjustment for the first time. Just as in the case when it was necessary to set the parameters of illumination and sensitivity, you need to find the slot or screw on the instrument panel with the inscription Time.
To correctly adjust the delay time you must:
- Set the regulator to the minimum value.
- Trigger the sensor by motion.
- Time it.
- Determine the required time empirically, saving the parameters.
Modern motion sensors allow you to adjust the delay time after turning on the light from 5 seconds to 10 minutes.
For example, if the sensor is installed at the entrance to the entrance, and a person needs to climb the stairs to the 5th floor, then catch his breath, find the keys and open the apartment, then the parameter should be set to the maximum value. Another thing is a corridor in an apartment, when passing through it does not take longer than 2-3 seconds. Here the value of this characteristic can be minimized.
What can be configured
Correctly setting up a motion sensor on the street or in the house will help reduce energy waste by up to 50-70%. The user can adjust the sensitivity, delay, illumination and operating angle. The first three parameters are set on the device itself.
Some may not detect one of the switches on their sensor. This indicates that an outdated model is being used. On these, the delay and one of two parameters are usually adjusted - either sensor sensitivity or illumination.
Delay time
This aspect refers to how long the light will remain on after the motion sensor to turn on is triggered. The sensor is configured according to this parameter taking into account the individual needs of the user. On the device it is usually indicated by the word “”. Most models allow you to set the time from 5 seconds to 10 minutes. Experienced users believe that the optimal time is 1 minute.
Adjusting the motion sensor to turn on/off the light
The first thing you need to do is set the time on the device. The sensor allows you to select an interval from a second to 10 minutes. It will be easier to decide over time if you listen to the following tips:
- the optimal period for supplying light to the stairs is a few minutes, because they rarely stay longer in such a place;
- The normal period of time for supplying light to a utility room is 10–15 minutes, because something often has to be taken from such a room.
The sensor is supposed to set a response delay after detecting the movement of an object. This value can range from a few seconds to 10 minutes and is determined by how fast the person moves. For example, a corridor is crossed quickly, so it is better to mount a sensor with a shortened “Time” parameter in it.
Without configuration, the device will not work correctly
The illumination level, dependent on the “Lux” regulator, should be adjusted so that the sensor performs its task at times when the room is illuminated less than usual. It is recommended to equip a room where a lot of light enters from the windows with a motion sensor with a “Lux” regulator set to the initial or middle position.
The sensitivity of the device, which triggers certain actions in response to human movement, is controlled by the “Sens” regulator. This value is influenced by the distance of the device from the moving object and the weight of the person who made the sensor work. Therefore, if the light sensor turns on for no reason, it is necessary to make the sensor less sensitive. And it’s worth thinking about increasing the device’s response rate only if there is no action from the sensor while a person is passing by it.
The motion sensor has a complex design that must be adjusted to special operating conditions. Ignoring the rules risks the fact that the device will work contrary to the wishes of the owner of the premises.
Application area
Protecting the perimeter of an object using motion sensors
Using motion sensors, you can control various electronic equipment, for example, lighting, as well as air conditioning and security systems in an apartment or on the street. A standard motion sensor is installed in areas with swimming pools, fountains and artificial reservoirs, as well as at the entrance to the premises. Such devices are present in every alarm system installed at a protected facility. They are capable of registering unauthorized entry into the territory, detecting gas or liquid leaks, and the opening of doors or windows.
Sensors are responsible for the recording process in car DVRs and special tracking cameras. Modern models of energy-saving lamps and “smart” air conditioning systems are also equipped with such sensors. Devices vary in type and sensitivity. Simple devices turn off after the thermal and wave characteristics have stabilized, for example, if the object has been stationary for a long time. More highly sensitive analogues react to even the slightest changes in characteristics. They do their job more accurately and thoroughly, so the immobility of the object will not be a reason to turn them off.
Installation stages
Before starting installation, you should carefully understand the motion sensor circuit, which can be different depending on what device it will work with. Otherwise, the installation process is standard for most devices.
Choosing an installation location
IR detectors designed to automatically turn on the lighting should be located opposite the front door. So a person entering the room immediately falls into the visibility range of the device. If you install the sensor above the door, then a blind zone will form under it, and the person entering the room will have to move in the dark for some time until the sensor detects him. The same rule applies to street lighting. The sensor's coverage area should primarily include the places where a person is most likely to appear: the porch and gate.
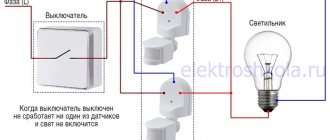
Separation of main and night lighting
For more efficient energy savings, it is recommended to separate the operation of the main and night lamps at the installation stage. This scheme for connecting motion sensors, although more labor-intensive, will pay for itself thanks to the use of low-power lighting devices at night.
Schematic diagram of connection
Connection diagram 2
When choosing a connection diagram, you need to decide whether it will contain a switch, or whether the detector is directly connected to the lamp. Connecting a motion sensor for lighting with a switch will require passing the core with the incoming phase through the breaker. In this case, the sensor will only operate when the switch is pressed.
For the convenience of electrical installation work, a standard coloring of the braid for different wiring strands has been adopted. The incoming phase is usually sent through a wire painted brown, white or lilac. The output is through a red-braided core, and the neutral is through a blue or blue-yellow wire.
Visual connection diagrams for each specific brand of device are given in the manufacturer’s instructions. The incoming, outgoing phase and zero are connected to the corresponding terminals of the sensor.
Settings after connection
After installing the detector, we proceed to its configuration. Various models have from 2 to 4 adjustment options. Usually this:
- Light level so that the sensor does not turn on the light during the daytime.
- Setting a timer to turn off the lights.
- Range.
Standard parameters and symbols of motion sensor buttons in English are given in the table:
| Designation | Function | Adjustable Parameter |
| LUX | Adjusting the light level at which the sensor is triggered | From 5 to 10,000 Lux |
| TIME | Duration of the timer after the object disappears from the detection zone | From 5 seconds to 15 minutes |
| SENS | Sensor sensitivity | Up to 12 meters |
| MIC | Adjusting the noise level when a microphone is connected to the device | From 30 to 90 decibels |
Blitz tips
The device body is made of plastic, so it should be protected from mechanical damage
Particular care must be taken when handling the lens, which is the most important element of the device's optical system.
When installing the device outdoors, you should ensure that the recorder is not exposed to direct sunlight and precipitation. Experts recommend installing protective canopies.
It should be taken into account that the sensors are not sensitive to direct movement towards them, in such cases it will not work. Therefore, placing it in the room above the door, located on the opposite side in the center, is not advisable.
Not all motion recorders for lighting work accurately with LED and fluorescent lamps. Devices using conventional electromechanical relays operate uninterruptedly. Therefore, before purchasing it, it is advisable to obtain comprehensive information regarding this feature from the seller.
Price
The price of motion devices depends on the country of origin, technical characteristics, method of receiving the signal and the principle of operation of the device.
The current market provides several leading manufacturers, with the majority of factories located in China. There are also Russian manufacturers who assemble devices from Chinese spare parts in our country. The price of such models is slightly higher, but the warranty period is also correspondingly higher.
Considering that the technical parameters are almost identical according to data sheets, domestic street-type models are more resistant to low temperatures.
The average price of a registrar is, rubles:
- Ultrasonic – 550 rubles.
- Microwave – 810 rubles.
- Infrared – 625 rubles.
How can you adjust the detector?
To correctly adjust the light sensor, which is triggered by detecting the movement of a person or animal, no special skills or knowledge are required. Anyone who is familiar with the elements of using modern household electrical equipment can perform these settings, which boil down to two main procedures:
- Hardware adjustment.
- Positioning.
Important! Correctly configuring the detector for lighting can reduce energy costs by more than half.
Hardware adjustment
Depending on the motion sensor model, its year of manufacture and individual characteristics, hardware adjustment is possible in one, two or three parameters:
- Sensitivity.
- Working hours.
- Degree of illumination.
Adjustment for sensitivity, designated by the word Sens, allows you to configure the detector to turn on the light strictly according to the parameters of a moving object. The operating time determines the period in which the lamp remains on after activation. The degree of illumination sets the moment of initiation of the device depending on the level of twilight.
How to configure the motion sensor to turn on the light according to the above and some other parameters is indicated in the product technical data sheet.
Positioning
Positioning is the process of mechanically adjusting a motion sensor to optimize performance. The device may have a hinge or bracket to set a better viewing angle. However, in the case where it has a fixed base, the essence of its adjustment will be the correct installation on the proper surface and height - in accordance with the manufacturer's recommendations.
Positioning is largely determined by the viewing angle and radiation pattern (for ultrasonic and microwave models with active radiation). As a rule, the maximum sensitivity of the sensor is observed in the center of the viewing area. Therefore, the closer to the periphery of this area the activity (object movement) is, the higher the sensitivity needs to be set. The consequence of this will be an ultra-high degree of detection in the middle, which will lead to frequent false alarms - from the movement of birds, the movement of branches, a car in the background, etc.
Setting up a motion sensor for lighting
Setting up a motion sensor is another important nuance in the operation of this device. Almost every sensor that can be used to control lighting has additional settings that allow it to work correctly.
Such settings take the form of special potentiometers designed for adjustment: setting the shutdown delay “TIME”, adjusting the illumination threshold “LUX” and adjusting the infrared sensitivity “SENS”.
Setting by time - “TIME”
Using the TIME setting, you can set the amount of time the lighting will remain on since the last time motion was detected. The value setting can vary from 1 to 600 seconds (depending on the model).
Using the “TIME” regulator, you can set the time delay setting for the activated motion sensor. The limits within which the trip setting is located range from 5 seconds to 8 minutes (480 seconds). The speed of human movement in the sensor sensitivity area plays the most important role here.
When a person passes through this space relatively quickly (for example, a corridor or staircase in an entrance), it is advisable to reduce the “TIME” setting. And, conversely, when staying in a given space for a certain time (for example, in a storage room, parking lot, utility room), it is better to increase the “TIME” setting.
Setting the trigger on the light level - “LUX”
The “LUX” adjustment is used to ensure correct operation of the sensor during the daytime. The sensor will trigger when motion is detected at a lower ambient light level than the threshold. Accordingly, the sensor response is not detected at a higher illumination level compared to the set threshold value.
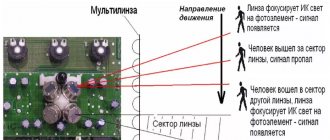
A drawing showing how to set up a motion sensor with your own hands. For adjustments, there are three regulators on the back of the sensor: a sensitivity regulator, a time regulator and a light regulator. Experiment and everything will work out.
The “LUX” regulator sets the response setting according to the level of ambient illumination (from twilight to sunlight). The division of the scale on which you can set the “LUX” setting, if your room has a large number of windows and natural light predominates, should be minimal or average.
It is recommended to set the “LUX” setting to the largest division of the scale if there is natural light in your room or if there is a small amount of it.
Setting sensitivity to sensor activation - “SENS”
You can adjust the sensitivity to triggering, depending on the volume and range of the object, using the “SENS” regulator. The sensor's response to movement directly depends on the sensitivity level. If there are a very large number of sensor activations, it is advisable to reduce the sensitivity and adjust the brightness of the IR illumination to which the motion sensor should respond.
You should increase the sensitivity if the sensor does not respond to you. If the lighting turns on spontaneously, you can reduce the sensitivity. If the sensor was configured in the winter, then it is likely that it will need to be reconfigured in the summer, and, conversely, with summer configuration it will need to be reconfigured in the winter.
And lastly, only by customizing the controlled zone as much as possible can you get a guarantee that he will “see” you. To do this, adjust the optimal tilt position of the head of this sensor. Here it will be sufficient to check the sensor’s response to movement at some point located in the distance.
Similar materials on the site:
No tags for this post.
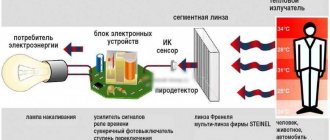
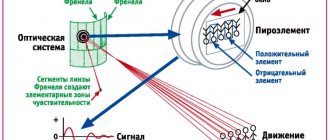
How does an infrared device work?
An infrared motion control device is also called passive. If we compare roughly, we can associate it with a thermometer. It is triggered when a heat source enters its range of action.
But for such a device to work, additional settings will be required. For example, you installed such an infrared device and configured it to detect the appearance of an adult. If a child enters the room, the sensor may not work. Everyone’s body temperature is the same, but the amount of heat that an adult and a child study is different. In this case, setting the device to the very minimum is also not a way out of the situation; it will then begin to react to any cat or dog running into the room. This is the disadvantage of infrared models - they will require careful manual adjustment. Another disadvantage of this sensor is that it falsely triggers heating devices operating indoors.
But such a sensor also has a number of advantages:
Learn more about the infrared sensor in this video: