Of all types of household appliances, electric kettles are most often subject to breakdowns, which is due to their intensive use and the low quality of water used for boiling. The malfunction can manifest itself in different ways: the device does not turn off on its own or, conversely, turns off prematurely, the power button sticks, the liquid does not heat up to the desired temperature. In case of minor breakdowns, it is possible to repair electric kettles on your own, but sometimes it is impossible to solve the problem without the help of a service center. In any case, you will need preliminary diagnostics of the equipment, which will allow you to determine the cause of the problem and select suitable options for eliminating it.
Principle of operation
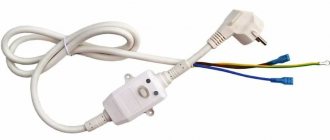
The electric kettle is standard. Inside the removable housing there are heating elements with a power of up to 2 kW, a flask with a volume of 2–3 liters and a thermostat. Connection to the electrical network is provided by a stand with a flexible cord. The difference between individual models is manifested in the type of heating element - a stainless steel spiral or a closed disk, as well as the location of the switch (at the bottom or at the top of the handle).
The electrical circuit of teapots works on the same principle:
- mains voltage is supplied to the contacts of the stand when the cord is plugged into the outlet;
- After installing the kettle on it, the spring-loaded contacts of the stand close with the electrodes of the body;
- after turning on the power button, voltage is supplied to the disk or spiral heating element in the kettle with passage through the thermal protection elements;
- the bimetallic plate completes the circuit until the signal is received from the steam sensor.
The additional thermal protection element is optional and is not available on some models. It is introduced into the circuit to turn off the device when there is a risk of overheating and is activated only if there is no water in the device. In operating mode, the kettle's backlight should be on; when turned off, all contacts, except those spring-loaded on the stand, open.
The electric kettle does not turn on if there is no connection in any of the following areas: loose connection of the cord or stand, opening of contacts when trying to heat an empty device. In such cases, the backlight does not light up, but the device itself may be a contact device. If the kettle does not work after eliminating these reasons, the device needs diagnostics - disassembly and sequential testing of individual elements of the electrical wires.
Design Features
Electric kettles can be called simple devices, putting them on a par with mixers, blenders and similar kitchen appliances. The segment pleases with an abundance of different models, ranging from budget to premium, made from high-quality materials. But despite the cost, the principle of operation of the device remains unchanged.
Basic elements of an electric kettle.
- Storage tank. An important feature of this part is the volume and material of execution. Some models may have a separate tank.
- Heating element (heating element). There are disk and spiral solutions.
- Receiver. Here we have a stand with a network cable and an interface/receiver where the kettle is installed.
- Thermostat. The element is usually located next to the power button and is responsible for turning off the device after the water boils.
There are also more complex devices on sale - thermopots. They differ from ordinary electric kettles by the presence of a thermostat. The latter allows you to maintain a user-specified temperature in the tank.
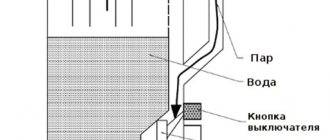
The principle of operation of the electric kettle is simple: after pressing the power button, the heating element starts working until the water boils. The device turns itself off thanks to the thermostat: steam, entering through a special channel onto the thermostat plate, causes it to expand, thereby opening the contacts.
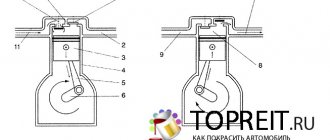
Thermopot device
Troubleshooting
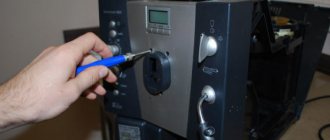
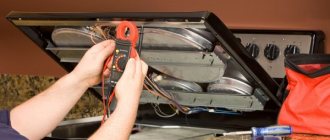
The need for ringing arises when any component of the electrical circuit breaks down (the device does not turn on, the reasons are unknown, and trivial errors such as a non-working socket or loose installation have been eliminated). The work is carried out using a special device - a multimeter, as well as screwdrivers selected according to the type of screws, and a sharp knife with pliers or pliers. In this case, the following points are sequentially checked:
- The performance of the flexible cord and stand contacts. It is difficult to repair a burnt stand without the appropriate experience, and its breakdowns are visible to the naked eye, but to save time, the contact group is always checked. At this stage, one end of the tester is applied to the plug, the other to the springy contacts (most often they are located in the center). Detected faults, such as a burnt or insufficiently thick cord, carbon deposits on the surface of the brass contact, are eliminated if possible, after which the group is called again. If there are no problems on all three lines (2 current-carrying lines and ground), repairing electric kettles becomes more complicated; the body has to be disassembled.
- The performance of the heating element power supply terminals at the base of the housing. At this stage, you need to disassemble the kettle, as indicated in the instructions, and check the contacts of the outer and inner copper rings in turn. If there is no ringing, the power supply block is completely disassembled to remove carbon deposits, reassembled and checked again.
- Power button functionality. One probe of the tester touches the contact of the wire that supplies current to the button, the second touches the power wire of the heating element. The button is checked in the off and working state; if there is no sound signal about serviceability, in the second case it needs to be repaired or replaced (if necessary, power the kettle directly).
- The performance of the heating element. One probe is directed to the power contact, the second to the connection point with the wire from the power button. If the circuit breaks, you need to replace the heating element with a new one, which is not always possible.
In addition to checking the circuit with a multimeter, the actual resistance of the heating element is assessed. To perform this operation, it is enough to remove the bottom of the kettle, turn on the tester in measurement mode and point its probes at the output terminals. If there is a significant deviation from the value calculated or declared by the manufacturer, the heating element needs to be cleaned or replaced.
Check the functionality of the flexible cord and stand contacts
Check the contacts of the outer and inner copper ring
See if the power button works
Carry out diagnostics of the heating element operation
Disassembling the stand
Before you begin self-repair, you need to make sure that the device is disconnected from the network. So, the first thing you need to do is turn the stand over and unscrew all the bolts that are present there. If this is a disk model, then there are three bolts at the bottom that are unscrewed with a Phillips screwdriver. Then the lower part of the structure is removed and the system with all the elements appears in front of you. It is easily detached from the body.
How to disassemble the stand
We disassemble the old-style stand. First, turn it over, unscrew all the bolts, and disconnect the lower part from the upper. After which all elements will be publicly available.
As you can see, disassembling the device is quite easy. However, you should never rush, as there may be some plastic latches present that the manufacturer decided to install to improve the quality of the connection.
How to disassemble
This stage is considered difficult; devices from different manufacturers may have different locations of the latches holding the handle, have their own way of removing the kettle lid, and open or hidden locations of the fastening screws. To avoid mistakes, before disassembling electric kettles of a particular modification, you should carefully study the process. Some manufacturers include this information in the instructions. The general disassembly procedure includes 2 main stages:
- Removing the bottom by unscrewing the exposed screws. This design is typical for old-style teapots or fasteners covered with decorative plugs. The bottom can be removed with a simple movement or after squeezing the teeth-clamps using a flat-head screwdriver. If necessary, remove the stand cover in the same way.
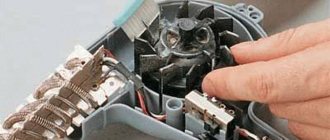
- Removing the switch. Repairing kettles at this stage requires attention and patience. The function button can be located either at the top or at the bottom of the handle. To access this element, carefully remove the fragile plastic covers and turn out the internal screws, which, unlike the bottom, are almost invisible. When repairing Brown kettles and similar models with two-piece handles, the latches are snapped off along the seam; for a number of modern appliances, the upper part of the body will be removed along with the handle.
Repairing old-type kettles does not require complete disassembly of the device; heating elements and thermal protection elements open after removing several screws. Models with a switch at the top of the handle will have to be completely dismantled.
Housing, side panel when repairing an electric kettle
Below are photos that allow you to personally enjoy the views of a detail of the simplest design. There will be links to the pictures in the text. If you want, look, if you don’t want, scroll blindly. Disassembly begins with the lid. If you skip this step, you cannot remove the side panel that hides the LED plus switch. With the side panel on it is more difficult to remove the bottom. Dilemma. Do the opposite, if you are looking for difficulties, then you don’t have to remove the lid at all!
Lid. It is held in place by two lugs and two pins. It’s a plastic monolith, you’ll be tortured to disassemble it, installation is even more difficult. The first photo shows the pins perfectly. There are two screws on the sides, immediately unscrew and remove the side panel. Everything is neat inside - plus models, we often find a whole mess of wires. Let's move on to the bottom.
There are three screws around the connector where the grounding terminal is provided (the structure hangs in the air). We unscrew it and make sure that the bottom is slow to come off. Along the perimeter there are six plastic teeth that fit into six holes in the housing. So that it does not accidentally fall apart, worn out by use, there is a guide on the sides of each tooth. One by one, you will have to snap off the teeth separately with a screwdriver (see photo below), if you break them, you will break the bottom when removing them. We took a picture of each tooth, illustrating what was said. We put the dismantled parts aside and look at the switch.
Variants of problems and ways to solve them
Possible causes of problems and solutions are given below:
| Type of problem | Possible reason | What and how to do at home |
| The kettle stopped turning on | Power button failure | The button terminals must be cleaned of carbon deposits or oxide, and the part itself must be replaced with a new one. |
| — | Contact group burnout | Replacing the plug, stripping and bending contacts |
| The kettle does not heat water, works slowly or turns off prematurely | Scale deposits on the heating element or its burnout | Cleaning/replacing the heating element |
| A kettle with boiling water does not turn off for a long time | Damage to the housing cover, thermostat, blockage of steam channels | Cleaning channels, replacing or repairing an electric thermostat |
| Water flows from the kettle | Housing leak | Attempt to replace sealing elements |
Defects such as cracks in the body or bulb, complex damage to the lid, and burnout of closed heating elements cannot be repaired. In most cases, these are the reasons for write-off that are indicated by experts’ reports when contacting service centers. If such breakdowns are discovered after the warranty period has expired, you should not rack your brains over how to repair the kettle; it is easier to replace the device with a new one.
The kettle won't turn off
Repair of kettles in such cases begins with checking the tightness of the lid and cleaning the steam supply hole to the thermostat shutdown sensor. With intensively working equipment, such channels can become clogged with scale, which can be removed with a needle or citric acid. If the cover and channels are operating normally, we disassemble and repair the thermostat. A damaged or heavily worn bimetallic strip requires replacement with a new one.
Check the tightness of the lid and clean the steam supply holes to the thermostat shutdown sensor
Disassemble and repair the thermostat
Shuts down prematurely
The main cause of this problem is scale. There is no need to send the device for write-off. To clean the heating element, folk remedies are used, for example, vinegar, citric acid, soda, poured in concentrated or diluted form overnight or brought to a boil with liquid. Modern household chemicals will also help to cope with the problem, for example, Heitmann Anti-scale liquid products, HG descaling products, Frau Schmidt or Filtero kettle tablets. If necessary, the procedure is repeated several times until the device stops turning off prematurely.
The effect of cleaning the heating element of the kettle will be short-lived if you continue to boil water with a high salt content in it. Under such operating conditions, the risk of damage to the electrical appliance increases significantly, and a heating element covered with scale may completely stop working.
Water doesn't heat up well
Complex repairs of kettles in such cases are not required; poor or slow heating of water is most often explained by scale deposits on the surface of the heating element. Its removal is carried out using the above household or chemical remedies, cleaning is repeated until the deposits are completely eliminated. In the absence of scale, poor water heating can be explained by power surges, burnt out contacts, or broken heating elements.
Specialized products (Asidol and its analogues) help speed up the repair of kettles and the process of cleaning contacts. If they are absent, the brass, copper or bronze contact is cleaned with ordinary ammonia.
In the absence of scale, poor water heating can be caused by burnout of contacts or breakdown of the heating element.
Heating element burnout
It is impossible to repair a kettle with a closed disk heater in such cases. Disc elements are integral with the bottom and are simply not available for sale. Open heating elements are changed according to a simple scheme:
- a failed heating element is removed after dismantling the fasteners;
- a new part is installed instead;
- all elements are returned to their place.
Testing the contacts helps eliminate errors and understand why the device does not work.
It is impossible to repair a kettle with a disc heater
Exposed heating element can be replaced
The button does not lock
The reason for such a breakdown of an electric kettle is most often the loss of any fixing element. Repairing the button in such cases begins with disassembling the handle, removing the fasteners and carefully inspecting the part. The whole element is simply returned to its place, but if the button is broken (the latch is damaged, the part is melted along the edges or from the inside), it is replaced with a new one. Ideally, a “native” button is installed on the kettle, but it is not always available for sale. When using a non-original part, pay attention to the correspondence of the length of the fasteners or the diameter of the holes for tightening them.
Carefully inspect the item
If damaged, the button can be replaced
Summing up
An electric kettle can be repaired in half of all cases. Each device has its own operating principles, and if they are violated, breakdown cannot be avoided. But if something happens (water leaks, the button sticks, does not turn off on its own), you should not continue to use the device. This can lead to short circuits, fire and other problems.
When starting a repair, you need to be prepared for any situation, which means preparing the necessary tools (screwdriver, soldering iron, knife, electrical tape). During the repair process, you should not make sudden movements, because the teapots are plastic and therefore fragile. When disassembling them, it is worth remembering the sequence of work, otherwise it will be difficult to assemble them again.
Warranty rules
Users often ask questions about what to do if a breakdown is detected after purchasing equipment, or how to repair a kettle under warranty. It is worth immediately noting that only devices with identified manufacturing defects or breakdowns caused by the manufacturer are subject to return, exchange or warranty repair. If a fault is detected, the device can be returned within 10 working days. In such cases, the user with a passport, warranty card and check goes to the store, writes a return application, picks up an approved copy of it and waits for money within 10 days.
Warranty obligations will apply if the kettle breaks down during the period of validity, and this was not due to the fault of the user - the device was not subjected to temperature, shock and mechanical influences, was not immersed in water, and, most importantly, was not disassembled on its own. In this case, the buyer fills out an application indicating the malfunction or identified defect, provides a warranty card, original packaging and a receipt.
At the moment the kettle is transferred not to a regular workshop, but to a service center, an assessment report on the appearance of the product is drawn up and the possibilities of its warranty repair are determined. The examination is carried out by a third party; the owner of the equipment should insist on personal presence at it. The warranty repair period depends on the complexity and type of breakdown, but does not exceed 45 days. During this period, it is allowed to temporarily replace the kettle with a model with similar properties. After 45 days, the buyer must receive a repaired kettle, regardless of the complexity of the breakdown and the presence/absence of the parts necessary for repair. If a brand refuses warranty repairs or performs them poorly, the buyer has the right to appeal to the court and Rospotrebnadzor.
The above algorithm will only work if you purchase electric kettles from official dealers, for example, Tefal, Brown, Scarlet, Vitek and other popular brands. In the absence of a coupon or preliminary repair of the equipment in an unaccredited service center, not to mention attempts to disassemble the electric kettle with your own hands, the manufacturer’s obligations do not apply and the product is removed from warranty service.
Repair of electric kettles in China
Products from Guangdong Province are widely known. China is rich in economic and other interesting zones that provide tax and some other benefits to manufacturers. The United States is not enthusiastic about the conflict with the heirs of communism, whose fate Nietzsche predicted a couple of centuries ago. Today we will look at how to repair a Chinese electric kettle, made according to a standard design for a company that does not seek to reveal the true origin, with a 95% probability of being a representative of Eastern Europe, perhaps, the Russian Federation. Let's see what our compatriots indulge in - the best examples of the world's household appliances pass through the hands of Guangdong workers.
China's GDP ranks second. Japan is third. Not bad, considering the state of the Land of the Rising Sun, which survived World War II. Feudal Japan became the world's largest electronics manufacturer.
Products without cord
This device has a base-stand on which the block and power connector are connected.
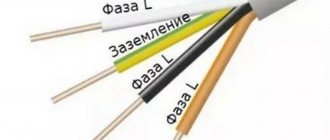
Connection to the electrical network is carried out thanks to a cord that is connected to this very stand. Due to this design, it is possible to pick up the kettle without removing the plug from the socket. There are modifications that are installed in a fixed position on the base. However, modern products can be placed facing any direction. The base also has a special compartment for storing excess cord. Cordless kettles contain:
- filter;
- steam outlet;
- indicator for determining the liquid level;
- power connector;
- base;
- bimetallic disk.
Disassembly nuances taking into account the model
Before starting repair work, it is necessary to conduct a preliminary inspection of the kettle for operability and eliminate all sorts of trivial issues that could cause a malfunction (connection to the power supply, activation of the power button, correct position, installation of the device directly on the stand itself). If, after a preliminary check, the device still remains faulty, then it is necessary to dismantle all components and find the cause of the breakdown. How to disassemble an electric kettle? It is recommended to disassemble models of electric kettles that are equipped with a closed heating element as follows:
- Remove the cover located on the bottom of the device. In this case, you need to take into account the fact that on older models, the fastening elements are located in the upper part.
- In more modern models, during disassembly, it is necessary to remove the top cover, which is secured in two grooves located at the base of the handle.
- The grooves should be carefully released, and then the bolts located under them should be unscrewed. In some models, the top handle is removed directly along with the lid.
- Then you need to turn the kettle over and remove the fastening elements at its bottom.
- Using a screwdriver, unclip the special fixing elements that are located around the perimeter of the bottom of the kettle.
After dismantling the bottom for damage, using a tester, you should inspect the heating element of the kettle. In models equipped with a disk heating element, the heating element does not come into contact with water. Therefore, at this stage, if the heating element is in a faulty state, you can determine the breakdown by ringing it with a tester. As a rule, the heating element in a kettle fails due to the appearance of broken spirals in the tube.
To check the thermostat for any malfunctions, you need to remove the screw located at the bottom of the kettle handle. Then the handle must be carefully removed and the screw removed under the power button. The connection points to which the thermostat is connected must be checked with a multimeter. After ringing, if the malfunction was not detected, you need to remove the assembly itself. To do this, first dismantle the cover itself, and then remove the part. To remove the cover, you need to lightly press it with your fingers and push it forward.
To properly disassemble the old model of electric kettle, you need to unscrew the screws located on the bottom of the device and dismantle its side part to gain access to the heating element, as well as the thermostat. In the case where the power button is located at the top of the kettle, the device must be completely disassembled. To check the open heating element, you must first dismantle the cover.
If the heating element is in working condition, and it was not possible to identify its malfunction, then the stand should be inspected. To do this, you need to disconnect it from the power supply, turn it over and remove all the bolts. Then you need to dismantle the lower part of the stand and inspect its elements.
What kind of damage can the kettle be returned to the seller?
If the purchased product does not meet the declared quality or malfunctions in its mechanisms are identified during operation, according to the Law on the Protection of Consumer Rights, the product can be returned to the seller and get a refund. To do this, certain conditions must be met.
- — the kettle has not been used, its appearance, factory seals and labels, as well as its presentation remained completely intact
- - availability of a sales receipt or other document evidencing the purchase (in the absence of such documents, it is possible to refer to the testimony of witnesses)
- — on the day of contact there is no similar replacement product available for sale
- — satisfaction of the request for the return of money must occur no later than 10 days from the date of presentation
- — you must have a civil passport with you to draw up a certificate of return of the kettle.
If the purchased kettle is under warranty, its repair can only be carried out in warranty workshops, the list of which is given in the warranty card. Independent disassembly of the device and an attempt to eliminate the malfunction entails termination of the manufacturer’s warranty obligations.
A simple conclusion follows from this. It makes more sense to use the warranty than to try to fix the kettle yourself. There is no point in hoping that the workshop will “not notice” any traces of an autopsy. For a professional who repairs household appliances every day and for many years, one glance is enough to determine whether the kettle has been disassembled or not. In addition, there are various tricks on the part of the manufacturer that are aimed at avoiding such situations. They are not visible to the eye, but are clear enough to be used to determine (and prove) the fact of unauthorized disassembly.
All defective goods are subject to return or exchange, at the request of the buyer. The only exceptions may be complex technical goods that are subject to examination for manufacturing or warehouse defects. The teapot, of course, does not fall into this category.
If controversial issues arise, the seller is obliged to conduct an expert examination of the goods at his own expense. The buyer has the right to be present during the examination. If, as a result of the examination, it is proven that the teapot (or other product) is defective due to the fault of the buyer, then he will be obliged to reimburse all expenses for the examination.