Purpose
Electrical plugs with grounding are intended for detachable connections of devices to the general network. They include a plug and socket. The socket is a separate part of the connection that provides power through direct contact with the network.
The plug assumes contact with the electrical device, so the connection parameters must match. A grounded Europlug must meet the following requirements:
- have reliable contact;
- go with high-quality electrical insulation;
- have the correct polarization;
- protect from touch;
- technically exclude the possibility of incorrect connection.
What is important for plugs is non-flammability, good protection from excessive loads, and adherence to the correct order of connecting the contacts. Conventional electrical plugs with grounding have a high protective class and good electrical safety. The structures are usually collapsible; electrical cords with 2-3 cores with a cross-section of no more than 2.5 mm are connected to them. You can also select other Euro grounding plugs to suit your current configuration and sizing requirements.
How to connect the oven
Quite often, devices - both Electrolux and Samsung - do not come with a plug, but only a power cable. What kind of socket and plug it needs determines the power of the device, and how to connect it depends on the wiring in the kitchen. The photo shows the cable connection.
- First of all, it is necessary to establish that the network parameters in the apartment meet the requirements of the device. The instructions contain a table of factory values, which indicates all the requirements, including which plug is needed.
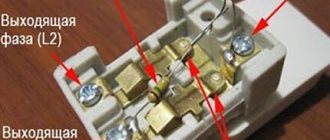
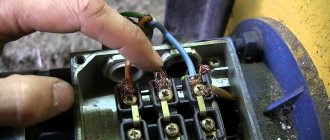
- A load-bearing plug is attached to the power cable. Connecting the plug to a Samsung, Bosch or Electrolux oven is done in the same way. As a rule, wires are marked in different colors. If the wires are the same, the phase is set using an indicator screwdriver.
- The oven is mounted in a niche in such a way that there is a gap of 30 mm between the back wall and the wall, and 85 mm between the floor and the body. You need to make sure that there are no gas pipes between the device and the wall. The device heats up noticeably during cooking, and gas pipes, due to operating conditions, exclude thermal insulation.
How to connect a model without a cable
Some high-power devices are sold without a plug or power cable. It is believed that direct connection to the wiring is more economical and reliable, since it eliminates unnecessary contacts. If this method seems unsafe or too unusual, you can connect the plug to the oven. Which one is needed for the device needs to be clarified in the instructions.
- Install a Euro socket - 16 or 32 A.
- Remove the protective cover from the back of the case. There are three wires here: red, white and black. Green is also possible - grounding.
- Colored wires are connected to the terminal connectors; the colors of the cord must match the shade of the connector wires: black and red mean alternating current, green and white mean grounding.
- The wires are screwed to the connector and the joining areas are wrapped with insulating tape.
- Then install the protective shield on the housing and connect the device.
- The oven is placed taking into account the same requirements: a gap around the body, no gas pipes.
Types
There are two types of grounded electrical plug:
- monolithic;
- collapsible.
Regardless of the form, the content will be the same. Non-separable devices outperform collapsible ones in terms of reliability and ease of use. Maximum elasticity will allow you not to worry about moisture getting inside, contacts being closed or oxidizing. A standard fault with such products is a bend at the base of the connector. But repairing such forks is not impossible. Other parameters of right angle grounding plugs:
- pin contacts – 2 or 3;
- shape - from flat to polygon.
When choosing, be sure to consider the safety factor. Almost every modern plug with grounding comes as standard - the usual ones, where a pair of wires are connected, are not used. Pay attention to the contacts - they are copper, steel or galvanized, nickel, tin with galvanization.
Parallel connection
Popularly, the connection diagram by powering several sockets to one power cable is called a “star”. An electrician installs a distribution box and connects branches to it in accordance with a pre-developed electrical wiring plan. The advantage of this method is that each power point operates autonomously. Voltage disappears at all electrical points only if the main electrical cable burns out. In this case, the load on each point can be selected based on the power of the electrical appliance. The only negative is the high wiring consumption.
Installation procedure
The angled plug with grounding is installed according to the following diagram:
- A phase is connected to one contact of the plug, which supplies voltage to the consumer.
- The wire with zero is connected to the other contact. Ideally, the zero, neutral contacts should carry a current of the same value. In the event of a short circuit, it increases and the protection is triggered. Connecting the neutral to the housing or ground loop is prohibited.
- The third ground pin is connected to the ground wire. It does not have a direct connection with the phase wires. It is inextricably linked with those parts of the structure that are grounded.
Since there is no uniform standard for the production of electrical plugs with grounding in different countries, there are many types of plugs. Here are some food types in other countries:
- 110-127 V and 60 hertz - USA;
- 220-240 V, 50 hertz - Euro plug with grounding.
In Russia, the euro version is accepted as a single standard, not the American one.
What is better to buy for a private home and bathroom
Now let's look at how to choose a grounding wire for a specific installation location.
For home
When installing a grounding structure in a private house, take into account the cross-section of the wiring and the presence of a grounding loop. If the ground electrode is buried in the ground and the bus bar is removed, all that remains is to select the correct cable.
Please note the following points:
Section. Must be selected taking into account operating conditions. In most cases, a wire of 4 sq.m. or more can be used for the home. mm and thicker. If a wire with a cross section of 6 square meters is used. mm without insulation, preference must be given to a stranded conductor. It is recommended to use steel reinforcement with a diameter of 16 square meters as grounding conductors. mm
It is allowed to use a steel angle of 50 mm or more. After completing the work, it is important to measure the resistance, which should not exceed 4 ohms.
When choosing a cable, you can use any of the ones suggested above - VVG, PV-6, NYM, ESUY, PPV and others.
Read - how to make grounding in a private house.
For bathroom
When it comes to the bathroom, it is important to ground all metal elements. This category includes the body of a metal bathtub, hot and cold water supply pipelines and other metal elements
The cross-section of the ground wire must be at least 2.5 square meters. mm, but when using a thicker phase wire, it is necessary to use a “ground” of 4 square meters. mm.
Wires that are connected to metal elements can be brought out to a common busbar, and from there the wire can be directed to the panel or to the machines (there must be a grounding wire for a bolted connection).
The conductor used can be flexible or solid, depending on the installation characteristics. Here the decision is made on the spot.
An important point is the requirement for cable resistance to temperature and moisture. The above brands of wires fully comply with the required characteristics.
Connector A standards
Angled plug with type A connectors is used in Japan and America. In the American version, the pins have different thicknesses, in the Japanese they are the same. Another name is Class II. An Asian plug fits into an American outlet, but not vice versa. Here is an example of an American plug. If the standard of the plug or socket does not coincide with the Russian one, then adapters are used.
Domestic devices
A plug produced in Russia must meet the standards of GOST 7396. Technical parameters are applied to the body - these are voltage, frequency, current. Device groups of this category:
- CEE 7 / 16 or C 5 with 4 mm contacts, insulated from the housing, designed for current limits of 6 Amperes;
- CEE 7/17 – here the plug belongs to class C 6, has thickened pins, a current limit of 10 Amperes.
Old C1 - b plugs are equipped with pins 6 mm thick and do not have grounding.
Fork adaptation
Quite often there are electrical appliances whose plugs are not suitable for domestic sockets. In this case, there is only one solution to the problem - connecting the device through a special adapter - an adapter.
Adaptation of three-pole design type IEC 60906-1
Polarized electrical plug IEC 60906-1
The distance between the pins for this configuration is 19 mm, the diameter of each pin is 4 mm, as for type C5. But unlike the latter, they are equipped with an additional grounding pin, which will not allow you to insert the plug into the socket.
To solve the problem, the structure is clamped in a vice and carefully, so as not to damage the necessary pins, the third one is cut off with a hacksaw. The absence of a grounding pin will allow you to easily connect the device to an outlet.
Adaptation of the English model BS 13-63
Such Euro plugs also have three pins, but are flat in shape. Two of them are on the same horizontal line, they are designed to supply power voltage, and the third is for proper connection and grounding.
The width of each pin is 6.5 mm. The interval between the internal planes is 16 mm, as with type C5. To make the mechanism usable, you will need to reduce the width of the pins by 2.5 mm and remove the ground. The excess is removed with a hacksaw, and with its help the remaining pins are ground off. This is where the adaptation ends, the plug can be used at home.
Connection features
Electrical plugs with grounding must be connected strictly taking into account the parameters of the device being connected and the current capabilities of the plug part. A Euro grounding plug is the safest option; it is not advisable to use others. Be sure to first find out the power of the connected device (and calculate the current that will flow through the plug contacts). For example, a simple plug cannot be connected to an induction hob, since the hob consumes around 7 kW, and not every plug can withstand these loads. The current can be calculated using the formula below.
For an oven and electric boiler, calculations are carried out in a similar way.
If the power cord is broken
Most often, a burnt out or melted plug is only the result of a short circuit that has occurred, and the source of the problem lies in something completely different. For example, in a broken power cord. The power cable suffers after being crushed by a heavy object or externally damaged by a snag on a sharp nail or corner. Therefore, we are not in a hurry to disassemble the adapter, but carefully inspect the surface of the wire for cracks, bends or burn marks.
The easiest way to check the integrity of the cord is to use a multimeter. You just need to find the tester, switch it to “Buzzer” mode and ring the cable. If the device detects a current leak, a high-pitched squeak will be heard.
If it is necessary to test a chain longer than two meters, then an additional wire should be prepared and included in the overall circuit. When there is no spare conductor, there is another option - to twist the phase and zero at one end of the wiring. Next, connect the multimeter probes to the nearest contacts. This option has several advantages over the first one:
- you can check for leakage two wires connected in series into a single circuit at a time;
- there is no need to look for a compatible conductor and expand the circuit.
If you don’t have a multimeter at hand, you can verify the integrity of the conductor using a special homemade universal device. To make it you will need a 3.5 Volt Ilyich light bulb, a power battery (preferably a square one with a power of 4.5 Volts), two connecting wires and a gripping connector. We connect all the elements in the following sequence:
- connect a light bulb to the “plus” of the battery;
- We connect a flexible conductor with an alligator clip to the negative of the battery.
It is better to first test the resulting device on an already familiar and working section of the network. It is enough to hook the clamp anywhere, and if the circuit is assembled correctly and current flows into the wire, the light bulb will light up. If there is no glow, we make a logical conclusion that there is a leak or a wire break.
If there are doubts about the integrity of the cord and plug or there are obvious traces of melting and burning, immediate action must be taken. Knowing what to do first and how to make repairs, you can protect your life, health and property.
Share your opinion - leave a comment
Tools
To connect a Euro grounding plug, take:
- side cutters;
- a screwdriver (depending on the type of screws, Phillips or slotted);
- electrician's knife.
Auxiliary accessories are usually not required. Procedure: standard diagram Let's look at how to connect a 220 V plug with grounding in stages:
- Take a cable - for example, round 3 * 1.5 mm.
- Unscrew the body - from the side or from below.
- Strip the wires of insulation - you need to get three wires with stripped wires at the ends (1 cm is enough).
- Disassemble, unscrew the contact group, connect neutral and phase to the pin contacts (grounding is the contact on the side).
- Connect blue and brown wires to the contacts, yellow to the ground contact.
- Stretch the contacts so that the wires fit tightly.
- Place the parts, assemble the body, tighten the fastening screw.
Check the build quality. How to connect a wire to a grounding plug, see video below:
Sockets with curtains: what are they for?
Such products are perfectly protected from children's curiosity. Curtains are special partitions inside the housing that block access to live contacts. In order to insert the plug into it, you need to make some effort. A little curious discoverer will not be able to stick any foreign body into it - a nail or a knitting needle. This allows parents to be calmer. Previously, special plastic plugs were used for such purposes, which were quite easily removed by the child.
Another type of such protection, although simpler, is a cover that is pressed against the body by a spring. Such products are more often used for outdoor installation, and therefore they do not have a wide range of colors. Mainly produced are gray and white external sockets without curtains with or without grounding, equipped with covers.
Tags: , machine, beat, sconce, view, plugs, harm, choice, generator, engine, house, , grounding, ground, cable, how, design, circuit, , tray, installation, load, voltage, neutral, nominal, connection, potential, wire, start, , socket, row, garden, light, lamp, connection, resistance, circuit, ten, type, current, triangle, , phase, shield, electricity
Replacing a broken euro plug
Procedure for breaking pins or melting:
- Cut off the plug to be replaced and remove the outer insulating sheath of the wire.
- Strip 3 wires by 20 mm, twist them, strip up to 10 mm of wire insulation - this is enough to connect a new plug yourself. Use side cutters to bite off what you don’t need.
- To improve contact with pliers (if the wire is single-core, hard), bend the copper ends of the wire and connect the wires.
- Cords for connecting washing machines, refrigerators, and other equipment have three contacts, separated by colors. Zero is the blue color of the wire insulation, grounding is yellow and green, phase is the latter (different shades are possible, usually brown). For correct replacement, you need to connect the ground to the contact in the center, the other two to the pins, which one does not matter where.
- Clamp the cable with a plastic jumper - it will fix it in the landing area.
- Assemble the Euro fork body and fasten the structure with a screw.
As you can see, the procedure is simple, you just need to follow the sequence.
How to connect 3 wires (1 ground) to 2 wires (no ground)?
Plus to plus. Minus to minus. On a beech, charging usually has 2 wires.
3 - usually 220 volts on the plug.
Cut off excess and insulate.
In general, it would be better for you to go to the service center.
grounding is a wire with two different colors just flip it off!! remove the grounding. problem solved)
Grounding is an integral part of our modern life. Of course, you can do without grounding, after all, how long have we lived without it. But, with the advent of modern household appliances, grounding is simply a prerequisite for protecting a person from electric shock.
People, you can’t tear off the land on laptops, at least HP goes +16 and +19, you can get by with 1m plus, but not without land
you just take the grounding, look for an aluminum plate (in your case, even a Sprite can or any other will do), solder the grounding to the plate and wrap it with electrical tape to the wire, and the other 2 wires in order. The problem may also be in the current conductivity of the wiring of the old and new. To determine current conductivity, look at the thickness of 1 and 2 old and new wires
Insulating Ground Wire - Multicolored (2 Colors)
Phase wire is always the same color (usually bright red)
The “zero” wire is always black.
If we are talking about the low-voltage side, then it’s not worth studying there, take it to someone who understands, three wires - a screen, and two pluses of different voltages or something else (I don’t remember exactly). If you mix it up, you can damage the laptop. What if it's high voltage? . .Grounding can be ignored and not used. Again, do not confuse other wires with ground. And the other two are for a 220 plug) (!) Electric shock is fatal (!) Two years ago I charged people about 30 thalers for this garbage (not the same times these days. )
and you advised - he means - the plug from charging 20 volts is broken - and you give him a 220 plug socket - idiots - in short, on a laptop in the charging connector the plug is - the central wire is “+” and the outer one is “-” - with a tester you find where the plus and minus and calmly solder a new plug
Replacing an old electrical plug
If the wiring in the apartment is old without a grounding wire, and it is necessary to replace the plug with a plug without a grounding contact, then for replacement you will need to use a different circuit:
- Cut off the old electrical plug that has failed.
- Remove the outer sheath of the wire, strip the ends to 20 mm, and bite off the excess.
- Attach the cores according to a similar pattern above, forming rings from the stripped ends, as in the photo.
- Insert a pair of conductors into a plug without being tied to poles. If there are 3 wires in the cord, the yellow-green one will need to be cut off - there is no place to connect it.
- Clamp the plate and assemble the body.
The technology for replacing an electrical plug with grounding is simple; the main thing is to connect the wires correctly. To do this, take into account the standard color coding of the wires.
Mounting methods
To secure the wire to a screw clamp, the ends of the wires must be cleared of insulation, placed in the groove and tightened by tightening the screw.
With a knife connection, the insulation is pierced by a special device inside the contact mechanism. To do this, the uncleaned end of the wire is inserted all the way into the corresponding socket. While holding this position, a flat-tipped screwdriver is inserted into the lower groove.
By moving the handle upward, the spring mechanism for piercing the wire and clamping the end of the wire is activated. Then you need to remove the screwdriver and check the reliability of the connection.
Useful tips Connection diagrams Principles of operation of devices Main concepts Meters from Energomer Precautions Incandescent lamps Video instructions for the master Testing with a multimeter