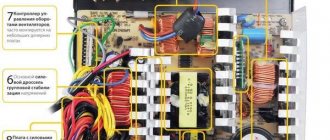
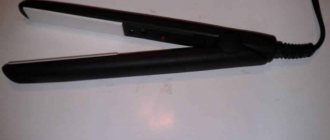
Brief design
A hair dryer consists of a motor, a fan, heating elements, and an electrical circuit that makes the elements work in harmony. Depending on the number of modes, the manufacturer, the element base, appearance, and composition of the switches are different. But there won’t be anything more complex than a semiconductor thyristor inside. Therefore, we will carry out home repairs of hair dryers with our own hands.
The body is held on by screws. The heads are often non-standard. This is a plus sign, an asterisk, a pitchfork. Therefore, first of all, before fixing a hair dryer, let’s take care of a tool that can cope with such a task. Fortunately, a set of bits costs 600 rubles today.
Sometimes the case doors are additionally secured together with special latches. This is a separate problem: experienced craftsmen often break plastic, despairing of dealing with it using civilized methods. There are no tricks, they come up with hidden screws hidden under stickers, plastic inserts, and removable regulator caps. The fastener is fictitious. There are no useful functions.
The hair dryer motor is powered by direct current 12, 24, 36 V. A diode bridge is used to rectify the mains voltage; in cheap models, a single diode is used. Filtering of power harmonics is carried out by a capacitor connected in parallel with the motor windings or included in a more complex filter. Due to their enormous mass, inductors are rarely used in hair dryers. Therefore, knowledge of the principles of smoothing ripples with RC circuits is enough to cope with the construction of a circuit diagram of a hair dryer being repaired. Sometimes the filter element uses one spiral (inductance).
The hair dryer switch simultaneously closes the circuit through which the coils will be powered and starts the motor. Further intervention schemes are determined by complexity:
- only the rotation speed or only the temperature is regulated;
- the ability to individually select heating and air flow intensity.
In most hair dryer models, there is parallel protection against turning on the heaters when the motor is idle. Protects the spiral.
An optional thermostat in the form of a special resistance or other sensitive element. Let us describe the breakdowns that occur in the faithful assistants of the fair half of humanity.
This is interesting: Samsung washing machine error 5e: causes and solutions
Typical faults
Due to the simplicity of the operating principle of the hair dryer, its possible breakdowns are typical and even a simple user can cope with them.
Smells something burnt
The problem is usually due to hair, dust or lint getting on the coil. If the element becomes dirty, the rotation speed of the impeller drops, the overheating protection system is triggered, which causes an unpleasant odor. To resolve the situation, just clean the heater and then check the functionality of the device. If the burning aroma does not disappear, you should contact the service center.
The filter is located at the back of the hair dryer, on the air intake side
Lack of power
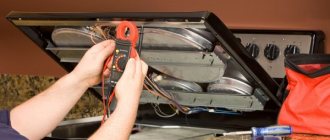
First of all, you need to make sure that there is electricity in the outlet and that the power cord is not damaged. Even if no external damage is noticed, you need to make sure that current is flowing through the wire. For this:
- It is necessary to disassemble the case and check the power contacts using a special tester;
- The next step is to check the power button to make sure that its pressing is not interfered with by debris or stuck dust. A uniform color without charred marks will indicate that the contacts are working properly;
- If damaged connections are identified, they need to be cleaned with a knife or sandpaper;
- Connect the device to the network, but do not turn on the start button on it. It is necessary to bring the tester to the terminals of the button to find out whether voltage is passing through.
Healthy!
If a cable malfunction is detected, it should be replaced with a new one. If this is not possible, it is permissible to use electrical tape to insulate the stripped and twisted contacts. If you find problems with the button, you can try cleaning the contacts or disconnecting the part altogether, then the unit will start immediately after connecting the plug to the socket.
Hairdryer won't turn on
Just as in the previous case, the problem may be due to a lack of electricity or a broken cable. Then the procedure is similar to that described above. Another possible reason is that the electric motor has broken down. The precursors to this problem are the following symptoms:
- a slight cracking sound is heard during startup;
- the motor runs intermittently;
- the smell of burnt wiring is heard;
- When the fan does not rotate, a hum is heard.
If such a malfunction is suspected or detected, it is almost impossible to resolve it yourself, since it is very difficult to identify the specific cause. In addition, the cost of repairs will not be cheap; in many situations it is easier to buy a new device.
Performance has decreased
If this problem occurs, it is worth checking the condition of the fan. Most often, it begins to spin more slowly due to the fact that hair, dust or other contaminants have accumulated on it. Then it is enough to clean the part from debris. If you perform the manipulation periodically, light cleaning with a toothpick, an old toothbrush or tweezers will help. If the device has never been cleaned or this happens rarely, you will need to disassemble the case in order to carry out high-quality cleaning.
DC motor
The fan rotates quite slowly
As in the previous option, this is most likely due to hair wrapping around the part or excessive clogging of the housing. You should also clean the device.
Cold air blows
A heating element, a spiral, is responsible for heating the flow. This part is one of the most vulnerable in the device, especially in the absence of overheating protection in the equipment. If there is no automatic shutdown when the maximum temperature is reached, you need to know what signs indicate that it is time for the device to rest:
- the appearance of a burning smell during operation, which may persist even after shutdown;
- The housing is too hot during operation; a working unit should not overheat.
To figure out the problem, you will need to disassemble the hair dryer. If the heater ruptures, it is noticeable to the naked eye. If there is minor damage, you can easily fix the problem by connecting the ends of the spiral and soldering them. If the gap is in several places, it is better to buy a new heating element, most importantly - from the same company as the equipment itself.
Important!
It is necessary to determine why the part was damaged. If you do not understand the cause and do not eliminate it, the problem will recur soon.
About the reasons for hair dryer overheating
Let's start with the fact that regular shutdowns of technical equipment during the work process are a normal occurrence. This means the protection is working.
Photo: After finishing work, immediately turn off the heater of the hair dryer, and then the electric motor. In this case, the heating element will not overheat.
It’s worse when the hair dryer heats up and then melts: as a result, a short circuit in the network is possible, which can harm its owner. This is no good. Let's consider different situations.
- The device has overheated and will not turn on.
Failure may be caused by a technical defect on the part of the manufacturer. However, this situation occurs extremely rarely.
Most often, this is overheating of a household hair dryer caused by weak air flow. This situation should be detailed:
- Perhaps the household appliance has been behaving this way since the moment of purchase;
- or the household appliance worked stably at first, but after a while it began to heat up and turn off spontaneously.
For any of the above reasons, you can “pick up the key.”
- The hair dryer I just bought started overheating.
The outgoing air flow has decreased: the blades of the hair dryer work in the specified mode, and less air flows in. The reason may be a clogged filter grid or contamination of the filter element itself. The issue can be resolved in literally 10-15 minutes. It is necessary to clean the hair dryer following the manufacturer's instructions.
Photo: Regularly removing hair and foreign objects from the hair dryer blades allows the fan to operate as planned without overheating.
Another possible problem: clogging of the household device with small foreign objects and/or hair. There is an additional load on the blades, which they either cannot cope with or cope with greater stress (they spin more slowly). What to do? In this case, you should not disassemble the device and try to carry out independent “technical treatment”. Entrust repairs to service center specialists.
The most confusing situation with the filling of a household appliance, which only masters can handle.
The hair dryer may overheat and turn off when it does not have enough power. If the power unit of the device is low-power, and you dry long hair, then the drying procedure takes a lot of time. The motor does not fuse, working constantly in enhanced mode.
Find out how to disassemble a hair dryer using popular models as examples.
What was the cause of the malfunction
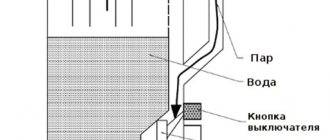
In my case, the heater shutdown button was broken. Do you know what this button is for? Many, as it turned out, are not aware. The fact is that if you turn off the hair dryer immediately, without using this button, then there is a risk of damaging the device. This can happen because the fan immediately stops after turning off, and the coil has not yet cooled down, the heat has nowhere to go, the hair dryer overheats, and you can even melt the body. And this button allows you to turn off and blow through the coil while the fan is running, giving it the opportunity to cool down somewhat.
So this very button failed, the fastening of one of the contacts broke, so the hair dryer only blew cold air. To repair it, I had to slightly widen the hole of the torn contact and, putting it in place, melt it with plastic to fix it. Of course, before this it would be correct to clean the burnt contacts.
Clean and secure the button contact
In general, after these simple steps (it takes much longer to describe than to do), the hair dryer worked properly.
The hair dryer has overheated and won’t turn on - why?
The main and most common reason for overheating is that the air flow is too weak. A powerful hair dryer transfers all excess heat from the heating element to the air - so it does not overheat for a long time.
Such situations can be divided into two groups:
- or the hair dryer behaves like this from the very beginning -
- or it worked well, and then gradually began to warm up and turn off.
The second one is more offensive. But most often it can be solved.
Why did an initially good hair dryer start to overheat?
Offhand, we can name three possible reasons.
- The simplest and most easily solved problem is that the filter or filter grid is clogged. Accordingly, the air flow at the inlet has decreased, the blades still rotate with the same power, but they do not have enough air. Have mercy - this can be solved by simple cleaning, which you can do yourself in fifteen minutes. Look - .
- Moderate complexity, but quite rare - the blades are clogged with small objects or hair. Now they themselves are spinning more slowly. It is rare, because the filter was installed for a reason. Should I go into the inside of the hair dryer myself to check this? Oh, I don't know. It is probably better to take the hair dryer to a service center.
- Complicated - something in the technical components of the hair dryer has gone bad. This is, of course, only a service center, unless you are a DIY person. However, with a high degree of probability, this problem is also solvable.
That is, there is no need to worry. Just calmly clean your hair dryer and see if the situation improves. Usually corrected. If it is not corrected, take it to a service center.
Why does the hair dryer quickly overheat when working from the very beginning?
What to do. Looks like you chose the wrong hairdryer. Well, that is, there is a possibility that the issue is a defect in a particular product. That is, the model itself is excellent, but this particular time there was some kind of glitch. Seek warranty service, it is possible that the problem will be fixed.
However, usually, of course, it’s not about marriage. It's just a hairdryer. What's wrong with him?
- The hairdryer is low power. In we explained why power is so important for a hair dryer. Yes - thick and long hair can be dried with a weak hair dryer for half an hour, in several stages and with breaks for cooling the hair dryer. A tedious and unpleasant task. Well, don't be sad. It was an investment in experience - now you know you need a more powerful hairdryer and don't make the same mistake next time.
- The hair dryer materials are poorly chosen. This is also possible. Speaks poorly of the hair dryer manufacturer. But it’s true - when information about why powerful hair dryers are better became quite widespread, some manufacturers began to cheat by screwing a nominally powerful motor into the hair dryer and indicating impressive numbers on the packaging. However, all other parts of the hairdryer remained of the same poor quality... In general, it was also, of course, an investment in experience.
Okay, everything is clear. But what should you do now with such a hairdryer? Is there any way to make it good?
Unfortunately, it's not possible.
It’s sad, but you’d better sell such a hairdryer on Avito, specifically indicating that the hairdryer works, it’s just not powerful enough for your hair. You won’t get the full price, but you can add money and buy one with which you won’t have to worry about overheating.
Well, that is, of course, any hair dryer can overheat. If desired. However, in order to overheat the MBF-1, you will have to try hard. He effortlessly copes with even the most voluminous hairstyles:
As a rule, hair dryers are quite often prone to various breakdowns, and you have to buy a new one. The device is not the most expensive, of course - you can easily buy another hair dryer, but at the same time it is quite simple, and many people will be able to restore its functionality without much effort.
What other problems can you fix yourself?
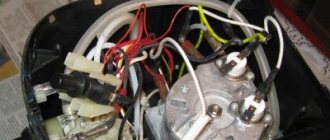
Connecting wires
Check the integrity of the power cord, plug, quality of connections, soldering. The button itself can also, if necessary, be disassembled for cleaning, but this must be done carefully so that the contacts and spring do not jump out (used in some buttons). If the button is seriously malfunctioning, it will already have to be replaced; this may not be possible due to the fact that it just can't be found.
The fan motor and the spiral itself are also poorly repairable - if they malfunction, either professional intervention is required, or...... Long live the store!
Another possible fault that can be repaired is the thermal fuse.
Thermal fuse
This is a self-resetting fuse that turns off the heater coil when overheated, and after cooling it returns to its original, closed position. But it happens that its contacts burn out over time and it stops working normally. You need to restore good contact, carefully use something thin (a nail file works great while your wife can’t see) and shuffle between the contacts, but do not loosen them more than the thickness of the file. Otherwise, you will then have to bend the contact plates to compress them well.
Sometimes tucking is simply necessary. But be careful, it’s not that simple, remember that everything is attached to a fragile mica base and putting in effort can only make things worse.
Remember that with any repair, care and accuracy are important! This is one of the keys to success!
Hair dryer design
Before we tell you how to repair a hair dryer , we will describe its design. Modern hair dryers from Rowenta and other manufacturers consist of the following elements inside:
- Electrical engine;
- fan;
- spiral (heating element);
- control panel (speed switches and switches);
- cable for connecting to the network through a socket.
As you can judge from the list of elements described above, the device has a very simple design, so disassembling your unit yourself and repairing the hair dryer yourself will not be difficult.
The following things will be useful to you from the tool kit: a multimeter, a flat-head or Phillips screwdriver (depending on the design) and a small soldering iron.
See also -
Rating of the best hair dryer brushes for home use
This is interesting: The dishwasher does not drain the water: there is water in the dishwasher
Hair dryer does not heat the air - what is the reason, how to fix it?
Table of contents:
- Is your hair dryer not heating up or not working at all?
- What to do if the coil in the hair dryer burns out and it does not heat the air?
- Where to buy a high-quality hair dryer that won’t cause problems?
Reading time: 3 minutes.
We continue the series of articles about possible problems with the operation of hair dryers. The problem of a hair dryer not heating the air is common. It is significantly different in its causes from other problems with hair dryers. Today we will understand its reasons and understand what to do in this case.
Removing hair from the device
The nuances of the hair removal process from a hair dryer depend on the specific type of device. In this case, you need to follow several general rules:
- Before disassembling and cleaning the hair dryer, you need to disconnect it from the power supply. Otherwise, there is a risk of electric shock or short circuit.
- Do not use a damp cloth, water or other liquids to clean the internal components.
- Cleaning can be done using improvised means - a toothbrush, vacuum cleaner, tweezers.
BaByliss
To disassemble the BaByliss hair dryer you need to follow a series of steps. In particular, it is required:
- Remove the nozzle by unscrewing the fasteners.
- Use a screwdriver to pry off the fixing ring located next to the nozzle. As a rule, the ring is easy to insert and remove without much effort.
- Remove the retaining cup next to the power cord. The element is secured in the housing using two latches.
- Separate the parts of the housing held by latches on each side. If the case is made of translucent plastic, upon external inspection it will be possible to easily detect the location of the latches.
- Unscrew the fan impeller and get to the shaft on which the hair is wound.
- Remove foreign elements using available tools and reassemble the hair dryer in the reverse order. To avoid making common mistakes during assembly, it is recommended to take photographs of the main steps during disassembly.
Viconte
The sequence for disassembling the body of the Viconte hair dryer is the same as for the BaByliss brand device. The difference in the internal system is that it is unlikely that it will be possible to remove the impeller from the motor shaft using a basic set of tools. To remove hair and process the bearing, you can make a hole in the motor holder housing. It is important to correctly calculate the location for the hole so as not to destroy the motor or the impeller itself.
The motor holder body is thin, so you can make a hole with a sharp knife. The suitable hole diameter is 3-5mm. A hook made from a simple paper clip is passed through the hole and all curled hair is carefully removed. To lubricate the bearing, you can use a simple medical syringe. It is enough to drop a drop of machine oil where the shaft enters the motor and rotate the impeller a couple of times.
To test the fan, the diode bridge needs to be supplied with 10V voltage from the DC power supply. Testing is not a requirement, but it will help ensure that your hair dryer's fan is working properly after hair removal. If the test results indicate stable operation of the device, all that remains is to assemble the structure. The hole you have made does not need to be blocked, as it will fit tightly to the body of the hair dryer.
Precautionary measures
When repairing any device, it is important to take basic precautions to avoid harm to yourself and others.
- Before use, make sure that the hair dryer is not connected to the mains and is not under voltage. It is strictly forbidden to disassemble a household appliance while it is plugged in - this is dangerous to life.
- If you are disassembling the device for the first time and are not sure that you will be able to put it back together correctly, then it is better to film the entire process with a smartphone camera or sketch an approximate layout of the elements. This will help you better understand where each part should be and make the assembly process easier.
- It is better to check the serviceability of the part after repair using a multimeter or an indicator screwdriver. Do not plug the device into the network until you are completely sure that it is working properly.
Rules of care and use
Strict adherence to the rules of operation and maintenance can reduce the risk of breakdowns. If all recommendations are followed, the hairdryer will work properly and will not require periodic repairs. The basic rules include the following:
- Before using the device, you need to inspect the condition of the power cord, and during storage, you should not wrap it around the handle. Otherwise the cord will become bent.
- You can only use the attachments included as standard, as well as those specifically designed for a specific hair dryer model.
- In places with high humidity, you should refrain from using the device. You should also avoid contact with water.
- Using a budget version of the device, you can independently install a fine-mesh filter in the air intake, which will prevent a large amount of hair and dirt from being sucked into the housing.
- Having noticed signs of any breakdown, you must immediately disconnect the device from the electricity and carry out diagnostics to detect all existing problems.
- You should not overheat the hair dryer, so if you need to use the device for a long time, you should buy a professional device designed for long-term continuous operation.
- Before storing the device in a closet, you need to wait until it cools completely, which takes about half an hour.
Electrical diagram of a standard device
Most hair dryers work according to the same circuit diagram.
The heater consists of three spirals. The first one powers the electric motor, and the other two are for heating. When the switch is in the off position, the circuit is de-energized.
If you turn on the first mode, the power will pass through a diode, which isolates one half-wave of alternating voltage. In this position, only the second heating coil is turned on, but not fully. The motor rotates at low speeds and the device produces minimal power.
In the second mode, the diode is short-circuited and the circuit uses both half-waves of the alternating voltage. The second spiral begins to work at full capacity. The motor picks up speed and the hair dryer gains average power.
In the third mode , the third spiral will also be powered, and the device will start at full power. If you press the “cool” button during operation, it will simply make the second and third spirals turn off, leaving cold airflow. The device's motor will continue to run.
When operating a commutator motor, a level of interference will occur. To reduce it, two inductors and a pair of capacitors are connected to the circuit.
Be sure to have a thermostat in case the fan suddenly stops working. And also a full-wave rectifier of four diodes, to reduce the voltage to the required one for the electric motor.
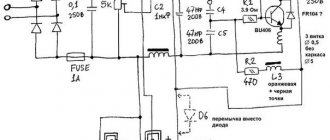
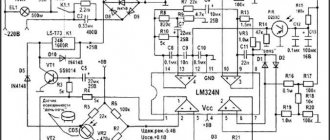
Schematic diagram
I had to “remove” the scheme after the fact. Switch SA1 turns on fan M1 in position 1 through diode VD1, heater R2, bridge rectifier VD3 and thermal relay SF1 into the network using plug XP1.
Position 2 of switch SA1 is intended to exclude diode VD1 from the circuit, increasing the time (in each half-cycle) of current flow in the circuit and, thereby, the air flow rate of fan M1.
Rice. 1. Schematic diagram of an electric hair dryer.
Heating of the air by heater R2 is insignificant, since it is wound with a thin high-resistance wire with a diameter of 0.19 mm with a total resistance of 100 Ohms. The main heater R1 is turned on by switch SA2 and also has two gradations: 1 - less heating (diode VD2 is connected in series in the circuit) and 2 - more heating (diode VD2 is excluded).
R1 is wound with a wire with a diameter of 0.44 mm and has a total resistance of 45.0 ohms. Both heaters are wound spirally on a long insulating mica cross with 3 wires bent like a serpentine to compensate for the expansion of the wire when heated.
The turns of the wire of the heater R1 are placed between the turns of the heater R2, without being closed and having separate terminals. That's all the wisdom, if the VD3 rectifier did not have a specific shape in the form of a tablet with four end terminals in one direction and was not placed in the very center of the structure (heating center) and, of course, it failed - the fan stopped working.
Final Tips
Repairing professional hair dryers is more complex. Design elements are often complemented by smooth controls and additional options such as the Care button. Spirals are made from special alloys that, when heated, create negative ions that have a beneficial effect on hair. The technique remains the same:
- cord;
- switches and buttons;
- dust removal;
- spirals;
- motor;
- visual inspection of capacitors and resistors.
Before repairing, it is advisable to get a schematic diagram.
Industrial models are not much different from household ones. But drying your hair is not recommended. Such products are distinguished by increased resistance to dust, shock, vibration, humidity, and other climatic factors. Home restoration of industrial hair dryers will not end well.
Electrical radio products used in household models are not suitable for use in harsh conditions. Requirements apply to wires, power cord, motor and coils.
How to disassemble a hair dryer: inspection procedure, disassembly and repair
Disassembling the device is not difficult if you follow the instructions, have the necessary tools on hand and have at least some knowledge in the field of electronics.
Cord
First of all, you need to inspect the wire. You should start with a power outlet to make sure there is electricity. If there is light, then move on to checking the cord - from the body to the plug. Inspect the integrity of the wire, look for kinks, breaks, melting. Inside the case, after disassembling it, observe the state of the electrical resistance - a pair of detachable contacts, soldering or wiring with plastic caps.
Permanent connection
If the wiring is embedded in plastic caps, then we are talking about a permanent connection. This option is quite difficult to test and requires the following materials:
- regular needle;
- tester;
- lamp;
- indicator.
The check is performed as follows:
- A needle is attached to one terminal - it should be inserted into the power core near the cap all the way to the copper;
- The second terminal covers the antennae of the plug;
- Both wires ring at once.
Healthy!
You should not make more than one puncture per core, since the operation of the device does not exclude moisture from entering the housing.
Contact pad
It is much easier to ring the wire when the joints are visible to the naked eye. If damage is found, it is better to replace the cord with a new one that has a permanent plug. The second option is preferable, since in the first case restrictions are imposed on the choice of insulating materials that prevent moisture from entering the cores.
Attention!
The most vulnerable spot is at the contact of the wire with the body. Constant bending and twisting of the cord leads to chafing and cracking. Damaged copper strands begin to spark, burn electrical tape and melt.
Switch and switch
You can check the functionality of the switch by short-circuiting the part. If a three-position switch is used, the corresponding check will need to be performed three times - for each mode separately. It is better to sketch out the wiring diagram to avoid mistakes during assembly.
Once a defect is identified, it should be carefully inspected and processed. Burn marks should be cleaned off with a file, eraser or sandpaper, contacts should be treated with alcohol. If an element cannot be restored, it should be replaced with a new, similar one.
Fan
A clogged air duct is a common problem when operating equipment. If there is a filter, it must be removed and thoroughly cleaned; clogged dust can be removed using a soft brush. If you find hair wound around the motor axis, it is better to remove the fan from the shaft and then remove the dirt.
Spirals
Most often, devices are equipped with several heaters at once, which outwardly do not differ from each other. After disassembling the unit, you should make sure that the heating elements are identical; if there are breaks, they need to be soldered or the ends twisted. In addition, the ends of the spiral can be connected using thin copper tubes.
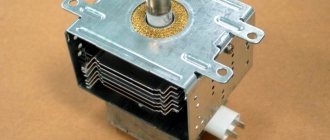
Engine
A breakdown of the motor is indicated by the occurrence of a strong crackling sound and the presence of sparks when turned on. If a malfunction is detected, remove the motor winding from the electrical circuit and check all connections. Replacing the winding requires certain skills and knowledge in the field of electrical engineering, so if you don’t have them, it’s better to immediately turn to professionals.
Healthy!
If the winding is in good condition, it is enough to clean the surface and evaluate the tightness of the brushes to the copper surface. In this case, the shaft should rotate freely, and it is better to lubricate all rubbing elements.
Chip:
- The getinax substrate periodically cracks, which leads to rupture of the track. If a damaged fragment is found, it should be buried, covering it a little with solder;
- A malfunction of the capacitor is indicated by swelling of the product; if it breaks, it bends outward. If a breakdown is identified, the only way out is to replace the part with a new one;
- When the resistor burns out, it darkens. Even if it is not faulty, it is worth replacing.
Thermostat
Some models are equipped with a self-regulation function. Operation is carried out by using a resistive divider, in which one arm is responsible for responding to temperature. In the future you can proceed as follows:
- Eliminate the sensor by breaking the circuit, and then check its functionality.
- Close the wires and observe the reaction of the device.
There is a high probability that the attempt will not be successful if the device only responds to certain resistance values.
What could have broken
After opening the case, you must carefully inspect all the parts to ensure they are working properly. Quite often the cause of a breakdown is the power supply wire; its contacts can burn out - they need to be cleaned and updated. If the wire is broken inside, then it is replaced with a new one.
Fan
This main unit of the product is driven by an electric motor; with the help of a fan, air is sucked into the hair dryer. Often the breakdown is associated with contamination of this device with dust; the brushes of the electric motor become clogged
. To clean the fan, we disassemble the device according to the diagram described above.
Electric motor
If, when you turn on the hair dryer, you hear a crackling sound and see flashes of sparking inside the body of the product - this is how the brushes behave when they are worn above normal, urgent replacement is required. When the engine does not turn on, one of the failure options can be very banal: a wad of dust
, it is a dielectric, which is why the motor armature does not rotate.
The air passes through a grille made of a special wire, which plays the role of a heating element - it must be undamaged. If a break is detected, it must be soldered; simple twisting will lead to an increase in the resistance of the entire grid, which will negatively affect the operation of the thermostat.
Many home craftsmen have become accustomed to soldering everything since the times of the USSR, but today all parts of devices have become much more delicate - the wires are so thin that a regular soldering iron simply burns them out. The capacitors are soldered to the printed circuit board; replacing them requires skill and a special low-power soldering iron with a thin tip
, and this is an extra cost.
Types of devices
Blenders are divided into desktop, that is, stationary, and hand-held (submersible). They differ in operation and design, and may include additional functions and attachments. To repair a blender yourself, you need to understand how it works.
Submersible models are electric devices that have a long handle and a blade attachment. They are lowered into a container with products for mixing and/or grinding. Then you need to press the start button and hold it until the procedure is completed.
The undoubted advantage of the manual model is its compactness. The device is easy to disassemble and wash, and does not require much space for storage. And if the device is equipped with additional attachments, then it becomes a universal assistant in the kitchen.
There is only one disadvantage of this design, but it is an important one. When grinding or other operations, you have to hold it in your hand all the time and also hold down the start button. During this time, the hand becomes numb and tired. In addition, a hand blender will not cope very well with large quantities of food.
Stationary models are another matter. They are somewhat similar to food processors and can handle many functions. Rotating knives are attached to the bottom of the container. You can place such a blender in any convenient place; you do not need to hold it with your hands during the process. With its help, you can not only chop and mix a large volume of products, but also knead batter and whip up a cocktail.
But even in this case there were some drawbacks. Countertop appliances take up a lot of space, and some models do a poor job of chopping vegetables, turning them into crumbs, or leaving large pieces. But it happens that they are easier to disassemble and repair yourself than manual models.
Safety precautions
It would seem that for us there is nothing new or incomprehensible about how to follow basic safety rules when working with electrical appliances. But self-repairing even such a compact device as a hair dryer will require you to be careful. And this is connected precisely with electricity:
- Proceed only if you are familiar with electrical work. If they are absent, it is better to trust the professionals.
- Be sure to unplug the device first. Use an indicator screwdriver or a multimeter to check.
Be sure to disconnect the device from the mains before repair work.
- Please note that our recommendations apply only to household hair dryers that are used at home. They are not suitable for professional devices.
Why does a hairdryer only blow cold air?
In most cases, the hair dryer simply refuses to start working and does not blow at all. In such situations, the problem is usually a burnout of the motor or individual wires inside the device.
But sometimes the hair dryer still blows, only the air coming out of it is extremely cold. Since a special spiral is responsible for heating in the device, the hot flow disappears when it malfunctions.
The coil may break due to intensive use of the hair dryer or due to problems with the power supply.
How to follow the rules for disassembling a hair dryer
We will tell you step by step about disassembly and repair using the example of the Roventa hair dryer model:
- First, inspect the device. Start with the power wire, namely where it enters the handle, where the contact block is located. Next, check up to the plug for kinks, burns and insulation breaks.
Check the entire length of the power cord for damage.
- If no damage is found, the hair dryer needs to be disassembled. Its body consists of two parts connected by screws. The nozzle is secured on the front with special latches. You need to squeeze them out very carefully, because they can break.
Disassembling the hair dryer body is not difficult, but you need to do it carefully
- Most Roventa hair dryer models are identical in design and can be disassembled in the same way. But if you have a hair dryer, you should consider some features. Read the instructions for the device very carefully.
- After disassembling the case, pay attention to what the fan looks like. In front of it are a filter and a protective grille: they provide protection from dust and hair. It is this grill that can become clogged, so it needs to be thoroughly cleaned with a small brush. In inexpensive models, only the grille is usually installed, and this causes a decrease in fan speed due to hair stuck on the shaft. Carefully remove the propeller, remove any entangled hair, and clean the blades. This is convenient to do with an old toothbrush.
Clean the fan blades and other parts from dust and hair
- Let's move on to the electric motor. Its incorrect operation leads to malfunctions of the entire device. The reason for this is usually a burnout of the diode bridge, a breakdown of the winding, or extreme wear of the brushes. Check that the motor axis rotates freely without creating runout. Lubricate all rubbing parts with machine oil.
- Most models are equipped with several spirals. They provide different air heating modes. Any damage to them will be detected during visual inspection. The integrity of the spirals can be restored by soldering or installing new similar products.
This is what the heating coil in a hair dryer looks like
In addition to the damage described above, the problem may be a malfunction of the microcircuits. Typical faults are:
- The getinax base cracked and the tin track was torn. Tin the damaged areas and cover them with solder.
- The capacitors are swollen. They need to be unsoldered and new ones installed.
- Replace faulty resistors (you will find them by their darkened surface).
As you can see, for such a repair you will need skills in working with a soldering iron. Otherwise, it is better to entrust the damaged hair dryer to a specialist or service center.
If you have an expensive hair dryer model, I recommend immediately sending it to specialists for repair. The fact is that such models have a more complex design, suggesting the presence of additional functions. For example, the Care button, which is a smooth action regulator, or an air flow ionizer. The parts of such hair dryers are made from special alloys, and it is almost impossible to reliably combine them in the event of a break at home.
Most common breakdowns
Unfortunately, hair dryers break down regularly. This is partly due to the low quality of workmanship (we are talking about inexpensive household models), partly due to non-compliance with the operating mode. The device should be allowed to rest every 5-10 minutes. The exact data is indicated in the instructions. In addition, before completing the work, you need to let the fan run for a while for cold blowing, without heating. Of course, if the model is equipped with such a function (for example, BOSCH PHG 630 DCE).
The most common types of faults are:
- burnout of the heating element (heating coil);
- wire break in the power cable;
- triac failure;
- diode or capacitor failure;
- switch malfunction.
The popularity of self-repair of various household appliances is growing: users are trying to save on calling a technician from a service center. This rule especially applies to small household appliances. Indeed, the design of such technology is simple, but sometimes some difficulties may arise. How to disassemble a hair dryer, for example, Philips, when there are no instructions or recommendations? We will try to tell you everything in detail.
Like any household appliance, a hair dryer stops working one not-so-great morning. The reasons for failure can be different: mechanical impact associated with an accidental fall, or a sudden surge in voltage in the network when the device is turned on. To find out exactly what happened, you need to partially or completely disassemble the Philips hair dryer, which you can do yourself with certain skills and ability to repair electrical household appliances.
Very important! Before proceeding with disassembly, disconnect the device from the power supply.
Most hair dryer models from the Philips company from the Netherlands open into two halves, but to do this you need to remove the plastic ring that holds both parts. It has four latches; in order to press them out, you need a flat tool - a flat thin spatula or a sharp, durable knife. You have to work very carefully - the plastic is fragile, if you break the latch, then the repair can be considered complete, you will have to go to the store for a new hair dryer.
Philips Salondry Control and Philips HP8656 models from Pro Care Ion series
They differ only in that the latter is a hair dryer brush, and their operating principle and design are almost the same. The addition of Ion at the end of the name means that the hair dryer has an air ionization function. This function is necessary to “pacify” unruly hair - negatively charged ions (ion) prevent magnetization, hair styling occurs without problems.
These models have fairly small but powerful latches on the inside of the casing at the front. To press them out, insert the tool between the casing and the body until a gap forms between them and pull the casing firmly. Now you need to unscrew all fastening elements
— there are only eight of them: 2 in the handle, 3 are located under the removable part of the nozzle and 3 hold the upper part of the body. The screwdriver must be prepared in advance, taking into account the type of slots on the screws. Disassembly of the Philips hair dryer is completed.
To help users, here is a video about the step-by-step disassembly of a hair dryer: