Operating principle and electrical diagram
Before you begin diagnosing or repairing a household kettle, you will need to find out what components it consists of and how it works. Despite the abundance of offers under different brands, all electrical devices in this category have a similar design. They include the following parts:
- frame;
- power indicator;
- a heating element;
- control system (power button, thermostat);
- stand with power cord and contact group.
Connections in the internal communication circuit are made using plug-in terminals, or, less commonly, soldering. After placing the kettle filled with water on the stand and pressing the key, the supply circuits of the device are closed. This is accompanied by a light indication indicating that everything is working. If at this stage there is no contact between the stand and the bottom of the device, the switch is faulty, nothing will work.
Next, a heating element (spiral or disk) installed at the bottom gradually brings the water in the tank to a boil. After boiling, the automatic switches off the power to the heater (the light goes out with a characteristic click). If there is not enough water in the kettle or it is accidentally turned on empty, the protection system should also work, de-energizing the power circuits.
Arrangement of electric kettle components
Both the old models with spiral heating elements and the new ones with disk-shaped heating elements remain similar in principle of operation and the presence of main components. They will definitely contain a heating element, a power button and a protection unit. Without them, the kettle will not work.
Overheat protection system
This unit is necessary to meet fire safety requirements. If it were not there, then if the water level was insufficient and an empty kettle was turned on, a fire would certainly have occurred. And so a special contact group will de-energize the heating element.
As a working tool, it uses a special plate made of 2 metals that reacts to heat. The normal position is closed; when overheated, the bimetal is deformed, breaking the power circuit, turning off the heating element. Manufacturers of household appliances use a number of standard solutions for this unit. And all use bimetallic sensors, which are reliable and efficient.
The only drawback of thermal protection is the need to wait until the working part cools down and returns to its original position. After this, the kettle is ready for use again.
Automatic shutdown system when water boils
Another critical unit, without which normal operation of the kettle is impossible. A procedure that we are so accustomed to that we don’t pay attention is the automatic switching off of the device after heating the water. It is no coincidence that manufacturers in their operating instructions focus on pouring liquid into the flask to a clearly marked level (corresponding to the nominal capacity). The operation of the circuit breaker under the influence of a jet of steam depends on this.
The protection is based on another bimetallic group, which, when heated, breaks the power supply circuit of the kettle's heating element.
Power indicator and backlight
Each model has a power indicator light: without it it is difficult to determine the status of the device. This is a light bulb interlocked with the contacts of the “main” button. Backlighting is an optional feature. Some manufacturers include it as an additional option. It works synchronously with turning on (off) the kettle.
Slow heating
Repairing an electronic kettle that heats up slowly with your own hands is even easier. Despite the use of purified water, scale appears on the heating element of the kettle over time. It reduces the thermal conductivity of the heating element, so the water heats up more slowly.
To clean the plate inside the kettle, pour water into it with the addition of 1 scan of table vinegar or 2 tbsp. spoons of citric acid. After boiling, the water should remain in the kettle for another 1-2 hours.
How to repair it yourself
Before you seriously start repairing a kettle, you need to understand the probable causes of the malfunction, moving from the consequences. There are several of them:
- The device turns on, but the water boiling sensor does not work.
- It is impossible to press the device's power key.
- The indicator lights up, nothing else happens.
Each situation requires detailed consideration, since the causes range from poor contact to a burnt-out heating element. And not all of them can be eliminated on your own. But first you will need, armed with a screwdriver, to carefully disassemble the kettle without damaging it.
How to disassemble
You will need a screwdriver, usually a flathead or Phillips head. In rare cases, the manufacturer uses non-standard solutions for which it is not so easy to select a tool (triangular notch).
If the kettle has a stand, it is immediately put aside, and the water is poured out of the device itself.
Next, unscrew the screws securing the parts of the plastic case. They can be hidden under decorative overlays. In combination with self-tapping screws, latches are used. It is very important not to destroy them when disassembling the kettle.
If the device does not heat water, but the light is on
You don’t need to be a major expert in electrical engineering to understand: the kettle receives power from the network, but something is preventing it from further normal operation. This remains to be found out by examining the components of the device.
It often happens that the overhead contacts of the heating element have weakened (oxidized) and a break has occurred in the conductors. Heater failure occurs less frequently. If the heating element is embedded in the bottom of the kettle (and burns out), you will have to forget about restoration.
Restoring contact in slip-on terminals
It is difficult to visually calculate this malfunction. Having reached the heating element of the kettle, lightly tugging at the terminals, check the reliability of the contacts. If necessary, carefully bend the edges, trying not to damage the insulation and the wire itself. This is done with the device de-energized and disconnected from the network.
Another clear sign of trouble with the terminals is traces of a short circuit, soot, melted insulation, burnout of the contact plate. Depending on the level of skill, methods of restoring (replacing) terminals and cleaning with fine sandpaper are used.
Restoring welded contacts
If a break occurs at the welding site, it will not be possible to restore their integrity in everyday conditions. You must choose one of the repair options: soldering, mechanical connection. The chosen method should ensure reliable operation of the kettle over a long period, so it is better to carefully consider what exactly to choose.
The water does not heat, the indicator does not light up
It seems that the answer is simple: in this situation, no electricity is supplied to the device. But what exactly is the reason for this “behavior” - a faulty socket (plug), poor contact of the kettle with the stand, failure of the switch - remains to be sorted out.
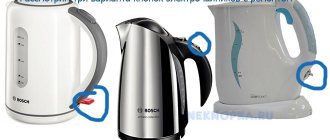
Contact group repair
Most modern kettles are designed the same way: a base-stand connected to the network, and the device itself. The weak point of this design is the contact group through which electric current is transmitted to the kettle. If water, dirt gets on the metal, or it has oxidized, the work will become unstable. Usually the problem is solved by wiping the contacts on the bottom and stand, or less often by cleaning with fine emery cloth. In the most difficult situations, individual elements will have to be replaced.
If the problem was precisely this malfunction, then after its elimination the kettle will begin to work without any complaints.
How to fix a switch button
In the practice of using teapots, situations also occur when the plastic button “falls” into the body parts. Repair is not always possible, since it will require the master to have skills in working with plastic and metal, as well as an understanding of what and where to restore. This is the key axis or response part.
Required Tools
Before repairing an electric kettle, it is necessary to correctly determine the possible cause of breakdowns and malfunctions, as well as prepare all the tools necessary to carry out the work. To carry out troubleshooting repairs you will need:
- multimeter (used for testing and troubleshooting directly in the electrical circuit);
- knife, electrical tape;
- pliers;
- set of triangular screwdrivers.
It is worth considering the fact that models from different manufacturers may use different screws. Therefore, depending on the type of screws, before you repair the kettle, you will need to purchase and then use a flat or Phillips screwdriver.
Design and principle of operation
Modern electric kettles are assembled on the basis of one electrical circuit and differ from each other in original design, power or volume. Moreover, all of them structurally consist of two parts - the teapot itself and the stand.
Design
The body parts of the electric kettle are made of various materials:
- stainless steel (Saturn, etc.);
- heat-resistant plastic (Maxwell mw -1028 b, etc.);
- heat-resistant glass (Vitek VT-7008 TR).
The electric kettle is connected to the mains when installed on a plastic stand, to which a power cord with a plug is connected. The connection is made through a 3-pin group located inside the stand in such a way as to prevent electric shock to the user. In this case, the device removed from the stand is completely de-energized.
In the body of the kettle, which is closed on top with a lid, the following are installed:
- contact group for connection with the mating part of the stand;
- disc heater or open coil (S or U-shaped);
- switch (thermostat);
- LED indicator (can be built into the switch);
- automatic shutdown device with bimetallic contacts.
In addition, a number of models are equipped with:
- additional filters that clean water from scale - made of stainless steel (Siemens TW60101) or nylon (Tefal BF2632 Vitesse);
- an internal flask that does not come into contact with the body of the kettle, which is made of heat-resistant glass or stainless steel and plays the role of a thermos;
- a thermal relay capable of maintaining a given water temperature in the range from 60 to 98°C for at least 4 hours (thermopot mode).
Important! Structurally, all parts that are energized during operation of the kettle are reliably protected from contact with water and exclude the possibility of accidental contact with them by the user.
Operating principle
Power supply from the AC mains is supplied to the kettle when it is placed on the stand through spring-loaded contacts, which are located in the center of its bottom. In the lower part of the body there is a heating element that heats the water when you press the switch, which can be located either in the upper or lower part of the kettle.
The connection diagram provides for the presence of a blocking device that protects the device from overheating. It consists of two contact pairs that are connected to the heating element. Each such pair consists of a contact and a bimetallic plate (glued together from two thin plates with different linear expansion coefficients), capable of bending in different directions when the temperature changes.
The bimetallic plate of one pair contacts directly with the housing and ensures that the connection opens when it overheats. In the normal position, this pair is constantly closed. It only works when a kettle without water is connected to the network.
The second pair of contacts ensures that the device is disconnected from the power supply when the water boils. This happens under the influence of hot steam acting on the bimetallic plate. In this case, hot air is supplied through a special channel, which is most often used as the cavity of the handle. However, in some models, a separate round or square tube is installed to supply steam.
Causes of malfunction of thermopots.
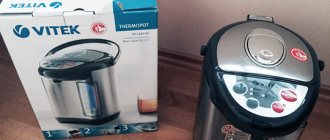
Before you start looking for the reasons for the breakdown of the thermal kettle, you need to know what kind of item it is. A thermopot is an electric kettle that includes a thermos function and consists of two bodies. The outer one is usually made of plastic, and the inner one is made of metal. The inner housing contains a water flask. The kettle is closed using a lid on which the entire control panel is located.
To fix any breakdown of the thermopot, the first thing you need to do is check that the settings are correct. In its settings menu you need to set exactly the water heating temperature that is needed. If everything is in order with the heating settings, then the reasons for the breakdown may be:
- thermal switch located on the bottom of the kettle;
- thermal fuse located on the wall of the thermopot;
- insufficient contact of any component connectors;
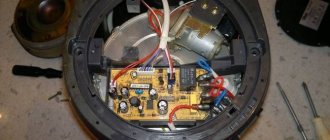
- electronic board malfunction;
- The indicator panel stopped turning off. There are times when, on the contrary, the indicator panel turns on, but the thermopot does not start. If this is the cause of the breakdown, then it is worth checking all its components, wiring and thermal fuse.
- The kettle stopped turning on. To eliminate this malfunction, it is necessary to check the correct operation of the electrical circuit and temperature switches.
In order to more accurately identify the cause of the gadget’s breakdown, you will have to disassemble it.
Electric kettle repair
Despite the apparent simplicity of the design, the service life of an electric kettle is not eternal. Sooner or later there comes a time when, having turned it on, the user discovers that the device has stopped working.
Common faults
A list of common malfunctions and the causes that cause them are given in the table.
| Malfunction | Faulty element | Possible reason |
| The kettle is turned on and does not heat the water. | heating element | Ÿ Scale formation; |
Ÿ The heating element has failed.
Ÿ damage to button parts.
Ÿ burnout of contact pads;
Ÿ power plug failure.
Ÿ the sealing elements have become unusable (in the presence of an open-type heating element).
Ÿ The steam channel is clogged with scale.
When starting repairs, the kettle must be disassembled, which is sometimes more difficult than repairing.
How to disassemble an electric kettle
Disassembling the electric kettle and/or its stand is not particularly difficult. To do this, it is enough to prepare only a set of screwdrivers: Phillips, flat and possibly Spanne (two-pronged fork).
Attention! Before you begin disassembling the electric kettle, you must unplug the power cord from the power outlet.
- Removing the bottom cover of the electric kettle. Disassembling the electric kettle begins by removing the bottom cover (bottom). To do this, you need to unscrew all the screws there. Typically, the bottom cover is secured with self-tapping screws (self-tapping screws) with a cross-shaped head. However, you can sometimes find screws with a Spanne head. This is how electric kettle manufacturers try to protect the device from self-repair. If you do not have a similar screwdriver, such screws can be carefully unscrewed with tweezers or side cutters.
In addition, the screw heads can be covered with decorative plugs, which can be easily removed using a sharp object. Once all the screws are removed, the bottom cover should come off easily. If this does not happen, then it is additionally secured with plastic latches. They need to be carefully pressed out using a flat-head screwdriver. The bottom cover of the stand is removed in a similar way.
Removing the switch. This is one of the most difficult operations that have to be performed when repairing an electric kettle. It is placed at the top of the handle (key) or at its base (plate or lever). To dismantle the switch, you need to carefully remove the plastic cover and unscrew the screws that opened underneath it. This will allow you to separate the handle with the lid from the body and remove the part. In addition, this allows access to thermal protection elements.
Reasons why the thermopot does not boil water
Thermal switch failure
Thermal switches are located on the walls or bottom of the thermopot. This part is attached to the main body with bolts from which contact wires extend. In order to maintain heat exchange inside the vessel, the mounting points of the thermal switches are coated with a special white compound. In order to remove it, you just need to disconnect the thermal switch contact and pull it out. In the quiet position the switch will be on. You can check its serviceability using a special tester (its readings should be equal to 0). You need to screw two wires to the thermal switch and lower it into boiling water. At this time, its resistance should increase, and the tester should show an infinite number - such readings indicate the serviceability of the part. If the tester readings do not budge, then you need to replace the thermal switch with a similar one.
Prevention of breakdowns
To avoid malfunctions, you must adhere to the following recommendations:
- comply with all requirements of the operating instructions;
- regularly clean the internal surfaces of the kettle from lime deposits (scale);
- Do not bend the electrical cord that connects the device to the AC mains.
Attention! Do not try to revive the kettle by connecting the heating element directly to the power supply. This is life-threatening!
Repairing an electric kettle that is not working is within the capabilities of any user. However, experts believe that the right decision is to purchase a new device.
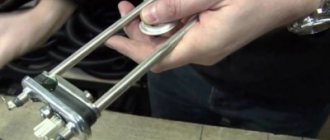
Checking the spiral
To assess the condition of the heating element, you need to calculate the resistance of the spiral. The power of the device in watts (indicated in the technical specifications) is divided by the standard voltage in the network, and the current is obtained. The actual value should not differ greatly from the calculated resistance. Remove the bottom cover from the kettle, set the tester to operate in ohmmeter mode, and check the resistance of the device. If the actual parameter deviates greatly from the calculated value, the heating element spiral has become unusable.
Checking the heating element for functionality
Scale on the heating element
The best electric kettles of 2019
Kettle Kitfort KT-633 on Yandex Market
Kettle Braun WK 3110 on Yandex Market
Kettle Kitfort KT-623 on Yandex Market
Kettle Kitfort KT-621 on Yandex Market
Kettle Zimber ZM-11181/11182 on Yandex Market
Often such an unpleasant situation arises as the kettle breaking down, and at the most inopportune moment. You can return a broken electrical appliance for repair, but this will take time. There may also be no available craftsmen and you will have to go without a kettle even longer. Or, perhaps, the cause of the failure could be a minor, easily fixable malfunction - then it would be a pity for the money wasted on repairs.
In general, why not try to do the repairs yourself, saving time and money? In this article we will provide recommendations that will help you identify a malfunction of the electric kettle and, if possible, eliminate it.
Electrical circuit and operating principle of an electric kettle
Most electric kettles, regardless of their cost, have a similar design. For clarity, here is a typical diagram of an electric kettle:
In order to troubleshoot an electric kettle, you need to understand the principle of its operation. Let us briefly describe the principle of operation of the above diagram, clearly showing all the elements of the scheme. Electricity from the household network flows through the plug and wire to the stand.
Next, the current flows from the stand to the kettle through a special contact part. Directly in the electric kettle, the grounding conductor is connected to the metal parts of the electric kettle. The neutral and phase conductors in a special unit are routed to terminals 1 and 2 (see diagram).
The same unit contains thermal protection - a thermal relay. The electrical diagram shows that the thermal relay is located in a phase conductor break.
Thermal protection serves to protect the kettle heating element from damage if the kettle is turned on without water, or if the kettle lid is open and it works for a long time without automatically turning off. In normal mode, the thermal relay contact is in the closed state. It opens in case of excessive overheating for the above reasons.
Next, from terminal 2, the voltage goes directly to the heating element at terminal 4, and from terminal 1 to the other terminal of the heating element at terminal 3, but not directly, but through the kettle power button.
The kettle power button allows you to manually turn the kettle on and off; it has a bimetallic plate, which, when a certain temperature is reached, turns off the button - that is, when the water boils, this button automatically turns off the electric kettle.