- June 2, 2019
- Tools and equipment
- Alexander Mishkin
There is an iron in every home. This household appliance is used for ironing clothes. There are hundreds of models and varieties. Users often ask the question of how to repair an iron, as situations arise in which such a device may malfunction. Most of them can be fixed manually, even without special skills and knowledge.
This repair manual will cover the following main points:
- The principle of operation of a household device.
- Main types of malfunction.
- How to identify the problem and solve it.
- What parts and tools will you need to troubleshoot.
All recommendations and repair tips are universal and suitable for almost all models of these types of household appliances. The exception is older versions of irons that are 20 years old or older. They are not subject to updating and replacement of parts, since they have not been produced for a long time.
How the device works
Before considering the question of how to repair an iron, you should familiarize yourself with the principle of its operation. This will allow you to understand its structure and quickly detect a malfunction. Whether it is a simple iron without modern functions, a cordless model, a compact travel iron or a steam iron with many options, the principle of operation remains unchanged. All models smooth out creases in fabric using steam moisture, pressure and heat.
When the steam valve is closed, the iron runs dry due to pressure and a heated soleplate. When the blower element is opened, water drips into a hot chamber, from where it exits as steam through vents located at the bottom of the appliance.
The working surface of the iron, or sole, can be made of plain metal or coated with an easy-to-clean non-stick compound. There are also more modern ceramic models that are better at eliminating wrinkles and creases in clothing. When asked how to fix an iron, users most often mention problems with the soleplate of this device. It is often damaged due to improper use.
Checking the serviceability of the iron's power cord using a table lamp
You can check the power cord on your iron in various ways. Everything will depend only on what you have available. If you don’t have any appliances in your house, then you can check the iron using a table lamp. To do this, you need to release the latch as shown in the photo.
Now you need to clean the contacts until they shine. If your terminals will fit without effort, then you need to tighten them with pliers. It is quite possible that this was precisely the problem. If everything is in order, then you need to connect the plug of the table lamp to the blue and brown wires. The switch, which is located in the table lamp, must be in the on position. If the table lamp shines steadily, then the device is fully operational.
What is the essence of all malfunctions
Fortunately, there is very little inside modern irons that can fail. Many models have simplified designs without complex electronics or electric motors. Most repairs concern:
- Faulty cords.
- Damaged handles.
- Blockages of steam chambers in the form of mineral deposits.
- Unregulated temperature conditions.
- Poor heating of the sole.
Problems with the electronic parts of the iron should be resolved by an authorized service center. Replacing a burnt-out board yourself will be problematic due to the lack of suitable components for microcircuits in retail sales. How to fix an iron with such a problem yourself is a capacious question. This requires soldering skills and specialized equipment. Without proper knowledge in this topic, it will be impossible to carry out such work.
Many note that, as a rule, it is more profitable to replace rather than repair an iron with internal problems. However, if the problems are related to external defects, they can be easily solved on their own. Consult your iron's owner's manual for the manufacturer's cleaning recommendations and storage tips. This will avoid many breakdowns in the future.
Tap water contains various impurities and minerals that can damage your appliance and harm your clothes. Use filtered or distilled liquid instead. Stores also often sell special water for ironing, which is poured into such a device.
Rules of care and use
To avoid premature breakdowns, you must adhere to several rules when operating household appliances:
- pour boiled water into the tank;
- if it overheats, turn off the equipment and wait until the sole cools down;
- Regularly clean the sole from dirt with a specialized product;
- Avoid getting water under the device body;
- Do not bend or tug the cord.
It is also necessary to adhere to the manufacturer's recommendations. It is important to take into account the operating features of a particular iron model, which can be found in the included instructions.
What you need to repair your iron
Moving on to the question of how to repair an iron with your own hands, you should immediately understand the necessary tools. Large hardware stores may have replacement parts for many models of these appliances. Basically these are replaceable cables and soles. However, you should not purchase internal components and microcircuits in stores yourself or order them from repair shops. Incorrect installation of the boards can lead to complete failure of the device or even fire.
Maintenance and repair tools you will need:
- Screwdriver.
- Toothpicks or thin needle.
- Steam compartment cleaning solution.
- Solution or pencil for cleaning soles.
- Accessories for replacement.
All these tools and solutions are suitable for almost all models of devices. Perform all actions slowly and carefully. Be careful when cleaning the soleplate of the iron. Most coatings are scratch sensitive. If you damage the top layer of the sole, then when ironing clothes in the future, stains or burns may remain on it. You can read below about how to repair an iron with your own hands if this type of malfunction occurs. This will not require much time and large expenses.
How to disassemble the device
In most cases, disassembling the device is necessary when the iron burns out. How to fix it is an interesting question and does not require special skills. You will need a screwdriver of the appropriate size and care when carrying out this action.
Gain access to the internal parts of the electric iron by removing the back cover. Some models have unique clasps to prevent you from opening them. Contact your local hardware store for the correct screwdriver.
All bolts are hidden under a protective layer, which can be easily removed with a flat-head screwdriver. The back cover is held in place by 4-6 fixing fasteners on each side. Next you need to unfasten the latch. After this, the cover will be easy to remove.
Replacing the cable is also necessary when the iron burns out. How to fix a damaged wire? If you need to replace the cord, look at the back of the unit. At the top there will be an adapter that attaches the power cable using a clamp to a special circuit. By unhooking the terminals, the wire can be easily pulled out.
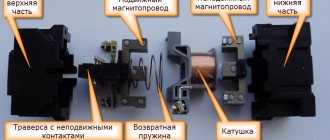
Temperature regulator
Second in line is the thermostat. We also check it using a continuity tester, which we attach to the contact group.
When the temperature control is turned toward the circuit closing direction, the electrical circuit should function. Is the light not on? We clean the contacts with sandpaper and check again. We immediately recommend watching the video repair instructions:
How to repair a temperature controller
https://youtu.be/KnTYT_qWeXA
The thermostat is working, but the iron does not heat up? Let's start checking the thermal fuse!
Cleaning Basics
Do-it-yourself iron repair mainly begins with preventative actions. To do this you will need to do some cleaning. Only after this can you begin analysis. Unplug your iron and make sure it is cool before cleaning. Drain completely. Allow the sole to dry completely. Use a toothpick or appliance cleaner to remove any debris from the steam vents, being careful not to get any debris inside the chamber.
Use a fine sewing needle to thoroughly clean the spray nozzle of mineral and salt deposits. Be careful not to damage the valve.
To remove residue from a steam iron, pour 1/2 cup water and 1/2 cup vinegar into the appliance's reservoir. Place the iron on the stand and set the steam setting until the liquid in it completely disappears. Repeat this procedure several times if necessary. Or follow the directions for using a solvent you can buy at the store. The procedure is usually written on the bottle.
Thermostat
The soleplate temperature regulator is the most important component of the iron and one of the most susceptible to breakdowns; It is a mechanical trigger device driven by a bimetallic plate. There are no “magnets, like in a refrigerator regulator,” in the iron’s thermostat. Like the refrigerator thermostat, there is also a mechanical trigger, only of a different design. The principle of its operation is simple:
- The part with the movable contact is pressed against the fixed one by a reversible spring. The contacts are closed, the heating element is heating up. The degree of compression of the spring is regulated by the temperature setting knob.
- On the other hand, the movable contact is connected by a dielectric pusher rod to a bimetallic plate.
- The bimetallic plate, bending from heat, presses through the rod onto the movable contact until it overpowers the spring.
- The spring is thrown over and opens the contacts.
- The heating element turns off, the sole of the iron with the bimetallic plate cools down.
- The bimetallic strip is straightened. When its pressure weakens sufficiently, the spring is thrown back and returns the regulator to its original state.
The heating element heats up again, the cycle repeats. In old irons and some new ones, the thermostat is assembled according to the scheme with a free rocker arm (item 1 in the figure):
Diagrams of iron thermostats
Its disadvantages are 2 pairs of contacts susceptible to burning and large hysteresis, i.e. difference between the response and return temperatures of the regulator. Therefore, in regulators with a free rocker there is always an adjustment screw under the handle, which is turned if the iron heats too much (tighten it by 1-2 turns) or weakly (unscrew it the same amount). To access the calibration screw, you need to remove the temperature control knob. It sits on the axis by friction, but is held in the body by claws with stops, see fig. on right. To remove the handle, you need to turn it all the way to the minimum (at the first point) and pull it up.
Iron temperature control knob
Most modern irons are equipped with a unified double-spring thermostat, pos. 2: it works very clearly and almost never requires adjustment during operation. Its weaknesses, firstly, are the same as in the previous one. case, contacts, see below. Secondly, there is a ceramic rod (indicated in blue), which sometimes cracks. The rod length is 8 mm, and a new one can be made from an MLT-0.5 W resistor, pos. 2a. The resistor leads are bitten to a length of 1.5-2 mm, the paint is washed off with dichloroethane or a surfactant remover, and the conductive layer is cleaned off with sandpaper. If the resistance of the resistor is more than 620-680 kOhm, some people install it instead of the rod as is, the paint burns without smoke or stink. However, then the sole of the iron may unpleasantly “pinch” with electricity. And what is much worse, the resistance of a resistor with an unprotected conductive layer can decrease several times, and the leakage current through it can increase to a dangerous value.
Note 3: sometimes the insert washers in thermostats crack. A new one can be machined from fluoroplastic instead; drawing see pos. 2b.
How to clean contacts
There is no need to clean the burnt contacts of the iron temperature regulator with sandpaper, as many sources advise: they operate under high current and after cleaning with sandpaper they quickly burn again. In the regulators of modern irons, the contacts are thin-walled stamped, and in this case they burn through to holes. To clean the contacts, you need to wrap a nail file along the suede moistened with alcohol, insert it between the contacts and rub until the suede stops getting very dirty with carbon deposits. An alternative is to cut a thin wedge out of an ink eraser and use it to clean the contacts. Then - with the same wedge made from a pencil eraser. Finally, wrap the nail file in a rag moistened with alcohol instead of suede and use it to remove any adhering particles of the eraser from the contacts.
Note: due to the thermostat, the following situation is possible - the iron heats at maximum, regardless of the position of the temperature setting knob; Adjusting the calibration screw does not help. This means that the contacts of the regulator are welded and it needs to be replaced.
Common faults
It is better to start repairing an iron yourself by determining the type of problem. Knowing exactly what the problem is, you can quickly fix it. In addition, this will reduce the likelihood of making mistakes that could lead to complete failure of the device. The following will list the main malfunctions and problems that occur with these types of household devices. Please note that the problems listed are those that occur in the most common models.
Many of them will not fit, for example, vertical steam irons or older models. Do not forget to also refer to the instructions for your device. It often lists all the main causes of problems, as well as the necessary actions related to preventive maintenance.
Thermal fuse
More often than the power cord, this element of the circuit fails. Its main purpose is to disconnect the electrical circuit if the temperature of the heating element exceeds the nominal value.
Using a continuity test, we determine the functionality of the fuse. If the reason for the breakdown of the iron is in it, we replace it with a new one, or remove it from the diagram altogether. During normal operation of the temperature controller, there is no need for a fuse.
Doesn't heat up enough
When asked how to repair an iron, users often indicate this type of fault. As a result, it will be impossible to iron the laundry properly. Possible causes for this could be an incorrectly installed thermostat, problems with the electrical connections, or damage to the switch or power supply.
If you experience frequent clicking noises when ironing your clothes or there is a plastic smell, it is likely that the internal circuits have been damaged. It will be difficult to repair such a problem on your own. Therefore, it is better to seek help from professional repairmen who have all the necessary diagnostic equipment.
Complete failure
Also, in the question of how to fix the iron (you can do this by reading this manual), users many times mention a problem associated with a complete lack of heat in the lower part. Insufficient heating of the sole and inoperability are different problems. If after connecting the device to the network it does not work, check all connections to the main power cable.
In most cases, it is the network cable that causes the equipment to fail. It may show open damage in the form of tears. In this case, a complete replacement of the entire cable will be required.
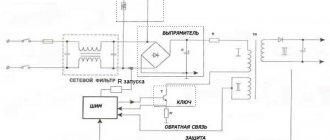
Electrical diagram
The electrical circuit of the iron is shown in the following. rice.:
Electrical circuit of an iron with a steam generator
The KM relay and the SK position sensor constitute the position protection. On its board there may be a power indicator, which in this case is LED, and not on the neon. Positional protection can be turned off without compromising the consumer qualities of the iron, but if the indicator is LED, then if the “positioning” is completely turned off, it will stop working. This is inconvenient, so faulty positional protection must be partially disabled (see below).
The numbers with indices show the sequence of testing the “hot” and “cold” circuits with a multimeter: one probe with an alligator clip is connected to the pin of the power plug, and the others go along the points. Both continuities should converge on the contacts of the KM relay. The fact is that the KM contacts are normally open: when the iron is plugged in and the thermostat contacts are closed, the KM pulls, its contacts are closed and current flows through them to the heating element. It is necessary that any malfunction of the positional protection itself disables the heating element (the principle of excess safety), but this circumstance can mislead an inexperienced technician.
Connecting wires with a cap connector
Note: when checking, it may turn out that there is a lack of contact in the connecting cap, see fig. on right. The only way out is to bite it off and reconnect the wires into a new one.
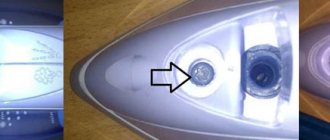
The sole of the device constantly gets dirty
Many people wonder how to fix an iron, Tefal, for example. A common reason for repairs is contamination of the bottom of a household appliance. As a result, the device begins to function poorly. Any type of iron can have problems with the soleplate. During use and ironing, the lower part may become dirty and its holes may become clogged. This can affect the heating of the device and overall performance.
In addition, overloads may occur due to excess pressure in the steam generator due to blockages. Many users seek repairs precisely because of this problem. If you do not carry out routine cleaning as indicated in the instructions for the household device, this may lead to problems in the future.
Where to begin?
First, you must visually inspect the case for cracks, defects and traces of melting of the case. Perhaps the appearance will immediately show what exactly is causing the iron to break down. If the inspection does not yield anything, you need to completely disassemble the case to independently diagnose all the components.
Please note that disassembling the iron is sometimes quite difficult. This is due to the fact that every year manufacturers spend more time on the design of electrical appliances, creating invisible fasteners and holes for screws. Initially, prepare a set of screwdrivers and a knife that will be useful to you for further actions.
Video instructions for disassembling the case
Clothes cling to the soles
How to fix a Philips iron if clothes constantly stick when ironing is an equally pressing question. This brand has many positive reviews. However, without proper care of the device, the first signs of such a problem may appear. This malfunction may occur due to a burnt sole. If, for example, you leave the iron on the fabric, it may cause it to burn. Its remains will remain in molten form at the bottom of the household appliance.
In the future, when ironing, traces of previously burnt fabric will create many problems. Special cleaning of the entire sole with solvents will be required. You can read about this below. It is not recommended to iron with such stains on the underside of the device.
Abstract reasoning
Manufacturers justify turning the iron into a kind of combination lock with safety, design and ergonomic requirements. But, sorry, from the visible fasteners on the irons there were only 1-2 screws at the back, and that remains so. Moreover, the body parts of old irons were made from fragile bakelite and polystyrene, while today’s plastics compete with metals in strength.
In fact, we, alas, live in an age of things that are not eternal. One of the fundamental principles of consumer society is inexorable: a product of mass demand must work flawlessly (manufacturer’s reputation, but what) for no more than 2-2.5 warranty periods, and then quickly and irreversibly become completely unusable. Leading manufacturers of consumer goods employ up to half or more of their design personnel to ensure that, God forbid, the product does not turn out to be too durable.
How does the work of the industry in the trash can affect the environment, and the involvement of truly high-quality specialists in actually harmful activities on the mass consciousness, is another question, but the iron almost does not give in to such attempts: it is too simple, and inside it is too hot and humid. Therefore, damage to the iron at the design stage comes down mainly to making it difficult to disassemble it outside the service center. However, it is still possible to repair an iron at home using improvised means if you know where and what secrets may be hidden in it and how to open them without the risk of completely ruining the iron.
Check all settings
The first thing to do if one or more modes are not working is to check all the settings and make sure everything is in order. Different fabrics require different ironing temperatures. If you use the options of such a household device incorrectly, this can also cause many malfunctions.
Basic temperature conditions for laundry:
- Cotton - 200 °C.
- Wool -145 °C.
- Polyester - 145 °C.
- Silk - 145 °C.
- Nylon - 135 °C.
Refer to the user manual that came with your home appliance and ensure that all connections and settings are made as recommended in the instructions. Tips for use may vary depending on the model of the device. It is better to check the ironing modes and temperatures for each type of fabric in the manual.
We repair heating elements
Any heating element, which stands for tubular electric heater, is, figuratively speaking, a powerful resistor, and accordingly you can check it in the same way as a resistor, simply by ringing; if it is a heating element from a washing machine, its resistance can be about 30 Ohms. If the resistance of the heating element is zero, such a heater cannot be connected to the network; a short circuit will occur.
The structure of the heating element is shown in the figures above. If you set the tester to 200 Ohms, but the heater does not ring, most likely the heater has burned out. True, as stated above, for a low-power load the resistance can be even more than 2 kiloOhms. But there is one more nuance here: such a heating element can sometimes break through to the housing over time, which will lead to a short circuit. In order to make sure that the resistance between the body and the heating element of the heating element is normal, you need to set the ohmmeter mode on the multimeter and select the measurement limit of 2 megaohms.
Next, you need to press one of the tester probes to the metal body of the heating element with the second probe and touch both terminals of the heating element in turn. If the multimeter shows any value different from one, which means that the resistance is normal and the heating element does not ring on the body, such a heating element cannot be used. During such a test, you should not touch the tester probes with both hands, otherwise the resistance will be displayed incorrectly due to the resistance of your body. In the same way, you can check a soldering iron or iron (at least a Soviet one, without electronics).
To do this, if we took a soldering iron with a voltage of 220 Volts, with a power of 25 Watts, we set the limit to 2 - 20 kiloOhms in ohmmeter mode, touching the pins of the plug with the ohmmeter probes. The resistance of such a soldering iron should be 1800 - 2200 Ohms.