How it works
Note that, despite having a lot of advantages, the thermopot also has specific disadvantages, in particular:
- high cost - much more than a standard electric kettle;
- low boiling speed (compared to electric kettles);
- increased energy costs due to constant switching on and the need to operate in temperature maintenance mode.
The device consists of a housing, external elements of the control panel and internal technical devices.
The housing is made of various materials (depending on the unit model):
- glass;
- plastic;
- metal;
- ceramics.
A combination of these materials is also possible.
Appearance of the thermopot
The shape of the case also depends on the specific model. Often, it is either a half-cylinder or a rectangle.
For ease of maintenance and care, almost all models are equipped with a removable flask into which water is poured.
The device is also equipped with a control panel with buttons that allow you to set certain operating modes.
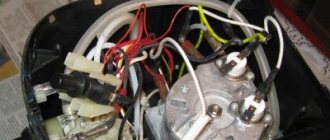
Since the unit in question combines two traditional devices at once - a kettle and a thermos - there are two heating elements inside:
- one is directly responsible for bringing water to a boil;
- the second performs the function of maintaining the temperature at a given level.
Due to the fact that the thermopot is quite heavy and bulky, manufacturers provide it with a special button for supplying water. This is very convenient - just place a mug under the drain hole and press the drain button. A special water pump is responsible for pumping water.
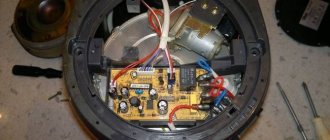
All thermopots are also equipped with electronic components - namely, a control chip that processes user commands, and a power supply.
Main nodes
Additional functions
To make using the equipment a joy and cause a minimum of hassle, some thermopots are equipped with auxiliary options:
- built-in carbon filter – ensures purification from impurities and chlorine, and improves taste;
- self-cleaning – eliminates the need to manually remove dirt and lime from the internal surface;
- timer – makes it possible to set the time by which boiling water should be ready;
- 360 degree rotation – allows you to install a thermopot in any corner of the kitchen;
- For ease of use, indicators for turning on, heating, the need to add water and replace the filter are useful.
The liquid crystal display will make operating the device as comfortable and simple as possible. In addition, all information about the state of the unit is displayed on the screen.
There are models that allow you to manage and monitor your condition remotely through a mobile application. In some cases this is really convenient, but consider whether it is worth paying extra for such a feature.
Basic operating principles
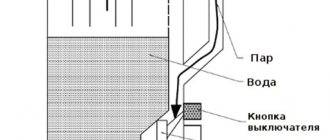
The device operates in the following order:
- water is poured in;
- the top cover closes;
- a heating element used to boil water heats the water to a temperature of 100 degrees;
- as soon as the water reaches the above temperature, a thermal fuse that protects against overheating turns off the device;
- the water begins to cool to the user-specified temperature;
- a second heating element is switched on to maintain the set temperature.
Side thermal fuses
They are fixed on the walls of the tank (approximately in the middle). But there are models where these elements, which look like small cylinders, are installed on the bottom. They operate at a temperature of +105-110 °C. Their purpose is to turn off the device if you forgot to pour water into it, but have already inserted the plug into the socket. If these elements operate at temperatures below +100 °C, then the thermopot will heat up, but not boil the water, as is the case in your case. To check this, place the part in heating water: if the thermal fuse trips before the liquid boils, it needs to be replaced.
Source
Schematic diagram
If the thermopot does not work, you need to familiarize yourself with the circuit diagram.
The circuit of this device is not too complicated - even a non-professional electrician can “read” it.
It can be used to investigate the causes of failure of devices from such popular manufacturers as:
- Polaris;
- Vitek;
- Elenberg;
- Scarlett et al.
Schematic diagram
Explanation of the main symbols used in the diagram
Explanation:
- S1 and S2 are temperature switches from the KSD 302 series, the first is located in the middle of the stainless steel tank and is connected in series to transmit a supply voltage of 220 Volts, the second is located in the bottom of the thermopot - current flows through it to the main heating element;
- F1 – thermal fuse;
- TN2 is an additional water heating coil, which should be checked to answer the question why the thermopot does not maintain the temperature;
- relay S1.1 connected in parallel with the reboiling spiral;
- TN1 – spiral of the main heating element;
- VT1, VT2 – transistors on which there is a relay for controlling the on and off time, which open under the influence of a charged capacitor C3;
- C3 is an electrolytic capacitor, charged by pulses from VD6 when the S4 button is briefly pressed;
- K1 – relay winding through which electric current flows and switches S1.1;
- C1, C2, VDS1 – voltage rectifiers that supply power to the time relay circuit.
Notes:
- C1 serves as a damper for excess voltage;
- C2 – smoothes out electric current ripples resulting from the operation of the bridge rectifier VDS1;
- Some units do not use C1, but a step-down transformer.
Replacing the pump if the thermopot does not pump water
It happens that the thermopot works, boils, heats and keeps the water warm as long as necessary, but it is impossible to pour water - the valve is broken and water supply is impossible. And it’s not at all clear which option is better: a broken heater or a supply function. Such a breakdown indicates a malfunction of the pump (pump) for pumping water into the mug. Then it is necessary to disassemble the machine and examine the suspicious element.
How to get to the pump:
- After removing the metal casing, disconnect the tubes from the pump. If you find scale on the wires, you need to get rid of it.
- Disconnect the pump itself from the tank and housing, while trying not to lose all the small parts.
- As soon as the pump and the electric motor are disconnected, remove all scale that interferes with the proper operation of the device.
Like any household appliance, a thermopot needs care and maintenance. You can descale it at home using citric acid, acetic acid and baking soda. The thermopot should be cleaned immediately, as soon as the first scale appears. If the product begins to make suspicious sounds, then cleaning is all the more necessary. This is the first signal for help.
Cleaning with soda and acid is carried out in accordance with the size of the product itself. You can also use special cleaning products, just carefully study the composition. Citric acid has its drawbacks - sometimes there is not enough for one kettle
But after boiling water with citric acid, it is important to then wipe the kettle with a soft cloth. There is no smell after boiling, you can combine it with vinegar
Acetic acid removes scale instantly, but it is very difficult to get rid of the aroma afterwards. It requires several boils after and cleaning with a special product, so it is better to clean with a mixture of citric acid and vinegar.
Private faults
Like any other household appliance, the thermopot has a list of the most common problems.
Here are some specific malfunctions of the thermopot and parts that should be replaced or repaired with your own hands in this case first:
- The control panel does not light up at all, the device itself does not start and does not work.
In this case, the cause of the breakdown may be:
- thermostat located, depending on the model, either on the bottom or on the side of the device;
- fuse;
- broken wires and connections.
- Only the temperature maintenance mode works, but the main boiling of water does not function.
You can fix the problem by checking:
- bottom thermal switch;
- main heating element designed to heat water up to 100 degrees.
- The opposite situation is that boiling to “one hundred” works, but heating does not function.
There is only one piece of advice - check all elements of the electrical circuit, paying special attention to the board module.
- Pressing the water supply button has no effect.
The problem lies in the pump - you need to disassemble the thermopot, following the instructions below, and find out the real reason.
Taking a tool
The internal structure of household thermopots is different. But the simplest models are surprising in their similarity and simplicity. Repair of the Scarlet thermopot can be carried out according to the standard scheme, while Zojirushi microprocessor technology will not tolerate intervention.
It is necessary to soberly assess your own strengths and not try to solder a microchip with a 150-watt soldering iron that requires a hot air gun. It is necessary to master the main techniques for working with electronic components that are afraid of static electricity and high temperatures.
The work will require tweezers, a tester, a voltage indicator screwdriver, and a soldering iron. The minimum list will kindly be suggested at any radio electronics forum. There, ask for advice on correcting the identified defect.
Just as it is impossible to comprehend the immensity, it is impossible to list in one review recommendations for all cases on how to repair a thermostat with your own hands.
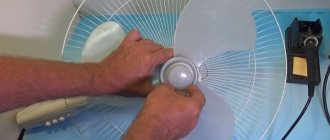
Disassembling the thermopot - step-by-step instructions
What should I do if the device does not want to turn on, does not heat the water, leaks or does not heat up? In this case, it is recommended to disassemble the unit by following these step-by-step instructions:
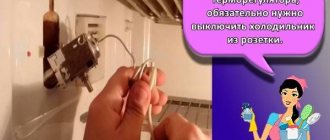
- disconnect the device from the electrical network;
- drain the water in the inner flask;
- turn the unit upside down;
- remove the plastic plug from the clamps using a flat screwdriver, knife or other improvised object;
Plastic plug
- use a Phillips screwdriver to remove all screws;
- then remove the pallet (for ease of reassembly, it is recommended to photograph the disassembly process so as not to get confused);
- after removing the pan, access will be made to the water pump, from which you need to remove the hoses held on by plastic ties - you can simply cut them off with scissors;
- Next, you need to remove the hoses from the pipes from the printed circuit board;
- then you can begin to unscrew the printed circuit board, which is held on by small bolts;
- there is a gasket under the board - it must be removed to gain access to the heating coil;
View of the board with the cover removed
- to gain access to the heating element, unscrew the last 8 screws, then remove the protection;
- check the accessed parts using a multimeter in the order indicated later in the article for various types of problems;
- for reliability, before reassembling, it is recommended to clean the heating element from scale, and also inspect the printed circuit board, and if necessary, replace the capacitors with new ones;
- Reassemble in the same manner as disassembly.
Microcircuits
A typical thermopot accommodates two circuit boards:
- Nourishing.
- Manager.
The technician will examine both, identifying the presence of swollen capacitors, burnt resistors, bad fuses, and broken tracks. Faulty radio elements are replaced with new ones, soldered, contacts are restored by tinning.
The first study concerns the presence of fuses and the integrity of elements. If the replacement is unsuccessful, the new element burns out - the problem is caused by the electronic filling. The thermopot is affected by a short circuit (sharp uncontrolled increase in current).
The resistor values are indicated by colored stripes. A typical problem is to detect the beginning and end of a marking.
Hint: there are special sites containing tables of various types of resistance designations. Gain access to the resource by filling out the search bar with the simple phrase “labeling resistors online.” The direction of the stripes is determined by the observed fact: a fixed set of colors meet at one edge.
Damaged electrolytic capacitors are easier to notice - the cylinders swell. Beginners looking for ways to repair a thermopot are interested in the appearance of a broken container. The answer will come automatically, as soon as a faulty capacitor is found. The appearance of the cylinder evokes the idea: the barrel is 100% swollen. The sidewall especially sticks out (imported ones are cut crosswise).
It is more difficult to test with diodes, but the semiconductor burns less often (silicon keeps temperatures below 150 degrees Celsius). Unsolder the element, ring both sides. The arrow marking shows the direction of flow of positive charges (lean against the positive probe of the tester).
Torn board tracks must be cleaned with sandpaper, removing the varnish from the metal. The shiny surface is tinned (with soldering irons), joined, and covered with solder. It will serve for decades. The mechanics repair the mechatronics and it works...
Detailed analysis of repair parts
There is a certain list of internal parts of the thermopot that are recommended to be inspected first.
Network wire
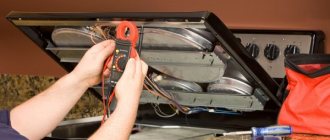
The 220 Volt power cord may bend or have poor contact with the three-pin connector located inside the case.
First, you need to check the wire itself directly in the “testing” mode using a multimeter or by connecting the cable to some other device.
Multimeter
If the cable is operational, you should check the presence of voltage at the terminal after the transformer.
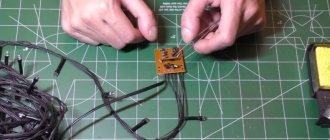
Microcircuits
Most models are equipped with two electronic modules:
- power supply board;
- control board.
Control board
In fact, the power board is a power supply unit from which electric current of the required parameters is supplied to each element of the thermopot.
To repair both boards, you must first inspect them for:
- swollen capacitors;
- burnt out resistors;
- unusable fuses;
- torn contact tracks, etc.
All damaged elements must be replaced with new ones, having first taken care of purchasing them on the radio market. Damaged tracks can be restored by tinning with a household soldering iron.
The most common problem here is a blown fuse. You can identify it by a torn thread inside the glass case.
If the fuse is OK, you should check the resistors and diodes with a tester.
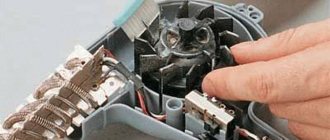
Water pump repair
What should you do if the thermopot starts running or, conversely, when you press the water drain button, nothing happens? In this case, you should get to the pump and start testing its performance.
This is done by simply dialing the contacts in pairs.
To check the functionality, you can also apply a standard voltage of 12 Volts, taking it, for example, from powerful batteries or from a car battery.
Also, the corresponding voltage is supplied by power supplies installed in the system units of personal computers.
water pump
Repair of heating elements
If heating or main boiling does not work, the problem may be a faulty heating element. It is not recommended to repair the heating element yourself - it is easier to buy a new one. The cost of heating coils starts from 2000 rubles.
Ten disassembled
A few recommendations
The thermopot will work for many years without failures or breakdowns if:
- Comply with the manufacturer's requirements regarding voltage and current in the electrical network.
- Do not use the thermal kettle for purposes other than its intended purpose, for example, as an alternative to a multicooker.
- In the event of a breakdown (premature shutdown, lack of contacts, constant boiling), immediately identify and fix the problem.
- At least once a quarter, pour any food acid into the water when heating. After this procedure, the flask is thoroughly washed.
- At least twice a year, check the condition of terminals, contacts, tubes, pumps, thermostats.
If any elements are faulty, you can always buy a replacement in our store. Just tell the consultant the model of the Potter, and he will help you fill out the application, including delivery to any city in Russia.
Analysis of common situations and ways to solve them
Here is a list of the most common problems - with instructions for solving them.
Thermopot provides constant boiling
It is not uncommon for a thermopot to constantly boil water. The opposite is also possible - when the unit is turned off at a time when the liquid is still far from starting to boil.
The problem is faulty thermal switches. They are located on the bottom of the device and on the side of the case.
The main problem with their inoperability is that the manufacturer applies a small amount of thermal paste, which is why the thermal relay begins to work incorrectly due to poor contact.
The functionality of the relay is checked with a conventional multimeter - to do this, it is connected to the contacts of the thermostat and set to ohmmeter mode. The tester should show a resistance of 0 ohms.
For additional testing, it is recommended to connect the thermal relay to the wires and lower it into boiling water. If the ohmmeter readings tend to infinity, the relay is serviceable, otherwise it needs to be replaced.
It is also recommended to check the thermostats if the thermopot does not switch to heating mode. In the presented situation, you should also check the connecting wires - they may oxidize.
Thermal relay
The thermopot drains liquid on its own
Some people encounter the following problem - immediately after plugging it into the outlet, the thermopot drains water from the flask, begins to hum, and a characteristic burning smell appears. How to correct such a deficiency?
The problem here is the water pump. First you need to disassemble the thermopot itself (see instructions above) and get to the location of the pump. Next, you should begin disassembling the pump.
After unscrewing the two bolts on the pump itself, you can gain access to the impeller and magnet. In order not to buy a new pump, you can repair the old one - to do this, you need to disconnect the blades from the magnet and clean them of scale with a rag or soft cloth. You should also inspect the magnet itself - tiny metal particles often accumulate on it, interfering with normal operation.
If the above steps have been performed, but the unit still leaks, you should buy a new pump.
Doesn't turn on
DIY iron repair
Another breakdown is that the thermopot does not turn on. There are quite a lot of reasons, you will have to go through everything in order.
- There is no contact between the cover and the body. Often, for safety, a fuse is installed that blocks the device from turning on with the lid open. We look at what is stopping us and eliminate the cause. The most likely reasons: the latch is broken or the rubber seal has sagged. The latch must either be replaced or repaired. The rubber seal can also be replaced, or it can be unfolded so that it does not interfere. Fuses in thermopot.
- The input fuse has blown. This is a small tube in a ceramic or plastic case. Through it, power is supplied to the heating element. We measure it with a multimeter in resistance measurement mode. If it is burned out, it shows a break. In this case, we repair it with a replacement.
- The thermal fuse is not working properly. If you look at the diagram, it comes after the input fuse. Its function is to prevent water from overheating. When the threshold temperature is reached, it turns off the power. After the device/water has cooled down, power is supplied again. But sometimes he turns off the heating element even before it starts boiling. This means that his settings have gone wrong and he is simply being replaced. Can it be excluded from the scheme? I guess, yes. But then the water may boil over and completely damage the device.
Another possible reason that the electric pot does not turn on is lack of contact. Poor soldering sooner or later reveals itself to be either completely or partially inoperable. The solution is to crimp the connector contacts and remove suspicious solder joints.
Water overheats (does not turn off) or does not turn on
If the thermopot overheats the water or constantly boils it, and does not just heat it up from time to time. If the heating does not turn on. All these breakdowns have two causes - a thermal fuse (which is responsible for overheating), or in the control board (this is if the model is more complex).
Thermal sensor for thermopot
The thermopot overheating sensor in more expensive models is made using a thermostat. A thermistor with a certain response threshold is sealed into the ceramic case. Install the sensor so that it is in close contact with the housing. Power is supplied to the heaters through the contacts of this device. When the case heats up above the response threshold, it will operate and open the contacts.
When it cools below a certain value (the second of the parameters), the thermal relay closes the circuit again, and the heating element begins to heat the water. So all of the above thermopot failures are usually associated with the temperature sensor. Thermal heater repair in this case means replacing the sensor.
Replacing the temperature sensor
As already mentioned, it is located either on the bottom or on the body. It looks like a black or white round (usually) “thing” on a metal plate. The sensor is simply disconnected - you just need to lightly press the central tab of the contact.
Thermopot repair: what does the overheat sensor look like and where is it located?
You can check it if you wish. Take a multimeter and set the measurement limit to resistance measurement mode. We touch the sensor terminals with the probes. There should be a resistance of 0 Ohm, that is, the contacts are closed. To check the functionality of the thermistor, you need to heat it, for example, with a lighter. When heated, the contacts open and the resistance disappears. If this does not work out, then repair is needed. We take a similar new one, put it in its original place in the case and connect the contacts.
Please note that you need to install it exactly like this, otherwise the device may not work properly. For example, KSD 201 is a self-resetting thermal switch, and KSD 302S is a forced-on device.
What else could it be
If the sensor has been replaced and the problem remains, check whether the sensor is installed properly. The back side should be pressed tightly against the body. Sometimes an air gap remains, which distorts the real temperature, so the water in the thermopot overheats.
You also need to check the thermopot control board
More complex models have a control board (simpler ones have only two LEDs - for turning on the power and the heating element). When making repairs, carefully look at the quality of soldering. Cold (dirty or cracked solder), moving wires under a layer of tin are all possible causes of breakdowns.
It's also worth checking the control buttons. They can “stick”, constantly giving a forced boiling signal. Or, conversely, when you press the button, there is no contact closure. You can disassemble the button, but you will have to tinker.
Well, it’s worth looking at the diode bridge in the power circuit. If one of the diodes is broken, the power supply can be increased. Repairing a thermopot is obvious - we check all the diodes for breakdown, and if necessary, replace them with a similar one.
Prevention
In order for the thermal kettle to work for many years and to be constantly in good condition, preventive maintenance should be carried out regularly.
- Once every two months, boil a solution of citric acid or vinegar. After this, rinse the flask thoroughly under running water.
- Once every six months, it is advisable to disassemble the device to remove all internal debris and mechanically clean out sediment that the acid could not remove. Along the way, you need to check all contacts for integrity.
Advice! If the upcoming work causes uncertainty or difficulties, then you can watch the corresponding video or use the services of a qualified craftsman.
The thermopot will serve for many years without serious disruptions in operation when used according to the instructions, careful handling and periodic maintenance.