Disassembling the thermopot
- First you need to remove the top cover so that it does not interfere in the future. Turn the device over and use a flat screwdriver to pry up the support ring, which is secured with latches. You need to apply some force to rotate this element.
- Next you will see a couple of screws (there may be 3-4 of them) that need to be removed using a shaped screwdriver.
- Now again take a flat tool and remove the bottom of the thermopot, which is also secured with latches, so it requires force.
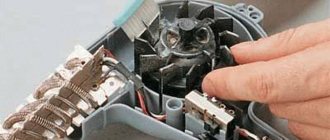
Now all the electronic stuffing is in front of you. Inspect all contact blocks and terminals, make sure that everything is connected (disconnection can occur, for example, if the device is dropped).
Perform disassembly only if you have basic knowledge of electrical engineering!
Thermal switches
They are usually located on the walls of the tank and on the bottom of the device. In the second case, the part is fastened with two screws and a pair of wires extend from it, put on the contact terminals. To improve heat transfer, the contact point between the thermal switch and the housing is treated with a special white paste. Disconnect the terminals and pull out the switch. In a quiet position it should be turned on - this needs to be checked with a tester (resistance will be 0 Ohm). Screw a couple of suitable wires to it and lower it into boiling water. If the resistance has increased to infinity, it means that the sensor is operational, because it has turned off. Otherwise, it must be replaced with a similar one. Below are several varieties of these parts.
An electrical specialist will help you select the right thermal switch.
Side thermal fuses
They are fixed on the walls of the tank (approximately in the middle). But there are models where these elements, which look like small cylinders, are installed on the bottom. They operate at a temperature of +105-110 °C. Their purpose is to turn off the device if you forgot to pour water into it, but have already inserted the plug into the socket. If these elements operate at temperatures below +100 °C, then the thermopot will heat up, but not boil the water, as is the case in your case. To check this, place the part in heating water: if the thermal fuse trips before the liquid boils, it needs to be replaced.
Source
Do-it-yourself thermopot repair
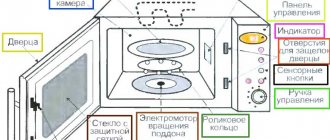
Thermopot device
A thermopot is essentially an electric kettle combined with a thermos. Unlike an electric kettle, an additional heating element was added to the design of the thermopot, used to heat water, and a controller controls its operation and maintains the temperature within 75º - 95º C. In many thermopots, in addition, a pump is installed to supply water. The water heating tank is covered with a casing that protects against burns and serves as the outer shell of the thermos, reducing electricity consumption to maintain the temperature. If the enclosure is made of metal, it is grounded (see electrical diagram) to protect against electric shock. All main components of the thermopot are located at the base of the body.
Electrical circuit of thermopot
The electrical circuit diagram of thermopots of various models and manufacturers does not differ significantly from the one shown below:
Diagram of a thermopot with one temperature sensor (Fig. 1)
Schematic diagram of a thermopot with two temperature sensors (Fig. 2) (Electrical diagram of a thermopot Elenberg-TH630)
Parts and components used in the thermopot:
The water pump is an electric motor with an impeller in a sealed housing that, when turned on, supplies water to the thermopot spout. Power supply 12V DC. It is attached with a bracket with screws to the body through a silicone gasket, which protects the motor from overheating. The impeller itself rotates due to a magnet, a very interesting design, a magnet on the motor shaft rotates the impeller with a similar magnet.
Temperature sensor (thermal switch, thermal relay) -
normally closed , when the required temperature is reached (95º - 125ºC) it opens the contacts. Designed for switching 10A 250V. It is attached to the surface of the tank with screws; for better thermal contact, thermal paste, type KPT-7, is used. You can check it with a multimeter by turning it on for continuity and heating the temperature sensor to a temperature above 125ºС; when the threshold value is exceeded, the contacts open.
Its structure and principle of operation
An electric pump consists of an electric motor and the pump itself mounted on its operating shaft - a chamber with an impeller, inlet and outlet pipes. When the engine is turned on, the impeller begins to rotate and distill water from the inlet pipe going into the flask into the outlet pipe going to the spout. In some models, there is a filter in front of the pump that traps mechanical inclusions, such as, for example, tea leaves that have fallen into the flask. Its condition must also be checked, washed or replaced if necessary.
A hand pump is a corrugated plastic cylinder. In the list of spare parts it is listed as an “air pump”. This pump only works when the lid of the thermopot is closed, when the flask is a sealed volume. When you press the large button on the lid, the cylinder contracts and forces air into the top of the flask. Excessive pressure forces a portion of water through the pipes into the spout. When the manual feed button is released, the elasticity of the cylinder and the pressure in the flask return the manual pump to its original position. The pump is ready for the next cycle.
Basic thermopot malfunctions and solutions
The thermopot does not turn on
- When the thermopot is turned on, the boiling mode does not turn on, the water pump works. The boiling heating element has failed, call and replace if it fails. Relay K1 is faulty (Fig. 1, Fig. 2). The power supply circuit of the boiling heating element may be broken.
- When the thermopot is turned on, the boiling mode does not turn on, the water pump does not work. Check temperature sensors (F1 Fig. 1, FU1 or SF2 Fig. 2). The power cord or plug may be damaged. There may be a break in the wiring in the power supply circuit.
The thermopot does not turn off
The thermopot boils water constantly - the temperature sensor is faulty (SF1 Fig. 2). Relay K1 is faulty (Fig. 1, Fig. 2).
The thermopot often switches to boiling mode
The heating element for heating the water has failed, call and replace if it fails. There may be a break in the power supply circuit of the heating element.
Thermopot does not boil water
Thermopot takes a long time to boil
The boiling heating element has failed, call and replace if it fails. Relay K1 is faulty (Fig. 1, Fig. 2). The power supply circuit of the boiling heating element may be broken.
Thermopot pump does not work
Water level sensor in thermopot
This is a fairy tale that “wonderful repairmen” tell to housewives in order to create fog and ask for more money. I have not yet seen a single thermopot in which the water level is monitored. In a thermopot, if there is little water and it boils away, the temperature of the tank increases sharply, and the critical temperature sensor turns off the heating elements.
Source
Why doesn't the thermostat work?
You can repair the thermopot yourself, the main causes of malfunctions are:
- The kettle has stopped turning on, the indicator light elements do not light up - you need to check the power cord of the thermopot, make sure that the wires are connected in the order. Additionally, test the control module, temperature controller, and fuse.
- When you press the power button, water does not flow into the cup - the reason lies in the pump, it needs to be repaired.
- Secondary boiling does not work, the thermos has stopped heating water - you need to check the power module on the electrical board.
- The main boiler has failed - you need to test the temperature controller and carry out repairs.
- Only heating works - check the heating element of the thermopot.
If the thermopot is broken, these recommendations usually help. When there is no effect, it is better to go to a service center.
The device of a thermos kettle
Let's look at the key elements of a thermopot.
- Tank made of corrosion-resistant steel.
- Spirals (heating elements) built into the body. One element is designed to boil water, and the other maintains the required temperature. To prevent short circuits, each spiral is wrapped in special ceramic “beads”.
- Water supply system. Consists of a pump, motor, blowers and connecting pipes for transporting liquid. The motor power supply fluctuates around 8-12 V. For more advanced models, this figure is increased to 24 V.
- The electronic unit. There is a temporary relay here, which is responsible for forcibly turning on the heating coil. Here you can see the elements that generate local voltage for both the motor and the relay itself.
- Control chip. This part is responsible for activating the thermopot modes: “Liquid supply” and “Re-boiling”. LEDs are also included here to indicate events: green light indicates the temperature maintenance mode, and red light indicates the heating process.
- Thermal switch. This part is sometimes called a thermal breaker, temperature sensor or thermostat. The correct operation of the kettle depends entirely on this element.
The thermal switch looks like a small barrel made of ceramic. Inside the case there are two paired metal contacts. Depending on the type of device, the contacts are either closed or disconnected.
In the first case, when the critical temperature is reached, the line opens and the spirals are turned off. When the water cools to a certain degree, the contacts close, starting the heating process. The switch-off and switch-on temperatures are usually fixed. In budget models, the indicators are set by default, while in more expensive solutions there is the possibility of manual selection.
Thermopot does not pump water - what to do and how to repair
Over time, the air pump accumulates contaminants in its chamber. However, they are not so significant that it stops pumping water. Most often, the corrugated chamber wears out. Frequent cycles of operation cause a crack to appear on its walls. The chamber is depressurized. It is no longer able to pump air to push water out. There is only one way out. A leaky hand pump in a thermopot cannot be repaired. It must be replaced.
The air pump is usually dirty enough for it to stop pumping water.
To replace the manual water pump, disassemble the thermopot cover. Depending on the model of the device, it is attached to the body with screws or latches. The first option is simpler. You will have to tinker with the latches. They cannot be broken, since you will have to buy a new cover, and it costs 1.5-2.5 thousand rubles. Carefully try to press the latches with a screwdriver. When the cover is removed, the old pump is removed and a new part for pumping water is installed in its place. The thermopot cover is returned to its place.
A new air pump is installed after removing the cover from the thermopot.
If after examination it turns out that the hand pump is intact and not even dirty, the problem lies in another unit. The silicone seal under the lid needs to be replaced. In some place it is leaking air, and the thermopot pump does not pump water from the reservoir to the spout.
The method for replacing the gasket depends on the model of the household appliance. Sometimes the seal can be picked up with a hook or a screwdriver. If the design is complex, you will have to disassemble the body or remove the flask.
Eating problems
When the electric pump stops pumping water, diagnostics similarly begin with an inspection. If there is no contamination inside the chamber, the problem lies in the motor power supply. Here you will need a multimeter and basic knowledge of electrical engineering to perform the test.
Before checking the thermopot pump, start testing with a multimeter from the power cord. Often the wire breaks at bends, areas near the plug. If it turns out that one of the wires has fallen off, the cable is replaced. The next element is the socket on the thermopot, where the power cord is connected. Here contacts can burn or become loose.
The electric pump motor runs on 12 volt DC. If you have knowledge of electronics, use a multimeter to check the diodes of the rectifier unit. They must allow current to pass in one direction and not pass in the other. Check the power supply itself. When the water supply pump on a thermopot with a heating function does not work, you need to test the resistance of the spiral with a multimeter. The motor of such a device is powered through a heating element. If it fails, the water supply will stop.
If you have no knowledge of electronics, do not despair. You can check the electric pump in another way. The motor is supplied with 12 volts from the battery. If it starts working and flows water, the problem is in the control system. When the engine shows no signs of life, the entire pump is replaced.
The thermopot does not pump water, but the motor hums
The serviceability of the electric pump motor can be judged by a clearly audible hum. The sound is not loud, but it is easy to hear. When the thermopot pump hums but does not pump water to the spout, the reason lies in the clogging of the working chamber, supply pipes or filter (if it is provided in the system by the manufacturer).
To troubleshoot the problem, perform the following steps:
- The thermopot is disconnected from the power supply and the water is drained. Unscrew the screws on the bottom and remove the cover. Underneath it, the entire electrical circuit of the household appliance will open along with the pump.
- The supply pipes are disconnected from the inlet and outlet of the pump, and, if any, the filter. The parts are checked for contamination and washed. To get into the working chamber of the electric pump, unscrew the bolts connecting it to the motor.
- First, remove the plastic cover of the camera. Do this carefully so as not to tear the silicone seal. If it is worn out or damaged during disassembly, it will have to be replaced. Dirt deposits on the inner walls of the chamber are cleaned with a wooden or plastic scraper. Do not clean with metal objects to avoid damaging the plastic.
- The impeller will not necessarily be covered in scale. Even if it is clean, it is still removed.
- After dismantling the impeller, the magnet will open. It is recessed inside the camera body. Dirt is most often deposited here, which prevents the impeller from rotating. Hard deposits on the magnet can be carefully removed with a flat-blade screwdriver.
After cleaning is completed, all parts are reassembled in reverse order. The problem when the thermopot does not pump hot water well must be solved.
Operating principle of the thermopot
After filling the tank with water and turning on the device, the heating elements begin to heat the liquid to a boil. When 100⁰C is reached, the relay is activated and the thermopot automatically switches to heating mode. The latter requires about 70-100 W, while boiling requires ten times more - from 1000 to 2500 W, which depends on the specific model.
Important! The water in the device cools at approximately the same speed as in a regular thermos, thanks to the heat-resistant flask that retains heat. That is, even when turned off, the liquid will remain hot much longer than in a classic electric kettle.
After the water temperature reaches minimum values, the thermal switch is triggered, activating the heating elements to maintain a certain degree. All devices of this type are equipped with a feed system. That is, there is no need to tilt the thermopot. It is enough to place the glass on a special platform and press the corresponding key. Water will be supplied under pressure, the strength of which depends on the selected model.
Budget thermopots, as a rule, have up to 4 modes, which are needed to indicate the minimum and maximum temperature thresholds. More expensive devices have much more adjustment options. In addition, they are equipped with some additional functionality: timer switching, “no steam” mode, self-cleaning, extended protection, an additional tank, etc.
Recommendations for using the thermopot
If the thermostat stops working, consider possible causes and eliminate them. The cost of restoration can be very different, it all depends on the model and the features of its operation. You can reduce the risk of malfunctions to a minimum if you pay enough attention to prevention, namely:
- Every 2 months, boil a solution of vinegar and lemon essence in a flask, then rinse the inner container with a stream of tap water.
- Once every six months, disassemble the device to remove internal debris from it, clean out sediment that the acid did not remove. Be sure to check the contacts for integrity.
You also need to carefully study the operating instructions and strictly follow them. This will minimize the likelihood of the thermopot breaking down and requiring repairs.
Prevention does not eliminate breakdowns 100%, but in practice it significantly reduces the likelihood of their occurrence.
Typical faults
The most common causes of breakdowns are the following device parts:
- network wire;
- control module;
- water pump;
- electric heaters;
- thermal switch.
Network wire
Before you repair a thermopot yourself, you should disconnect it from the network. After this, in order to “ring” the device’s wire with a tester, it must be disconnected. To do this, unscrew the screws on the bottom of the device and remove it. You will see the terminals where the power cord is attached. Disconnect the cord and start “ringing” it with the tester. If the cord is in order, you can proceed to further troubleshooting.
Microcircuits
If you find that a button or all keys on the device do not work, then the cause of the problem may be a faulty control unit. It is not recommended to repair it yourself, since you need to have certain knowledge in radio electronics. It would be better if a service center repairs the thermos kettle.
Electric heaters
If, after turning on the device, it does not boil water, while all heating modes are working, as well as the automation, then these symptoms indicate that the heater may have burned out, or the thermostat has failed . To find out, you will need to disassemble the unit.
- Empty the water from the container and turn the device over. At the bottom you will see screws that need to be removed.
- Using a flat object (you can use a screwdriver), remove the plastic ring from the latches. Underneath you will see a fastener that needs to be unscrewed.
- After removing the screws, remove the tray. To continue disassembly, it is recommended to mark all the wires of the same color with a marker and photograph the location of all other conductors. This should be done so that later there are no difficulties during assembly.
- Disconnect the clamps holding the hoses connected to the pump. They can simply be cut off with scissors or wire cutters.
- Disconnect the hoses from the electric pump connections.
- Remove the top cover of the thermopot without much effort, turn it upside down and lower the tank so that it rests on the table.
- Unscrew the PCB and set it aside.
- Under the gasket you can find 2 more screws.
- After unscrewing all the screws on the metal tray, it can be removed along with the bottom.
- Next, remove the 8 screws holding the cover in place.
- Now use a screwdriver to pry up the protective cover and remove it. You will see a heating element.
- After removing the heating element, it must be checked for a break using a tester. If the changes show that there is damage to the heater, then it will have to be replaced with a new one, since this damage does not cause the water to boil.
What to do if the electric kettle does not turn off when boiling?
An electric kettle is a mandatory attribute of all offices and industrial sheds. This warm friend will warm you up in winter, relieve fatigue on a weekday, share homesickness at lunch, and also become a reason to take a break during a hard day at work.
However, like any device, it can fail. Having collected water and plugged in the device, while running off for a couple of minutes to call your colleagues for tea, you can return and find a Finnish sauna, the cause of which was a steaming electric kettle.
In this article we will figure out why the kettle does not turn off when it boils and how to fix it yourself.
Causes of malfunction
If the kettle does not turn off when boiling water, the causes of the malfunction may be:
- its lid is not closed;
- large gap between the cover and the body;
- there is no filter or it is unevenly positioned;
- scale formation on the walls.
- the switch or the bimetallic plate that acts on it is broken.
Below we will look at instructions for repairing a kettle that does not turn off when it boils. If you are ready to disassemble the device and try to repair it yourself, read below what you need to do.
How to fix it yourself?
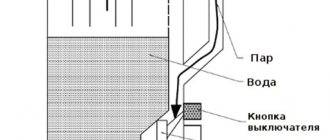
The electric kettle is designed in such a way that when water boils, steam collects under the lid and, having reached a certain concentration, is sent to a special section in which the switch is located. The latter, in turn, when heated, automatically releases the button, thereby disconnecting the kettle from the network. You can clearly see the design of the device in the diagram below:
The first step is to inspect the electric kettle; perhaps in a hurry and in anticipation of a break, a work colleague did not close the lid tightly, or an uneven filter prevented the lid from closing tightly
Please note that an open lid is the most common reason why the kettle does not turn off when boiling.
If everything is in order with this, then you should look inside the electrical appliance. On the side of the handle, between the lid and the wall, there is a hole for discharging steam to the switch. It must be clean, without any obstructions or scale plugs.
In old electric kettles, the hole is small and very often gets clogged, as a result of which the device does not turn off on its own when the water boils.
New models do not have this drawback, so if you want to replace the device, we recommend that you read our tips for choosing an electric kettle for your home.
If you examined everything in order and did not find the reason, most likely the electric kettle does not turn off automatically when it boils due to the switch. To get to it, you will have to disassemble the device almost completely.
To do this, you need to unscrew all the screws on the bottom cover, remove it, unscrew the screws on the handle, and remove it carefully without damaging the latches.
Try to remember the sequence of your actions so that after repair you can quickly assemble the case.
We draw your attention to the fact that the design of the switch does not provide for repair or intervention, so only replacing this unit with a similar one will allow you to repair the electric kettle with your own hands. If, at your own peril and risk, you want to repair a kettle that does not turn off for a long time when it boils, then to do this you need to get to the switch and first of all visually inspect it
If the contacts are burnt, clean them with fine sandpaper. You can learn more about the repair in the video below:
If, at your own peril and risk, you want to repair a kettle that does not turn off for a long time when it boils, then to do this you need to get to the switch and first of all visually inspect it. If the contacts are burnt, clean them with fine sandpaper. You can learn more about the repair in the video below:
Repair technology
By the way, a faulty button can even cause the electric kettle to turn off early without heating the water to a boil. In this case, you need to act according to a similar method - either change it or repair it.
Assembling the kettle occurs in the reverse order. Before connecting it to the network, fill with water and make sure there are no leaks. It is possible that the seal was moved during repairs.
Repeat disassembly and return the gasket to its place. That's all I wanted to tell you about this issue.
We hope you now know why the kettle does not turn off when it boils and how to repair it yourself.
Source https://samelectrik.ru/elektrochajnik-ne-vyklyuchaetsya-pri-kipenii.html
(Visited 1,039 times, 1 visits today) Quick kettle repair Quick kettle repair. Consultations are free. Spare parts are in stock and on order. Delivery throughout Russia. Repair of an electric kettle. Repair of a thermal switch is shown.