To quickly strip electrical single- or multi-core wires, a special tool is usually used - a stripper. However, the author suggests making an alternative to it and saving money.
To make a simple device for removing insulation from wires with your own hands, you will need a small piece of polypropylene pipe about 15-20 cm long, as well as a segmented blade for a stationery knife.
First of all, the author applies a segment blade to a piece of PP pipe, after which, using a regular pencil, he places marks on the surface of the pipe at approximately the same distance from each other.
1
Features of the manufacture and operation of individual components
The durability and accuracy of cutting is determined by the accuracy of installation and manufacture of cutting half-knives. They are made from tool steel grades U10 or U12, and are hardened to a hardness of up to 50...55 HRC. For cutting multi-core cables, knives with carbide inserts made of VK8 alloy are used. In this case, the knife body is made of high-quality structural steel 45 or 30X, and the working carbide plates are soldered into the body seat using the copper soldering method. Increasing the efficiency of using knives can be achieved by using designs with several cutting edges: as the knife becomes dull, the knife is turned to a certain angle, thus introducing a new section of the cutting edge into the work.
Some foreign companies supply cutting equipment with additional units, in particular, drawing dies. They pick up the cleaned section of the cable and push it into the entrance hole, after which they pull the cable through the zone with a small - up to 8...10% - compression. The result is a metal rod, the continuity of which practically corresponds to the continuity of the base metal.
The productivity of strippers is determined by the rotation speed of the movable half-blades, and their efficiency is determined by the ratio of the parameters of the drive power and the diameter of the cable being processed.
Machines of this kind are compact, do not require a special foundation for installation, and therefore can easily be installed and reinstalled in suitable areas of the relevant industries.
The main technical characteristics of mechanical equipment for cutting electrical cables are summarized in the table:
| Equipment model | Power consumption, W | Diameter of cut cable, mm | Knife type | Cutting speed, m/min |
| KB-0.3 | 2200 | 5…20 | Sectional half knives | 20…40 |
| KB-0.4 | 3300 | 20…80 | 30 | |
| Stripper | 4000 | 5…80 | Roller knives | – |
| GS-500 | 6000 | 15…140 | – |
The versatility of the use of such equipment is ensured by the presence of adjacent cutting heads, which can be easily reinstalled by the operator into the corresponding seats of the tool block.
The principle of mechanical removal of insulation and braiding from a cable
This is how the cable is cut
Such equipment is called mechanical strippers (from the English verb to strip - to strip off). The principle of operation of a mechanical stripper is the gradual introduction of driving half-knives (shaped like the radius of a circle of the outer cable braid) into the insulation layer, followed by its separation from the metal core. In this case, the cable cutting machine is equipped with a special blocking unit, which prevents the knives from moving to the outer perimeter of the core itself. Then the clamped fragment of the cable is forced to move along its axis, resulting in its complete release from the insulation layer.
The simplest design of a stripper for cutting cables
To ensure the quality of the cut, strippers provide for forced clamping of the cable in the separation zone. This creates compressive stresses, which, firstly, increase the cutting accuracy, and, secondly, contribute to more efficient separation of the insulation, the material of which (in comparison with the core metal) has lower shear resistance values.
Video - the operation of a small cable stripper:
Strippers are effective for cutting both single-core and multi-core cables.
A typical cable cutting machine operates in the following technological cycle:
- The cable to be cut is installed in the working area of the half-knives and clamped there until it stops with corrugated clamps.
- A controlled stroke of the tool is performed, cutting through the insulation.
- The cut parts of the insulating layer are moved apart in opposite directions. In this case, the insulation is finally separated from the metal cores of the cable.
- The cores are wound into a bay.
Reflow method
Cleaning with a soldering iron
If you have a soldering iron, you can quickly remove the insulation using the thermal method. To do this, heat the soldering iron tip and run it lightly over the plastic insulation. Once heated, the plastic will melt and come off. This method does not disrupt the conductor in any way. If you need to strip a large number of wires with such a winding, it is recommended to use a special device. For example, a special wood burning tool, which was previously known as a “Pattern,” would be suitable.
The reflow method is most effective if your wiring is old. After a long period of use, the plastic winding on the wire becomes hard and brittle. Moreover, if the wire protrudes two or three centimeters from the junction box, neither wire cutters nor a knife will be able to handle it. And if you use a lighter or reach in with a soldering iron, you can strip the wire.
To summarize the above
Buying a stripper or removing insulation the old fashioned way using improvised means is a personal choice for everyone. However, given the low cost of the simplest devices, such a tool will not be superfluous. After all, no one wants to completely replace the cable because the core being stripped has broken off and become too short to connect. It’s much easier to spend 100 rubles one day and not worry about the quality of the stripping.
PHOTO: buildoman.ru To strip many veins you will have to spend a lot of time and effort
We really hope that the information presented today was useful to our dear reader. The editors of the online magazine Homius will be happy to answer any questions that may arise during the reading process. You just need to state their essence in the comments below. And one more thing - let's try to determine the number of readers who think that it is better to make a stripper with your own hands, and those who think otherwise. Please also leave your opinion in the discussions. If you liked the article, don't forget to rate it. And finally, we suggest watching a very useful video that will more fully reveal today’s topic. Take care of yourself, your loved ones and be healthy!
How does a stripper differ from a crimper?
To obtain complete high-quality contact of individual elements of an electrical circuit, a crimping tool is used to crimp bare and insulated conductors. A crimper is a pressing pliers that crimps the tip and sleeve into a single electrical circuit. The procedure is as follows:
- The cable is placed into the cutting part and the sheath is removed.
- The cleaned section of the conductor is inserted into the sleeve and placed between the matrices of the required size.
- Squeezing the handles presses the connection.
If necessary, the operation is repeated several times, moving the pliers along the tip. The actions of a crimper are different from those of a stripper. The main purpose of the crimper is to form a reliable connection between the cable and the electricity consumer.
The crimper package includes a set of dies. They provide differences in tip cross-section sizes and functionality. The most used plates for crimping tips are NShVI and NShV brands. The matrices have a digital designation of the cross-section of the sleeve and tip.
For crimping multi-core cables and cross-sections of 16 mm2, massive pliers PK-16U are used. Single wires are not crimped with this model - the powerful force on the jaws of the matrix contributes to its breaking.
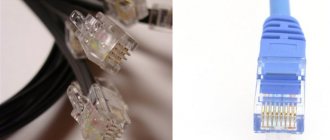
Computer wire connections use polymer RJ-45 connectors connecting twisted pair wires. For crimping, crimpers with special dies are used; it is performed in several stages.
Particularly relevant when crimping terminal sheaths where soldering of parts cannot be used - irons, microwave ovens, electric kettles, and other heating devices. Instead of a crimper, you can use a universal stripper, with which you remove the insulation and crimp the ends of a round conductor.
Features of working with machines for armored cables
Armored cable is a universal conductor of electric current. Unlike simple insulated wires, the metal braiding of the conductor gives it special strength and creates reliable protection from external negative factors.
The armor is a two-layer spiral shell made of steel tape. The cross-sectional structure of the armored cable is shown in the lower figure.
Cross section of armored cable
Removing metal tape requires a powerful power unit and durable, sharp disc blades. Industrial machines are equipped with cutting units that can clean several armored cables of different diameters at once. This is due to the need to process large quantities of wire products per work shift.
Note! Passing through the cutting unit, the knife cleans the cable from the surface polymer or rubber hose, electrically conductive screen (armor) and PVC belt insulation.
Only factory-made machines can remove metal insulation. They are large units. After the armor is removed, as a rule, three insulated cores are obtained. They are cut on the same machine, placing them in other openings of the cutting block.
Stripper for cutting armored cable
Typical faults
Among our compatriots there is an opinion that one of the main faults of the armature is the lack of resistance. It should be noted that the resistance is checked on the rotor winding, and the rotor, in turn, can be installed instead of an inductor, and a stator will stand instead of an armature. This is done in order to provide higher power, so the resistance can only be diagnosed at the rotor.
As for the anchor specifically, it is characterized by the following malfunctions:
- Most often, do-it-yourself repair of the generator armature is carried out as a result of wear of the slip rings;
- also, the need to repair the unit may arise as a result of failure of the shaft bearing;
- not so often, but the problem of winding short circuit still occurs.
It should also be noted that there are breakdowns that cannot be repaired:
- wear of the collector to a diameter of 8.6 cm;
- wear of keyways.
1. Anchor installed in a lathe
2. Grooving the armature on the lathe
Using side cutters
Stripping with side cutters
Tools such as side cutters are often used incorrectly
The tool is picked up as needed, and no attention is paid to the direction of the cutting edges. If you use side cutters incorrectly, you will have to put in a lot of effort.
In addition, in this case there is a high risk of breaking off the wire along with the insulation.
It is important that the cutting edges are directed in the direction opposite to the movement of the tool. With this option, the blade will cut into the insulation even with little force
As a result, the insulation is removed with a tube from the surface of the core without damaging it.
Why an electrician's knife provides safety
If you consider any professional tool, what catches your eye is:
- comfortable handle made of non-slip plastic, well held by hand;
- short but thick blade with a wide approach angle.
This was done on purpose. It is convenient to use such a knife even under voltage: it is difficult for them to trim a metal core, but it is convenient to remove insulation from a wire and cut a cable.
I have come across cases where “masters” believed that such sharpening was incorrect and changed the angle of approach and the cutting edge on the emery wheel, thereby damaging the electrician’s knife.
Special tool
Cutting wires and cables containing an outer sheath can be greatly facilitated by specialized devices. In recent years, a knife with a heel at the end of the blade has gained popularity.
It works in three stages:
- The piglet is inserted from the end of the wire under its sheath, supported by the insulation of the cores.
- The blade is guided by hand along the cable to the cut point.
- The cut insulation is pulled apart to release the wires.
This allows you to reliably and safely remove the top dielectric layer of protection.
How to use an electrician's knife with a heel
We got acquainted with the device, now let's see in practice.
In my work, I most often encounter VVG cable with a cross-section from 1.5 mm2 to 6 mm2. Sometimes you have to work with PVS brand wire. Therefore, now we will try to cut all these cables using the knife described above.
Example 1. We strip the VVG-P 3x2.5 mm2 cable with an electrician’s knife
In order to cut the cable, we place the heel under the insulation. To make the heel fit easier, some comrades make an incision first, but I deepen the heel by lightly swinging the knife left and right, the outer insulation is cut through, thereby the heel easily fits under the shell.
Then we carefully pull the knife away from us along the cable, thereby cutting the outer insulation along the cores
to the required length. The heel slides inside the cable, and the blade cuts the insulation perfectly.
When cutting wires with such a tool, the likelihood of damage to the insulation of the cores and the cores themselves is reduced to zero. As you can see in the photo, the insulation of the current-carrying conductors remains intact and unharmed.
We did the cutting with the front blade. Let's try to do the same with the rear blade. We deepen the heel under the shell and smoothly move the knife along the veins towards ourselves.
The insulation cuts through perfectly in this direction as well. Another advantage of a knife with a heel leaves your fingers intact, but you still need to be very careful and work with gloves.
It doesn’t matter at all which blade you use to cut the shell, the back or the front. There is no difference here, and everyone works as they are comfortable
For some, it is more convenient to hold the knife away from you, for others, vice versa.
As you can see the knife with the heel of the STOCK
removes insulation from VVG cable with a cross section of 3x2.5 mm2 without any problems. Let's move on to the next example.
Example 2. Stripping the insulation from the VVG-P 3x1.5 mm2 cable
The next example for our knife will be a cable with a slightly smaller cross-section - 3x1.5 mm2. In this case, the heel fits a little tight under the insulation.
If you are unable to pick up the insulation with your heel, you can use regular pliers or thin-nose pliers. Lightly squeeze the edge of the cable with thin-nose pliers; an empty space is formed between the wires, into which the heel of the knife can easily fit.
Then we push the knife away from us and cut the outer insulation of the cable.
Let's now try to work while holding the knife towards ourselves. The blade cuts through the shell in both directions with ease.
Example 3. We strip the VVG 2x1.5 mm2 cable with an electrician’s knife
I came across reviews on the Internet where guys complained that it was difficult to cut cables with a cross-section of 2x1.5 mm2 or less with such a knife. The heel is large compared to the width of the cable and fits tightly under the sheath. Let's check it out.
We take a piece of VVG-P cable with a cross-section of 2x1.5 mm2 and try to cut it.
Yes, indeed, relative to the width of the cable, the heel is a little large.
To get the heel under the shell you need to apply a little force. The heel fits under the sheath with a stretch, so you have to push the knife with little effort. Not because the blade is dull and does not cut well, but because the heel is tight. There is effort, but you can work.
When cutting, the knife moves away from you easier than when cutting the insulation towards you. In addition, in the latter case, there is a high probability of injury if the knife comes off.
Example 4. Using an electrician’s knife, remove the insulation from a 3x1.5 mm2 PVA wire
Now let's try to cut a round wire of the PVS brand and see how an electrician's knife works with a heel
will cope with this task. The external insulation of PVA fits very tightly to the cores and it is quite difficult to fit the heel under the insulation.
We insert the tip of the heel between the veins and swing the knife and cut through the edge of the outer shell. Then we push the knife away from us and cut through the insulation further. The knife passes. It's a little difficult, but it goes away. Of course, cutting a flat cable is much easier and faster, but if you get used to it, you can also remove it from a round one, although it takes a little more time.
The lower the ambient temperature, the more difficult it is to remove the insulation from a PVA wire with such a knife - the insulation in the cold becomes simply oak. Accordingly, if you work with PVA or NYM, it is better to work in a warm place.
Another point that I would like to draw your attention to, friends, is the voltage for which the insulation of the knife handle is designed. According to the passport, the insulation can withstand voltages up to 1000 Volts
Although it’s hard for me to imagine how such a knife can be used under voltage.
DIY cable cleaning machine
Several types of tools are used to strip insulation from wires: these are all kinds of knives, pliers, strippers, pliers (including automatic ones) and a number of others. How do they differ, how do they work and how convenient are they to use?
Hand tools
Hand tools for stripping wires are, as a rule, all kinds of pliers, pliers and pliers, which are simple in design and have a number of corresponding cutting edges.
Mechanical stripper
The cheapest and most common tool is simple manual strippers-crimpers, which combine wire cutters for stripping insulation from the ends of wires of different diameters, as well as press pliers for crimping and crimping wires.
The stripper shown in the photo above also has a device for cutting studs and bolts.
The main disadvantage of such instruments is their low quality due to their low price.
In a store, before purchasing, it would be good to hold a specific copy in your hands in order to make sure that it is not a one-time Chinese craft.
Price – from 120 rub.
Stripping pliers
In terms of its purpose and functionality, this tool is completely similar to the stripper described above. But it is a little compact and convenient.
However, its price is also higher
When purchasing, you should pay attention to its functionality. They differ for different models
It happens that everything is limited only to cleaning the ends of the wires from insulation.
Price – from 700 rub.
Stripping pliers
A very common tool. Using a screw, it adapts to wires of different diameters.
To remove the insulation, you need to lightly bite and twist the wire, and then pull off the cut sheath. However, many people find this type of stripper inconvenient, although it is easier for them to work in hard-to-reach places.
Price – from 300 rub.
Pliers for stripping insulation from round cables
This multi-tool is focused on stripping round and coaxial cables.
Despite its unusual shape, it is comfortable to work with. Especially with large diameter cables.
To strip the insulation, the cable is placed in the drop-down handle, lightly clamped and turned slightly to make a circular cut.
Price – from 800 rub.
Stripping knife
There are a lot of knives of various shapes designed for longitudinal and transverse cuts of insulation.
The most popular are those with a hook-shaped blade. The knife in the photo above also has legs that make it difficult for it to slip out of the cut shell.
Price – from 700 rub.
Knife for removing cable sheaths
This knife has a small retractable adjustable blade, which, thanks to the rotating mechanism, allows you to cut cable sheaths in any direction (lengthwise, crosswise).
Not all tools of this type are the same in their convenience, so in the store it would be good to first take a closer look at the ones you like.
Price – from 200 rub.
Semi-automatic tools
Semi-automatic wire stripping tools can significantly simplify the entire process and speed it up at the same time.
Wire strippers
Tongs of this design are the most affordable option on the market and will undoubtedly come in handy in the household. They are not intended to work with wires with a cross-section of more than 6 mm2.
When choosing a cheap model, you should personally check its performance.
Alas, the quality of Chinese goods is not high, so in half the cases you may end up with a specimen that either squeezes the wire too much, cutting the wires, or, on the contrary, slips along the insulation. In addition, the durability of cheap models is also a big question. However, for one-time work it is quite suitable.
Price – from 180 rub.
However, there are expensive branded instruments that do not have most of the listed disadvantages. But their price is appropriate - 10 thousand rubles is not the limit.
Automatic wire stripping pliers
And this is an outdated type of pliers, although still popular due to its low price and simpler design.
Among the disadvantages is a small number of functions. For example, they cannot be used to crimp wires.
Price – from 300 rub.
Well, if the store is far from you now, then this idea of making a stripper with your own hands will probably seem not only funny, but also useful to you:
You may also be interested in:— Test of two inexpensive semi-automatic strippers
Article rating: (2, 5.00
Device for stripping wires: types, cost, methods of stripping wires
Any electrical installation work involves the need to strip conductors. Everyone performs this procedure in a way that is convenient for them. Some use a cutter, others use side cutters, while others invent often useless devices.
However, there have long been tools on the market that can help in this matter. But how convenient and effective they are, you should understand in detail. And is it even worth spending money on a stripper or is it easier to get by with familiar tools? This is what we will talk about today.
Nuances that should be taken into account when removing insulation from conductors
Many people do not attach much importance to what tool to use to strip the insulation from cable cores. However, it is the tool that plays an important role in the durability of the mounted connection.
For example, you can consider using a conventional cutter. If you cut the insulation along its entire length, you can damage the live wires of the flexible cable.
If you cut the insulation in a circular manner, then grooves are formed on the cores, along which they can subsequently break off.
PHOTO: drive2.ru Various tools can be used to strip cable cores
The same can be said about stripping cores using side cutters. Of course, a professional electrician with experience will freely remove the insulation with any tool without damaging the wires, but there are only a few such specialists.
What about those who do not have sufficient experience? In this case, some advise making a special device for removing insulation.
Of course, there are “individuals” who use their own teeth to strip cables, but the editors of Homius warn the dear reader against such actions. Still, human teeth are intended for something slightly different.
Homemade devices for stripping wire cores, and is it worth using them?
There are many videos circulating online in which “craftsmen” advise making a device for removing insulation from a paper knife and a plastic cover. At first glance, it may seem that such a device is functional and even useful. However, you should not make hasty conclusions.
PHOTO: .com You should not trust such homemade products - there is a high risk of damaging not only the cable, but also your hands
When working with such a device, a cut inevitably forms on the surface of the current-carrying conductor. The slightest bend at the cut site will lead to a fracture of the metal. However, these are not all the pitfalls. Using such a device is quite dangerous. There is a high risk of cutting yourself, and given the sharpness of the blades, the injury can be very serious.
PHOTO: i.stuff.co.nz If you use homemade products, you should be prepared for this
In general, when carrying out electrical installation work, you should not “reinvent the wheel”.
Manufacturers offer many different tools to make such tasks easier. Moreover, the cost of these devices is low, which means that everyone can purchase them.
So is it worth the risk using various handicrafts?
Other methods of removing insulation from wires
A fairly common method among people is using matches or a lighter. It is as follows. The part of the wire insulation required for stripping is heated and then removed manually. It must be said that the method works, subject to certain nuances.
PHOTO: Pinterest You can use a lighter to remove the insulation, but be extremely careful
Firstly, when implementing it, accuracy is required. Otherwise, there is a high risk of getting burned. And secondly, the method is only suitable for thin conductors with a small cross-section. And using open fire is at least unsafe.
PHOTO: primelestiri.md The consequences of careless handling of fire can be extremely sad
Using a professional stripping tool
Today, on the shelves of electrical goods stores there is a huge assortment of special tools for removing insulation, called a stripper.
The instrument is presented in various price categories, which allows you to purchase it without compromising the family budget. As of October 2022, you can purchase a stripper for a price starting from 100 rubles.
Such a tool is quite suitable for one-time work. As for the cost of professional strippers, their price can reach 20,000 rubles or even more.
PHOTO: shopper.life The simplest stripper resembles side cutters with slots on the working surface
What is a stripper
In appearance, the simplest stripper resembles side cutters, on the working surface of which there are recesses for conductors of various sections. They protect the current-carrying part of the cable from damage. The master only needs to choose the right size.
PHOTO: shopper.life Such a stripper may cost little money, but for one-time work it is quite suitable
Strippers can be manual, semi-automatic, or automatic with electric drive.
Also, various models can cut the core insulation both along the conductor and across it. There are even ultra-precise devices designed to work with fiber optic cables.
However, for one-time work performed by home craftsmen, such expensive devices are useless.
PHOTO: vsehoztovari.ruAnd this is an automatic stripper used by specialists at work, although it is also quite suitable for home use
To summarize the above
Buying a stripper or removing insulation the old fashioned way using improvised means is a personal choice for everyone. However, given the low cost of the simplest devices, such a tool will not be superfluous.
After all, no one wants to completely replace the cable because the core being stripped has broken off and become too short to connect.
It’s much easier to spend 100 rubles one day and not worry about the quality of the stripping.
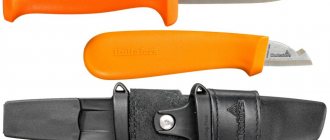
Electrician's knife with heel
This product is one of the types of electrician's knife. It is also called plow. This is a convenient device for removing the casing. It has a short, inwardly curved blade; at the tip of the blade there is a special device called the “heel”. The main purpose of this “heel” is to limit the depth of the cut when working with double insulation, when it is necessary to remove the top layer of braid, and not affect the insulation of the internal wires.
The platform at the tip of the blade facilitates the longitudinal sliding of the device when removing the top layer of protection and prevents the tip from catching the internal wires. The device is excellent for cables with hard cores (VVG), but it is worse at removing a soft sheath, such as PVA (it worsens the sliding of the heel). In general, this is a useful tool for removing insulation in the work of an electrician.
Other devices
After removing the outer layer of insulation, it is usually necessary to remove part of the inner layer, for example, to solder it to the board or screw it to the terminals. This manipulation will be more difficult since the inner winding is usually surrounded by stranded wire, which consists of thin copper strands twisted together. In this case, you will need a type of tool such as a puller or stripper.
Their device has several blades of different lengths and shapes, but the main element is a clamp, with which you can make circular cuts in the insulation of cables with different sections. It is convenient to use such tools, since you can manually select the desired diameter and not worry about damaging the conductor. To do this, the cable is fixed in the clamp, and the insulation stripper is rotated around it.
A stripper is a type of insulation stripping tool that is well known to electricians. They are very convenient for working with wires of different diameters, removing both the top protective layer and the inner one, adjusting the depth of the cut. Easy to strip thin cables. Often the stripper is equipped with additional devices, with which it becomes a truly multifunctional device.
A knife with a beak is endowed with a certain specificity. Not all electricians use it in their work. It is convenient for many, but not for everyone. The blade has a smooth bend shape, there is no heel. The beak-shaped inner edge allows you to make circular cuts in the insulation before removing it.
With caution, since there is no heel, it can also be used for cuts along the wire. More often, experienced electricians use this device, since the depth of the cut is adjusted manually
A knife with a hook is a professional tool. It has a straight and short blade, equipped with a hook at the end. The sharpened edge is either absent altogether (only the hook is sharpened) or is on the other side as an addition. The device is convenient to use for cleaning insulation on almost all types of wires.
Types of equipment
For small volumes of work, purchasing expensive equipment is not practical. Home craftsmen assemble simple devices for cleaning small-diameter wires; they also make quite complex universal strippers for cutting cables.
Simple device
The easiest way to strip a wire from PVC insulation is to make a device from the following materials:
- two wooden blocks measuring 40 x 40 x 400 mm;
- two screws 90 mm long with M 8 nuts;
- painting or stationery knife.
Step by step assembly:
- The bars are tightened with a clamp.
- Stepping back from the ends of the planks by 40 mm on both sides, the planks are drilled through.
- The screws are threaded through the holes and the wooden elements are tightened with nuts.
- 6 holes ø from 2 to 12 mm are drilled along the connection line.
- Before stripping the wires of insulation, insert a knife blade into the gap.
- The tip of the cutter is placed in the middle of the opening of the required diameter.
- The nuts are finally tightened. The device is ready for use.
A simple device
Remove the insulation as follows:
- Having loosened the nuts, the knife is moved to the desired hole, the bars are tightened again;
- the wire is inserted into the opening so that its end comes out on the other side of the device;
- Having grabbed the core with pliers, pull the entire wire through the hole;
- metal wires are separated from the insulation and given a compact shape.
Universal stripper
In order to strip wire products in relatively large volumes, you will need a universal machine. Making it yourself is not easy. Experience and skill in handling and availability of metalworking equipment will be required. As a last resort, having made drawings, the parts can be made in the nearest workshop.
To assemble a homemade stripper you will need:
- steel sheet 8 mm thick;
- two bevel gears;
- rod with threaded M 8;
- round steel rod ø 8 mm;
- L-shaped lever;
- M 8 nuts and washers.
Step-by-step instructions for assembling the machine:
- According to the drawing, the metal strip is marked using a tape measure and a marker.
- An angle machine with a diamond wheel is used to cut the metal into assembly elements.
- Corner slots are made in the strip. Along these lines, the workpiece is bent into a frame, resulting in a stripper body.
- They also make a movable U-shaped frame of the cutting unit.
- The side walls of the housing and block are drilled on both sides.
- A shaft with rollers mounted on it is inserted into the housing.
- An L-shaped handle is attached to the end of the shaft.
- A shaft with a disk knife is inserted into the holes of the inner frame.
- The cutting disc is made from a flat washer, the edges of which are sharpened using sandpaper.
- An M8 nut is inserted into the pre-drilled hole in the upper platform in the center.
- Screw in the rod, the lower end of which is secured in the hinge seat of the cutting block using a spring washer.
- By rotating the rod handle, you set the height of the gap between the knife and the drive rollers.
- Insert the end of the cable into the opening and begin to turn the handle.
- Instead of a lever, an electric motor is installed, the shaft of which is connected to the axis of the feed rollers.
Cutting machine with electric motor
Additional Information. This instruction is advisory in nature. Each master is free to add or come up with his own design for a cable cutting machine. The main thing is the principle of pulling the wire along the cutter blade.
The topic of the article “Do-it-yourself cable cutting machine drawings” is of interest to those people who can realize themselves in this type of business, such as extracting non-ferrous metal from waste wire products. Today, cutting cables and wires at home using a homemade machine is a great idea for earning extra income.
Homemade wire stripper
Using this device, which does not take up much space in the workshop, you can quickly and easily clean insulation from aluminum or copper wire. You can make a stationary wire stripper from scrap materials in just a few hours.
Materials and stages of work
To make a “homemade” homemade wire stripper, you will need steel plates of different lengths, two cone-shaped metal blanks, a shaft, a pin and nuts with washers. First of all, it is necessary to vertically weld two steel plates with holes for bearings to the base of the structure.
On top of the plates you need to weld another shorter plate - this will be the upper part of the structure. During the welding process, it is important to ensure that the parts are positioned at right angles. The best way to do this is to use a magnetic square.
Then, using a hacksaw for metal, you need to make notches on the cone-shaped parts, thanks to which the wire will not jump out of the “socket” during the pulling process. The truncated blanks themselves are mounted on a shaft, which is installed in bearings located in the side plates.
The final stage of work
You will also need to install a shaft with a special round-shaped cutting knife above the pulling rollers, which will cut through the wire sheath.
Additionally, during the process of assembling the stripper, it is necessary to fasten four narrow steel plates to the vertical posts, having previously drilled holes for the bolts in them.
You can watch the detailed process of making a homemade stripper for quick, convenient and, most importantly, safe removal of insulation from electrical wires in the video on our website.
Homemade wire stripper / Korowarka do kabli / Kabelschaelmaschine
How to properly remove insulation without defects?
The protective coating of any stranded copper wire must be dual-functional: strong and at the same time elastic. In other words, do not allow moisture on the copper and subsequent oxidation of the wire and easily allow for partial necessary removal from the core. Our step-by-step instructions will help you on how to properly strip wires.
What kind of damage can be expected from unprofessional stripping of a wire end?
- reducing the cross-section of the conductor;
- fractures of part of the copper threads in the core and a drop in strength characteristics;
- hidden defects when using blunt stripping devices - from stretching and bending;
- loss of part of the copper threads in the multistrand;
- contamination with residual insulation of the conductor.
Stripping power cable insulation
Power cables are used mainly for laying conductors to powerful equipment and distribution panels. How to remove the outer layer of cable insulation?
- Slowly cut the insulating layer from the end along the cable, but not very deeply.
- Using pliers, pull out one core at a time located inside.
- Cut off the remaining piece from the outer insulation.
- We cut the wires.
Before you begin this work, carefully consider how much insulation you will need to remove. It is better to cut with a small margin. If you expose a piece that is too long, you can always cut off the excess. Use a cambric to better position the cable inside the device.
And finally. Various tools for stripping wire insulation and how to use them video.
Making an electrical installation knife with your own hands (step-by-step instructions)
As can be seen from the information presented, the insulation stripping tool is a useful and convenient device, however, due to its high cost, it is not always available to people who cut wires only periodically. However, you should not refuse the opportunity to become the owner of such a device and make it yourself at home.
There are several ways to make a knife with a heel. This publication will discuss the two most popular options:
- from the blade of a stationery knife;
- from a metal strip.
Both methods give good results, so the choice largely depends on the availability of a certain tool that will be needed during the work.
Option one (from a blade from a stationery knife)
Blades are sold with the knife or separately. For manufacturing you will need two such parts. Next, the entire process is indicated in the form of sequential actions:
- A ledge is cut out at the end of one of the blades, onto which the heel will subsequently be attached. The required cut is made using a drill and a diamond microdisc.
- If the goal is a knife capable of cutting insulation in both directions, then the back of the protrusion must also be sharpened
- A piece is separated from the second blade, from which the heel of the future knife with a slot is cut out using a drill with a diamond disk. The length of the slot should match the length of the projection made on the first blade
- Insert the protrusion into the heel slot, then use a soldering iron and POS tin-lead solder to perform high-quality reliable soldering, fastening the workpieces together
- Process the heel with a file until it forms an oval shape, and then sand the soldering areas. The result should be the product shown in the photo:
Appearance of the heel soldered to the stationery blade
- The final stage is making the handle. To make it, you can use plywood or plastic, from which you can cut out pads and attach them to the blade using epoxy glue.
The resulting product cannot be used as a professional tool, but for periodic use for domestic purposes, it may well become an indispensable assistant. The disadvantage of the described method is the inability to create a crescent-shaped (curved) blade, like branded analogues, but the final price and rare use can shift this omission to the background.
Option two (from a metal strip)
This method does not require the use of a special tool, such as a drill, or special skills, such as using a soldering iron and complex solder. In addition, it allows you to give the working body of the knife any shape convenient for the user. Considering that the tool being manufactured must have sufficient strength properties, be sharpenable and be able to maintain the sharpness of the cutting edge, it is recommended to use a piece of strip of high-alloy carbon steel with a thickness of 3-5 mm as a workpiece.
Step-by-step actions alternate in the following order:
- On a steel strip, the shape of the future tool is marked with a scriber, taking into account the length of the heel, after which all excess metal is cut off using an angle grinder (“grinder”)
Approximate marking of a knife blank with a heel on a piece of metal strip
- Using the same “grinder”, metal is sampled at the border of the blade and heel, and the thickness of the material in the area of the intended blade is reduced. Thus, the heel begins to stand out in length and width from the base of the blade
- The crescent-shaped part of the workpiece is sharpened on both sides and ground
- The heel is also thoroughly polished. The quality of the knife’s operation and the integrity of the insulation of internal current-carrying conductors will depend on the smoothness of its lower surface.
- The handle, as in the previous version, can be made of wood or plastic, or can be made of a piece of hose stretched over the back of the workpiece and sealed in a heat-shrinkable tube.
We tell you how to make a simple and convenient stripper with your own hands
A stripper is a must-have tool for anyone who has to do electrical work. It allows you to strip the ends of wires from insulation without damaging the conductors inside them. However, it is not at all necessary to buy a stripper in a store, since you can make it without much difficulty with your own hands, which we will tell you about in today’s short article.
What is needed to make a stripper
The stripper that we want to offer you today is made of wood and does not require metal working skills, which is undoubtedly a great advantage that allows even an inexperienced craftsman to make it. To make this simple tool, you will need the following materials:
- two small wooden or plywood blocks;
- a blade, such as is usually installed in stationery knives;
- two thin wooden spacers.
Spacers are, in fact, fairly thin pieces of wood, only slightly thicker than the thickness of the blade used in this tool.
Stripper manufacturing procedure
A small semicircular recess is marked on one of the bars and then cut out with a jigsaw.
Then the wooden blocks are glued together so that there are pre-prepared wooden spacers between them.
On the outside, all edges of the wooden block are sanded so that they are free from chips, splinters and burrs.
A hole is drilled on one side of the glued block. The blade of the knife is inserted into the gap between the bars so that the hole on it coincides with the hole drilled in the wood. After this, it is secured inside the wooden part using a regular screw and nut.
At the other end of the wooden block, a hole is drilled for a rivet, which should be installed so that it prevents the blade from completely sinking into the internal cavity of the future tool.
On the second block, on which there is no notch, holes of various diameters are first marked and then drilled.
Types of electrical installation knives
A cable stripper does not have to have a straight blade. Often, to remove insulation you need to make circular cuts, which are more convenient to make with a curved blade.
You can get by with a regular knife, carefully cutting the top layer of insulation along the wire, and the inner layer using circular movements, then removing the braid. However, if the parameters of the knife blade and handle do not meet the necessary requirements, you can easily damage the wire strands, especially if they are thin. To make it easier to make circular cuts, the mounting knife is equipped with recesses corresponding to different wire sections.
The cable stripper must meet the following requirements:
- The repair knife should be small for easy handling in hard-to-reach places (panel, cabinet). The blade should also be small so that when working with a bundle of wiring, you do not accidentally damage it by cutting off excess. This tool makes it easier to strip wires, especially thin ones.
- The cutting edge must be straight. It will be easier to cut a double-insulated cord if you only need to remove the outer layer and leave the inner one intact.
- The handle may not have an anatomical shape, the main thing is that it allows you to determine the tip of the blade by touch. The material of manufacture must be dielectric and also durable (plastic, carbon fiber) to prevent electric shock during installation work.
- The blade is made of carbon steel. This will allow you to maintain the required blade sharpness for a long time.
The fitter's fingers will involuntarily touch the sharpened side of the blade, and damage to the metal strands of the wire will also occur.
When cleaning the cable, it is necessary to monitor the position of the blade in relation to it (maintain an acute angle), otherwise you can cut a core of soft metal (copper or aluminum). Removal of insulation should be carried out with light movements away from you, cutting off the braid in parts.
If the tool is purchased at a retail outlet, electrical technicians should pay attention to the voltage that the handle can withstand. It's marked here
Stripper designs and sequence of their operation
DIY soldering iron
The structure of the machine for cutting wire products consists of two moving units enclosed in a massive body. The lower assembly is two bevel gears on an axle. The rollers face each other with narrowed tops in the form of a Y-shaped opening.
The roller axis is connected directly or through a drive belt to the electric motor shaft. The end of the cable is laid on the cones of the lower node.
In the upper part of the machine, a frame with a circular knife moves along vertical guides on a horizontal axis. Using the adjusting screw, the knife is pressed against the cable so that it enters the wire only to a depth equal to the thickness of the insulating coating.
Machine drawing
Once the cable is installed, the bevel gears are driven. The knife cuts the insulation along the wire. All that remains is to wind the bare wires into a compact coil or twist them into a convenient bundle.
Knife with heel for stripping cable insulation
The insulation stripper has a narrow focus and is unlikely to be used for other purposes, but its practicality makes you want to have such a tool in your kit.
Appearance of a tool for cleaning insulation from a cable or wire
Its design is simple but very effective:
- the blade is used to cut rubber or polyvinyl chloride coating;
- the heel prevents damage to the internal conductors and acts as a limiter on the depth of the cut;
- The handle makes it easy to hold the device in your hand.
Practical use of the knife
The knife has a double-edged blade, so it can open the shell in any direction convenient for the master: towards himself or away from himself.
- The heel protrusion is placed under the insulation layer to be removed so that its lower plane is above the current-carrying conductor
- With a longitudinal movement, the tool moves to the required distance, while the base of the heel slides along the vein without damaging it due to the smoothness of its surface
- Having made a cut of the required length, the knife is removed, the veins are released from the outer sheath, and it, in turn, is removed using the cutting edge of the blade.
These manipulations are accessible even to a novice master. To operate the device, you do not need special training or specific skills.
The knife cuts the upper shell without damaging the internal conductors
Safety precautions when working with the tool
The device is not a piercing object, but its cutting edge can cause harm to the owner when worn or during operation. Therefore, during transportation, it is recommended to cover the working part with a protective casing. It will also protect the knife from damage and dulling when struck by other objects or tools.
The handle of the tool is made of dielectric material, but this does not mean that work can be done with the electricity turned on. Most manufacturers indicate on their products the voltage that the product can withstand. Usually it does not exceed 1000 Volts.
On the handle you can see an inscription about the voltage that the dielectric can withstand
Tool for quickly stripping old wires
Sometimes it happens that a large number of old and unnecessary wire scraps accumulate in the workshop.
Of course, some of them can still serve in some projects, and some that have breaks inside are easier to dissolve and hand over to a non-ferrous metal collection point.
In this review, we will tell and show how to make a small machine for quickly stripping insulation from unnecessary wire scraps.
For manufacturing you will need the following materials: a round knife from a pipe cutter or tile cutter, a pair of bevel gears, a pair of sockets with bearings, a small piece of reinforcement, a few studs and some nuts with washers.
In addition, you will need a couple more sheet metal plates and some old handle. The tools you will need are: a welding machine, an angle grinder, a drill, a marking tool and several open-end wrenches.
Main stages of work
First, we cut out the required metal plate for the lower part of our machine. Mark and drill four holes in the corners. We insert the pre-prepared studs into the holes and secure them with nuts.
We cut off a small section from the reinforcement to make the shaft. We adjust it to the required size and fix the gears opposite each other with the tops of the cones.
We put sockets with bearings on both sides and install them on the studs. We fix everything through the washer using nuts.
Now you can make the cutting part. To do this, cut a longitudinal hole in the hairpin and try on the knife. If everything fits, then remove the threads on both sides of the stud and drill a hole. We fix it to a bolted connection.
The top cover is cut the same size as the bottom and with the same holes. Another hole is drilled in the center, we install a knife in it, and secure it with nuts.
Install the top cover and tighten everything with nuts. We weld a piece of metal strip to the output shaft from the gears and secure the handle for rotation. The knife is adjusted using two nuts.
Our homemade product is ready and we can get to work. To learn in detail how this tool is made, you can watch the video below. The review is based on a video from the YouTube channel DIYFixMan.
How to Build a Homemade Tool for Copper Wire Stripping - DIY
Arrangement of wires and cables.
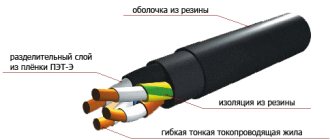
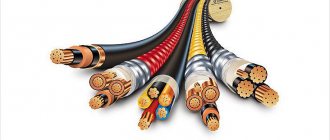
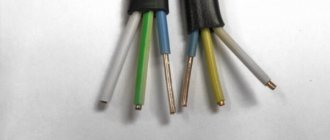
The types and arrangement of wires and cables have already been repeatedly discussed in articles devoted to this topic. For example: “Wires for electrical wiring in an apartment”, “Types and markings of wires”, “SIP wire”, etc. As a rule, a wire is a conductor (rigid or flexible) coated with PVC (polyvinyl chloride) or rubber insulation. There can be one layer of insulation, or maybe several. Sometimes silk braiding acts as additional insulation, sometimes the conductor part is coated with insulating varnish. How the cable works is already written a little higher. What is technically considered a cable is often colloquially referred to as a wire, and a stranded wire may be called a cable. Polyvinyl chloride, rubber and other non-flammable dielectrics are used as insulation for wires and cables. They protect wires from short circuits, human contact, and fire. Sometimes the conductors of a stranded wire are enveloped in a rather dense layer of insulation, which can cause difficulties when stripping. According to the type of conductor cross-section, wires are divided into two types:
- Single-wire (rigid). They are a conductor consisting of one solid conductor.
- Stranded (flexible). They consist of several very thin wires intertwined with each other.
Why cutting cables and wires is beneficial
If we approach this issue from a commercial point of view, then extracting metal from waste wire products can become a source of additional income. The average price at collection points for non-ferrous scrap metal per 1 kg is:
- copper – 400 rub.;
- brass – 240 rub.;
- lead - 100 rubles;
- aluminum – 110 rub.
Important! It is unprofitable to recycle cables and wires because processing enterprises incur the costs of removing the insulating coating from wire products to recover the metal. Therefore, delivery may cost more than the profit from delivering the insulated cable.
The metal of wires and cables contains a minimum of impurities, so it is valued much higher than any other type of scrap. With a skillful approach, you can quickly strip flexible electrical conductors in your home workshop. To do this, you will need special equipment - a cable cutting machine (stripper).
Bottom line
To summarize the above, which knife with a heel is best to choose?
If this tool is needed once for one apartment, then the best choice is a red Chinese knife. Firstly, it’s inexpensive, and you don’t mind throwing it away if it breaks. The only controversial point is checking its sharpening.
For everyday work, choose Knipex. Although its price is higher than many others, if used as intended, it will last you quite a long time. The main thing is not to dull the blade due to any extraneous stripping.
The middle option between the two above is KVT.
When you are afraid to buy at random through a Chinese online store, the main advantage of this brand is that it is easy to find on sale in many of our cities and what is called testing everything with your own hands. No tags for this post.
A simple device for stripping insulation without hassle or hassle
Any electrical installation work involves the need to strip conductors. Everyone performs this procedure in a way that is convenient for them. Some use a cutter, others use side cutters, while others invent often useless devices. However, there have long been tools on the market that can help in this matter. But how convenient and effective they are, you should understand in detail. And is it even worth spending money on a stripper or is it easier to get by with familiar tools? This is what we will talk about today.