As you know, kitchen hoods come in classic and recirculating types.
The first discharges air into the ventilation shaft or directly to the street. The recirculation system simply pushes it through itself, trapping fat. It is designed with filters to remove odors from the air.
The main questions and problems arise when installing and connecting the classic version. We will consider it in as much detail as possible.
To begin with, we will briefly list the main mistakes that await you along this path. Below we present ways to solve them and the most popular installation methods.
Mistakes when installing a kitchen hood
1 Blind connection of the air duct to natural ventilation is the most common mistake.
Some people, of course, leave a grille for natural air movement, but still manage to block it with the air duct itself.
2 Connecting an air duct of too small a diameter through an adapter to a powerful hood with a large outlet flange.
Recommended dimensions for round air ducts are d=125mm. For rectangular ones - 204*60mm.
3 Exit the air duct to the street through a homemade hole in the wall.
In most cases, this is prohibited by the rules. Specific points will be given below in the text.
You can, of course, lay a separate box along the facade straight to the roof. But is it worth it? Although in restaurants and cafes located on the ground floors of high-rise buildings, this solution is widely used.
By the way, the ban on venting air to the street through a wall does not apply to private houses, but only to high-rise buildings.
4 Complex route geometry with a large number of transitions and curvatures.
First of all, this will affect the noise. Although, of course, the turns themselves are not the greatest evil. And sometimes you can’t do without them.
It is the turns that follow one after another, without acceleration sections, that are dangerous.
5 Connecting an overly powerful hood (for example, 1000 m3/h) to a standard ventilation duct, which is capable of passing about 300 m3/h.
Remember that a productivity of 200-300 m3/h is quite enough to effectively remove all odors, with minimal load on the ventilation of the house.
6 Installing the hood at the wrong height.
The installation height directly depends on what kind of stove you have - gas or induction hob.
7 Assembling a plastic ventilation duct without a good seal, or joining parts with superglue.
Believe me, sometimes this structure has to be disassembled.
8 Upper, rather than lower, location of the slots in the decorative grille in the same frame as the air duct.
Why this is a mistake, and when it is still possible to do this, is discussed below.
9 Lack of a separate outlet in the upper part of the wall for the hood.
As a result, connecting it haphazardly, through carriers and extension cords. Do not forget that in the end this is not a portable device, such as a fan, heater or mobile air conditioner.
This means that the wiring for it needs to be done stationary and wisely.
10 Incorrect installation of check valve.
It must be embedded and installed in compliance with the appropriate angles and inclinations. Otherwise it will work every other time.
In general, installation of a hood can be divided into two main stages. The first is its connection to electricity. The second is the air duct structure and everything connected with it.
Let's look at each of them separately.
Daisy chain connection
Installing a new outlet will require laying a wire from the nearest source of electricity. You can connect to a nearby outlet by making jumpers. To connect with a cable, it is enough to use a copper wire with a cross-section of 1.5 - 2 mm. It is not necessary to trench the walls to lay a new cable. New wiring can be hidden in a neat cable duct. When connecting a built-in hood, the wiring along with the new outlet can be easily hidden inside the structure of the kitchen furniture or along its top line.
Remember! When laying a new cable, avoid multiple contact connections; let the cable be fully tensioned. Surely you are already familiar with how twists negatively affect wiring: poor contact, overheating, sparking.
Connecting the hood to electricity
This stage is the simplest. It’s very good when initially planning your kitchen, you carefully planned the location of all sockets and electrical points.
You can find out how to avoid making a bunch of basic mistakes and maintain all distances in a separate article.
If you do not have a free socket for the hood, you will have to install it. To do this you will need the following materials:
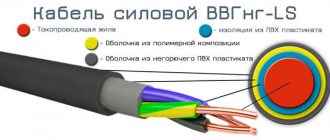
- three-core cable VVGngLs 3*2.5mm2
For home wiring, use a cable of this particular brand (with the index Ls).
- regular 16A socket with grounding contacts
The hood itself, unlike other kitchen appliances, is a low-power device. Accordingly, it is not at all necessary to pull separate wiring under it directly from the switchboard.
The same cannot be said about the hob or dishwasher.
It turns out that this unit can be connected from a common socket group from the nearest distribution box.
Pull a groove or cable channel from the distribution box to the location of the future outlet and mount the socket box.
This outlet is located on top, almost under the ceiling, slightly above or to the side of the hood itself. The choice of a specific location will depend on the length of the cord and the requirement for the minimum installation height of the exhaust unit above the stove.
Often you have to cut a hole in the nearest kitchen cabinet for this purpose.
Next, remove the insulation from the cable, mark the cores and connect them together in the junction box.
All that remains is to connect the outlet correctly.
The wiring for the kitchen unit is ready. Let's move on to the air duct.
Variety of choices
Before you go to a specialized store to make a purchase, you need to discuss the type of hood with everyone in your household so that there are no disagreements later.
Before purchasing, make the necessary calculations on how much power you need for the hood depending on the size of the kitchen.
Manufacturers of household appliances have launched the production of different exhaust systems, which not only have differences in installation, but also function differently.
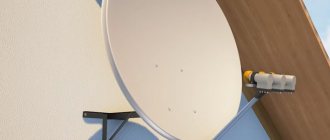
- Wall-mounted option - a large selection of case designs, it will not be difficult to choose a headset for yours. Installation is carried out above the slab on the adjacent wall.
- Corner ones are considered the ideal solution for a small kitchen, where every centimeter is precious; installation is carried out on the wall in the corner.
- Hanging type - they are flat, suspended above the stove under the wall cabinet, and fit perfectly into the interior.
- Built-in type - installed inside the headset.
- Island hoods are a universal type of hood, used in large rooms where the stove and cutting table are in the middle of the kitchen.
You made a choice and purchased the option that you think is best. Now a natural question arises: how to connect the hood in the kitchen so that everything works correctly, complying with the required sanitary standards and safety measures.
Incorrect connection of the exhaust duct to the ventilation
The main problem during installation is to correctly connect the air duct without disturbing the natural ventilation in the apartment.
Some of the craftsmen generally advise taking the whole thing out into the street, through the nearest wall. However, according to SNiP it is prohibited to do this.
It clearly states that such a hole cannot be placed closer than 8m from the adjacent window. Since this window is considered a device for supplying outside air.
Here, read the paragraphs of the set of rules SP54 and SP60.
That is, drill a healthy hole in the wall, spend a lot of nerves and money, and the neighbor will complain about you, and you will be obligated to repair it all.
How do most consumers connect? An ordinary corrugation is taken, placed on the outlet, stretched and attached to a flange, which is screwed to the ventilation hole.
That's all. Simple, cheap and wrong. What are the disadvantages of this method? First of all, the noise.
When air passes through such a ribbed corrugation, it makes extremely unpleasant sounds.
But most importantly, when your device is turned off and not working, natural ventilation is forced to draw air from the apartment through the hood. Not only can your box be clogged, but in the summer there is sometimes no traction at all (due to the same temperature at home and outside).
Moreover, you are actually putting an oily mesh, motor, turbine, etc. in the path of the air. Also, air suction will not occur at the ceiling level, but at the level of the middle of the kitchen.
Although the collection of all odors of waste products should be carried out from the maximum height.
It is quite clear that in this case there will be no traction. That is, with your own hands you are depriving yourself of natural ventilation.
This threatens the occurrence of fungus and increased humidity. In the off-season, your doors will simply begin to swell and close poorly.
There will also be a lack of oxygen and constant poor health. At the same time, someone falls into mysticism and begins to think that they have been damaged or the apartment has bad energy, but in fact, there it is - improper ventilation!
Initially, in Soviet times, when designing our multi-story buildings, engineers expected that air would flow into the apartment due to leaks in wooden windows.
However, with the installation of plastic windows and sealed doors, we thereby blocked this channel of fresh air in the house. You will also close the ventilation and you will live like in a submarine.
To correct the situation in such cases, it is recommended to install a supply valve on a plastic window.
Instead of clogging, you can do everything more intelligently. What alternative options are used for this?
Drawing a new line
This method is the most acceptable and safe. It is very popular when connecting a suspended (island) hood. The disadvantage of this method lies in the need to lay an electrical cable from the nearest junction box during renovations in the kitchen, because... work is coming on gating and plastering a section of the wall and ceiling. The new electrical wire for a suspended hood can be hidden behind a suspended ceiling. Undoubtedly, a socket on the ceiling looks unaesthetic, so a connection option via a terminal block or separate terminal blocks is suitable here. Make sure the cables are connected correctly: phase to phase, zero to zero and ground to ground.
Hood duct and grille with non-return valve
The first is that instead of corrugation, a plastic pipe is taken (for example, d-125mm), and through one or several bends it is led into the hole in the ventilation duct. In this case, a certain division is made in the hole itself under the ceiling.
An entrance to the pipe is mounted on top, and a small rectangle is left below through a grate with a valve for natural inflow.
Moreover, the grille should be at the bottom, and not at the top. Otherwise, the air flow from the hood will blow upward and lift the so-called non-return valve.
Although, of course, if you have a more advanced valve design - a circle or rectangle with an offset axis, and not simple strips of polyethylene, or there is a solid partition, then you can safely install it as you want - on top, side, bottom.
However, in fact, this whole structure often does not work as intended. When you turn on the exhaust unit and create pressure, a small part of the dust still seeps through the cracks and micro-holes, after which it safely ends up in your kitchen on the dining table.
No check valves are 100% effective. The bulk of the air, of course, goes outside, but the gradual formation of dust inside the apartment is a fact.
And even when the hood is turned off due to the reduction in the diameter of the original hole, natural ventilation through narrow grilles will be much worse.
Everything can be done much better.
Ways to improve the draft of an exhaust hood
One of the key conditions necessary for optimal hood draft over the stove is the regular supply of clean air into the room to replace exhaust air. In the cold season, this problem is quite difficult to solve by systematically ventilating the room, so the most correct solution would be to install a wall or window supply valve.
The first is made with an adjustable partition and an internal thermal insulation coating. The second option is installed by inserting into the upper area of the double-glazed window frame. The principle of operation of the device is the circulation of air flow entering through the slot and descending down the profile. Gradually heating up from its body, it leaves the room.
In addition, there is a built-in system that works in accordance with the indicators of measuring instruments that control the temperature and humidity levels in the kitchen. Such electronic mechanisms can be programmed to maintain optimal climatic conditions inside the room.
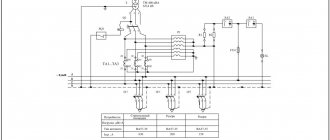
Correct connection of the air duct to the ventilation system
For this you will need:
- plastic air duct
- offset check valve
- tee splitter
In the end, you should end up with something like this.
How does it all work? When the hood is turned off, the valve will be open and warm air from the kitchen will quietly flow by gravity into the ventilation duct. As soon as you turn on the exhaust hood, the valve immediately closes automatically, blocking the air flow into the room.
In this case, all odors from the stove will easily go outside. When switched off, the pressure in the box drops and the valve automatically opens, connecting the ventilation shaft to the apartment.
Which outlet to choose
In order to protect electrical components from water, it is best to select a kitchen outlet according to the following rules:
- It is better to purchase an electric current model with protection from moisture and dust with a degree of protection in the international IP standard.
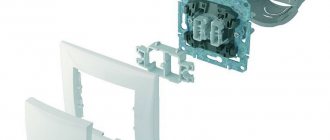
- The housing should be made of thermoplastic and have a protective shutter that covers the holes when the plug is pulled out.
Kitchen socket block with moisture protection and curtain
Assembly instructions - all numbers and performance
How does this all come together in practice? For capacities up to 300 m3/h (low speeds of most hoods), a d-125mm pipe is sufficient. On the device itself, the outlet hole may be larger.
For example, for 650 m3/h you will need a d-150mm pipe. However, you are unlikely to find such plastic pipes, and if you use the next standard size d-160mm, it will turn out to be a huge and awkward structure that spoils the entire interior and design of the kitchen.
Moreover, you will have to drill a factory hole for the ventilation duct in the wall, expanding it.
Therefore, in most cases, the optimal diameter of 125 mm is chosen. And you don’t need more.
The forced throughput capacity of standard channels and shafts with dimensions of 100*150mm is 400 m3/h.
An air flow of more than 450 m3/h simply will not fit there (it was tested in practice), even if it says 1200 m3/h on your hood!
Remember also that you cannot underestimate the diameter of the air duct too much compared to the outlet pipe on the hood. Otherwise, the vibration and noise will be so strong that the structure will have to be re-glued every month.
The connection of different diameters is made using special adapters.
Let's start assembling. First, install the adapter on the hood and connect the vertical section to it.
To improve its sound insulation, it makes sense to go crazy and stick a 5mm thick heat-sound-insulating material on top.
It wouldn’t hurt for them to cover the inside of the decorative casing and the noisiest part - the adapter. This is where the greatest turbulence occurs.
Next, add 90-degree elbows and other straight sections of duct as necessary to ultimately exit toward the hole in the wall.
All this is glued together with silicone, no superglues. There should be no gaps anywhere.
We reach the tee. A valve is installed in it from the side of the room.
Keep in mind that this is a gravity valve! It opens not due to air flow, but due to its weight.
One half of it is heavier than the other and at the same time it is installed at a slight angle of 2 degrees.
Installation of electrical outlets in compliance with the PUE
If you have already selected and purchased an outlet, you need to select its location.
The main criteria by which the location for an outlet for an exhaust system is determined are as follows.
- It is necessary to determine exactly at what height and where the hood will hang or is already hanging (perhaps the most basic rule). This is required so that when determining the location for the electrical outlet, you can adhere to other principles and restrictions (distance to furniture items).
- The shortest distance from the electrical power point to the furniture in the kitchen (countertop, cabinets, shelves) is 5 centimeters.
- The minimum distance from the electrical power source to the ventilation shaft opening is 20 centimeters.
- It is recommended to install the socket not close to the exhaust system casing, but to make an indentation of approximately 30 centimeters. In this case, the heat will not reach the power supply point, and splashes of fat and water from the hob (stove) will reach.
- A connection must be made to a grounding device, the current strength is from 15A.
- The total power of kitchen electrical appliances should not exceed 4 kW. In the case when the total power of electrical equipment in the kitchen is already equal to 4 kW or exceeds this value, it is necessary to install its own line for the exhaust system in order to avoid overloading the electrical network when all appliances are operating simultaneously.
- The outlet must be freely accessible and not blocked by equipment or furniture, at least heavy and bulky furniture. First, you need to see the state of the power point. Secondly, if it or the electrical wiring fails, you will need to move away the appliances and furniture (and in the kitchen it is often impossible to move a separate piece of furniture).
Preparing the ventilation shaft hole
Before all installation work, it is advisable to plaster the entry into the ventilation shaft itself and remove all sharp corners. This will give the entrance maximum aerodynamic qualities.
You should end up with approximately the same surface as a standard 90 degree round elbow.
It is recommended to add ceresit liquid (ceresit CT99) to the plaster solution.
This hole will be exposed to fat and moisture. And ceresite contains components that prevent the formation of mold.
However, do not use gypsum plaster under any circumstances. Its use in ventilation shafts is a direct path to the appearance of mold and fungi.
Attach sections of a standard air duct to the tee on both sides. From the side of the wall, 5-7 cm, wall it up in the ventilation duct. The exit itself is decorated with a square frame.
Additional recommendations
When deciding how to install the entire set of equipment, it is necessary to take into account the nuances of the equipment itself and the features of the room. This will increase the efficiency of the equipment and help avoid possible troubles during operation:
- It is advisable to equip the ventilation duct with a shut-off valve with a throttle operation; when the hood is turned off, it closes and does not allow heat to escape from the room;
- the grille must be equipped with holes for natural air flow;
- if the installed kit is located in a private house, the channel should not be removed from the basement, which will avoid unpleasant odors;
- for such conditions, the outlet of the channel to the outside should be made from the leeward wall, where the efficiency will be higher;
- in old buildings, where there is only one ventilation shaft for several apartments, consultation with a specialist is necessary, he will help you choose a model with optimal parameters that will not drive odors into the neighboring apartment;
- Perhaps a circulation installation option is better suited for such situations.
Proper installation of ventilation equipment will ensure its efficient and uninterrupted operation. The kitchen space will become much more comfortable for everyday use. If your own knowledge and experience is not enough for proper installation, it is better to use the services of professionals. This will allow you to avoid additional and significant costs for correcting errors and reinstalling the entire set of equipment.
Why does the check valve sometimes not work and close?
On the kitchen side, a check valve is mounted on the tee. In the factory version it will be quite long. In this case, it is better to shorten it so that this “gun” does not stick out too much.
The valve is inserted inside a section of a standard air duct d-125mm, and this air duct is put on and siliconized onto the tee.
If this whole structure seems too cumbersome to you, and the protruding pipe with the valve is not very aesthetically pleasing, you can do it a little differently. You make the air duct not with a round pipe, but with rectangular channels.
In this case, you install the above check valve on a straight section, as close as possible to the turn.
You can't achieve a factory connection here, so you'll have to farm collectively. Buy a rectangular tee with a round outlet on one side. Next, this round timber is cut off and a check valve is glued in its place.
The valve is placed strictly at an angle (2 degrees). Otherwise, it will open every once in a while or not open at all.
Many people have encountered this problem and easily solved it this way.
The damper itself is also mounted with a vertical deviation. The upper turning point, based on the hour dial, is at 13.00 (1 o'clock), and the lower one is at 17.00 (5 o'clock). This is if your flow direction is from right to left.
Otherwise, the circle is placed at the 11 o'clock - 7 o'clock position.
For more reliable operation and stable opening of the damper, you can stick some kind of weighting material (no more than 2 grams) on one side. Glue it close to the edge.
By the way, do not throw away the previously cut round pipe. It is tightly inserted onto the valve from above, after which a decorative grille diffuser is mounted on it.
What nuances might there be with this method? If your hood stands exactly above the entrance to the ventilation shaft, and the duct pipe goes straight, without any turns in the horizontal plane, then the valve installed on such a straight section does not work normally, at least at 1st speed.
You will simply have nowhere to get the increased pressure to close it. The air will fly through this “turn” in a straight line. You definitely need an angle.
The valve cover and its rotating mechanisms are easy to clean and do not be afraid of them becoming overgrown with grease. For this to happen, you will have to fry huge wild boars on the stove and stew them in your oven for several hours a day, no less.
If you don’t want to see a protruding “hollow” under the ceiling at all, then, as an option, you can install a tee so that the middle elbow rests against the wall, otherwise, where the valve is located, it would look to the side. In this case, also close the hole with a decorative cover.
Everything will look much nicer. However, due to the additional rotation, the performance of natural ventilation will deteriorate slightly. And the grill will reduce it by another twenty percent.
In addition, it will no longer be possible to clean the channel by hand or with a vacuum cleaner. But many do this deliberately and even hide the entire structure in a wooden or plastic box.
As they say, beauty requires sacrifice.
Operation, care
The instructions say: change the aluminum grease filter every two months. We would venture to guess that the instructions in the original language contain something like renew, which is translated as updating. Rather, the grease filter should be washed once every two months, avoiding buying a new one. Otherwise, the device will become an expensive purchase; in a year, maintenance will consume three times more money than the cost of the unit. Check with the manufacturer. You can do it yourself after purchasing. Just try to wash the grease filter, if the accessory returns to its previous condition and becomes as good as new, quickly continue using it.
The carbon filter will have to be changed. The large size is not so alarming as the renewal period - 2 months. The manufacturer is not so cruel, he specifies a period of six months, since the carbon filter costs money. The instructions say: regenerating or washing components is unacceptable. More like the truth. The carbon filter is located above the grease filter and is used in the recirculation mode, when the air simply circulates around. Not the best option for a gas stove; for an electric one, nothing more is needed.
Annoying: the name and type of carbon filter are not indicated. A direct search engine query regarding the type of kitchen hood in question is powerless to give a positive result. Cunning dealers are annoying when they write: the Hansa FWU 60 carbon filter is not available, but can be ordered. The price is kept silent. We find it difficult to calculate the cost of operating the product and have no desire to call to make inquiries. The reader will have to take the steering wheel. In this review we consider the installation of a kitchen hood, not the problems of stubbornness.
The components cost 250-800 rubles. Manufacturers identified. Avoid buying something for free and take a kitchen hood. Expensive carbon filters can last six months, cheap ones - two months. A simple calculation shows: we exchange the awl for soap. After a year, the cost of the product will be covered. An expensive kitchen hood, of high quality, requires similar operating costs.
Installation of a kitchen hood is carried out according to the instructions. Manufacturers' settings are specific, so don't think that kitchen hoods are alike, like twin brothers. All that remains is to say goodbye.
Why does the air from the kitchen get to the neighbors - is the hood to blame?
Despite all the advantages, such a hood connection system has many critics. They believe that in this way you are rudely interfering with the overall ventilation system of the entire house.
For example, everything will be fine with you, but have you thought about your neighbors? Allegedly, due to this connection of the hood to the ventilation, all odors from your kitchen will automatically penetrate into the apartments through the riser above.
They started frying pies, and all the neighbors already knew about it. However, all critics are mistaken based on misconceptions about the ventilation system in apartment buildings.
They think that from bottom to top there is one common channel 110*150mm with “holes” for each apartment.
In fact, in 5 floors, all the channels are individual and you are unlikely to be able to blow out extraneous odors from your neighbors. In houses of 6 floors and above, there is already a ventilation system with air removal through satellite channels, connecting to a common collection channel through one floor.
This common channel has a cross-sectional area 6-8 times larger than individual shafts in apartments with dimensions of 110 * 150 mm.
Schematically, such a ventilation system for a multi-story building can be represented like this.
Yes, in such buildings, if several hoods are turned on at the same time to the maximum, reverse draft may occur. But this is an extremely rare case.
Look - the natural draft from apartments, at best, ranges from 100 to 150 m3/h. You have a nine-story house. The first seven floors are embedded in a common channel measuring 510*270mm, or even more. The total natural flow in it is about 1000 m3/h.
And then, instead of the usual draft of 150, you turn on your hood at 300 m3/h. Do you think it is capable of creating reverse draft in this case and starting to expel air to the neighbors?
To do this, it is necessary that all 6 floors do the same thing, and at maximum speed.
Then one apartment will be unlucky and its inhabitants will have to smell all the aromas of their neighbors’ cooking. But this option is unlikely.
Despite all this, sometimes the air from your kitchen actually gets into other apartments in the house. Or, on the contrary, you have a great feeling that your neighbors are grilling you for lunch today. Why does this happen and where to look for the reason?
This happens for several reasons. For which ones, read in more detail under the spoiler.
Why does the smell from your apartment penetrate to your neighbors?
Drilling work
Using a hammer drill, make holes in pre-marked areas. You should also make holes for attaching the grille. To perform work on fixing the hood, you will need a drill with a diameter of 8 mm. The finished hole is “hammered in” with a 50-gauge dowel, into which 50 mm self-tapping screws are screwed. To fasten the grille, a drill with a smaller diameter is used, and, accordingly, smaller fasteners: 6 mm will be just right. After installing the fasteners, the grille itself is fixed. As a rule, the ventilation grille is fixed with four self-tapping screws.