How the hood works
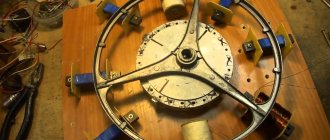
Before you start repairing the hood with your own hands, it is worth understanding its structure. This technique can be of an exhaust (discharge) or recirculation type (the air is cleaned and released back), but in both types the main working element is always an asynchronous motor (8).
In addition, such a technique will necessarily have a fan (2), which may be axial or tangential. The axial one consists of blades that “draw” air inside. The air flow will pass along the axis of rotation of the engine. Tangential type fans have blades evenly spaced in a circle. Such a fan is preferable - its operating principle provides increased efficiency.
There will definitely be filters in the hood. For example, a budget carbon filter (9) is placed on the round inlet window of the motor, and a more expensive filter structure with carbon granules will be one that has a rectangular shape and is installed immediately behind the fat filter. The grease filter, in turn, is located immediately behind the working surface (12). There are also fabric filters and impregnated paper products (disposable), but now mesh reusable metal grease traps are most common.
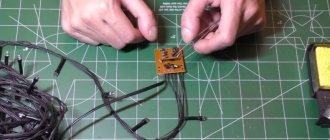
As for the control panel, it can be of a touch or mechanical type, but will always be a common unit, as shown in the photo below.
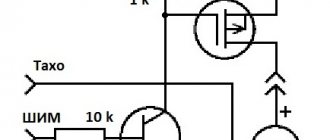
If the device provides for changing speeds, then there must be a circuit that generates the control voltage. The design is also complemented by lighting. These can be incandescent, halogen or LED lamps.
Repairing a hood with your own hands is not difficult if you follow a certain algorithm. It is clear that first you need to decide on the problem.
If the hood breaks down and does not turn on, you must check the functionality of the built-in lighting. In this way, the integrity of the power circuit and the correct connection to the outlet are monitored. If the lights work, then the problem is with the motor or control system, in which case you need to buy new parts that fit your hood model and are approved by the manufacturer.
Spare parts for kitchen hoods are sold in specialized stores of spare parts for household appliances and in online stores.
A little excursion into history
Modern people are calm about a million things that would previously have seemed very strange, without thinking at all about where they came from. But even a kitchen hood did not always exist. Initially, all ventilation of cooking rooms consisted of draft created by the stove pipe and open vents. Accordingly, it was very difficult to be in such a space. Just imagine - heat, fumes, smoke, smell, reflections of fire on the walls, periodic gusts of wind (drafts) - purgatory. Only devils are missing, although people who burned the stove with wood could easily pass for them because of the soot settling on them.
They tried to solve the urgent problem with ventilation in different ways - they placed air holes in the walls, creating a constant draft, opened windows and vents, or came up with a million other ventilation methods. But until the first kitchen hoods appeared in the 20th century, all attempts to create a clean atmosphere were ineffective.
Since 1955, the Italian company Faber began supplying ventilation that is most similar to modern ventilation - kitchen ventilation. Its popularity was so high that in a short time many companies were formed that produced similar equipment. Through their efforts and proper advertising, kitchen hoods quickly conquered the markets of Europe and America. Closer to the 90s of the 20th century, they stood in houses located in almost all parts of the world.
Despite the presence of many models on the market, the internal differences between them are minimal, and the principle of operation is always the same. Air enters the device from one side, moves through the filtration system, leaving behind debris and grease, and then exits from the other. The input part is the side of the device that is mainly aimed at sources of unpleasant odors. The exit is carried out in a cycle back to the kitchen, built-in ventilation system or directly to the street.
How to change the hood motor
- Turn off the power supply to the hood.
- Remove the filters by pulling the tab. Unscrew the bottom panel of the hood, holding it from below so that it does not fall.
- Disconnect the backlight wire connectors, this way you will disconnect both panels from each other.
- Remove the hood or remove it from the cabinet by unscrewing the screws and place it carefully on the floor. Attention, the hood is heavy, so it is advisable to remove it with a partner.
- Remove the fan from the engine by releasing the spring clip or other fastener.
- Now you need to remove the engine. To do this, disconnect the green ground wire from the screw on the hood body, and then cut the wires connected to the motor. Remove the 3 screws from the mounting plate as shown in the photo below, remove the plate and pull the fan motor out of the hood.
- Connect the new motor to the mounting plate, then place it in the hood body, ground wire back.
- Reinstall the fan blades using the spring clip. Install or build in the hood in its place, fasten all the body panels back and connect the power supply, check the operation of the new motor.
Disassembly
Of course, each specific model from any manufacturer has its own design nuances, however, all kitchen ventilation units are similar in structure. And first, to repair a kitchen hood, you need to disassemble it.
The disassembly procedure is as follows: the filter elements are disconnected at the bottom of the structure. They are often made entirely detachable from the unit body to facilitate access to the carbon and grease cleaner. After them, further inside the case, a protective panel can be located, which is dismantled by unscrewing the outer fastening bolts. By removing the interfering element, you can gain access to the very filling of the device. Next, if there is a lighting panel, it is removed. Going deeper is the control unit, which is quite easily detached from the common frame - it is attached to the body with a pair of bolts or a plastic latch. From it comes a power wire, an engine control cable, and a lighting line. Before removing the block, they must be removed from the connectors.
Attention! Before starting to work with the hood, unplug it from the mains - a rather serious 220 V electric shock is possible.
After that there will be an impeller block. The dismantling procedure begins with removing the retaining ring of the element and disconnecting the group of planes themselves from the motor. Next, connect the engine to the unit housing. Here, just as in the case of the control unit, bolts can be used that secure the engine to the common casing or plastic latches that need to be gently pressed with a screwdriver to release the component from the stops.
What to do if the control panel is broken
If the motor runs all the time but does not change speed, then in 92% of cases the problem lies in the control panel. It’s better and easier in this case to just buy a new one and replace it; repairing the board yourself is quite difficult.
Now let’s look at possible minor hood malfunctions.
Summary
Having chosen a hood by carefully selecting it to match the color and design of the kitchen unit, you are faced with a choice: turn to professionals for help in installation, paying a substantial fee for installing a kitchen hood; or hang it yourself, after reading our article.
The most important thing when installing a kitchen hood is: objectively assess your strengths and the possibility of receiving help from household members; evaluate the instrumentation before starting work; understand the instructions included with the hood and believe in yourself.
Source
What to do if the hood does not turn on
There are several possible problems here:
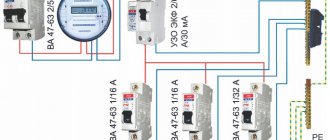
- The device may not be connected to the electrical network. You need to check both the fact of connection and the presence of voltage in the outlet.
- The functionality of the switch is checked by a tester. If this element does not “ring”, it must be replaced.
- It may turn out that there are problems with the power supply. They can occur due to a breakdown of the machine or failure of the fuses.
- The power plug may also fail. By the way, the plug may have a built-in fuse that may blow out - in this case it will need to be replaced.
- The internal wiring of the device can also cause malfunctions. It must be checked with a tester, and any bad contacts found are eliminated by tightening the screws or crimping the tips with pliers.
- But electric motor malfunctions require major repairs and professional intervention.
Preparing to Clean the Grille
Each model of kitchen hood has a manual for disassembling the equipment. Before you remove some of the parts yourself, you need to familiarize yourself with it. Sometimes the circuit is placed on the outside of the hood itself or under the housing cover. The methods for attaching spare parts are different for all models, but the disassembly algorithm for cleaning is similar:
- First of all, you need to disconnect the kitchen hood from the power source.
- The upper part of the housing is removed.
- Then you need to remove the metal grill. Fasteners are usually used as fastenings, which can be snapped off with light pressure.
- If there is a carbon filter, it must also be removed.
- The last pipe to be unscrewed is the one that carries dirt and soot into the vent.
In order for the hood to work as efficiently as possible, in addition to the metal mesh, it is also necessary to clean the clamps holding it and the profile pipe. If you need to wash the kitchen hood body, it is not necessary to remove it.
The hood works, but does not eliminate odors
If there are still foreign odors in the kitchen when the hood is running, then most likely the problem is in the filter. The efficiency of the hood decreases if it is not replaced (not cleaned) in a timely manner. For example, the carbon filter located immediately behind the air intake grille must be replaced approximately once every 3 months. This type of filter can be dismountable, in which case only the carbon granules are changed (photo on the left).
Disposable grease filters (paper and fabric) must also be replaced. They are not restored and cannot be washed. But metal mesh structures need regular cleaning (they can even be washed in the dishwasher - approximately once a month).
If you are sure that the problem is not in the filter, then you can solve the problem as follows - increase the operating time of the device, turning it on a few minutes before turning on the burners and turning it off a quarter of an hour after the stove is free.
Causes of breakdowns
Most often, malfunctions in the operation of hoods can be corrected independently. First of all, you need to read the instructions for the device. Famous manufacturers such as Shindo Domestic, Faber. Turboair, France, Pyramid, Elikor and others indicate typical malfunctions and options for eliminating them in their instructions.
The most common breakdowns are: decreased performance, inability to control speed, appearance of extraneous noise, disappearance of lighting, lack of response to switching on.
Motor failure is usually due to overheating. Working in conditions of hot steam removal at high power, the device, due to clogged grease filters, receives insufficient cooling, which leads to its heating and burnout of the windings. Therefore, it is necessary to monitor the condition of the grease filters and clean them regularly.
It’s easy to check if the filter is clogged - you need to hold a sheet of thin paper with the hood on to the filter grille and see if it is attracted to it - if not, then cleaning will be required. A clogged filter also affects the overall performance of the hood.
How to keep working
- In order for your hood to work as long as possible, you should change and clean the filters in it on time. Modern models are equipped with special sensors (buzzer or light bulb) that indicate the need for replacement;
- To prevent overheating (breakage) of the engine, it is necessary to prevent operation of the device with gas burners operating without utensils;
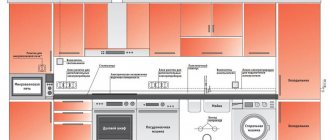
- In addition, the minimum installation height of the working surface of the hood must be maintained - 70-75 cm above the gas stove, and 65-70 above the hob.
Support the project - share the material with your friends on social networks:
Features of installation of built-in and island appliances
As for built-in models, they are installed in special niches in kitchen furniture. Such hoods are secured using self-tapping screws screwed directly into the furniture material.
When selecting the length of the screws, it is important to follow the manufacturer’s recommendations so as not to inadvertently flash through the furniture wall.
The logic for installing an island hood is similar to that of a conventional hood, which we wrote about just above. The only significant difference is that the device is mounted not on the wall, but on the ceiling.
Checking and installing the ventilation shaft
It is with these works that any installation of a kitchen hood should begin. If there is a problem with the shaft, then none of the most modern and powerful systems will improve indoor air quality. If you install a hood in a new home, the functionality of the vertical channel may be impaired. The reasons are various, but most often these are gross deviations from building codes and regulations. There is no natural ventilation - call representatives of the construction company to fix the problem. In our case, the ventilation passage was clogged with mortar during masonry work.
The ventilation passage was clogged with solution
It is necessary not only to clean it, but also to install a hood with a check valve to ensure continuous natural ventilation. This is a strict safety requirement; if it is violated, gas workers will not give permission to connect the kitchen stove.
Ventilation duct after cleaning
Step 1
. Remove the decorative grille and inspect the shaft. Widen the hole slightly and align the edges of the hole.
Step 2
. Install an MDF board of the appropriate size into it, secure it with two spacers. A plate is required to prevent clogging of the channel with solution.
MDF board installed
Spacers
Step 3
. Make a box according to the dimensions of the connected air duct; a check valve will be installed in it. The device operates only when the hood is turned on; it is constantly open. Due to this, the mandatory requirement of gas workers is fulfilled.
Box
Step 4
. Attach two rods of metal fittings to the wall. To do this, fix the dowels and use them to install the rods.
Two rods of metal reinforcement
Step 5
. Prepare a cement-sand mortar, be sure to add a special liquid to it that inhibits the proliferation of fungi and pathogenic microorganisms. The fact is that the hood captures fat and delivers it into the canal; special additives are used to prevent negative consequences.
Mortar mixture and liquid that inhibits fungal growth
Step 6
. Level the box and fill it with solution. The next day, the solution will gain sufficient strength; use a sharp metal object to disconnect the box from the mass and remove it.
The box is leveled
The box is fixed with mortar
Practical advice. It is much easier to free the box from the mass with a hacksaw blade for metal.
The box is removed by sawing
Do not rush, the solution has not yet reached maximum strength and may be damaged. Experienced builders advise wrapping the box in several layers of plastic film before installing it in place. After the mass hardens, the element can be easily removed from the ventilation shaft.
Mine after removing the box
Step 7. Insert a plastic pipe into the hole and also fill it with mass. You need to form a round hole. Work carefully, do not clog the channel, do not allow solution to get into it.
Plastic pipe
Pipe fastening
Forming a round hole
The wall is sealed with gypsum plaster
Never use gypsum plaster when making holes. This is very bad material in all respects. What is important for the mine is that it is hygroscopic and absorbs a lot of moisture. Mushrooms and mold will certainly appear on such a surface; over time, the affected area increases, and brown spots will appear on the front surface of the wall.
Plastic, metal and cement mortar are excellent at transmitting noise generated by the vibration of fan blades. During operation of the hood, unpleasant sounds are heard in the room. To reduce them, practice recommends covering all pipelines in places of contact with the vertical ventilation duct with noise-absorbing tapes. It can be ordinary thick tape, the specific material does not matter. The main thing is that it is plastic and absorbs multidirectional dynamic forces.
The pipe is covered with noise-absorbing material
The pipe is inserted into the previously prepared hole
Silicone sealant is applied around the pipe
Air duct assembly
Check valve installed with silicone sealant
Now all that remains is to thoroughly level the surface of the wall near the prepared entrances and then proceed with the installation of the hood.
Washing with store-bought cleaning products
Specialized products such as “Shine Anti-grease”, “Shumanit” or “Azelite” do an excellent job of cleaning the filter. They completely eliminate stubborn fat and are packaged in containers with a dispenser. They are easy to use. The composition is applied to the grill and left for 10–15 minutes, after which it is thoroughly washed off.
Oven Cleaner is great for removing old grease from plastic parts.
Among the ingredients of cleaning products there are alkalis, so the effect of the composition is first tested on a small area.
If the hood has not been sanitized for many months, you can use radical fat solvents, for example, clean it with “Mole” or another product that removes fat and impurities that are difficult to dissolve in water:
- The grate is placed on a tray and the product is poured so that it covers it.
- A lot of foam will appear.
- Once the foaming stops, the dirt can be washed off.
The technical means contain alkalis or acids in a decent percentage, so they must be used according to their intended purpose. Such active reagents should not come into contact with kitchen work surfaces.
Cleaning the fan
To clean the hood fan from oil and mucus accumulated on the blades, it is best to use a brush and a minimal amount of moisture to prevent it from getting inside the rotating mechanism. After global cleaning, it is not recommended to turn on the hood for the next 24 hours, so that moisture, if it gets on the electrical circuits, does not cause equipment failure or fire.
These are the main ways to clean your hood from grease, dirt and dust. Nothing complicated, you just need patience, desire and a lot of work.