Moreover, they are universal and allow you to install not only infrared, but also any other type of device, for example, oil or convection. The options presented below are arranged from simplest to most complex. Each subsequent one eliminates the shortcomings of the previous one and gives new opportunities to the consumer, but at the same time installation becomes more complicated and increases the amount of materials used.
Basic connection diagrams for infrared heaters
1. Direct
2. Through a thermostat plugged into an outlet
3. Through a stationary mechanical/electronic thermostat
4. Via thermostat and contactor
How to connect a thermostat to an infrared heater
With the onset of cold weather, many begin to think about additional heating of their homes. Since with the beginning of the heating season, as a rule, repair work begins at the sites of heating main breaks.
Or thoughts arise to switch to electric heating as an additional alternative for a country house.
In this article we will talk about a temperature-controlling device - a thermostat, and we will talk about how to install and connect a thermostat to an infrared heater.
Installation nuances
We will not go into the types and types of regulators, or arrange comparisons and tournaments. They are all good in their own way and will fulfill their purpose, serving faithfully
The first thing you want to pay attention to is the installation location. Doesn’t depend on what type of heaters you have: infrared, panel, underfloor heating, convection
Installation of a thermostat with an air temperature sensor is prohibited in the following places:
- in close proximity to heaters;
- in places where there is a draft;
- in the heating zone of infrared emitters.
All these places are unsuitable for placing a thermostat, since when located near the heater, the air next to it will heat up to the desired temperature earlier, which will lead to false operation, as a result of which the room will not heat up to a comfortable temperature.
If you install the thermostat in the heating zone of the IR heater, its body will heat up earlier and distort the sensor readings. In places where there is a draft, the sensor will not show the desired temperature and the heaters will overheat the room, consuming excess electricity. The height of the temperature sensor should be placed in the comfort zone, at a level of 1.5 meters from the floor.
Connection diagrams
Always, before installing and connecting the thermostat, read the instructions and passport data for the device. Since the manufacturer indicates the required cable cross-section and provides a connection diagram for its products. If you deviate from the requirements and save on wires and thermostats, there is a high probability of equipment failure or fire hazard.
To connect heaters, it is usually recommended to use a 2.5 mm three-core PVA wire. It is recommended to connect the thermostat with the same wire.
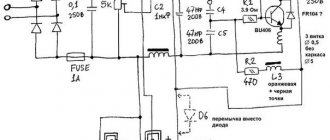
Connection diagram of the thermostat to an infrared heater with a power of up to 3.5 kW:
If the room is heated by a group of heaters up to 3.5 kW, then the connection diagram will look like this:
If you are the owner of a three-phase network and heating is carried out by a group of heaters with a total power of more than 3.5 kW, then a magnetic starter is added to the control circuit, which is controlled by a thermostat:
This is the principle used to install a temperature controller.
As you can see, there are some features in installing and connecting the thermostat, so it is important to first read the instructions from the manufacturer and then proceed with the main process.
Finally, we recommend watching a video that clearly demonstrates the technology for connecting contacts using the example of a fairly popular thermostat from Ballu BMT-1:
Manufacturers
If we talk about manufacturers, then it is easy to find various types of thermostats for IR heaters for a summer cottage on sale. Moreover, both mechanical and electronic. Solutions from domestic companies that combine durability, quality and an affordable price are considered quite popular. European, Japanese and American models of thermostats are considered popular. If we talk in more detail about specific models, then first we should name a regulator called Ballu BMT-1. This device is a fairly affordable mechanical thermostat that works with infrared heating devices from this manufacturer. The advantages of the model will be the ability to work with 1-phase devices with a power of up to 2 kW and the presence of a fairly large control range. Another advantage is that the Ballu BMT-1 body is made of very durable plastic.
The next model, which is also quite popular, is Easter RTC 70.26. This electromechanical type thermostat is used in heated floors equipped with infrared heating devices. It has a remote-type sensor that measures the necessary indicators and transmits a signal to the main control unit. It is very easy to use, versatile and can work with most heating devices up to 3.5 kW.
Another good device is the Eberle RTT-E 6121. It belongs to the category of electromechanical overhead devices that have manual controls. The temperature control range is from +5 to -30 degrees Celsius
It is important that this device allows you to control several heating devices at once, the total power of which will not exceed 3.5 kW. Also, a distinctive feature of the device will be the ability to use it in rooms where the humidity reaches 95 percent
It is based on a bimetallic plate.
Another model that is extremely popular among consumers is Terneo PRO. This is a programmable electronic thermostat, which belongs to the expensive price segment. Thanks to the presence of the cloud, the device can store all the data about the settings and operation of the infrared heater, which makes it possible to view the necessary information from a smartphone or tablet. Moreover, there is a special application for working with this thermostat model.
For fans of domestic products, the best solution would be BiLux T08. This is a programmable thermostat from the domestic manufacturer of the same name. It is equipped with a pleasant backlit screen, which is classified as a touch screen. It features the highest class of moisture resistance and has a very durable body made of plastic. Has two control modes:
- programmable;
- manual.
Electrical installation work connecting the thermostat
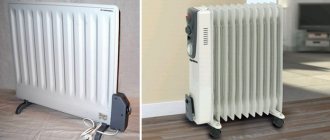
Infrared heater: manufacturers and types
It’s worth mentioning right away that the location for the thermostat needs to be chosen carefully. It is advisable that it be located in the opposite corner from the place where the heater is installed. This way you can definitely guarantee yourself the optimal temperature in your home.
How to connect a thermostat to an infrared heater:
- Initially, you need to connect the contacts of the electrical plug to the terminal blocks of the thermostat; they are installed on the housing.
- Each socket received its own designation: L – phase, N – zero. The number of zero and phase terminals is two. After all, you need to install in the following sequence: “From the network to the regulator - “From the thermostat to the heater.” This is how everything looks on the diagram.
- We clean all the contacts and insert them into the terminals, checking that they are well secured. Remember about the light marking, it will help prevent mistakes.
Advice! If you decide to install one thermostat for two infrared heaters, the regulator in this case should be installed in the coldest room.
Connecting an infrared heater yourself
Conclusions and useful video on the topic
Types of thermostats and their comparison:
By choosing the optimal thermostat model and correctly installing it in the outlet, you can make your life much more comfortable.
Now, in order to maintain the desired temperature in your home/office, you don’t have to constantly pay attention to the heater, turning it on and off. The thermostat itself will control this process, taking into account the settings set by the user, which will help to save energy.
Are you looking for a practical and convenient plug-in thermostat? Or do you have experience using such devices? Please leave comments on the article and share your impressions about using thermostats for heaters.
Selecting a thermostat
Gas infrared heater - a reliable assistant in the fight against the cold
Connection diagram for infrared heater.
One of the main characteristics of a thermostat is its maximum power (current)
Therefore, when choosing this device, you need to pay attention to this value. The thermostat can simultaneously control the operation of several heating units, so there can be one for the whole house
In this case, it is important to observe one condition: the maximum connected load must be 15% higher than the total power of the IR heaters. . For example, the controller power is 3 kW, and 3 heaters are used to heat the house: 1 kW, 1 kW and 0.5 kW
Their total power will be: 1+1+0.5 = 2.5 kW. Therefore, to control their operation, one 3 kW thermostat is sufficient (2.5 * 0.15 + 2.5 = 2.875 kW).
For example, the controller power is 3 kW, and 3 heaters are used to heat the house: 1 kW, 1 kW and 0.5 kW. Their total power will be: 1+1+0.5 = 2.5 kW. Therefore, to control their operation, one 3 kW thermostat is sufficient (2.5 * 0.15 + 2.5 = 2.875 kW).
Wi-Fi controlled devices
This option implies increased expenses compared to all previous ones. At the same time, such a thermostat can be controlled via calls or SMS, and via the Internet.
It is only required that Wi-Fi function in the space where the device is located.
Connecting an infrared heater in stages
Connecting a heated floor to a thermostat
Initially, you need to choose the place where the infrared heater will be installed. It can be installed on:
- Wall.
- Semi.
- The ceiling.
Here everything depends only on the preferences of the owners, but please note that it is better to install it in an open place where nothing will interfere with heating. . How to connect an infrared heater
How to connect an infrared heater
- When you have chosen a place, you need to make calculations and mark where the fasteners will be installed. We recommend using “Level”, it allows you to set everything up easily.
- Next, we make all the holes; if the wall is wooden, you can use a drill; if it’s concrete, you can use a hammer drill.
- We insert our structure, drive in the dowels and screw in the brackets.
- We install the heater in its rightful place.
Now that the first stage is behind us, now we move on to a more complex one.
Types of thermostats
Thermostats are divided into mechanical and electronic. The price of the latter is higher, as they can perform a number of additional functions. Each type will be discussed in more detail below.
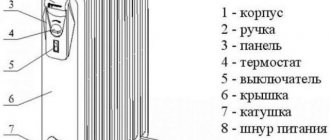
Mechanical thermostat diagram.
Mechanical regulators are produced by many companies, but they differ little from each other. Almost all models are mounted on the wall in a mortise or overhead manner, which allows them to be connected to any type of wiring.
Inside the device there is a thermocouple, the sensitivity of which determines the accuracy and price of the entire device. The standard error is no more than 0.5 °C. The adjustment limit is 5-30 °C. Thermoregulators for IR heaters are similar in principle to relays, which are activated when the temperature rises or falls to a given value (there are input and output contacts, and the regulator’s task is to close and open them). The operation of this device is completely mechanical, that is, it does not need to be powered from a stationary 220 V network.
Electronic regulators are distinguished not only by the presence of a liquid crystal display and clarity of operation, but also by the ability to program the operation of the heater for the day, week or month in advance. What must be done manually on mechanical devices is done automatically here. This is very convenient: if you are at work or on a business trip, the infrared heater can operate at minimum power, periodically warming up the room, and heating the air to a comfortable value can be started 10-20 minutes before you return home.
Infrared heater Ballu BIH-0.8. Kirovograd
Specifications:
Power consumption: 0.8 kW
Minimum installation height: 1.8 m
Min. distance when staying in the heating zone for a long time: 0.7 m
Net weight: 3.8kg
Gross weight: 5.0 kg
Device dimensions (WxHxD): 1190x45x150 mm
Dimensions in packaging (WxHxD): 1210x58x170 mm
Infrared heaters BALLU BIH-0.8 are modern, economical heating devices for directional heating. They are indispensable for local heating of work areas in rooms with high ceilings or poor thermal insulation, where the use of traditional heating methods is ineffective. The possibility of local installation above the place where people are located ensures economical energy consumption.
The thermal radiation of infrared heaters, like sunlight, is not absorbed by the air and reaches the heated surfaces with virtually no loss. Heat is transferred to dense objects (floors, walls, furniture), and from them to the air, which allows you to quickly and evenly warm up rooms. In addition, a lower air temperature in the room (at a comfortable temperature - on the surface of objects, floors and walls) creates the effect of freshness. Infrared heaters operate silently, do not overheat the air, and do not create a burning smell or dust circulation. And their placement on the ceiling allows you to keep the work area free and prevent the possibility of burns.
Purpose
Main: main and additional heating of premises, local heating of working areas in premises.
Additional: cleaning surfaces from ice and snow and maintaining them in this condition, heating and drying materials.
Scope of application
Workshops, warehouses, industrial premises, construction, repair, unloading sites, transport hubs and entrances to them, greenhouses, livestock farms, winter gardens, storage facilities, sports complexes, shopping and exhibition centers, shops, cafes, offices, private houses, terraces, gazebos etc.
Distinctive features
- Efficient heating of rooms with high ceilings or poor thermal insulation
- Possibility of local application
- Comfortable, even heating
- High energy efficiency
- Does not burn oxygen and does not create a burning smell
- Ceiling installation keeps work area clear
- Highly efficient radiant panels made of a special aluminum alloy with longitudinal corrugation and anodizing (coating thickness 25 microns!)
- Double-layer lining made of heat-reflective materials
- Easy to install, mounting brackets included
- Possibility of connection to a thermostat
- 2 year warranty.
Connecting the regulator to an infrared heater
To ensure high-quality operation of the thermostat, it should be mounted in a place free from exposure to any heat sources, including sunlight. The height of the installation site should be 150 cm from the floor level. It is recommended to lay a layer of thermal insulation material between the wall and the device to prevent the negative impact of low temperatures on the accuracy of the system. A separate device must be installed in each room, which can control the operation of several heaters installed in a given room.
After installing the thermostat in the selected location, wires from the infrared heater are connected to it according to the diagram. At the same time, some schemes require a serial connection of the heater through a thermostat, and some require a parallel connection. Parallel connection of several heaters to one controller is shown in Figure 1.
All manipulations must be carried out with the power turned off. However, the connecting wires are not included in the thermostat kit, so you must purchase them yourself. If the current load exceeds the maximum permissible value, which is 16 A for mechanical regulators and 8 A for electronic regulators, several regulators or a contactor must be used.
The demand for infrared systems is increasing every year. This is mainly due to the fact that their operation produces heat similar to the energy of the sun's rays. Using an infrared heater connected through an electronic or mechanical thermostat, you can create comfortable living conditions without drying out the air in the room.
Types of devices
Various types of thermostats for heaters are distinguished according to numerous characteristics. By installation method we can distinguish:
- A stationary thermostat, it is fixedly placed in the wall and connected to the wiring there;
- Rosette, otherwise portable, it can be placed anywhere in the room, and can also be taken to other rooms.
Based on the placement of the temperature sensor, these devices can be divided into those equipped with:
- A remote sensor, this element is located outside the thermostat, most often at the end of the cable extending from this device. This cable can have different lengths, short options; have an indicator ranging from 10 to 20 centimeters, and long - from one and a half to three meters.
- Built-in sensor provided inside the thermostat
Thermostats TDC 1 and TDC 2 how to connect
Unlike radiators, infrared heaters help provide heating over a larger area at a much lower temperature. This makes it possible to heat modern homes economically. To ensure thermal comfort for users and controlled operation of floor equipment, controls should be used. Below is information on how to connect the Ballu BMT 1 and BMT 2 thermostat, the features and advantages of these devices.
Control via TDC thermostat
Thermal comfort is a subjective feeling for each person. This is a condition in which people perform normal household work without becoming overheated or exposed to cold. Thermostats are needed to regulate the temperature and help infrared heaters function properly. TDC is a modern electronic feedback device that maintains an exact set temperature.
Its control system is very simple and at the same time effective - you should set the value that you want to achieve in the selected room. Sensors detect the temperature and then turn on the device to achieve the desired value. After this, the heating devices automatically turn off. The next switching occurs when the temperature begins to drop. This control system saves energy - the heaters operate only about 4-6 hours a day.
Before answering the question, TDC thermostat 1: how to connect, you should know that the temperature in the apartment largely depends on the location of the heater. It is recommended to install it in an accessible place, away from drafts (windows, doors).
Main advantages
The main advantages of TDC thermostats include:
- ease of use (just use the dial to set the desired room temperature);
- low purchase and subsequent maintenance costs.
Thus, controlling the temperature inside the house allows you to maintain sufficient thermal comfort and reduce heating costs.
Before installation
You should know that the answer to the question: TDC thermostat 2 - how to connect, is directly related to the installation of Ballu BMT 1
To install them safely, it is recommended to follow the following precautions: . Before starting work, turn off the heater from the mains; use wires with standard colors and suitable cross-section
- Before starting work, turn off the heater from the mains;
- Use wires with standard colors and suitable cross-section.
Meaning of wire colors:
- brown phase – control cable;
- blue phase – neutral wire N (“zero”);
- red or black – phase conductor.
It is recommended to use wires with a cross section of 1.5 mm2.
Installing a thermostat
A few words about how to connect the Ballu TDC thermostat 1. Installation of the device must proceed sequentially:
- Pull back the thermostat cover and remove the screws and plugs.
- Use an indicator screwdriver to determine the phase in the socket.
- Connect the brown wire (phase) to the sensor.
- According to the diagram, connect one end of the heater to the third wire.
- Connect the blue wire to the remaining end.
- Place a jumper between the third and fifth wires.
- After an intermediate test, in which the device is rung to see if the thermostat is working, a plastic box is put on.
The figure below shows how to connect the Ballu BMT 1 thermostat according to the connection diagram. Wiring is laid to the location of the device, which is connected to zero or phase.
For the Ballu BMT 2 thermostat, the connection diagram is similar to the one shown above, only the terminal numbers are different. After installation, the device is connected to the infrared heater using a separate line.