Unlike radiators, infrared heaters help provide heating over a larger area at a much lower temperature. This makes it possible to heat modern homes economically. To ensure thermal comfort for users and controlled operation of floor equipment, controls should be used. Below is information on how to connect the Ballu BMT 1 and BMT 2 thermostat, the features and advantages of these devices.
Installation nuances
We will not go into the types and types of regulators, or arrange comparisons and tournaments. All of them are good in their own way and will fulfill their purpose, serving faithfully. The first thing you want to pay attention to is the installation location. Doesn’t depend on what type of heaters you have: infrared, panel, heated floor, convection.
Installation of a thermostat with an air temperature sensor is prohibited in the following places:
- in close proximity to heaters;
- in places where there is a draft;
- in the heating zone of infrared emitters.
All these places are unsuitable for placing a thermostat, since when located near the heater, the air next to it will heat up to the desired temperature earlier, which will lead to false operation, as a result of which the room will not heat up to a comfortable temperature.
If you install the thermostat in the heating zone of the IR heater, its body will heat up earlier and distort the sensor readings. In places where there is a draft, the sensor will not show the desired temperature and the heaters will overheat the room, consuming excess electricity. The height of the temperature sensor should be placed in the comfort zone, at a level of 1.5 meters from the floor.
How to choose a suitable thermostat
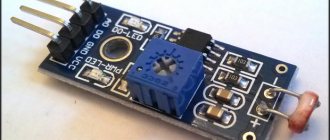
Thermal sensors allow you to control household electric heaters and maintain the required indoor microclimate. These devices are divided into two main types.
Types of thermostats:
- Mechanical;
- Programmable.
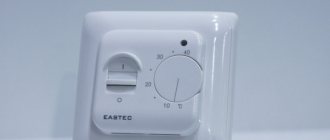
Currently, the simplest models, and the most frequently used, are mechanical devices. It is worth noting that while they are similar in principle of operation and design, these thermostats may differ in the quality of the materials used for their manufacture.
Mechanical thermostats are used for wall installation. At the same time, they may differ in the type of installation (mortise and overhead models). It follows that these thermostats can be connected to any type of electrical wiring.
The operating temperature range for mechanical thermostats varies from +5 to + 30C. The control elements in these devices are a mechanical regulator, through which the required level of air temperature is set, and a button for turning the thermostat on and off.
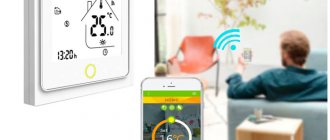
The most advanced type of temperature controllers are programmable models. An extended temperature control range allows you to expand the possibilities of using this device.
Programmable models are able to monitor both the air temperature in the room and the temperature of the heating device, which additionally provides fire protection.
Connection diagrams
Always, before installing and connecting the thermostat, read the instructions and passport data for the device. Since the manufacturer indicates the required cable cross-section and provides a connection diagram for its products. If you deviate from the requirements and save on wires and thermostats, there is a high probability of equipment failure or fire hazard.
To connect heaters, it is usually recommended to use a 2.5 mm three-core PVA wire. It is recommended to connect the thermostat with the same wire.
Connection diagram of the thermostat to an infrared heater with a power of up to 3.5 kW:
If the room is heated by a group of heaters up to 3.5 kW, then the connection diagram will look like this:
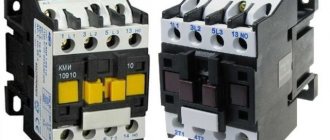
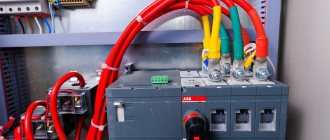
If you are the owner of a three-phase network and heating is carried out by a group of heaters with a total power of more than 3.5 kW, then a magnetic starter is added to the control circuit, which is controlled by a thermostat:
This is the principle used to install a temperature controller. As you can see, there are some features in installing and connecting the thermostat, so it is important to first read the instructions from the manufacturer and then proceed with the main process.
Finally, we recommend watching a video that clearly demonstrates the technology for connecting contacts using the example of a fairly popular thermostat from Ballu BMT-1:
You probably don't know:
Unlike radiators, infrared heaters help provide heating over a larger area at a much lower temperature. This makes it possible to heat modern homes economically. To ensure thermal comfort for users and controlled operation of floor equipment, controls should be used. Below is information on how to connect the Ballu BMT 1 and BMT 2 thermostat, the features and advantages of these devices.
Connecting Ballu air curtains
The check showed the serviceability of the micathermic heater.
The device is ready for use.
Its operating principle is based on the properties of different metals, which increase or decrease in size with temperature changes in different ways. Page 24 BSGI 09 12 a. Now the power neutral: the power neutral - through the second contact of the switch connected in series - to the heater neutral.
When using the dehumidifier, install the device on a flat surface to avoid water leaks and loud noise. This warranty does not provide any right to compensation or coverage for damage resulting from modification or adjustment of the product, without the prior written consent of the manufacturer, in order to bring it into compliance with national or local technical and safety standards in force in any country other than the Russian Federation, in which the product was originally sold. As it turned out, the micathermic heating element is composite and consists of two.
Checking the connection diagram. To check the serviceability of the thermostat, just touch the probes of the multimeter to its terminals and turn the handle from lock to lock in any direction.
Once every 2 weeks, during intensive use, more often, check the cleanliness of the air filters in the indoor unit, see. Find out the causes of the problem and eliminate them in a specialized service center. Reminder for caring for the air conditioner: 1.
Responsibility for malfunction of the device due to the fault of the organization that carried out the installation of the device falls on the installation organization. Let's look at the repair sequence using the example of a modern Bimatek PH micathermic heater (photo at the beginning of the article), assembled using the most complex of the electrical circuits presented above. The operating principle of the convector is as follows.
To expand the functionality of the device, the consumer can install a mixing unit. Does the low high side. This warranty is valid only in the Russian Federation for products purchased in the Russian Federation. Checking the serviceability of the thermal fuse It remains to check the thermal fuses connected in series, of which there were three and all of them were installed behind the micrometric heater plate. Dehumidifying area III: The compressor stops. Mechanical thermostat ballu BMT 1 connection
Control via TDC thermostat
Thermal comfort is a subjective feeling for each person. This is a condition in which people perform normal household work without becoming overheated or exposed to cold. Thermostats are needed to regulate the temperature and help infrared heaters function properly. TDC is a modern electronic feedback device that maintains an exact set temperature.
Its control system is very simple and at the same time effective - you should set the value that you want to achieve in the selected room. Sensors detect the temperature and then turn on the device to achieve the desired value. After this, the heating devices automatically turn off. The next switching occurs when the temperature begins to drop. This control system saves energy - the heaters operate only about 4-6 hours a day.
Before answering the question, TDC thermostat 1: how to connect, you should know that the temperature in the apartment largely depends on the location of the heater. It is recommended to install it in an accessible place, away from drafts (windows, doors).
How to connect a thermostat to an infrared heater
Using a thermostat is very convenient; you just need to determine how to properly connect the thermostat to an infrared heater in order to get the maximum effect from using this device.
Necessary materials
Preparing to install the thermostat will not take much time, nor will the installation itself. Even if you have no experience connecting thermostats, you can easily do all the work yourself.
But if you do not have experience working with electrical equipment and even installing a socket is difficult, and you are not familiar with the operating principle of an indicator screwdriver, you should not try to figure out how to connect a mechanical or electronic thermostat. In such cases, it is safer to entrust this work to a professional.
For those who are well versed in electricity and know for sure that before work they should turn off the power to devices and equipment, it is necessary to prepare the following set of tools:
- Drill or screwdriver. They are only needed to drill a hole in the wall to mount the thermostat.
- Pliers for working with electrical cables.
- Indicator screwdriver or tester.
- Pencil, tape measure. They will help determine and mark the place where the temperature regulator will be located.
Also for work you will need an electrical cable that will connect the thermostat and the infrared heating device, a collapsible socket and hardware for attaching the regulator and fixing the cable. When the materials and tools are prepared, you can begin marking and installation.
Connection diagram
The connection diagram of the thermostat to the infrared household heater is selected depending on the device used, the experience and knowledge of the electrical installation specialist.
Standard
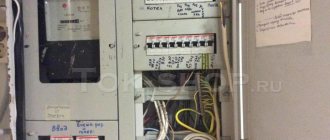
In the standard scheme, the thermostat is installed in a ready-made network between the heater itself and the circuit breaker on the panel. The starting point of the network will be the machine. Two wires come from it - phase and zero, which are connected to the corresponding contacts of the thermostat. There are also two wires coming from the thermostat, which are connected to the heating device.
This scheme is also convenient if two or three heaters need to be connected to one thermostat. Located in different rooms, they ensure the same temperature throughout the apartment. For their effective operation, the connection is made as follows:
- Two wires lead from the machine to the thermostat: phase and zero.
- Two wires come from the machine for each heating device.
- Infrared heaters do not connect to each other.
Parallel connection will allow you to safely control several devices at once, without purchasing additional controllers for each of them.
Using a magnetic starter
This scheme is a little more complicated and will take a little longer. But thanks to the use of additional equipment in the form of a magnetic starter, it is possible to connect several heaters to one thermostat at once, including equipment with higher power and industrial systems.
Devices are connected in the following sequence:
- A thermostat is connected to the machine using a cable (phase and neutral).
- The thermostat is connected to the magnetic starter through the output terminals.
- The magnetic starter is connected to heating devices.
In this case, the circuit for connecting the magnetic starter is calculated individually. This will ensure the devices operate safely and efficiently.
Main advantages
The main advantages of TDC thermostats include:
- ease of use (just use the dial to set the desired room temperature);
- low purchase and subsequent maintenance costs.
Thus, controlling the temperature inside the house allows you to maintain sufficient thermal comfort and reduce heating costs.
Principle of operation
The Ballu VMT 1 thermostat consists of two main components:
- temperature sensor, which is installed in close proximity to the heater (when used in an open space), or in a room that is heated;
- control unit - an electronic system operating based on signals from a temperature sensor.
The interaction between these two elements looks like this:
- on the control unit, the operating parameters of the infrared heater are set - the required temperature and heating value of the thermal element;
- the temperature sensor constantly receives readings of the actual air temperature in the room or around the heater (when used in an open space);
- The heating element is switched on by the control unit if the temperature detected by the sensor is less than the set value. If the temperature readings are higher than the specified ones, the heater turns off or reduces the heating intensity.
Thus, heat transfer is constantly adjusted, which allows you to maintain the optimal temperature with rational energy consumption. The control unit begins its work with temperature changes from 0.1 to 1 degree, so significant fluctuations in heating do not occur.
Schematic diagram of connecting the thermostat
Types of thermostats
Manufacturers of such devices produce them in two versions:
- mechanical;
- electronic
Mechanical devices
The circuit by which this type of device operates does not require additional power, since its operation is based on changing the physical dimensions of a special plate or diaphragm (like a gas one). These elements are very sensitive to the ambient temperature, when changes in temperature cause expansion or contraction of the material from which they are made.
The plate (diaphragm) makes or breaks contacts in the circuit that powers the heater. The adjustment occurs due to a lever set to a certain position, with the help of which a mechanical temperature sensor influences the operation of the heating device.
The advantages of such a device include the possibility of its operation without power supply, and the disadvantages are that the temperature is controlled within 0.5-1°C.
Connecting the mechanical thermostat BALLU BMT-1 (video)
Electronic devices
Such devices are equipped with a temperature sensor, the operation of which is based on reading certain frequencies of electromagnetic waves. In this case, it is possible to obtain data on the ambient temperature directly in the heated room.
The control unit, having received data from the temperature sensor, regulates the operation of the heater in accordance with the program using a specific algorithm. The signal processing circuit is set by the manufacturer and can have many control options depending on the parameters specified by the user.
The advantages of an electronic device include:
- high accuracy - 0.1°C;
- autonomy - the ability to program for a long time without further user intervention.
As a disadvantage, we can highlight the dependence on a third-party power source.
Before installation
You should know that the answer to the question: BMT thermostat 2 - how to connect, is directly related to the installation of Ballu BMT 1. To install them safely, it is recommended to follow the following precautions:
- Before starting work, turn off the heater from the mains;
- Use wires with standard colors and suitable cross-section.
Meaning of wire colors:
- brown phase – control cable;
- blue phase – neutral wire N (“zero”);
- red or black – phase conductor.
It is recommended to use wires with a cross section of 1.5 mm2.
Thermostat Ballu BMT 1: how to connect
The most common and well-known to many is a thermostat with an air temperature sensor Ballu BMT 1. It has proven itself in operation.
Sequence of work:
- Laying cables;
- Installation and connection of the device.
First of all, you need to choose a place to install the heater. After this, you can start laying the wires. To ensure fire safety, you should choose a wire with a cross-section of at least 2.5 mm2.
Having laid the cables, we install the thermostat. Next, we connect the device. To do this, you need to understand the circuit, since many people are completely unclear how to connect the device correctly.
From left to right, the regulator terminals are labeled (3, 4, 1, 5, 6). We connect the supply phase wire to the terminal numbered (1). The neutral wires are connected using the terminal numbered (6). The working zero and the device zero are connected to one terminal.
After this, from the terminal numbered (3), you need to make a jumper to terminal (5). With this jumper, the device indication is connected. The phase wire leading to the heating device is connected to terminal (4).
In order not to get confused when connecting, you need to know the color marking of the wires. Phase wire (white or brown), neutral (blue), ground (yellow - green). It is worth noting that this circuit is suitable for connecting the F2000 thermostat.
Installing a thermostat
A few words about how to connect the Ballu TDC thermostat 1. Installation of the device must proceed sequentially:
- Pull back the thermostat cover and remove the screws and plugs.
- Use an indicator screwdriver to determine the phase in the socket.
- Connect the brown wire (phase) to the sensor.
- According to the diagram, connect one end of the heater to the third wire.
- Connect the blue wire to the remaining end.
- Place a jumper between the third and fifth wires.
- After an intermediate test, in which the device is rung to see if the thermostat is working, a plastic box is put on.
The figure below shows how to connect the Ballu BMT 1 thermostat according to the connection diagram. Wiring is laid to the location of the device, which is connected to zero or phase.
For the Ballu BMT 2 thermostat, the connection diagram is similar to the one shown above, only the terminal numbers are different. After installation, the device is connected to the infrared heater using a separate line.
Features of different installation schemes
The IR heater is connected as standard, like all electrical devices. This can be a connection through a socket or a separate line drawn from a separate one on the electrical panel. That is, there are two wires: neutral and phase.
The thermostat is mounted in the network between the machine and the heating device. Simple circuit for one or two heaters
: The thermostat has four terminals: two input (phase and neutral) and two output (also “+” and “-”).
If there is only one heater
:
- two wires are laid, which are connected to the corresponding terminals of the thermostat;
- two wires are attached to the output terminals of the latter, taking into account the polarity - they are connected to the IR heater. This is a serial connection.
If there are two heaters
:
- You need to remove four wires from the thermostat (two phases and two neutrals) and route the wiring to the heaters. This is the so-called parallel connection.
- You need to remove two wires from the thermostat, connect them to one heater, and then to the second. This will be a series connection of two heaters.
In some cases, you will need to connect the phase directly (from the machine to the heater), and the neutral through a thermostat. The disadvantage of this method is that the thermostat does not work correctly. Complicated connection diagram for several heaters
:
- The thermostat is connected to the machine on the electrical panel;
- the output terminals are connected to the magnetic starter;
- the output contacts of the starter are connected to the heater.
This type of connection is suitable for industrial heaters or multiple IR heaters. assumes operation in automatic mode.
In conclusion, I would like to remind you that any powerful electrical appliances, especially heating or heating ones, require increased attention to safety measures.
First of all, this concerns grounding. The heater must be equipped with conductors of sufficient thickness and low resistance. In fact, the protection must remove excess current of any unimaginable magnitude. Human life depends on it!
Connecting a thermostat is not the easiest task. Even if you easily understand all the intricacies of the process, you may not have enough skills in handling tools. Having installed everything according to the diagrams yourself, you need to ask a specialist to check your work again.
Control via TDC thermostat
Thermal comfort is a subjective feeling for each person. This is a condition in which people perform normal household work without becoming overheated or exposed to cold. Thermostats are needed to regulate the temperature and help infrared heaters function properly. TDC is a modern electronic feedback device that maintains an exact set temperature.
Its control system is very simple and at the same time effective - you should set the value that you want to achieve in the selected room. Sensors detect the temperature and then turn on the device to achieve the desired value. After this, the heating devices automatically turn off. The next switching occurs when the temperature begins to drop. This control system saves energy - the heaters operate only about 4-6 hours a day.
Before answering the question, TDC thermostat 1: how to connect, you should know that the temperature in the apartment largely depends on the location of the heater. It is recommended to install it in an accessible place, away from drafts (windows, doors).
Direct connection of IR heater
The simplest, but at the same time inconvenient installation method is a direct connection to a household electrical network.
A power cord from the kit or purchased separately is connected to the terminals, which is plugged into a standard 220V socket.
This scheme is only suitable if your model of heating device has a built-in thermostat.
The disadvantages are obvious:
— Inability to automatically regulate temperature
The device will have only two operating modes, either on or off. You will have to change them manually. The principle here is simple - as soon as it gets cold, you turn it on, if it gets hot, turn it off.
— You cannot connect several IR heaters to one outlet
You depend on the number of electrical outlets and their location when choosing a location, installation method and the number of heaters in the room. The socket mechanisms have a maximum connected current, most often no more than 16A; accordingly, you can connect no more than 3 kW of electrical power to it. The problem of lack of socket mechanisms is also acute, because... You cannot connect heating devices through tees; there is always a risk of fire from overheating.
— One of the electrical outlets is occupied
If you did not previously plan to install additional electric heating devices, or did not install a special socket or outlet for this, you will have to use one of the existing mechanisms, which are often not superfluous.
- Requires manual switching on and off
To adjust and even simply control the operation of the equipment, you need to turn it on and off yourself, and this is terribly inconvenient.
- Appearance
External installation, when wires pass along the surface of the walls, even in a cable channel, this always spoils the appearance of the interior.
Main advantages:
— Easy installation
It all comes down to connecting the power cord to the terminals of the device and installing it into the outlet connector. The following advantage follows from this:
— Sales cost
Often, everything you need is always at hand and there is no need to purchase additional equipment or electrical materials.
— Ability to use the existing network of an apartment or house
Most often there is no need to lay separate power lines to the installation site. It is enough to use the existing apartment socket network.
CONCLUSION: It is recommended to use a direct connection only as a temporary connection, for example, at a time when the electrical wiring is not yet ready, the rest of the electrical equipment has not been installed or delivered, and the room already needs to be heated. At the same time, it is imperative to control the area in which the heating equipment is located and not leave it unattended.
In addition, this is a good option if the IR heater has a built-in thermostat. Then the main disadvantages will be different:
— it is not always convenient to make adjustments, because often devices are suspended from the ceiling
— You will have to occupy one of the sockets in the room
— External installation spoils the overall appearance of the interior
Main advantages
The main advantages of TDC thermostats include:
- ease of use (just use the dial to set the desired room temperature);
- low purchase and subsequent maintenance costs.
Thus, controlling the temperature inside the house allows you to maintain sufficient thermal comfort and reduce heating costs.
Electrical installation work connecting the thermostat
Infrared heater: manufacturers and types It’s worth mentioning right away that the location for the thermostat needs to be chosen carefully. It is advisable that it be located in the opposite corner from the place where the heater is installed. This way you can definitely guarantee yourself the optimal temperature in your home.
How to connect a thermostat to an infrared heater:
- Initially, you need to connect the contacts of the electrical plug to the terminal blocks of the thermostat; they are installed on the housing.
- Each socket received its own designation: L – phase, N – zero. The number of zero and phase terminals is two. After all, you need to install in the following sequence: “From the network to the regulator - “From the thermostat to the heater.” This is how everything looks on the diagram.
- We clean all the contacts and insert them into the terminals, checking that they are well secured. Remember about the light marking, it will help prevent mistakes.
Advice! If you decide to install one thermostat for two infrared heaters, the regulator in this case should be installed in the coldest room.
Connecting an infrared heater yourself
Before installation
You should know that the answer to the question: BMT thermostat 2 - how to connect, is directly related to the installation of Ballu BMT 1. To install them safely, it is recommended to follow the following precautions:
- Before starting work, turn off the heater from the mains;
- Use wires with standard colors and suitable cross-section.
Meaning of wire colors:
- brown phase – control cable;
- blue phase – neutral wire N (“zero”);
- red or black – phase conductor.
It is recommended to use wires with a cross section of 1.5 mm2.
What wire can be used to connect room thermostats?
Another important point in connecting the thermostat is the choice of wire. Typically, the cross-section and number of cores are indicated in the instructions for a specific product. In addition, you need to remember the distance from the thermostat to the boiler or hub to which the thermostat is connected - if the output on the thermostat is potential, then the length of the wire can have a significant impact on the operation of the automation. This is due to the voltage drop on the wire. To reduce it, you should take a wire with the largest possible cross-section.
Most often, to connect mechanical thermostats, a two-core wire with a cross-section of 0.5 or 0.75 “squares” is used.
For electronic ones, as I described above, it is important to consider the length of the wire. The longer the wire, the larger the cross-section should be (usually the cross-section does not exceed 1.5 “square”)
But manufacturers do not recommend exceeding the wire length of 100 meters, although this is not specified in the data sheets and instructions for the products.
What is a thermostat, purpose, principle of operation
The operation of a thermostat is based on a cyclic process of closing and opening an electrical circuit. Microclimate regulation according to this parameter is based on signals sent by the temperature sensor. Let's look at this process in more detail:
- When a given temperature threshold is reached, the resistance of the internal sensor increases.
- The thermostat opens the electrical circuit.
- As the sensor cools down, the resistance increases again.
- The thermostat starts up again, but no longer opens, but closes the electrical circuit.
This cycle continues for a specified time and allows us to talk about automatic setting of the temperature in a room equipped with an infrared heater . Its advantage is that it heats surrounding objects, and the thermostat makes it easier to control this process.
Characteristics
Weight, kg 0.163 Manufacturer's warranty (years) 1 Country of manufacture China Brand BALLU Product type Temperature controller Thermostat type Mechanical Connection type Internal / internal Mounting type Wall mounted Minimum temperature (°C) 10 Maximum temperature (°C) 30.0 Backlit screen No Color White cream Width (cm) 8.3 Height (cm) 8.3 Depth (cm) 3.8 Possibility of integration into a smart home network No Compatibility with other devices Mechanical thermostat VMT-1 is used to regulate the temperature maintained in the room Voltage (V) 220.0 Maximum load current (in A) 10.0
Prices and availability may vary. Please check the exact cost and availability of goods in stores.
2,443.00 Infrared ceiling heater Equation Comfort Heat, 600 W 3,098.00 Infrared ceiling heater Equation Comfort Heat, 800 W 2,860.00 Infrared ceiling heater Equation Comfort Heat, 1000 W 5,170.00 Oba infrared ceiling heater Equation Comfort Heat, 2000 W 3,003.00 Infrared ceiling heater AC Electric ACE-IT-1.0, 1000 W 4,624.00 Infrared ceiling heater AC Electric ACE-IT-2.0, 2000 W 4,765.00 Heat curtain AC Electric ACE-CS3, 3000 W 7,128.00 Thermal curtain AC Electric ACE-CS5, 5000 W 135.00 Wago terminal 2 connectors for wires 12.4x14.5x20.5 mm, polyamide, 5 pcs. 54,00 Grounding plug with handle 220 V white Show all Related products
Detailed instructions for DIY installation and connection
You can enjoy all the above benefits only by installing the device correctly. The work is carried out in 5 stages and requires strict adherence to the instructions.
Preparatory stage
First, you need a set of tools so that you don’t have to be distracted during installation. Must be present:
- Roulette.
- Pyrometer.
- Screwdriver.
- Screwdriver.
- Drill (perforator).
- Pliers.
Where and how to install an IR heater?
At this stage, the location of the infrared heater is determined. It can be installed on a wall, ceiling, or with a slope.
IR with a power of up to 800 W is installed in residential premises. If we are talking about public buildings, then the power starts from 1.5 kW.
The surface must be strong to support a load of 20-30 kg.
Do not install the heater near flammable objects
Location and height from the floor
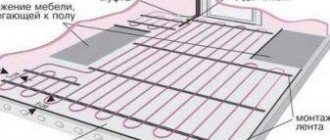
IR is recommended to be installed next to surfaces that absorb heat.
Wood, carpets, and stone surfaces work well. Reflective surfaces should be avoided, since when using the device the owner will receive a minimal effect. Electrical wiring must be laid on a non-combustible base. The location of the heater largely depends on the specifics of the premises. There is an optimal scheme for placing IR in residential buildings. It looks like this:
- A pyrometer can measure the coldest place that needs heating. In the case of installing several heaters at once, it is required.
- The height from the floor should be 1.5 m in residential areas. If a person spends a lot of time under the heater, the value should start from 1.8 m.
- If the installation of a high-temperature infrared heater is carried out in public buildings, offices, then the distance should be 2 m.
Installation of the device
You can do the installation yourself without spending a penny. The only difficulty is that it requires certain skills and knowledge, as well as knowledge of the installation process.
During installation and connection to the electrical network, it is prohibited to turn on the heater.
Progress:
Determine the mounting height from the ceiling and floor using a tape measure. Tighten the bolts or drill a hole with a drill (perforator) if the wall is concrete
It is important that the distance between the attachment points is the same. Insert dowels into the drilled holes. Install fasteners. Secure the device into the fixing holes. The designs of different heaters may differ slightly, so do not ignore the manufacturers' recommendations
The designs of different heaters may differ slightly, so do not ignore the manufacturers' recommendations.
Electrical connection
To save energy and provide a comfortable temperature, the infrared heater is mounted together with a thermostat. The device automatically turns off the IR when the room reaches the specified temperature. As soon as the air in the room cools down, the thermostat turns on the IR.
Connecting to the network together with the thermostat takes place in 4 stages:
- Attach the thermostat to the wall at a height of 1.4 m from the floor near the infrared heater.
- Select a wire that is resistant to heavy loads. It must be laid inside the walls and ceiling from the IR to the thermostat.
- The wire is masked with plaster or special boxes.
- The heater wiring is switched parallel to the main line.
When installing heaters in several rooms at once, one thermostat will not be enough. One device is required for each room.
Connection diagram for several heaters via a thermostat
The connection involves connecting the cables of several devices to the thermostat. Next, the thermostat is connected to the junction box.
The best option is to create a separate machine in the switchboard. This will prevent the risk of overload.
Design and purpose of the thermostat
An electronic device, the design of which includes sensors, a display, control buttons, a temperature sensor or a controller, allows you to control the operation of the heating system. The element is connected to a heating device, for example, an infrared heater. According to the set parameters, the heating elements are turned on/off. This can be done after a specified period of time or when the room is cooled to a certain temperature.
The thermostat has a housing with a power scale and a shutdown button
A thermostat or thermostat can be of different types, but the main task of any such device is to maintain a certain temperature of the coolant for heating or cooling the space. Configuration can be done manually, and further work occurs automatically. This device makes control of heating devices more comfortable than in the absence of a control element. Thanks to this, energy resources and time are saved. The benefit of the thermostat is also expressed in the fact that if the heater is not turned off in automatic mode, the controlling part emits an audible warning signal.
Thermostats are varied, but have the same functions
The devices can be installed in both residential and industrial premises. The devices often complement the main or additional space heating system, allowing you to control the heating level.
Electronic or mechanical is installed in the coolant system and collects information about current temperature readings. When a lower or higher value is reached, the operation of the device stops or starts. At the same time, thermostats for infrared heaters are designed taking into account the fact that the heating device heats the surrounding objects rather than the air.