Of the wide variety of additional heating, many prefer IR panels, because they are easy to use and quickly warm up the room. In addition, using the built-in thermostat, you can quickly set the required temperature. You can entrust the installation of infrared heaters to professionals or do it yourself, which will significantly save money.
Infrared heater - a heating device that emits heat through infrared radiation
How to properly install an infrared heater
IR heating devices are divided into types - gas and electric devices.
- Electric models of infrared heaters are compact and simply designed. They are equipped with electric emitters and operate from the electrical network, which is expensive for its owners.
- The operation of gas heaters is based on liquefied gas. They are more suitable for heating outdoor premises or outbuildings. Depending on the model, they can work on built-in mini gas cans.
Remember that when installing an infrared gas heater, you need to use the same instructions as when installing electric models.
Installation of infrared heaters can occur in 2 ways:
- on the wall
- on the ceiling
The decision to place the IR heater on the wall will be a more optimal placement, because in this case the room will be maximally heated, right down to the floor. If you are the owner of an apartment with very high ceilings, and therefore it is difficult for you to perform ceiling installation, use a wall installation.
To keep your room warm even in the harshest winter, you need to correctly calculate the power indicator. The most optimal is - for 10 square meters, calculate 1 kW of IR heater power.
If the installation of an IR heater is carried out only for additional heating, and not for the main one, then it makes sense to use less power. For such a case, a power of 1 thousand W will be sufficient for 20 square meters.
It is important to know that a safer and more comfortable option to use would be several low-power heaters than one overly powerful one. Installation of the latter is highly not recommended for residential premises
Varieties
They are divided into two categories - electric and gas appliances. The first ones operate from a household electrical network and are equipped with electric emitters. They are characterized by extreme structural simplicity, which ensures their compactness. However, this comes at the cost of high energy consumption.
Gas IR heaters operate from liquefied gas. Their main advantage is autonomy - they do not require access to the power grid to operate. They are in little demand at home; most often they are used for heating open street areas and industrial buildings. Some models operate using built-in miniature gas cartridges.
Peculiarities
Infrared heaters have a rather interesting operating principle. They heat not the air itself, but objects located around them due to infrared radiation.
As a result, they become warm, releasing part of the thermal energy into the atmosphere - the room becomes warm and comfortable. Let's look at the main features of IR heaters:
The most striking drawback of these heaters is the high electricity consumption, which is typical for any, even the most economical electrical appliance.
- Correct heat distribution. If you install traditional radiators indoors, it will be cool near the floors and hot near the ceilings. In the case of IR heaters, the floors will be warm, since they will be heated by IR radiation;
- When installed correctly, they do not cause harm to human health - if this equipment is installed correctly in its normal place, then it will not have a negative effect on the body (in particular, there will be no headaches);
- Fast heating of rooms - they warm up noticeably faster than traditional radiators;
- Almost complete silence - only gas appliances make noise (and even then they are practically inaudible);
- Can work in rooms with high humidity levels;
- Available for use in outdoor conditions, creating a comfortable environment in open areas;
- No negative impact on the environment.
Installing an IR heater in a living room will create a warm atmosphere in which it is pleasant not only to relax, but also to work.
Warranty service
The service center will not work with equipment that has been damaged as a result of improper use or violations of safety rules.
Don’t forget that trying to fix the heater yourself will also not lead to anything good. Of course, you can fix some problems without “opening” the equipment. For example, if the device does not heat well, we advise you to check the network voltage, as well as the temperature value set on the thermostat. The cause of the malfunction may be a broken thermostat or problems with the power line.
The warranty service itself consists of repairing equipment or replacing defective parts. Defects obtained in production are recognized only by specialists during an examination. To ensure that your heater does not experience any breakdowns or malfunctions, trust installation, installation and maintenance to professionals.
Source
Advantages and disadvantages
Any equipment has both positive and negative sides. The advantages of infrared heaters include:
- Cost-effective (especially when using devices as an additional heat source).
- The device does not burn oxygen.
- No harmful effects on human health (scientists have proven that devices can even have a positive effect on the body).
- When mounted on the ceiling, they take up minimal space in the room.
- Safety for children.
- Quiet operation. In addition, the products can be used as a light source.
- Many models are equipped with a built-in thermostat, with which you can maintain the optimal temperature level.
- The heat remains for a long time, because heated objects release energy into space.
- Infrared systems are resistant to moisture, so they can be installed in gazebos, bathrooms or on terraces.
The only disadvantage of the products is their high price.
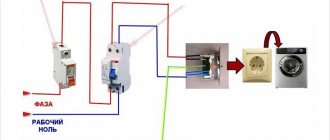
Connecting an infrared heater via a thermostat
Ceiling models must have a connection via a thermostat. Sometimes it comes included. Several heaters can be connected in parallel to one thermostat if they are installed in the same room. In this case, the total load should not exceed 3 kW.
An important rule: do not place the thermostat close to a heating source or in a draft. Otherwise, it will not work properly
The recommended installation height is 1.5 meters from the floor.
Sooner or later, developers or future homeowners have to face one of the most troubling issues: how to choose the right heating system. There are quite a lot of options for arranging a heating system, but increasingly, owners of new buildings deliberately choose electric infrared heaters and convectors for heating. Unlike bulky water and gas heaters, using electrical appliances is much easier and cheaper. You just need to choose the right layout and install an infrared heater in each room of the house. Nothing complicated at first glance, but there are certain nuances in installation and use.
Installation price
Installation of an electric infrared heater up to 3 kW costs the owner 2,500 rubles. The gas model will cost 3,000 rubles.
Installing an infrared heater is a simple task that can be handled by someone who understands the basic principles of how the tools work. The main thing is to pay attention to safety measures and strictly follow the instructions.
How to properly connect an IR heater
A regular single-phase network is suitable for connection, unless, of course, it is a high-power industrial design. The infrared heater is connected using a thermostat.
The thermostat is guided by the temperature in the space, thereby providing and maintaining the desired temperature regime. Equipped with a mechanical control method. The thermocouple immediately disconnects the heater from the network as soon as the temperature reaches the desired limit. When the air cools, the contact will close and the flow of electricity will be restored.
We install a separate thermostat for each room in the house to regulate the temperature separately. In the absence of regulators, excess electricity will be consumed and the atmosphere will not be comfortable enough.
After installation, you will need to connect the IR heater, for which you need to use a wire that is resistant to heavy loads, for example, VVG 2*2.5. It should be laid inside the walls or ceiling, after which it should be masked with a layer of plaster.
Since the power of the devices is not the highest, a VVG 2*1.5 wire could be suitable, which is more applicable to the installation of lighting devices. For power loads, this option has a small cross-section.
There is no need to be intimidated by the connection diagrams for infrared heaters - simply connect the cable from one or a group of devices to the location of the thermostat, and then to the nearest junction box.
Please note that the thermostat breaks one phase, so no additional cable or conductors are needed.
With a heater power of 3 kW or more, a separate solid line to the distribution panel and equipment with an RCD automatic device will help you.
The aesthetic issue - how to avoid them coming into view - is solved by carefully finishing them inside the walls and floors. If this is not possible, equip everything with plastic cable ducts, and for non-residential premises you can use corrugated cables.
Installing such heaters is not difficult. It is much more difficult to correctly perform installation calculations so that the use of the device is safe.
In terms of power, based on your tasks and the size of the room. It makes sense to install several devices of lower power instead of one powerful one. The benefit is double: heating is more uniform and it is easier to regulate the temperature.
If the model you choose is permanently installed, it must be hung on the ceiling or wall and connected correctly. You can entrust this to a specialist, or you can do it yourself. But this requires at least minimal electrical knowledge. Below we will look at how to install an infrared heater.
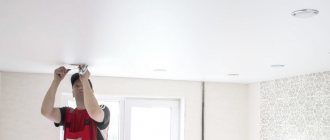
We install the heater ourselves
The simplest and most effective installation method involves placing the heating device on the ceiling of the room. The chassis is suspended in the following order:
- At the short ends of the case, it is necessary to unscrew the screws and remove the covers; the suspension brackets are inserted into the slots and secured with a latch;
- The installation locations of anchor hooks are marked according to the distance between the brackets on the ceiling;
- Using the markings, holes are drilled in the ceiling slab, plugs are hammered in and the suspension hooks are screwed in.
Before fixing the infrared heater, you will need to lay the wiring from the electrical input panel to the thermostat installation location and then to the heater. Ceiling structures are rarely equipped with built-in thermostats, so the box responsible for controlling the heating process is placed at a height of 1.6-1.7 m near the entrance to the room according to the above diagram.
To connect an infrared heater, you will need to strip the ends of the wires and secure them in the chips according to the diagram given in the product passport or pasted on the inside of the cover. All that remains is to connect the wiring to a separate package on the panel, and you can put the infrared heater into action.
Digital thermostats allow you to control the temperature in your room with high precision. But in practice, infrared devices have a slight heating inertia. For example, by setting the room temperature at 22°C on the device, the heater will actually raise it half a degree or a degree higher, since the hot radiating coil or heater panel continues to heat the air by inertia for another 5-7 minutes after the thermostat cuts off the power.
Connection via a thermostat plugged into an outlet
The main disadvantage of the previous scheme is the lack of automatic adjustment of the heater. This can be solved by using a thermostat.
In this case, the simplest option is to purchase an additional thermostat that plugs into a standard household outlet and connect the heater to it. The same principle is obtained when using a heating device with a built-in regulator, which is connected to a standard outlet in an apartment or house.
Main disadvantages
— binding to the location of sockets
As in the previous option, you remain tied to the existing location of the outlets.
— the need to purchase additional equipment - thermostat for socket
Additional purchase costs will be required, and in addition, such specific equipment is not available for purchase everywhere.
— There is no possibility of connecting several heaters to one independent thermostat
If you plan to use several heaters, for each of them you will have to use its own individual thermostat in the outlet.
— Installation appearance
All conductors remain visible, the socket is occupied.
Advantages:
— Simplicity
Implementation does not require any preparatory work or skills and knowledge.
— Possibility of automatic adjustment and maintenance of the desired temperature
You get a fully automated heating system.
Assessing the feasibility of installing infrared heaters
The class of devices will allow you to structure the room into separate areas, which designers really like.
Difficulties in installing infrared film-type heaters
A Russian search engine led to the website teplodvor.ru. After a series of experiments, it became clear that the calculator could be trusted. The installation of infrared heaters in the house is preceded by calculations. Without thinking twice, we entered typical values into the calculated parameters:
- Room temperature 20 ºС.
- The minimum temperature outside the window is taken to be minus 20 ºС. This is far from the smallest value in Russia, but there is no goal to drive manufacturers of infrared heaters to the conditions of the North Pole. A reasonable temperature is taken; below it it can be frosty anywhere in the Russian Federation.
- Since the cottage in the video is made of wood, it was decided to set the walls made of logs to a maximum thickness (in the calculator) of 25 cm.
- The double-glazed windows were taken as usual, with double glazing, in a house where an infrared heater is supposed to be installed.
- The ceiling height is 2.5 meters, and in real housing it is even higher. We did not try to create difficult conditions for the operation of infrared heaters.
- Finally, the window area for such a room is ridiculous. Four openings of 1.5 x 1.5 meters are specified. This is a low figure.
- The floor was made of planks and erected over a typical cellar.
- The ceiling leads to the attic.
Considering that the result has been rounded, it turns out to be 10 kW. This is one and a half times more than what manufacturers of film ceiling heaters promise. Let us object that the vault of the premises is additionally insulated, due to which losses are reduced. Let us add that steam permeability deteriorates and the cost of the structure increases. Installation of a decorative ceiling covering becomes more difficult, and the emissivity of the equipment is likely to be low, which will not have the best effect on the efficiency of the heating complex. It just seems that if you put thermal insulation on the ceiling, the resistance of the ceiling tiles can simply be discarded as too low. Although it is made from polyurethane foam.
- Sprayed thermal insulation for foundations, walls and roofs – polyurethane foam.
- The insulation of boilers, boilers, water heaters is polyurethane foam.
- Plates for insulation of facades and premises - polyurethane foam.
It turns out that the insulation on top and bottom is the same. And the film mainly heats itself. The structure will be of a sandwich type with at least three layers: a heat insulator, a film, a decorative ceiling covering - which disrupts the normal permeability of steam. Attics are not built this way: pitched roofs are simply equipped with special membranes when creating an air gap for cladding with metal tiles or slate. Such a step would likely disrupt the construction technology of the building. You need to think through the smallest details.
The simple fact is kept silent that apartment buildings require waterproofing, which is difficult to perform. If the heater floods from above, it’s good if not the slightest crack is found, and the device does not work at a particular moment. Otherwise the consequences are dire. Electricity and water are things incompatible with human life. And the installation of infrared heaters in an apartment is complemented by the following actions:
- Penetrating waterproofing of the ceiling and upper edges of the walls, which costs a lot. For those who don’t believe, we recommend asking the price for Kalmatron (it’s better not to think about Penetron).
- Purchase of a differential protection device to prevent electric shock to people.
- Purchasing quotas for power, which is often completely impossible in an apartment building. In new generation high-rise buildings, the shield is not so flimsy and will probably bear the load.
Pros of installing infrared heaters on the ceiling
We see only three advantages of the described advanced technology:
- You don't need a project to carry out the work.
- The appearance is not spoiled by heating radiators.
- Work is carried out during the day.
And electricity is more expensive than natural gas. And let us remind you that boilers readily consume diesel fuel, coal and firewood. The cost is not a fact that will remain for ceiling infrared heaters of the film type. Using a calculator, it was determined that 6 kW is not enough to heat the room; the losses are greater than the obtained figure. Although the area is deliberately underestimated, and the conditions are chosen to be mild. Infrared ceiling heaters will replace boilers or central heating radiators exclusively in mild climates, where it is advantageous to use the equipment.
This is if there is no hot water in the house. And if there is one, the electric heater will still have to be connected and supplemented with a boiler to accumulate energy. In this light, installing radiators, laying pipes, and spending on an additional recirculation pump do not look so scary in comparison with the work already done.
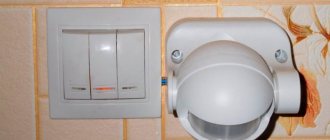
What to look for when choosing
Halogen heater
New generation devices are constantly appearing, which complicate the choice of heating equipment. When arriving at the store, the first thing they evaluate is what the heater looks like. The case should be both stylish and strong, the cable should be reliable, with a high-quality plug. In Moscow you can often find downright cheap devices. It's better not to choose these. There is a high probability that the components are of low quality, and therefore the heater will not “live” for long.
An important point when choosing is power. It is calculated simply: every 10 m2 requires 1.2 kW of energy.
Carbon Ceiling Infrared Heaters
In the reviews there are different devices, some are placed on the floor, others are attached to the wall or ceiling. After the installation method, the type of heating element is considered an equally important criterion. There are four varieties.
- Halogen. The source of infrared waves is an incandescent filament, which emits visible golden light and waves in small ranges. The latter do not have the best effect on human health. Therefore, such IR heaters are cheaper than others.
- Carbon. The heating element is made in the form of a quartz emitter. It heats up quickly, the efficiency is the highest among this equipment, but it “eats” a lot of electricity. The radiation is safe for human health. However, this heater cannot be used continuously.
- Ceramic. The heating element is protected by a ceramic shell, which “blocks” the radiation spectrum that is unpleasant to the human eye. Advantages: moisture resistance, strength, cost-effectiveness. Ceramic elements take a long time to heat up and take just as long to cool down.
- Tubular. Another name is heating element. One of the popular options, suitable for constant use. The air is not dried out and no radiation is emitted. True, they make a slight crackling noise when turning the heater on and off.
Popular models
In PLEN film heaters, the role of the emitter is played by a screen made of reflective foil (aluminum), which is heated by a resistive element (metal thread) connected to the electrical network. The length of the emitted infrared waves is 9.4 microns. The temperature of the heating element is 40 - 50 degrees, which makes PLEN heaters absolutely safe for people and pets.
Film heater PLEN
The heating element and aluminum foil in PLEN IR heaters are separated from each other by lavsan (the domestic name for polyester) film. The entire structure is enclosed in a shell of the same material. The total thickness of all five layers of the PLEN heater ranges from 1 to 1.5 mm.
The maximum installation height of PLEN heaters on the ceiling is 3 – 3.5 m.
Infrared radiation in heaters of this brand is generated by a thin carbon fiber enclosed in a polymer shell. Peony heaters are low-temperature; depending on the settings on the thermostat, they can heat up to temperatures from 30 to 110 degrees. The maximum power of one heater is 500 W.
Power cord and thermostat with thermostat are included.
The service life declared by the manufacturer is 25 years.
Zebra film heaters are produced on the same production base as PLEN, but using more advanced technologies and materials. Thanks to this, we were able to achieve some improvements:
— the protection class has been increased to IP44 (for PLEN it is IP20), which made it possible to use IR heaters in rooms with high humidity;
— a third grounding wire has been added to the Zebra heater connection diagram;
— a series of “Multivoltage” heaters have been developed, capable of operating under voltage drops of up to 150 V.
Film heater installed on the ceiling
Pros and cons of ceiling IR heaters
Infrared heaters are safe to use
Electric infrared heaters with ceiling installation are in demand for apartments, cottages and industrial buildings. This is explained by their positive qualities:
- Efficient heating. Suspended equipment in the form of a heater does not affect the air, but objects and people.
- Efficiency reaching 90%. Compared to traditional appliances, they consume less electricity. Many ceiling infrared heaters are supplied with a thermostat - this is necessary to automatically turn off the heating when the set temperature is reached.
- Safe to use. IR technology does not “dry” the surrounding air. For this reason, it is suitable for installation in children's rooms.
- European standards are responsible for environmental cleanliness. No harmful materials that are hazardous to health are used for production.
- Easy to install. The owner can easily handle the installation; in addition, the fastenings are already included. You can attach the equipment both to the wall and to the ceiling. It is also suitable for plasterboard ceilings, but you will first need to install a support beam that will hold the device. Compact models, several centimeters thick, are increasingly being produced, for example, Ballu BIH AP 08.
There are not many disadvantages, but they should also be taken into account:
- Due to constant heating, painting coatings may deteriorate. If you have a humidifier at home, this problem does not occur.
- If you turn off the device, the room will quickly cool down.
These disadvantages can hardly be called significant. In order not to be afraid of overheating, many users equip their equipment with thermostats.
Comparison with other types of heating equipment
Competing heating devices (batteries, convectors, heat fans, oil radiators) are aimed primarily at heating the air. Only then does the warm air partially transfer heat to surrounding objects and people.
This method has a number of disadvantages:
- As a result of heating the environment, “air stratification” occurs. In this case, warm air accumulates at the top of the room, and cold air at the bottom. This disadvantage is especially noticeable if tiles are used as flooring.
- Mixing warm and cold air form convection currents, creating drafts in the room.
- Heating of the room is extremely slow.
On all of the above points, infrared heaters beat their competitors.
Main process
Hanging the case
First you need to determine the installation location of the infrared heater in the house (or apartment). As we said above, the housing can be placed both on the ceiling and on the walls, depending on the individual preferences of the owners.
The first thing you need to do is mark out the mounting locations yourself. To do this, use a tape measure to measure the same distance from the ceiling to the selected area. It is also recommended to use a building level, with which you can level the brackets in a horizontal plane.
After marking, proceed to drilling. If the ceiling (or wall) is made of wood, drill holes with a drill. If you have to deal with concrete, you cannot do without a hammer drill. You need to drive dowels into the created holes and screw in the brackets, after which you can install the infrared heater in its place.
Please note that the design of the unit varies. Some products have guides that are fixed into brackets
A simpler option is chains attached to the ceiling (special holders attach to them). Also on the market you can see infrared heaters on a leg, which are simply placed on the floor.
Electric installation work
As we said at the beginning, the process of connecting an infrared heater to the network will be carried out using a temperature controller.
First you need to connect the contacts of the collapsible electrical plug to the thermostat terminal blocks, which are installed in the product body. Each “socket” has its own designation: N – zero, L – phase. It should be noted that there are at least two of both zero and phase terminals (from the network to the regulator and from the regulator to the heater). Everything is quite simple - you strip the wires, insert them into the seats until they click (or tighten the screws). Be sure to follow the color coding of the wires so that the connection is correct.
For your attention here are the correct connection diagrams:
As you can see, connecting an infrared heater through a thermostat is quite simple, the main thing is not to mix up the wires and tightly tighten them in the terminal blocks.
A very important nuance is the correct choice of location of the regulator. You should not install the product next to a heater, because in this case, the incoming warm air will negatively affect the accuracy of the measurements. It is best to place the device in a more distant area, at a height of one and a half meters above the floor.
Also note that you need to install the controller in the coldest room, otherwise the heating problem will not be completely solved. As for the number of infrared devices served by one temperature controller, it all depends on the power of the heaters
Typically, one 3 kW controller is used for several products, with a total power of no more than 2.5 kW (so that there is a reserve of at least 15%).
You can read more about connecting a thermostat to an IR heater in our separate article, which provides several installation diagrams!
So that you can clearly see the entire connection process with your own hands, we provide these lessons for viewing:
Video instructions: connecting an infrared heater with your own hands
How to connect a temperature controller
Security measures
Please note that installation of IR panels involves working with electricity. It is very important to exercise extreme caution and follow safety rules:
- It is prohibited to install an infrared heater on the ceiling if fire hazardous objects are located nearby.
- Electrical wiring must be located on a non-combustible base.
- Fasteners must not come into contact with the heating element.
- It is not recommended to install devices with a power of more than 800 W in residential premises.
- The device must not be connected to the network until installation work is completed.
For more efficient operation of the device, it is recommended to place the device near objects that absorb heat well: stone walls, wood, carpets, etc.
Experts do not recommend installing the heater near reflective surfaces, as this reduces the efficiency of the product. The mounting surface must be strong, because some structures weigh about 30 kg, although most of them weigh less.
How to install an infrared heater on the ceiling
- Start installing an IR heater on the ceiling by calculating the height of its location. For living rooms, stop at the optimal height for this of 2-3 meters, this parameter is indicated in the passport for this equipment. The more powerful your heater, the higher the suspension should be. Otherwise, your health may worsen and your head will start to hurt.
- When installing an infrared heater yourself, make sure that there are no crowded places near its placement. Since it is a rather intense emitter, which can lead to unpleasant symptoms - itchy skin and headaches.
- The ceiling infrared heater can be installed using the standard brackets that come with it. Use them to suspend equipment from the ceiling with cables or chains.
- Purchase mounting hooks for wood or concrete in advance, complete with plastic dowels. Next comes the installation of fasteners, screwing the hooks into the ceiling and adjusting the length of the cable or chain to adjust the appropriate height of the suspension.
As you can see, self-installation of infrared heaters is an easily accessible process that can take a maximum of 2 hours of your time. The situation is more difficult with installation on a concrete ceiling, where you cannot do without a powerful hammer drill.
If you decide to install the heater on the wall, then use the same hooks with hangers. Heaters should be tilted slightly downward and in a strictly horizontal position.
Optimal location of the heater
Of course, radiation alone, even from the most powerful heater, cannot guarantee to warm up every corner of the room; you still cannot do without convection. Only warm air moving under the influence of the ventilation flow is able to equalize the temperature and evenly warm the entire room.
Different rooms use their own, most optimal heater installation scheme:
- For a bedroom, the most convenient and effective would be to place the infrared heater at the maximum height above the head of the sofa or bed, so that 2/3 of the surface is located in the shadow of the heat flow;
- For the kitchen and living room, the heater is installed so that the heat flow of infrared radiation is directed to the window sill, the place where cold air flows into the room;
- In hallways and corridors, the heater is installed on the ceiling with the vertical direction of infrared radiation down to the floor. The heat emitter has a truly unique ability to quickly dry the floor and remove drops and residual moisture brought into the room from the street on shoes and outerwear. To avoid damaging shoes, they must be removed from the heat flow of the heater in a timely manner.
In addition, it is necessary to correctly calculate the height of the heater ceiling suspension. For the ceiling in the hallway, the best option would be to place the heater in the center; with a standard ceiling height of 250 cm, only people 170-175 cm tall will feel comfortable under an infrared heater with a power of 700 W.
Therefore, when planning the installation of infrared heaters, you will need to make the ceilings in the hallway 260-270 cm high, or instead of one device, use two low-power 500 W heaters so that it doesn’t get too hot. You can see the features of this installation in the video:
Example of power calculation
Before you begin the process of installing infrared heaters, perform calculations of all rooms in the house. The following values will be used as an example:
- corridor – 5 m²;
- kitchen and living room – 20 m²;
- two bedrooms of 10 m² each;
- storage room – 3 m²;
- bathroom – 5 m².
Figure 2. Connection diagram for IR ceiling heater.
The total area is about 53 m². It is necessary to select a number of infrared heaters that would be sufficient to heat all these rooms. The connection diagram must include all places where installation needs to be done. Determine the total number of infrared heaters based on their power.
In this example, 2 1000 W heaters will be needed to heat the kitchen and living room. Each of them will heat 10 m². In each bedroom you will need to install 1 thermostat - a 1000 W device. To heat the corridor, storage room and bathroom, devices with a power of 500 W will be sufficient. As a result, the total power will be about 5.5 kW. The system connection diagram is as follows: Fig. 2.
Heaters must be installed at a certain height. As a rule, this value fluctuates between 220-350 cm. The heater cannot be installed at a height of less than 50 cm from a person’s head. It is not advisable to connect them where a person is constantly present. For example, it is recommended to exclude installation through the living room or kitchen. To prevent the head from being exposed to infrared radiation, the heater can be moved slightly to the side.
It is important to maintain distances between infrared heaters and surfaces
How to install an infrared heater yourself
Infrared panels are gaining more and more popularity every year. They are easy to use and provide quick heating of the room, and the built-in thermostat allows you to set the desired heating temperature in a few clicks. Moreover, installing infrared heaters yourself is quick and easy if you follow the instructions. Other advantages of this equipment include:
- long service life;
- noiselessness;
- safety;
- spot heating;
- Possibility of use in open space.
It is not surprising that many people are interested in installing infrared heaters themselves. This process does not require special skills and takes from 25 minutes to an hour and a half.
Preparation
Required Tools
In order for the installation of an infrared heater to go as expected, you must have the following tools:
If necessary, more complex equipment can be used. For example, if you are interested in installing several infrared heaters with your own hands, it is best to use a pyrometer for calculations. It will allow you to determine the warmest and coldest places in the room. Based on the information received, you will select the optimal location for each device.
Safety precautions
There is a set of measures that will prevent accidents both during installation and during operation:
- Do not install IR panels near flammable or explosive objects;
Electrical cables must be laid on a non-combustible base;
The fastener should not touch the heating element;
The height at which the panel should hang is 2.5-3.5 meters;
For a house or apartment, devices with a power of no more than 800 watts are purchased.
The device must not be turned on until installation is complete. The device must have an appropriate degree of protection if the panel is installed in a bathhouse or sauna. If all these rules are followed, the installation of an infrared heater will be quick and easy.
Working while people are away
If you choose an infrared heater correctly, then thanks to its performance characteristics it will allow you to efficiently heat the desired areas in the room and provide the opportunity to save significantly. But if you intend to leave the IR heater on while leaving on business, it is best to choose products with a metal plate for radiation
Attention: Quartz heaters should not be left running unattended for a long period of time.
This is due to the fact that quartz models of IR heaters have a spiral in the lamp, which heats up to a temperature of more than 500 degrees and can cause a fire. If a metal plate is installed in the heaters, then its heating temperature does not exceed 200 degrees. If there is a device to protect against overheating, they can be left on without fear.
When connecting IR heaters, external thermostats, fuses and differential devices should be used as protection equipment. Only if they are available can you guarantee that connecting the heater will be safe.
This is interesting: How to warm up concrete in winter?