Oil-filled electric heaters are popular units in everyday life, characterized by high durability, since their production is carried out in an industrial environment using modern technologies. However, these electrical appliances are not designed to withstand all emergency situations in everyday life and still fail.
The design of even the most modern unit allows, in some cases, to repair oil heaters yourself.
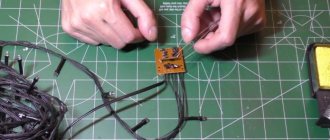
Household oil-filled heating electrical appliances: on the left - flat, on the right - ribbed.
Let's consider this popular household heater from the perspective of assessing the possibility of restoring it after failure, since an oil heater needs to be repaired with a guarantee of the safety of its further operation.
Common oil heater malfunctions, their symptoms and repair methods
Troubleshooting an oil-filled electric heater, like repairing an infrared heater of any other type, requires certain skills and compliance with a number of rules.
Important! If any of the structural elements of the oil heater fail, operation of the heater must be stopped until the malfunction is eliminated.
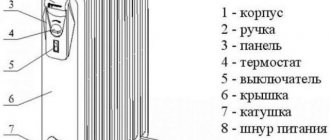
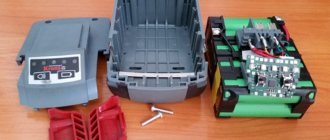
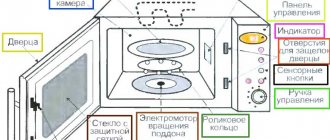
Actual image of one of the models of oil heaters with a list of external equipment
First of all, you should be aware that restoring the functionality of most of the components of this heating device at home is impossible or requires professional knowledge and skills. Experimenting with failed electrical components is fraught with unpredictable consequences (electrical injury, thermal injury, fire, explosion), so repairing an oil heater with your own hands, without professional training, in most cases should only be done by replacing the part that has become unusable.
In addition, when repairing an electric heater, the following rules must be followed:
- the device must be unplugged from the outlet;
- the heater must be cooled to room temperature;
- equipping the device with homemade components is prohibited;
- Avoid contact of transformer oil with the body, as well as with the wiring insulation;
- Replacing a standard power supply cable with a grounding conductor with a wire without grounding is prohibited.
Oil leak
A leak in the oil cooler usually occurs due to mechanical damage or as a result of corrosion caused by a defect in the protective paint coating.
When a long-used, familiar oil radiator leaks, a natural question arises: what to do, why not try to restore its tightness with your own hands?
However, repairing an infrared heater on your own in the event of a leak is only possible if the device is an old-style domestically produced unit with a flat steel radiator and a removable heating element.
Flat oil electric heaters of domestic production with steel radiators
*
To carry out repairs, the control unit, under which the heating element is located, is disconnected from the device body. Then, after disconnecting the contacts, the heater is unscrewed and the oil is drained through the mounting socket into a clean container. The remaining oil is allowed to drain, after which the radiator is filled with water to prevent the oil inside from igniting.
The wall thickness of such radiators is 1-1.2 mm, which allows the use of electric welding. The leakage area on the body is cleaned with a grinder with a grinding disc or manually with coarse sandpaper. Depending on the location and size of the damage, a patch of steel of appropriate thickness is cut out, applied to the hole and scalded using a Kemppi semi-automatic machine.
Kemppi machines of various models for semi-automatic electric welding in domestic conditions
The welding seam is cleaned and ground, after which, if necessary, it is welded again. After degreasing, the repair area is painted with heat-resistant paint, for example, Rustins High Heat Black Pain.
Important! If the heater is painted using powder technology, then when carrying out repair work you need to strive for minimal damage to the coating - it is impossible to restore it under domestic conditions.
Heat-resistant paint Rustins High Heat Black Pain in small volume packaging
After the paint has dried, the radiator is filled 80% with oil, and the heater is assembled in the reverse order.
If the oil heater clicked when heating before the repair, you should not expect that the clicks will disappear after the seal is restored - the mating parts of the housing are deformed when the temperature rises and at the same time crack.
Repairing radiators of finned oil heaters is not advisable, since they are made of thin sheet steel using laser welding. Restoring the tightness of such tanks is technically difficult, does not guarantee success in domestic conditions, or is comparable in cost to the cost of a new heater. In addition, if the heating element is non-removable, then the oil can be drained through damage, but it will no longer be possible to fill it back.
No heating
*
A technically sound oil-filled household heater makes a quiet noise when plugged in. This factor is not dangerous, as it is caused only by the expansion of the assembled body of the unit, which clicks when heated.
If, after turning on the unit and setting the required power and temperature values, the heater is silent, it means that the radiator is not heating, and the fault should be looked for in the electrical part.
First of all, visually inspect the integrity of the electrical cable. If there is no visible damage, you must first remove the racks with wheels from the bottom of the unit body.
Then you need to disconnect the control unit from the radiator, for which purpose, using a screwdriver, pry up and remove the standard plate on top of it with the inscription Do not cover, under which there are fastening screws.
Placement of fastening screws of the control unit to the housing
Having unscrewed the fasteners from above, the screws in the lower part of the control unit are also released or the fixing springs are unfastened (depending on the model), the shell is removed from the edge of the junction of the block with the radiator, and the dismantled unit is laid with the inside out.
Sequence of removing the control unit from the oil heater housing
Perform a visual inspection of the integrity of the wiring and insulation, as well as the quality of contacts at the junctions of the wires, paying attention to areas with kinks and oxidation. A wire with obvious internal damage is replaced with a new one, the oxidized contacts are disassembled, cleaned with sandpaper and reassembled.
Upon completion of the visual inspection, they begin to “test” the components using a tester - a multimeter, which begins with testing the cores of the wire section from the plug to the nearest connection. The operation is simplified by the different colors of the cores in the cable of the electrical appliance, which makes it easy to track the direction of the wiring.
The sound signal from the tester indicates the integrity of the area being called, while the absence of a signal indicates damage.
The initial stage of testing an oil heater using a multimeter is the section from the plug to the heating element
Replacing the Tubular Heater
*
The heating element, in addition to heating elements, is equipped externally with current and temperature fuses, the presence of which must be taken into account when dialing. It is possible that, with a working heating element, one of these fuses burned out, or even both failed.
Heating element fuses: on the left - by temperature, on the right - by current
If testing nevertheless reveals a failure of the tubular heater, then further actions depend on the method of installing the heating element in the radiator. The threaded fastening of the heater in the absence of rolling allows its replacement. In this case, the heating element is unscrewed from the radiator, and in its place, with the replacement of the sealing gasket, a heater with identical parameters in terms of power and shutdown temperature is installed.
Tubular electric heater with a threaded installation method in a heating unit
With a non-removable installation option, the heater is rolled into the radiator socket. In domestic conditions, it is very difficult to flare an old heating element and install a new heating element by sealing it, so you should think about buying a new oil heater.
Temperature controller malfunction
Testing this node is done as follows:
- ring the section of the chain from the plug to the thermostat;
- the regulator is set to the minimum temperature value and tested - the circuit must be open;
- when turning on each of the heaters individually, as well as two heating elements simultaneously, when setting the temperature regulator to a value other than zero, the circuit must be closed.
View from the inside of the thermostat of a Sinbo household oil heater with a power of 2 kW.
If a test of the thermostat shows its malfunction, that is, the oil heater does not respond to switching power modes or changing the temperature by turning the flywheel, the device must be replaced, since diagnostics of its technical characteristics with subsequent repairs based on the test results in industrial conditions are not advisable, and it is extremely difficult to do this in domestic conditions.
If there are no malfunctions, the regulator is cleaned of dust and the contacts are tightened.
Failure of the bimetallic strip
*
The question of whether an oil heater can explode is relevant, since the oil pressure in the radiator reaches high values, and the air “cushion” in the form of 20% of its volume still has limited potential. To prevent this from happening, the heater design contains a thermal relay, which should turn off the heater if it overheats.
Under normal conditions, this relay, which is a bimetallic strip, should complete an electrical circuit. If the multimeter detects an open circuit in this thermal fuse, then it should also be replaced with a new one with identical characteristics.
Continuity of the thermorelay of an oil-filled heater and appearance of the thermorelay
Oil heaters explode extremely rarely precisely because they have several degrees of protection that duplicate each other, and the likelihood of simultaneous failure of all safety devices is low.
No heater shutdown when tipping over
Opening the electrical circuit when the oil heater is tilted or tipped over is ensured by a device whose operating principle is based on the presence in its design of a suspended weight, which retains its position when the unit deviates from the vertical.
An option for equipping the oil heater with a circuit-breaking device when the device overturns is a plumb line with a metal weight
Testing of this device is carried out by manually deflecting the heater from the vertical. If the device does not turn off, the element must be cleaned of dust and removed, or better yet, replaced with a new one, the installation of which is not difficult.
It should be noted that if the protective switch fails, the oil heater does not explode - if heating elements that are not covered with oil overheat, the thermal protection of the tubular heater is triggered, or the thermal relay opens the electrical circuit.
Making a heater from improvised materials
How to make a homemade oil heater? Many video reviews on social networks are devoted to this topic. The principle of collection is identical everywhere, only the external indicators and the purpose of the heater differ.
The article presents an average option that is suitable for both a garage and a cottage or home. The appearance of the radiator and its functionality will depend on your capabilities, skill and availability of materials.
Preparation of material
A set of necessary materials will probably be found in the garage of every car enthusiast or skilled home craftsman. What you will need to create a heater:
- metal pipes or cast iron battery,
- heating element,
- new or used oil,
- wire with plug,
- welding machine if you plan to form the required dimensions of the structure.
Let us dwell in more detail on the principles of material selection.
The battery can be used, the main requirements are integrity, absence of external and internal contamination. For remodeling, time-tested cast iron samples are usually used.
Metal pipes can be used in different diameters, shapes and lengths; the thickness is also chosen at your discretion. The more area you need to heat, the larger your design should be. Radiators from cars and sealed metal containers are also actively used for the body.
Characteristics of the heating element for a homemade heater:
- 220V voltage is sufficient for connection,
- power 1.5–5 kW.
These parameters will be sufficient to heat a garage area and an average room.
You can use used car oil for the radiator or purchase new one. Before adding used oil, it is recommended to filter it and remove impurities and dirt.
Heater stand
Craftsmen offer two options for installing an oil heater: floor-mounted and wall-mounted. The most advantageous and convenient is wall-mounted; it takes up little space and is quickly hung in the chosen location on hooks deeply and firmly planted in the load-bearing wall.
Making a floor stand is not difficult. To do this you will need a metal corner or profile. Dimensions are selected based on the overall dimensions of the structure. We arm ourselves with a welding machine, a grinder and get to work.
- We draw a diagram of the structure of the legs and calculate the dimensions of the elements. It is recommended to provide for the possibility of disassembling and removing the stand in the future. It is possible that you will want to remove it during the warmer months.
- According to calculations, we cut all the parts of the future stand and sand the edges.
- We weld all the workpieces according to the diagram.
- We clean the welds and paint.
Working with pipes
Let's move on to more complex work - forming a body from metal pipes. First of all, we draw a drawing and determine the main parameters of the elements. Only after careful calculations can you start working with the grinder.
- We cut the pipes according to the diagram and carefully clean the ends.
- We weld the structural elements and install plugs; the tightness and operation of the entire radiator as a whole will depend on the quality of work.
- One of the lower ends must be left free. In the future, a heating element will be installed there. In the upper part it is required to provide a safety valve and a filler plug; it is made in the form of a welded squeegee with a coupling. The valve will allow you to control the pressure and secure the structure.
- We carry out piping using pipes of smaller diameter.
Installation of heating elements
The part of the homemade body responsible for working with electricity is easy to do and does not require special knowledge. You will need a heater radiator, a heating element, a gasket made of thermo-oil-resistant material and a wire with a plug.
The step-by-step steps for installing the heating element are as follows.
- We cut out the metal plate to which the heating element will be attached.
- A hole is drilled or cut out by electric welding in the plate to install the heater fasteners.
- We weld the plate to the end of the lower pipe. Previously, this place was specially left for installing a heating element.
- We process the seams after welding and install the heating element.
Now you can begin laying the gasket made of special heat-resistant rubber and attaching the electrical wire. At this point, you can complete the assembly and start filling in the coolant, namely oil.
Important: according to safety rules and technical standards, the amount of oil per total internal volume should be 80–85%.
Precautionary measures
An oil heater is a popular heating device that does not include complex technical solutions. When repairing the housing, it is necessary to carry out work in a well-ventilated utility room.
When repairing electrical wiring, disconnect the device from the power supply. Repairs must be carried out using insulating gloves.
Restoring failed radiator modules at home is dangerous; in this case, only installing new parts is allowed.
Installation
When installing convectors, you must comply with fire safety rules and working with household electrical appliances. Despite the safety, safety modules, a convector hung on the wall is a potential threat to the life and health of people and pets.
Finned heating element
General installation requirements
More often, questions about installing convectors arise with wall-mounted and in-floor models.
When installing a wall-mounted convector, the following requirements must be observed:
- Mount on the wall using the brackets supplied with the convector.
- The installed convector must be located on the wall no lower than 300 mm from the floor surface, no closer than 500 mm from above, on the right or left side of objects, no closer than 300 mm to the electrical outlet.
- The convector should not be blocked by furniture or curtains.
- The best place for installation is on the wall under the window, the distance from the device body to the wall is at least 30 mm.
If you plan to install an in-floor convector, you need to remember:
- He will need a niche in the subfloor. The dimensions should exceed the dimensions of the device body by 50-70 mm.
- It is necessary to provide for the possibility of hidden wiring for power supply. Must be protected from moisture, children, and pets.
- Periodically, the equipment must be cleaned of any debris that has gotten inside.
Monolithic heater
Installation
Installation involves removing it from the packaging, assembling the mounting bracket, marking holes in the wall for self-tapping screws (you need to check the parallelism of the floor with a building level), screwing the bracket, and installing the device.
The in-floor design is somewhat more complicated. It makes more sense to install it in monolithic concrete screeds. After opening the finished floor, recesses are formed in the subfloor using a wall chaser for the device body and power cables. An even layer of cement and gypsum mortar is applied to the bottom of the recess. The device is installed on top, and a solution is placed in the spaces between the body and the walls of the recess.
The cable laid in the grooves is filled with solution. After the structure has dried, the finished floor is returned to its place, and the joint with the side of the device is sealed with silicone sealant. The device is covered from above with the included removable decorative grille.
Connection via contactor
How to check a bimetallic strip
Modern oil radiators are equipped with a bimetallic plate to protect against overheating. When the coolant pressure in the device reaches critical values, the part opens the circuit and forcibly stops the operation of the device.
The bimetallic strip may become deformed. Its serviceability is checked as follows:
- Open the radiator control panel and use a relay to set the temperature not too high to change the position of the plate.
- A powerful hairdryer is applied to the part until it reaches the specified degree of heating.
- They look at the reaction of the plate - a working element should bend and disconnect the contact. The deformed part will remain motionless after exceeding the set temperature.
The broken bimetallic plate is replaced with the same new one. After doing the repair yourself, you must first make sure that the part is working correctly and test it according to the above diagram, and then assemble the heater.
Advice! If the new plate also does not unbend at the required moments, it is adjusted by changing the pressure of the element to the contact corresponding to the minimum temperature.
If the bimetallic plate breaks, it is easier to replace the entire thermoregulation unit
Checking internal connections
Before opening the convector, you need to read the operating instructions, find a detailed diagram and study it carefully. The design of the convector is quite simple, and you can understand it without technical education.
First, you need to check the power button, if it is working, then move on: remove the front panel of the device to open access to the internal device. Visually check all the wires approaching the terminals - look for signs of burning or loosening in the tightening of the fastening screws that secure the mounting wires. If you find a screw that has become loose due to a broken thread, replace it with a new one and tighten it. We remove the detected scale, clean the wire connection area by disassembling the connection. This operation must be approached thoroughly: clean the washers and the exposed part of the wire with sandpaper, then reassemble everything, tightening the screw firmly.
Then we check the temperature regulator using a multimeter. In electric convectors of different models, it is this mechanical switch that can break.
Types and design of convector
The convector device enhances natural convection, as a result of which air heated by heating elements or a coolant rises upward, and cold air falls down.
Convectors are divided according to their characteristics:
- Installation type: floor, wall (horizontal, vertical or ceiling), built-in.
- Heating principle: water, gas, electric, infrared.
- Circulation principle: natural, forced.
Floor convectors are mobile, but they need a constant connection to an outlet. Wall convectors are more common and have a small thickness. Wall-mounted convectors have a variety of attractive designs, attract little attention and do not spoil the overall interior.
The installation of such a convector must be thought out in advance - at the construction stage, because This type of convector requires niches, channels, and supply coolant. These convectors look like a grate in the floor through which warm air rises.
Water convectors made of copper and aluminum or other materials are a good alternative to radiators. The gas convector system is the most economical due to the affordable cost of fuel, but such a convector is more dangerous, so they are extremely rarely used in residential premises.
Convectors with forced circulation have a fan that increases the speed of rising warm air and cools the heating element. With the help of an electric convector you can quickly heat your house, because... they do not require pipes, a heating boiler, etc. to operate. To calculate the number of convectors sufficient to maintain a comfortable temperature in the room, it is enough to have the dimensions of the room, the number of windows and a calculator.
The most common brands of convectors that can be purchased in Moscow and other cities:
- Timberk;
- Ballu;
- Noirot;
- Thermia.
The use of electric heaters is permissible in any room where there is an outlet, subject to safety precautions.
The design of almost all convectors includes:
- Thermostat;
- Electronic rollover sensor;
- Thermal fuse;
- Screen.
The thermostat regulates the temperature of the heating mechanism and the air leaving the convector. On models in the lower price range, mechanical thermostats are installed, which regulate the temperature more roughly. Models in a higher price category have electronic thermostats. Electronic thermostats allow you to more accurately set the temperature value - down to 1/10 of a degree. In everyday life there is no need for such precision in adjusting the temperature value, so using a convector with a mechanical thermostat will not cause discomfort. To quickly heat the air, the thermostat value is set to the maximum value; after warming up, the value can be set lower.
It makes more sense to use a convector with an electronic thermostat in rooms where strict temperature conditions must be observed. Convectors also have a voltage supply switch to the heating element. It allows you to turn on all heating elements separately or at once. Convectors with a power of 1,500 - 2,500 W have several heating elements.
Because If there is a possibility of floor-type convectors tipping over, which can cause a fire, they are equipped with a safety device that turns off the power to the heating element. Disconnection occurs due to the opening of contacts in the event of a fall, when the value of the specified angle changes. The thermal fuse protects against overheating by turning off the fuel supply (gas, electricity) when the required temperature is reached. The screen or air damper serves to direct the air flow.
Solar heating system design
A solar heating system can do more than just heat a home. Since some regions experience a large number of sunny days a year, this allows the use of this type of heating to obtain a high-quality hot water supply system in the house, which will be used for domestic needs.
If we take this into account, we can confidently say that such solar installations will be more economical, even despite the high price of the collector and auxiliary equipment. In addition to heating radiators and hot water supply, you can use auxiliary elements such as heated floors and heated towel rails
Kinds
The principle of operation for all models is the same - they heat the air circulating between the elements of the heating devices. The heated air, becoming lighter, rises, and heavier, cooled air takes its place. Devices are divided into groups according to installation method, type of heating element, power, and additional functions.
By installation method:
- Ceiling - located almost at the ceiling of the room.
- Wall-mounted - need to be hung on the wall, just below the window openings.
- Floor-standing - can be placed in any desired place in the room, near the wall, in the center.
- Skirting boards - mounted in place of classic skirting boards along the walls.
- In-floor - immersed deep into the thickness of the floor, along large window openings, external walls.
Heating elements:
- Needle-shaped.
- Finned heating element.
- Monolithic.
Power - 1.5-2.5 kW. Models with larger and smaller characteristics are less common. A power of 1.5 kW is enough to heat a room with one external wall, an area of about 10-15 square meters. meters, 2.5-3 kW can withstand standard wiring.
Heater replacement
It is not difficult to repair convectors with your own hands if there are domestic heating elements inside. If they are open, then repairs can be made using the following method:
- Remove the spiral from the bar.
- Measure its length and wind a spiral of the same cross-section from nichrome wire.
- Place the spiral on the ceramic strips (put on ceramic safety beads).
- Place it back in its original place.
Closed types of heaters change in a similar way - the burnt-out spiral is removed from the hermetic glass flask, and a new one is inserted in its place
But first, it must first be washed in gasoline to remove the grease - only after this can you begin final assembly with all precautions
If a heating element is installed in the convector, then your task is to accurately determine its inoperability, and replacement is even easier than in other cases. A new heating element is installed in place of the burnt-out heater, followed by connecting the current-carrying wires.
Heating element repair
Prerequisites for breakdowns
A significant number of manufacturers supply cheap products of low quality to the markets. An early breakdown of a water heater in this group does not come as a surprise, since even the warranty obligations for the products are minimal. However, even high-quality products, distinguished by their quality and reliability, may end up being repaired soon after purchase due to a number of factors, which are not at all difficult to avoid.
The main causes of water heater malfunction
hiding in our everyday life. Hard water and unstable power supply have a detrimental effect on equipment. Our water contains various salts in large quantities. It is they that lead to the formation of scale inside devices and operating circuits. Installing flow filters at the inlet of the heaters will help to significantly reduce the salt content. In the supply networks of most regions, voltage and frequency can vary significantly in a short period of time. Connecting network filters or uninterruptible power supplies will solve the problem.
It is important to install and connect the device correctly. Many breakdowns occur precisely due to errors at this stage.
Even ignoring conventional grounding can not only lead to electrical shock, but will also contribute to the accelerated destruction of the magnesium anode and severe corrosion of all elements inside the tank. The optimal heating temperature is set to 60-70 C.
Is it possible to repair an oil radiator?
Damage to the heater is caused by electronic or mechanical failure. In the event of electrical equipment failure, pay attention to the heating element, control unit, fuses, relays and switch. In rare cases, the cause of the malfunction is the electrical wiring.
Mechanical damage includes breakage of the housing, rupture of sections from which oily liquid may leak. This malfunction is determined by inspecting the location of the oil heater. If there is an oily stain under the device, the housing is damaged.
Sometimes during diagnostics, specialists identify complex breakdowns with the replacement of expensive parts. In such cases, it is cheaper to purchase a new oil heater than to repair the old one.
What to do if the heater does not turn off when tipped over
Most modern oil heaters automatically turn off when changing position. The role of the sensor is performed by a special plumb line with a weight, which is sensitive to deviations from the vertical.
The element is simple and quite reliable, but in an old heater it can turn sour in one position. Do-it-yourself repairs are carried out as follows:
- Remove the cover of the device to gain access to the internal parts.
- Manually test the heater again, tilting it to the sides, and monitor the position of the plumb line.
- If there is no reaction, clean the mechanical sensor from accumulated dust, and then develop it with careful movements.
If the weight moves too tightly even after repair, it is better to change it.
The plumb line with the load should be located at the top of the device next to the thermostat
Removing the heater housing
Most modern electric heaters are not difficult to disassemble. The case can be disassembled quickly, after unscrewing several screws. But at the same time you need to carefully monitor the order in which the parts are removed. Many manufacturers use the housing as a supporting structure, attaching parts of the heater engineering solution to it.
The biggest difficulties arise when disassembling oil heaters. Here the main circuits and sensors are covered with a lid. It can be easily removed: to pry the latch, you need to carefully move a thin metal object (screwdriver, knife) around the perimeter of the lid. This must be done carefully, without scratching the part. After determining the location of the latch, press on it and remove the cover.
Checking internal connections
Before opening the convector, you need to read the operating instructions, find a detailed diagram and study it carefully. The design of the convector is quite simple, and you can understand it without technical education.
First, you need to check the power button, if it is working, then move on: remove the front panel of the device to open access to the internal device. Visually check all the wires approaching the terminals - look for signs of burning or loosening in the tightening of the fastening screws that secure the mounting wires. If you find a screw that has become loose due to a broken thread, replace it with a new one and tighten it. We remove the detected scale, clean the wire connection area by disassembling the connection. This operation must be approached thoroughly: clean the washers and the exposed part of the wire with sandpaper, then reassemble everything, tightening the screw firmly.
Then we check the temperature regulator using a multimeter. In electric convectors of different models, it is this mechanical switch that can break.
Operating principle and design of a gas-type convector
Let's consider a gas convector; its operating principle is very simple and is based on the ability of gas to change properties as the temperature level increases. When cold air passes through the heat exchanger of a convector device, it heats up, decreases in weight and begins to rise. Next comes new portions of air masses. This process is called convection.
The convector can operate on liquefied gas and natural gas.
To change the device's power source, you need to reconfigure the gas valve. Most often, a gas convector is placed under a window. This allows the unit to operate more efficiently. Since it is in this place of the room that heat loss is greatest.
Let's consider the device of a gas convector for heating a living space. As a rule, the device consists of the following components:
- Frame. Performs protective and decorative functions. Made from high strength metal. The surface is treated with heat-resistant paint with anti-corrosion properties.
- Heat exchanger. Designed to heat air.
- Gas-burner. Located inside the heat exchanger. Consists of the main and ignition parts.
- Combination valve. Allows you to control the gas pressure level.
- Combustion product removal system.
- Tangential fan. Responsible for the rate of supply of heated air, improves the process of heating the room.
Depending on the device, all devices are divided into two types: fireplace and parapet. The operating principle of a fireplace type is similar to that of a conventional stove. Parapet options are safer and more environmentally friendly. They are easier to install. Therefore, it is the most widely produced and used type.
Connection to gas supply
This is the most important stage and must be taken very seriously. If you do not have special skills, it is advisable to entrust the work to specialists. Repairing gas convectors with your own hands is also unnecessary. This is for professionals.
The connection is made according to the following algorithm:
- Making a bend on a gas pipe. If there is a special outlet, you just need to screw the tap onto the pipe.
- Gas pipe supply to the convector. In this case, it is necessary to ensure that the fitting connection is perfect.
- When laying a pipe, it must be secured with clips at intervals of 1.0 m.
- Call a gas service worker to check the connections.
Conclusions and useful video on the topic
Video material from a professional technician working in the service department of the Bosch dishwasher manufacturer.
The sequence of replacing the heating element, a detailed explanation of the nuances of operation. Tips on the practical use of heating elements applicable to specific modifications of dishwashers.
The heating system of the heating element is located in the dishwasher at a close distance to other control units. Because of this fact, replacing it or the entire pump + heater unit seems like a troublesome and difficult task. But if you follow the instructions, the repair will be successful and safe.
The main condition for replacement is strict adherence to the sequence of dismantling the inoperative machine unit and care when installing a new element.
The next step is checking the thermal protection element
Finding it was not easy, since it was hidden in an insulating tube.
Unscrew its fastening and tighten the tube. It works like a fuse, it trips (breaking the circuit) when the temperature is exceeded and when it cools down it returns to its original state.
This is where the same dialer comes to the rescue. We simply connect its ends on both sides. The presence of a circuit indicates the serviceability of the thermoelement. And again no fault was found.