Hello my dear friend! Before we look at a DIY Wi-Fi signal amplifier, let's look at all the possible ways to expand the coverage area of a wireless signal.
The fact is that many do not understand: the principle of amplification; what does it depend on; why does he fall? and also what influences this. Because of this, such “homemade” people, after they finally make such a Wi-Fi amplifier, begin to understand that it is in vain. First of all, you need to understand why it is needed.
One needs to catch a signal over several kilometers, and the second doesn’t like the fact that he has two bars on his phone in a three-room apartment. Also, some people want to improve the signal in a large country house. All methods of amplification will be different and there is no point in using the same one. Now I advise you to read this article.
Please take the time to read it. It explains very briefly and clearly what exactly the signal amplification in the radio space depends on. Otherwise, you will not understand anything further or make the wrong choice. Further, after reading, we will look at several options for signal amplification, and only then you decide for yourself which one is better.
Setting up the router, installing and improving the signal
A radio wave, if you knew, it has a very interesting property of being attenuated and also reflected. Reflection is stronger from metal surfaces and mirrors. Attenuation occurs more strongly from thick concrete walls, and the thicker the walls, the stronger the attenuation. First of all, you need to think about whether my router is installed correctly. Perhaps it can be installed so that everything will have enough signal and there is no need to amplify it.
Therefore, for this reason, I wrote a separate complete instruction and you can read it here. It tells you how to properly install the router, as well as how to increase the transmitter power. However, you need to understand that not all firmware supports this function.
Also, very often in large cities, a poor signal may indicate that several more neighboring routers are on the same channel. In general, the Internet center should select the channel itself when rebooting, but this does not always happen. Therefore, you can find and select the optimal channel yourself. Full instructions on this can be found here.
How to test changes
The simplest and most affordable option for testing a homemade Wi-Fi antenna is to measure changes in the speed of the Internet channel. To do this, a comparative study of the results is carried out alternately with a connected standard antenna and a self-made one. You can carry out such measurements, for example, on the Speedtest resource. The system will automatically select the optimal server, check ping, download and upload speed.
To confirm the result, it is recommended to test the Internet speed 2-3 times
Repeater
Now we have reached the most interesting Wi-Fi signal amplifier, which actually amplifies radio waves. Essentially, a repeater or repeater catches a signal from the central router, being in sight, and repeats this signal. You can say it is a kind of Wi-Fi zone extender.
This is very convenient if you need to strengthen the signal only in a certain place. At the same time, you can connect such a device either via WiFi or cable. Stationary repeaters work from an outlet - plug it in, configure it and it works. My colleague wrote a complete analysis of these devices here. They are not expensive and work reliably.
What are Wi-Fi signal boosters used for?
To understand why a repeater is needed, you need to know how a Wi-Fi signal amplifier works - it picks up waves emanating from the main router, clears them of interference, restores them and broadcasts them further. It is recommended to use the device in large apartments and private houses, where there is a problem with weak connections in rooms remote from the modem. A repeater is useful where there are problems with the signal, and a laptop, phone and other gadgets often lose the network.
Pros of using a repeater:
- the repeater is cheaper than a PLC adapter;
- simple setup, or rather, the absence of it, you just need to plug the device into a power outlet and press a button on it;
- significant expansion of Wi-Fi coverage area.
Disadvantages of the device:
- it is necessary to carefully select the installation location of the repeater so that unimpeded duplication of the signal and its transmission occurs;
- repeaters negatively affect connection speed.
Additional Information! In large venues with many rooms, multiple repeaters can be installed to completely eliminate signal dead spots.
Repeaters work not only from the network, there are models with a USB port, they are connected directly to the gadget
Homemade
Now we have finally come to how to make an amplifier at home. First, a short excursion. If you read the first article to which I provided a link, you should understand that there are several types of antennas. Narrow and omnidirectional. If you look at the figure below, you can understand that omnidirectional ones are most often used at home.
To transmit a signal over a long distance when setting up a bridge, highly directional ones are used. Next, I will tell you first how to make a home one, and then how to make an external antenna or gun.
A little theory
Before you start choosing the type of antenna and putting your grandiose plans into practice, you should familiarize yourself with the fundamental laws of the theory of antenna-feeder devices. There are two of them:
- Wavelength, which determines the size of the device.
- Gain. The most interesting point, which makes it possible to detect a weak radio signal over long distances, is exactly why we are taking on this matter.
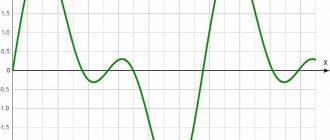
The magnetic field strength diagram of any radio signal has the shape of a sinusoid. The distance between the first and third points where it intersects the x-axis is called the wavelength.
The frequency rating is the number of oscillations per second. Since a radio signal travels at the speed of light, the wavelength in meters will be equal to the result of its division by the frequency. For low frequency (most common) Wi-Fi range: 299792458 / 2.4 = 12.5 cm.
Remember this value, since all dimensions of the future antenna will be calculated as its fractional parts.
Gain is a conditional value that shows how many times the output signal at the terminals of a directional antenna is greater than that of an omnidirectional antenna. Moreover, this ratio is calculated as a decimal logarithm and is denoted dB - decibel. Omnidirectional is one for which the position relative to the radio signal source is indifferent. These are used in mobile phones and tablets, since this is, firstly, assumed by the terms of use, and, secondly, determined by the small size of the devices.
The directional properties of an antenna appear if its length is equal to half the wavelength. For Wi-Fi it is 6.25 cm. Its spatial radiation pattern is a torus - a donut, perpendicular to the antenna axis. The gain in this case is equal to two decibels, that is, 1.58 times. Such half-wave dipoles allow you to increase the range by ten meters, which is already good for reliable signal reception in your apartment.
Home
- I made the mounts and base from a regular CD stand. You can use something like this. I made even round cuts in the middle to accommodate the antenna.
- Look at the picture above, it should look something like this.
- We take copper wire up to 4 mm in diameter and make squares like these using pliers. You can see the dimensions in the picture. You also need to leave about 1-1.5 mm in the center.
- Now let's take a piece of coaxial cable. Removes about a centimeter of the top braid. Now we solder the core to one corner, and the braid to the other.
- We push the cable inside and glue the antenna to the center.
- We also seal the top with glue.
- To prevent the wire from being torn out, I also recommend gluing it to the base from behind.
- You can solder the wire directly to the board. Or just make an adapter and screw it to the antenna output.
- The end result should be something like this. You can put a disk on the back, which will scatter and reflect the signal in the desired direction.
Connection
The method for connecting the Wi-Fi antenna depends on the type of router, adapter or other device you are using. In most cases, you will have to open the gadget, find the place where the standard antenna is connected (soldered), and similarly attach (solder) a homemade cable. It is very convenient when the gadget provides an independent connection for an external antenna; this can be done in the form of:
- connector in the battery compartment, on the back cover of the device, inside the case, etc.;
- the so-called pigtail (usually located directly on the device board).
If the adapter has a removable standard antenna, a homemade design can be connected instead.
In any case (excluding the option with soldering), you will need an appropriate connector, which can be purchased at a radio store.
Photo gallery: options for connecting an external antenna
The connector for connecting an external antenna can be hidden under the cover of the router
Antenna connectors may vary in size and design
You are lucky if your router has an output for connecting an external antenna headset
You can install the pigtail socket on the body of the gadget yourself if you are confident in your own abilities
A tiny connector on the device board is used to connect a special pigtail extension cord
Sometimes the fastest and most reliable option is to solder a cable instead of a standard antenna
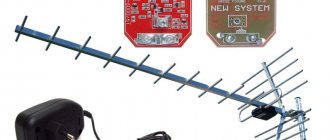
Homemade narrow beam antenna
I’ll say right away that the antenna is external and will be used to transmit data over a distance of up to 10 km. By the way, it can also be used to improve the signal of a 3G/4G modem, since approximately the same frequency is used.
First of all, look at the diagram above. All the exact dimensions are indicated there, which we will strive for as we work.
- So, we will need a sheet of copper, a stud and nuts. Now you need to very carefully cut out all the circles to size.
- Now we carefully screw all the circles to size except the last two (the largest).
- Now on the penultimate one you need to make precise holes at an angle of 90 degrees, as in the picture above.
- To connect, we will also need an old antenna from the router. You need to remove the top two layers and expose the braided wiring.
- And now we need to make similar holes on the last circle opposite the penultimate circle into which we will push the antenna. After that we screw the circles. Now be very careful - you need to solder the braid to the last circle, and the wiring that goes in the center to the penultimate one.
- The second pair of holes will be needed for the coaxial extension cable. It is necessary to make the entrance in such a way that the central core of the cable reaches the second circle. But this same central core should not touch the first circle - so you may need to widen the hole a little. After this, we solder the central core to the second circle and glue the wire itself.
You can connect such an antenna to a router, 3G, 4G modem. To use the bridge, you will need a second one - similar. It needs to be installed as high as possible so that there are as few obstacles as possible, trees, houses, etc. below in the path of the radio wave. Also, the antennas must be installed clearly to each other.
How to strengthen the Wi-Fi signal at home: choosing a recipe
Top
- Ratings
- Reviews Smartphones and Tablets
- Computers and laptops
- Accessories
- Periphery
- Photo and video
- Accessories
- TV and audio
- Home Appliances
- Programs and applications
- Purchase
- Smartphones and tablets
- Games