The heated floor system is widely used today in the design of residential premises. Such heating helps to distribute the temperature evenly and maintain a comfortable microclimate in the room. The choice of system and its installation technology depend on the type of floor covering.
Let's figure out how to make an electric heated floor under tiles and indicate acceptable installation methods. In addition, we will provide step-by-step instructions on arranging underfloor heating and describe the important points of connecting the system to the power supply.
Choosing the best option
You can heat the floor covering using a heating cable or thermomat. Each option has its own advantages and disadvantages, which you should know about before going to the store.
Cable electric underfloor heating has a lower cost, but it is quite difficult to correctly calculate the cable length and install it. In addition, laying a cable heated floor under the tiles involves installing a thicker floor screed, which will lead to a decrease in the height of the room.
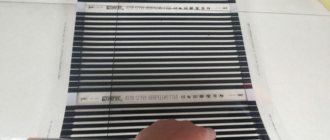
A heating mat is an improved version of a conductor and therefore has great advantages. Among the design features, we can highlight the placement of the cable on a special mesh made of fiberglass fabric with an even pitch between the turns.
One of the advantages of a thermomat is the simple calculation of the material; for this, it is enough to know the area of the room. Using this parameter, a roll of the required size is purchased in a specialized store.
Features of using tiles
Using tiles is very convenient, but for all its advantages it has several disadvantages:
- If moisture gets on the surface, the tiles can easily slip.
- The floor is cold and walking on it is then uncomfortable.
The latter circumstance is especially evident during the winter period.
The first of these disadvantages can be overcome by choosing tiles with a special surface. In the second case, the problem can be solved, but for this it will be necessary to install a warm floor.
Installation of heated electric floor
Laying cables and mats is carried out according to the same scheme, only the basic processes differ. At the same time, it is very important to understand how to properly install a heated floor under the tiles.
Surface preparation
To ensure high-quality installation work, you should pay careful attention to the surface preparation stage.
- The old coating is removed and the surface is cleaned of debris, dirt and dust.
- If there are unevennesses, make a rough floor screed. To do this, level the surface with a solution, the thickness of which can be about 7 cm.
Step-by-step installation of a single-core thermomat
If you are planning to install a heated floor with your own hands and have chosen a single-core thermomat as the base electrical system, then it is worth keeping in mind that it is installed in strict accordance with a technological cycle that has a very specific sequence:
- First of all, you will need to draw up an installation plan or installation plan, as experts say. And you shouldn’t listen to those who call this operation unnecessary.
- Then the distribution/installation boxes are installed, and (according to the pre-installation plan drawn up) the tubes for the temperature sensor are installed.
- It will also be necessary to provide high-quality warm floor screed. And you can use:
- a rigid thermal insulation board 2-3 cm thick;
- Styrofoam;
- hard plugs;
- or polystyrene foam.
- The resistance of the electric mat is checked, and then its cutting is done. The fiberglass mesh will need to be cut to suit the features of the existing layout. This is very easy to do, because the material has neither a face nor a backside, the only important thing is not to interrupt the cable. Therefore, when laying a heated floor using thermomats, they rarely use sharp or cutting tools (except for the moment when they cut the mat itself with extreme caution), they try to work in shoes with soft soles and carefully ensure that they do not step on the cables or interrupt them with construction materials. garbage.
- The mat is placed on a completely finished screed, which at this stage is the working surface. Fiberglass mesh, equipped with a thin cable system, is laid out on the floor so that the distance from the walls is at least 10, or even 15 cm. You will have to retreat from the batteries by 15-20 cm.
- And you need to spread the thermomat in such a way that both of its cold ends lead to the power supply.
- As mentioned above, electromatte heated floors work with a thermostat. And it’s better (to save energy) if such a regulator is equipped with a special “floor sensor” that shows its current temperature, but also in a number of models automatically turns off the heating when the readings exceed the designated control point on the temperature scale.
- The floor sensor is placed in a corrugation, which is then located in a canvas specially grooved for it and between the cable branches. After all, it reacts exclusively to temperature changes in this situation.
- The end of the corrugation must be plugged so that not a drop of solution or, for example, glue gets on the floor sensor.
- Next, the cold ends (pre-shortened to the required size) and the floor sensor are connected to the thermostatic device.
- A qualified tiler can begin laying the tiles immediately (after checking the resistance of the mat again). But if we are talking about an amateur who has decided to equip a heated floor on his own (and in general, if you adhere exactly to the letter of the technology), then it is first recommended to fill the laid cable mats with tile adhesive. This is done in order to avoid damage to the heated floors when laying the tiled flooring. However, no glue is used, but only special adhesives based on epoxy resin that can withstand high temperatures. When heated, such adhesives become elastic and do not crack at all.
- The glue used to fill thin-cable single-core thermomats is diluted to a “sour cream” consistency, and then thickly applied with a spatula directly over the laid fiberglass mesh equipped with a cable pattern. So that there are no voids left and no air gaps. But the thickness of such an adhesive coating should not exceed 2.5-5 mm.
- Then you will need to wait until the adhesive layer dries completely.
- And only then start actually laying the tiles on the floor.
Thermomats with a single-core cable have a number of advantages over the same two-core cables. They:
- cheaper;
- thinner;
- have greater linear power, and therefore a higher heating rate.
But for mats with a two-core cable that do not have a second cold end, there is no need to necessarily lead it to the first. This means that there are no special requirements for cutting and laying such mats.
The advantages of mats with a two-core cable are described in the video review:
Drawing up a laying scheme - how best to lay a heated floor
A wiring diagram for an electric heated floor is necessary for the correct placement of the heating mat or cable. It is drawn up before installing a warm floor under the tiles and calculating the required amount of materials.
When drawing up a diagram, you must adhere to the following recommendations:
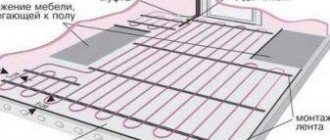
- The distance from the walls to the contour of the heated floor should be at least 10 cm.
- Do not place the material under furniture without legs or household appliances. In this case, the heat given off will return back, which will cause the conductor to overheat and fail.
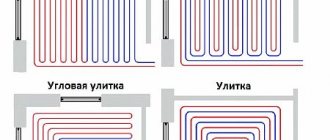
- Laying can be done not only in a straight line. Trimming individual sections of the grid allows you to direct the path in the desired direction. As a result, a certain area is heated, which helps reduce energy costs.
How to choose the right system
In order to decide which warm floor for tiles is best to choose, you need to determine your preferences. To do this, you need to take into account the following:
- Since we are talking about installing a heating system, it is necessary to determine what power it should have. Can be used as the only or additional heating unit in the house. In these cases, power requirements will vary.
- You need to decide how much you need to use the screed. Although it provides reliable protection for heating elements, in some cases it can create additional inconvenience. There are alternative options for making the top layer of the floor.
- When analyzing the situation, you need to take into account the type of room. in which the installation will take place. In a city apartment there are more restrictions to choose from compared to a private house.
- You need to decide what level of costs the owner can afford. In this case, it is necessary to consider not only the cost of the installation, but also how much it will cost to operate.
Methods for laying a water floor Source bg.aviarydecor.com
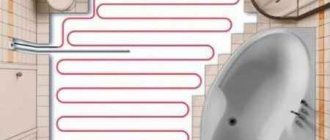
If the house uses tiles for the floor, then installing heating under it will not only warm up the apartment better, but also make it possible to walk on it without fear of freezing. The latter is especially important when it comes to the bathroom.
When thinking about how to choose a heated floor, you need to try to ensure that the system can be repaired at minimal cost.
About water heated floors
It is a pipe system through which heated coolant circulates. The pipeline is located between the base of the floor and the top covering. Water is used as a coolant. It can be taken from the heating system, or special equipment can be used for heating. As the water passes through the pipes, it gradually cools, so in such systems it is not recommended to use pipes that are too long. During installation, metal or polymer pipes are usually used. When choosing them, reliability and durability play an important role, because in the event of a leak, complex and expensive repairs will have to be performed.
The water floor is connected to the heating Source rmnt.mirtesen.ru
The operation of such floors is relatively economical. Their use makes it possible to reduce energy consumption. This value in different cases can be 20-60% depending on the specific situation. The coolant temperature during operation does not exceed 50-60 degrees.
The installation is quite complicated and requires the participation of specialists. The water heated floor is a multi-layer structure. When installing them, it is necessary to ensure high-quality thermal insulation so that the heat does not escape outside the home.
If a heated floor is installed in a residential building that was left for several days during frost, then there is a danger that the liquid in the pipes may freeze. To prevent this from happening, the system is left turned on for this time at a reduced coolant temperature or liquid is pumped out of the pipes during absence.
Installation of a water floor Source my-climate.com.ua
Cable heated floors
In this case, the heating element is an electrical cable. After laying it, a cement screed is made. When using this option, its thickness will be minimal - no more than 5 centimeters. This floor heating option is considered one of the easiest to install. To operate such a system, it is enough to use 220 volt power. During operation, a power of 80-150 watts is consumed per square meter of area. However, if the wiring in the house is old. then before installing this system it must be changed to a more reliable one.
Such devices are easy to operate and highly reliable. It is believed that cable heated floors can operate without failure for 50 years or longer. There was a recorded case where such a system worked for 62 years and was in fully operational condition at the time of replacement. It was dismantled due to deterioration of the coating.
Installation of a thermomat Source folksland.net
Use of special heating mats
This coating is an improved version of cable coating. In this case, the wire with which the heating will be carried out is attached to a special mesh. Usually its length is 50 and its thickness is 30 centimeters. This improvement significantly simplifies and speeds up installation of the system. When installing heated floors, it is recommended to avoid areas where heavy furniture will subsequently stand.
Single or double wires are used for heating mats. In the first case, this reduces the price, and in the second, it increases the reliability of the equipment used. Such mats have a thickness of 3 millimeters, so their installation does not lead to a significant rise in the floor.
When creating a warm floor under tiles, this type is very convenient due to its low thickness and ease of installation.
Film heating Source education-web.ru
See also: Catalog of companies that specialize in insulating country houses.
Film heating system
This principle of operation of a heated floor is based on the fact that the film warms up thanks to infrared radiation. When the rays hit opaque objects, they release thermal energy. At the same time, the floor covering is heated. The temperature of parts that emit energy does not increase during operation, which allows you to spend less energy on heating.
When the heating rods are turned on, it causes the flooring to heat up. As a result, the air near the floor is heated to the greatest extent. Temperatures decrease as altitude increases. The effect of infrared rays will become invisible at a height of 2-2.5 meters. A 4 mm thick film is used as a heating element, on which graphite strips are applied. As soon as the temperature reaches a certain limit, the sensor is triggered and temporarily turns off the current. The intensity of work can be adjusted using thermocouples.
Electric heated floor Source prodomostroy.ru
When controlling the operation of such heated floors, electronic control can be used, which allows you to set the desired operating mode for a long time. It is interesting to note that during operation of the system in question, electromagnetic radiation is generated. However, it is very weak and cannot harm human health.
Application of electric water heating
In recent years, another type of underfloor heating has gained popularity, in which both electric heating and coolant circulating through pipes are used to generate heat. This type of heating uses pipes that are made of structured polyethylene. Their diameter is two centimeters. Antifreeze is used as a coolant in the pipes. A chromium-nickel electrical cable is laid parallel to them, which is in a sheath made of Teflon. Pipes and cables are covered with concrete screed. If a leak occurs, a clearly visible stain will appear on the floor surface, which will allow you to accurately determine the location of the breakdown and take action.
Installation diagram Source pronyr.ru
The cable warms up the antifreeze, which circulates through the pipes. As a result of the heat, the liquid quickly boils, which leads to rapid heating of the floor.
An important feature of this type of heated floors is that electrical energy during their operation is consumed efficiently and at the same time economically. This system has good resistance to overheating, which allows it to be installed in the right places, including under massive furniture.
Rules for performing calculations
Before laying an electric heated floor under the tiles with your own hands, you need to make the correct calculations:
- If the system is used as the main heating, then to heat an area of 1 sq. m. requires a heater with a power of 140-180 W.
- If the heated floor will be used for additional heating, then you can use a heater with a power of 80 W or more.
In both cases, the quality of the room's thermal insulation is taken into account.
When performing calculations, it is necessary to calculate the usable area of the room. To do this, multiply the length of the room by its width and subtract the area occupied by household appliances and furniture without legs. Then, in accordance with the obtained values, the total power of the heating element and its length are calculated. Depending on the manufacturer, the power of 1 meter of heating cable is 16-21 W.
The choice of heating mats follows a similar principle; the usable area of the room and the total power are also taken into account. To attach thermomats to a concrete screed, an additional purchase of a special mounting tape is required.
Infrared carbon floors
Infrared floors consist of heating elements filled with a carbon mixture and fixed to a polypropylene base. When exposed to current, carbon emits heat waves with a length of 8–14 microns; the waves pass through the floor covering and warm up the objects in the room (the air only slightly). A room heated by an infrared carbon floor is always very comfortable - there is no dry air, which is why we suffer so much in winter.
RavaFORUMHOUSE Member
It heats up objects: tables, stairs, walls, that’s the whole point. You open the windows wide, ventilate, and when you close everything, it’s warm again. Because not only the air is warm, but everything around it.
Infrared floors are not afraid of frost: you can come to a cold country house in winter for the weekend after a week of hellish minuses, turn on the system and it will work normally, and a comfortable temperature will be established very quickly (the system enters operating mode in 5-7 minutes, but it also cools down such a floor immediately).
Film and rod floors have their own characteristics.
| Film floor | Rod floor |
| Installed without wet processes, on a dry, flat surface under the finishing coat. Installation is quick, with the ability to dismantle the system and use it again. | Laying is carried out in a screed or a layer of tile adhesive (2 cm) with mandatory thermal insulation of the rough base. Foil materials are not allowed for the coating substrate. |
| It is not recommended under carpet, carpet tiles, linoleum on felt - these coatings reduce the heating efficiency several times. Parquet and solid boards are possible if the operating temperature of the system is not higher than 28 degrees. | Self-regulating system: if the floor temperature rises in the area under the furniture, the power consumption of the heating elements decreases. And vice versa. |
| It can be cut into pieces and placed arbitrarily - this allows you to heat only some local areas of the room: passages, places where children play, etc. | A core floor can be installed in any room; large furniture and equipment can be placed on top. |
| If any section breaks, the floor will work as before - you won’t even notice it. | Thanks to the parallel connection scheme, the system will operate stably even if several heating elements fail. |
Heating coatings of this type are used to heat stairs and porches in private homes, to prevent the formation of ice.
Checking the electrical wiring
Before laying a heated floor under the tiles, you should check the functionality of the old electrical wiring. After all, to heat a large room, you need a powerful heater, which during operation will put a significant load on the wiring. Therefore, it is important to correctly determine the cable cross-section and find out whether it matches the new heating system.
If necessary, the electrical wiring in the room should be replaced with a more powerful version. In addition, appropriate RCDs and circuit breakers are additionally installed.
How to properly lay insulation on the floor under tiles
The first stage of direct installation of heating elements is floor insulation. The efficiency of the entire system and the cost-effectiveness of its use depend on the quality of the work performed. The most popular among thermal insulation materials used for underfloor heating systems is penofol. This roll insulation has a self-adhesive layer and a foil coating. For insulation, the material is rolled out and glued to the surface, the joints are taped with foil tape. To increase the thermal insulation characteristics of the room, foam foam is overlapped on the walls by several centimeters.
After laying the insulation in the lower part of the walls, a damper tape is glued around the perimeter of the room. It compensates for the expansion of the floor covering when heated.
A metal mesh is laid on top of the heat-insulating material to prevent the heating element from coming into contact with the insulation and to simplify the installation of the heated floor under the tiles.
Advantages and disadvantages of electric flooring in the house
Advantages of installing electric floors:
- The use of electricity makes it possible to conveniently change the degree of heating.
- When such a floor operates in the lower part of the room, uniform heating occurs over the entire area. One consequence of this is the absence of air currents from top to bottom or in horizontal directions. There is no accumulation or movement of dust and dirt particles.
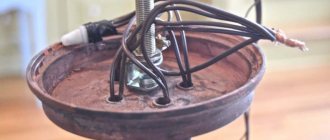
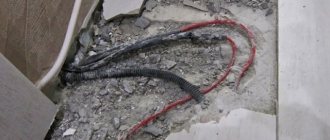
Cable laying for heated floors
Cable laying for heated floors
- High level of security. The parts of the device are securely hidden, which eliminates the possibility of accidental burns or electric shock.
- This heating system works efficiently. Since there is convenient adjustment, you can set the optimal degree of heating depending on the specific situation.
- The installation of such heating devices can be done without professional skills. Simple installation allows almost any owner to install the system themselves.
These floors have a long service life.
Benefits of use
Installation of control devices
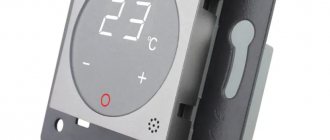
Special devices help control the operation and manage the system: a thermostat and a temperature sensor. The thermostat can be mechanical or electronic; with its help, a certain temperature regime and the time for turning the system on and off are set. This device is placed in close proximity to sockets, mounted in the wall.
It is recommended to place temperature sensors on the floor. To install this device, a vertical hole is drilled in the wall from the thermostat to the temperature control point, into which a sensor is placed, previously placed in a corrugated insulating pipe. The control location must be chosen between the heater turns.
The use of corrugation avoids unexpected damage to the sensor. In addition, this design provides quick access in case of an emergency. One end of the corrugated pipe is located in the concrete screed, so there is a risk of solution getting inside. To avoid this, the end of the corrugation is filled with sealant.
Features of underfloor heating
There are two types of heated floors:
- using water heating;
- electric.
In the first case, the solution is more economical in operation - after installing the heated floor, it can be connected to the existing heating system. However, installing such a heated floor is a more complex and expensive procedure compared to the second option.
Heating a tiled floor can be considered as an additional heating system in an apartment.
Laying a concrete screed Source narobraz.ru
Fixing heating cables or mats
After complete preparation of the surface, you can begin laying and securing cables or heating mats and directly deciding how to lay a heated floor under the tiles.
The cable can be secured using mounting tape and special plastic clamps. The use of these elements makes it faster and easier to fix the heating cable. During the installation process, it is necessary to maintain the same distance between the turns, otherwise the floor will heat up unevenly.
In heating mats, a certain pitch is maintained between the turns, so their installation is much easier and faster. It is enough just to arrange the material according to the diagram and make the correct connection to the thermostat.
After fixing the heating element to the floor, it is necessary to test the operation of the system and measure the resistance using a multimeter. The readings obtained must correspond to those recorded before laying the material.
Principle of operation
The system is a thin film, between the layers of which carbon strips are laid. They are the heating elements. Laying is carried out on a pre-prepared base, the system is connected to the power supply and begins to heat up. Heating of all elements located around the film occurs due to infrared radiation.
IR floor design
Due to the small thickness of the film, the floor surface heats up very quickly and is turned off by the thermostat, working about 20 minutes per hour. When the room temperature drops, the system starts working again and warms up the base. Compared to other types of heaters, IR flooring is highly efficient, consuming very little electricity.
Comparison of water and film floors
The system can be used in any room, taking into account the arrangement of furniture: the film does not go under large and heavy objects. It’s easier to use it only in places where your feet come into contact with the tile surface, for example, at the exit from the bathroom.
There is another type of film IR floor - bimetallic. It is not allowed to be laid under tiles!
Screed
One of the stages in solving the question of how to lay a warm floor under the tiles is pouring the screed. To prepare a concrete solution, you will need materials taken in the following ratio:
- Sand - 4 parts.
- Cement - 1 part.
- Crushed stone - part 5.
- Water – 0.6 parts.
In addition, it is necessary to add a special plasticizer, which will make the solution more elastic. The additive is taken in an amount of 1% by weight of cement.
The total thickness of the screed should be no less than 3 cm and no more than 5 cm. The poured solution is left until completely dry, which most often takes about a month. Premature activation of the system is not allowed.
It should be remembered that the screed is made only when using a heating cable. You can immediately apply tile adhesive to thermomats.
Installation of thermostat and sensors
The controller, which regulates temperature indicators, is installed in a specially designated place. The cable connecting the thermostat and the system elements must be placed in a corrugation. The corrugation is located in the pipe. It must be carried out to the temperature sensor. It should be mounted at a distance of 30 cm from the wall. If this condition is not met, temperature measurement will be complicated.
The corrugation is laid in such a way that no kinks are formed. They happen especially often near the baseboard. The edge that abuts the system should be sealed with sealant. This will prevent concrete mixture from getting into it.
In addition, a temperature sensor is placed in the corrugation. This improves the maintainability of the device.
Floor tiling
Laying tiles can begin after the screed has set, usually 2-3 days are enough for this. However, the work must be carried out by a professional tiler, who will ensure that the tiles fit correctly and make the surface horizontal. To lay tiles on a warm electric floor, you must use a special glue.
At this point, the process of installing an electric heated floor under the tiles is considered complete. You can do all the work yourself if you follow the instructions on how to properly lay a heated floor under the tiles.
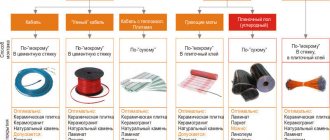
Types and types of electric floors
From the point of view of technical equipment, all modern electric floors can be divided into 3 main types:
- classic cable, which has several varieties;
- innovative infrared-carbon, rod and film;
- and thermomats, that is, thin cables on a mesh.
All these types of electric floors have a number of general characteristics:
- they require a dry mounting base;
- they need thermal insulation with grounding;
- they are equipped with a special thermostat.
In addition, they are all reliable and durable systems for additional heating of premises.
There are also several types of electric floors, which may belong to the same type (or may not), but differ from each other in:
- features of installation technologies;
- combination with various types of floor coverings;
- quality of generated heat.