Dear visitors!!!
Analyzing your questions, which mostly affect the repair and connection of electric stoves, it became necessary to publish an additional topic on this topic. Having understood all of the above, in general, as regards this blog, you will receive the necessary knowledge and, accordingly, then you will make your own decisions in troubleshooting both electric stoves and other household appliances.
I consider my goal to be to convey my knowledge and experience in solving one or another task assigned to you - to eliminate any malfunction. This topic will be like a reference for you to resolve any issue that may arise regarding the repair of electric stoves.
Electric stove Electra 1006
So, you have purchased a household stationary electric stove designed for cooking:
- stewing vegetable, fish and meat dishes;
- frying;
- cooking;
- drying fruits, mushrooms and vegetables.
Convenience is created by the fact that, for example, using a high-temperature heater \grill\ and a gearmotor with a spit, you can prepare:
- chicken on a spit,
- kebabs
etc.
Of course, before you start using this or that electric stove, you should carefully read the technical data sheet “Operating Manual” and, accordingly, follow the specified recommendations.
It should be remembered that connecting an electric stove to an external alternating voltage source \outlet\ without grounding is not allowed.
Repairs or diagnostics of the electric stove should be carried out in compliance with safety precautions, that is, by first disconnecting the plug from the outlet. As a basis for this training topic, we will consider the electrical circuit of the Electra 1001m power supply.
That is, we need to understand the essence of all electrical connections. The topic, I would say, is very significant for us. For example, in the event of any malfunction, it is necessary to change the same burner. What needs to be taken into account? Does the installed burner correspond to the power specified in the instruction manual?
Next, you need to replace the burner power switch. Which terminals \contacts\ of the power switch should the wires be connected to? How to properly connect the burner to the wires? How to properly connect two heating elements \upper and lower heating elements\ of the oven? How to correctly connect two oven heating elements in an electrical circuit?
How to replace:
- electric burner warning light;
- oven warning light;
- oven lighting lamp.
Or let’s say, how to replace a key switch for an electric stove? Here, as it were, the topic is quite difficult - both in carrying out repairs and in correct connection.
For example, we changed the power cable with the plug, but do the contact connections of the power plug match the contacts of the power socket? I may be missing something on this topic too. I believe that in our lives we should be inquisitive, interested in one or another source of information that has not a negative, but a positive side in its content.
And we need to convince ourselves that:
- you will succeed;
- You will be able to make your decision;
- You will find the necessary source of information;
- You will become experts in this area.
In fact, to understand, we are already them as such - if we are interested in issues related to electrical engineering. If we... are currently interested in:
- technical sites;
- technical literature.
And so, to the point. I will try to present everything separately, for each electrical connection, for each individual section of the electrical circuit.
Basic equipment
The design of any model of domestic or imported electric stove is almost the same, but they all have their own original nuances. For example, modern Hansa electric stoves from Germany have a special configuration, but we will look at the standard option that every electric stove model has. Traditionally, these products are a combined electrical appliance designed for cooking; it combines:
- hob with burners;
- oven;
- bottom drawer for storing dishes and baking sheets.
The operating principle is standard for most electrical appliances: current passing through the heating element heats it to a given temperature. controls are located on the front front panel
– they can be mechanical or electronic, depending on the class of the product.
As a rule, on the same panel there are two indicators
: one notifying that the device is connected to the network, and the second notifying that the oven is turned on. Some stoves only have the first indicator. Using the controls, users can set the cooking mode on any burner or oven.
The figure below shows a diagram of a standard electric stove.
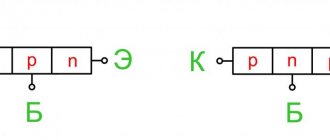
Let's decipher the notation:
- power regulator;
- terminal box;
- burner;
- support bar;
- oven temperature sensor;
- a loop;
- stopper;
- oven heating element holder;
- oven heating element;
- internal cladding panel;
- door latch lock;
- latch socket;
- insulating gasket;
- heating element for grilling;
- burner rim;
- power cord;
- ground terminal;
- adjustment knobs.
Oven
The heat inside the cabinet required for preparing various dishes is generated using a special configuration of heating elements. In budget models there is only one heating element and it is located at the bottom. Most modern electric ovens have 2 heating elements: at the bottom and at the top. As a rule, the top one is responsible for the “grill” function. The most advanced models also have side heating elements, which allow you to cook food even faster. The amount of heating inside is regulated by a switch located on the control panel - a thermostat.
Most ovens are equipped with a timer that not only turns off the device at the right time, but can also turn it on if the user sets the required program in advance.
Some models have convection - the fan distributes hot air evenly throughout the entire volume of the cabinet, so there is no need to turn, for example, a duck carcass while baking it on a baking sheet.
The entire surface of the oven in the most advanced models is coated with a special high-quality enamel coating, making it quite easy to maintain internal cleanliness. For example, the Hans brand has a special mode - pyrolytic cleaning, when turned on, all dripping fat instantly turns into ash.
Electric stoves are considered not only a unique product for high-quality cooking - they can become the highlight of your kitchen interior design. Each buyer will find his own model, made in a classic or modern style - a variety of dimensions and colors, the presence of a large number of functional features allows you to choose an electric stove according to personal priorities.
Preparatory stage
Now let's move on to the preparation and subsequent connection of the equipment in question. Before you start directly connecting and working with electrical wiring, you should choose the right place for the stove. There are the following rules on how to do this:
- the place where you plan to install the stove must be level, so that when adjusting with the legs, its stable and stable horizontal position is ensured;
- the length of the wire should be made with a reserve so that, if necessary, you can easily move the household appliance away from the wall without removing the plug from the socket;
- In no case should the device be placed close to the refrigerator, since the hot burner can have a temperature of up to hundreds of degrees;
- if the stove is built into a kitchen wall or cabinet, then the panels made of plastic should be protected from overheating during operation of the electrical appliance;
- It is better not to place other electrical appliances near an induction cooker - the electromagnetic field can negatively affect their operation.
To carry out the work you will need to have the following materials on hand:
- 3-core cable, the cross-section of which will be 4-6 millimeters. This will depend on the length;
- a separate machine for the panel in order to correctly connect the equipment. There should be either a 32-amp version or a 40-amp equivalent, depending on the wire cross-section;
- RCD, which should protect equipment from overloads.
The last two points are considered mandatory components of the process of connecting the device in question, regardless of the manufacturer. They are the ones who will save equipment from burning out due to voltage surges that can be observed in the city’s electrical network. It's kind of a switch. If the builders carried out only a 3-core wire, then to install a special socket or terminal box you will need to make channels in the wall to deepen the cable. This work will require some skills and will take a lot of time, but in the end the interior of the room will not be damaged, and the cable will be located inside the wall. True, you first need to decide what would be best to do:
- connect everything directly;
- install a socket;
- install the transfer case.
If you don't know what to choose, you should consult a professional. Connecting directly is considered the safest, because the absence of unnecessary cables significantly reduces the risk of device overheating. In new high-rise buildings the situation is simplest - the builders simply leave the cable insulated, and the residents decide for themselves what to do. The solution through the terminal box, if there is no plug on the cable, is also possible in new houses.
The box is usually placed on the kitchen wall no lower than 0.6 meters from the floor, and the stove is installed no further than a couple of meters from it. As a rule, it is made of metal or very durable plastic, and is covered with a lid on top.
It should be noted that there is already a connection to the home electrical network inside. You just need to find out how to connect the electric stove. The circuit is very simple: the black cable represents the phase, the blue cable represents the neutral, and the yellow cable represents the ground. All 3 wires are connected to the box, oriented by color. Then all that remains is to check the tightness of the connection screws and close the cover.
Another way to connect is through an outlet. There are currently three categories of sockets on the market:
Belarusian;
In the Russian version, the ground wire is located on top, its input is rotated 90 degrees to 2 other holes. When working with a Belarusian socket, the contacts are rotated 120 degrees. A feature of the European socket is the presence of two contacts with a round cross-section, and the grounding will have a flat cross-section and be located at the bottom. But this option is considered obsolete. If there is no point in creating wiring, then the mounted socket simply needs to be checked with a special device to find out the phase.
Types of electric stoves based on heating principle
It is quite natural that when developing household kitchen appliances, engineers try to offer the user maximum convenience and efficiency in using electric stoves. Therefore, today the classic electric stove is becoming a thing of the past, giving way to more modern and high-tech solutions that also run on electricity.
Classic electric stove
The main working element of this stove is a heater covered with a fairly thick cast iron plate. This design has a number of disadvantages. In particular, the block does not transport heat efficiently due to the presence of air gaps.
This burner has significant inertia. It is impossible to properly control temperature conditions due to the fact that this part heats up and cools down slowly.
Due to their relatively low energy efficiency and significant consumption, classic stoves are losing popularity among consumers. And if you add to their disadvantages the difficulty of caring for the burner plate, such a negative attitude becomes even more justified. However, the classic solution also has its advantages. Among them:
- affordable price tag;
- the inertia of the surface of the burners allows you to heat food for some time;
- you can use any type of cookware;
- The burners are repairable and easy to replace even with your own hands.
And the list of main shortcomings looks like this:
- The burner takes a long time to heat up, it is difficult to select a cooking mode;
- the cost of consumed electricity is high compared to other solutions;
- The time of trouble-free operation of the burners is very short.
Induction heating furnaces
Safety, speed of setting the heat transport mode, flexible control - all this is what induction furnaces offer their owners. They are easy to care for. The main energy-generating element here is the inductor, which is located behind a layer of tempered glass. It is durable, does not scratch, and can be easily washed from any dirt.
There is no risk of burns. Until a metal container or frying pan is placed on the burner, energy transfer does not occur. The glass cools quickly and it is impossible to get burned. That is, the oven does not heat its surface, but directly the walls of the metal cookware.
Induction electric stoves have many advantages.
- You can choose the cooking mode very precisely. The operating parameters of the inductor are set quite strictly even by analogue regulators.
- Good energy efficiency. The oven transfers energy only to the walls of the metal cookware. She does not spend it on heating the air, her surface. As soon as the utensil is removed, the energy transfer immediately stops. Savings reach from 30 to 60% compared to classic solutions.
- The surface of the stove is safe; you cannot get burned on it. Special durable glass is almost impossible to break during normal use of the device.
- The electric stove is easy to care for. No contaminants stick to the glass surface.
But there are also a number of disadvantages to this seemingly ideal solution. Firstly, induction cookers have a high price tag. However, it is worth honestly noting that every day it becomes more accessible. Secondly, you will need special cookware for an induction cooker. If it does not have the required bottom surface, the oven will not be able to transfer energy and simply will not start.
Halogen plates
Halogen stoves claim to be a product with the latest technology. The heat source in them is glass tubes containing a mixture of gases and metal salts called halogen. Tape heating coils are also used. When voltage is applied, the halogen or metal element heats up to a high temperature, beginning to transfer heat through infrared radiation.
Tubes or heating tapes glow red during operation, signaling the danger of high temperature and at the same time indicating the area for placing cookware. With the use of this class of heat sources, great ease of control is achieved. And not just temperature. By turning individual heaters on or off, you can create a round-bottomed pan area of varying sizes. Or select an area for installing oval containers.
The surface of halogen plates is made of ceramics. During operation, it heats up to a high temperature. This is a potential burn hazard. However, most modern stove models are equipped with heating indicators; in addition, ceramics cool down quickly. The stove is easy to adjust to a specific thermal regime, the energy output is very intense, the flow is constant, and is supplied without delay.
Halogen stoves have many advantages.
- The dishes and food in them warm up very quickly, and the overall cooking process becomes shorter.
- The surface of the stove cools quickly, the devices are equipped with an indication.
- The controls are precise and clear. Modern systems offer both digital solutions with and without remote controls, as well as reliable analogue controls.
- The surface of the stove is easy to clean.
- The device looks stylish.
But halogen electric stoves also have a lot of disadvantages.
- The price tag for the devices is very high.
- The device consumes significant power; most apartments will require a separate connection line for it.
- Moisture coming into contact with hot ceramics can damage them. Do not place wet dishes on the stove.
- When cleaning, the surface becomes scratched over time.
- Do not place dishes with uneven bottoms on the stove.
But the main disadvantage of halogen stoves is their service life. The average time between failures of heaters is from 5 to 8 years with everyday use.
Socket selection
According to technical standards, the electric stove must be plugged directly into an outlet. Connection via an extension cord is prohibited for electrical safety reasons. To connect an electric stove, you cannot use a regular outlet, since it is not able to withstand a high load. For high-power electrical household appliances, special sockets are required, designed for a power of 7 kW or more. When choosing such an outlet, you need to focus on the maximum rated current value.
Power sockets can be made of carbolite and high-quality plastic. Sockets of the first type are available only in black and have a lower cost. Plastic sockets are made mainly in white. They are of high quality and have a high level of wear resistance, which is why they are more expensive than carbolite ones.
Power sockets are available for open and hidden installation. If the socket is installed directly behind the stove, which is located near the wall itself, then it is better to use a model for hidden installation, in which the working mechanism is completely hidden in the wall.
It is also necessary to take into account the number of phases in the home network and the presence of a grounding contact in the outlet.
When starting to install an outlet, you must first turn off the power supply to the apartment. Then, using a puncher, a hole is made in the selected location for the socket glass. A power wire is threaded into the socket box, from which the protective braid is removed. The ends of the freed wires in multi-colored insulation are carefully stripped to a length of up to one centimeter. Then they are connected to the contacts of the socket.
It is very important to connect all wires correctly. The yellow-green wire must be connected to the grounding contact of the socket, which is located in the center, and the phase and neutral wires are connected to the outer contacts
It is very important that when connecting an outlet, the zero must be on zero and the phase on phase. Otherwise a short circuit will occur. Therefore, you need to very carefully check the correctness and quality of the wire connections. After checking, the socket box is tightly fixed in the wall using gypsum or alabaster mortar. Finally, you need to check the operation of the outlet and connect the stove itself.
Sometimes it is not possible to install a power outlet for an electric stove. In this case, the stove can be connected to the power cable directly. The cable is placed in a junction box and all its wires are connected to the corresponding terminals of the block. In some cases, the box is not used and the power cable simply comes out of the wall.
When connecting the stove to a cable without an electrical outlet, you must unscrew the plug on the stove's power cord. Then the cut end of the cable is inserted into the plug body and all its wires are connected to the wires of the cord. In this case, you must carefully ensure that the wires are the same color, that is, the blue wire of the stove's power cord is connected to the blue wire of the power cable, yellow-green to yellow-green, and red to red. Of course, all work related to connecting electrical equipment should be carried out when the home power supply is turned off.
Connecting the stove directly to the electrical cable is considered more reliable, since in this case there is a minimum number of contact points, which increases the reliability of the connection. But this method is not entirely convenient, since you can only turn off the power supply to the stove using a machine.
In the case when the apartment already has an outlet for an electric stove, it is necessary to check where the phase, neutral and ground are located and connect the wires in the plug accordingly. To determine the phase in the socket, you can use a voltage indicator in the form of a screwdriver. This is done quite simply: the indicator is installed in the place of the expected phase. If the LED on it lights up, it means there is voltage and this is a phase. If the LED does not light up, then there is no voltage and this is zero. Land is defined even more simply. This is usually the contact at the bottom or top of the socket.
Where to start
It should be noted right away that modern electric stoves go on retail sale without a power cable. The thing is that today manufacturers are trying to avoid creating critical situations that may arise due to the outlet to which the stove is connected.
Of course, in any hardware store today you can purchase a safe socket designed for high current. For example, for an electric stove, the outlet must withstand a current of more than 32 amperes. And this will already be considered a secure connection. But there is no guarantee that the electrical wiring of the house has the required cross-section of the laid cables.
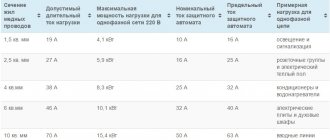
Therefore, a few words about the cable for the electric stove. Firstly, the wire must have a cross-section of at least 4 mm². And this is only if the length of the laid section does not exceed 12 m. If the length is longer, then a cable with a cross-section of 6 mm² will be required.
Next, you will need to decide on the cable, or more precisely, its location. If the house is just being built, then this issue must be taken into account before finishing work begins. When the electricians get down to business. The shorter the section being laid, the better. Typically, wiring is laid in grooves on the walls or floor. Sometimes installation is carried out under suspended ceilings.
Cable for connecting an electric stove Source strojdvor.ru
Selecting the type of electrical installation
The first thing you need to start with is to decide on the method of installing the line. Today, open and hidden wiring is used. Open electrical wiring involves fastening all the constituent elements on top of finished walls (the routes are laid in special cable channels).
Open line routing
The advantage is as follows:
- the damaged area can be repaired without any problems (no need to cut wallpaper, destroy plastered walls, etc.);
- simpler installation and preparatory work (no need to tap the walls along the electrical wiring in the house);
- convenient to add new branch points.
This installation method has one disadvantage -
very often it does not fit into the overall interior of the rooms since the cable channels do not have a very attractive appearance.
Hidden electrical wiring in the house is becoming more popular. In this case, wires and cables are laid in the walls; for this purpose, grooves are drilled - grooves in the walls, ceiling and floor or behind the suspended ceiling and wall cladding.
Advantage:
- does not spoil the interior of the rooms with its appearance;
- is fireproof;
- cheaper than outside.
- the likelihood of damage is much less;
- high durability of all elements.
Among the disadvantages are:
- complexity of repair and operation (to replace the electrical wiring in the house or connect a new point, you need to open the wall decoration;
- when a breakdown occurs, it is very difficult to find the exact location of the breakdown unless you use special devices, for example, a homemade metal detector;
- prohibited in a wooden house, according to PUE 7.1.38.;
- Electrical installation work requires more experience and a set of tools.
We recommend that you still opt for the latter method, since it is more durable and the entire line is not striking! When choosing high-quality components and correctly installing electrical wiring in the house, the likelihood of a breakdown is extremely low.
Types of heating elements
The base of the burners can contain different types of heating elements. They are usually parts that can be easily repaired or replaced by a suitably qualified technician.
Spiral burners
In appearance, they resemble spiral heating elements used in electric kettles or single electric stoves. They consist of one or two turns. The degree of their heating is regulated by ordinary rotary switches with smooth adjustment.
Pancake option
Heaters of this type have a continuous outer surface, under which heating elements are located. This design is considered more reliable and resistant to mechanical damage. Step power regulators are usually used with them.
Halogen type
Small halogen emitters are used here as a heating element, arranged in random order or in a pattern under a glass-ceramic plate. They transfer energy through heat waves. The heating area is illuminated by LED indicators. It only takes a few seconds to reach the full power of thermal radiation. Models of this type are often regulated by touch buttons located directly on the plane of the hob, although traditional regulators built into the front panel are also used.
Ceramic devices
Ceramic burners are a relief disk with small grooves cut into it. They are tightly packed with nichrome wire, which intensely releases heat when current passes. The part is installed under the glass-ceramic hob. A two-stage power regulator is usually used with it.
Pancake version Halogen burners
Spiral burners Gas stove with ceramic burner
Interesting! There are models of electric stoves in which ceramic elements are combined with halogen ones.
Connection type
Before installation, determine the required type of connection. Depending on where the electric stoves are connected, choose one of the following options:
- direct connection.
- using a terminal box.
- through the socket.
Each of them has its own distinctive features.
Direct connection
The direct connection option is suitable when there is no need to disconnect the stove from the general network. This is the safest way. With it, the risk of overheating is minimized as there are no additional connections.
If a separate disconnect is necessary, you need to install a socket or terminal box.
How to install the terminal box
A terminal box is needed when connecting a modern stove to the network without plugging it into an outlet. In this case, a block is used in a mounting box, mounted on the wall from the outside, or a metal box for hidden installation. It is placed maintaining a distance of 2 meters from the electric stove. However, the height should not exceed 0.6 meters from the floor.
During installation, you must turn off the power. The following follows according to the scheme:
- A simple pencil marks the attachment points.
- The box is attached to a concrete wall using dowels.
- The tips of the seals are cut off so that the wires can then be inserted.
- Connection of wires: zero to zero, phase to phase and ground to ground.
- The joints are insulated with PVC insulation.
Connecting without an outlet is not much different from this method.
Connection via socket
This is a common option for connecting to the network; here the use of grounding is mandatory. You can use a three-phase socket.
First you need to connect the wire to the machine. After this, the phase and neutral wires are connected. Next, the earth is connected to the grounding of the apartment or house. A wire is pulled to the installation site of the socket. It is necessary to connect the wires carefully so as not to mix them up.
The socket is fixed on the wall away from metal structures, and the power cable is connected to the stove along with the plug.
The nuances of connecting the heating element and checking it
The heating element ensures normal operation of the electric stove burner. In fact, this is its main element, without which the normal functioning of the entire circuit is impossible. But for everything to go smoothly, it is necessary to take into account many nuances. Among the main ones:
- The contact connections should not touch the body of the electric stove, otherwise the connection may end disastrously.
- The contacts must be properly insulated. Cambric is best suited for this purpose. As a last resort, you can use regular electrical tape. But its reliability is much worse.
- It is very important to test the heating element of the electric stove burner so that the connection according to the diagram is successful.
To test the heating element of an electric stove burner you will need a special device. It's called an ohmmeter. A multimeter is also quite suitable for this purpose. These devices are designed to measure resistance in a circuit.
If you are using a multimeter, then first you need to set the appropriate measurement mode. Next, the two wires must be connected to the corresponding sockets.
After this, you need to turn on the device. Using two probes you can measure the resistance of heating elements. To do this, you need to use probes to connect the electric stove burner to the contacts of the heating element.
If your measuring device is a digital multimeter, then after connecting its probes to the contacts, the display will immediately show the result. Three positions are possible:
- gap,
- complete unsuitability
- resistance.
Of course, in order to connect the heating element of the burner to the electric stove according to the diagram, it is necessary for the multimeter to show the third position. Otherwise, nothing will work.
After connecting the heating element of an electric stove, each person has a question: will the burner work after this? Are all wires connected correctly? This is especially true when it comes to burners.
For your review, we offer electrical circuit diagrams for electric stoves for self-repair!
Russian and imported slabs are presented, which have not changed for years. To view larger, click on the picture.
Main elements and components of the stove: heating element E1 (in the first burner), E2 (in the second burner), E3-E5 (in the oven), switching unit consisting of switches S1-S4, thermal relay F type T-300, indicators HL1 and HL (gas discharge for indicating the operation of the heating element), HL3 (incandescent type for illuminating the oven). The power of each heating element is about 1 kW
To adjust the power and degree of heating of the heating element of the oven, a 4-position switch S1 is used. When its handle is set to the first position, contacts P1-2 and P2-3 are closed. In this case, the following will be connected to the network using a plug: heating element E3 in series with parallel-connected heating elements E2 and E3. The current will flow along the path: lower contact of the plug XP, F, P1-2, E4 and E5, E3, P2-3, upper XP plug contact. Since heating element E3 is connected to heating element E4 and E5 in series, the circuit resistance will be maximum, and the power and degree of heating will be minimal. In addition, the neon indicator HL1 will light up due to the passage of current through the circuit: the lower contact of the XP plug, F, P1-2, E4 and E5, R1, HL1, the upper contact of XP.
Connecting Dream 8 nodes:
In the second position, contacts P1-1, P2-3 are switched on. In this case, the current will flow through the circuit: the lower contact of the XP plug, F, P1-1, E3, P2-3, the upper contact of XP. In this situation, only one E3 heating element will work and the power will be greater due to a decrease in the total resistance at a constant mains voltage of 220V.
In the third position of switch S1, contacts P1-1, P2-2 will close, which will lead to connection to the network only of parallel-connected heating elements E4 and E5. Switch S4 is used to turn on the oven lighting lamp HL3.
H1, H2 - tubular burners, H3 - cast iron burner 200mm, H4 - cast iron burner 145mm, P1, P2 - stepless power regulators, P3, P4 - seven-position power switches, PSh - three-stage oven switch, P5 - blocking switch, L1.... L4 - signal lamps for turning on the burners, L5 - signal lamp for turning on the oven or grill heaters, L6 - signal lamp for reaching the set temperature in the oven, H5, H6 - oven heaters, H7 - grill, T - temperature regulator, B - key switch, L7 – oven lighting lamp, M – gear motor.
6. BURNER SWITCHES Combustion, Нansa, Electra, Lysva:
In this article we will offer instructions for repairing an electric stove at home. An electric stove is the most powerful household electrical appliance. And its operating conditions are not the most comfortable. The following factors influence its performance:
- High temperatures
cause the insulation to dry out and become damaged; - Currents
switched by controls lead to wear and breakage of switches; - Contaminants
from cooking food that get inside the stove, in sufficient quantities, can lead to breakdowns.
The problem of choosing hobs
Choosing a product on the market is difficult due to the lack of suitable types. After all, the type of installation of the hob depends on the parameters of the selected model.
Hob: view after installation Source tehznatok.com
Main product classification:
- Products are gas, electric and induction. As for the electric panel, this is the best option for a house where gas is not installed. If the buyer's first priority is comfort, experts recommend purchasing a gas appliance. The induction hob is characterized by a modern set of advantages.
- Dependent panel. A dependent model is a model produced together with the oven. In this case, the oven is located inside the kitchen unit or is integral with the hob. The combination of oven and hob does not always happen, even if they are manufactured by the same company.
- Independent model. It is not connected to the oven. The main advantage of such units is the arbitrary location of the device in the kitchen. The dependent model is made so that it can be placed exclusively above the oven.
Differences by type of control:
- Mechanical mode of operation requires a rotating mechanism. Most consumers prefer this type.
- Touch models work with a light touch of your hand. This is a truly innovative method. Cleaning the panel is easy because the surface is smooth.
The main rule when choosing is security parameters. Source m.sm-shop24.ru
Slab surface: varieties
Electric stoves presented on the household appliances market are divided into two large categories based on the type of hob. Each of them deserves separate consideration.
Enamel
The burners of electric stoves were originally made of cast iron and covered with heat-resistant enamel. This type of home electric stove has obvious advantages:
- low cost of materials used;
- ease of manufacture;
- maintainability;
- high reliability;
- ease of maintenance.
You can place a heavy frying pan or saucepan on such a surface without fear of damage, without worrying too much about their material. Enamel can be cleaned using any detergent.
But experts also see the disadvantages of such slabs:
- poor heat transfer leading to longer cooking times;
- long heating and cooling after removing the pans from the stove, which increases unreasonable energy losses;
- carbon deposits are difficult to clean off without using household chemicals.
Glass ceramics
Modern electric stoves are increasingly equipped with glass-ceramic hobs. This material looks stylish and impeccably beautiful. It is manufactured under conditions of intensive heat treatment and is not afraid of elevated temperatures. The design of such an electric stove has a number of advantages:
- the top surface of the stove is a perfectly smooth sheet of ceramics, easy to maintain and beautiful in appearance;
- when turned on, only the burner zone heats up, which is safe for the user;
- the absence of protruding parts prevents the dishes from unintentionally tipping over;
- glass ceramics quickly heats up and cools down, which reduces heat losses and saves energy consumption;
- This surface is not prone to dirt sticking and is easy to clean.
Helpful information! Most models from well-known manufacturers of electric stoves with glass-ceramic hobs install automatic touch sensors that turn off the heating element when removing the cookware. Restrictions on use:
- You cannot cook food in dishes made of aluminum or copper alloys, which, unlike stainless steel, leave noticeable marks on glass ceramics;
- You must be careful when handling hard, sharp objects that can scratch the stove.
Idea N2: Infrared heater
To make an infrared heater with your own hands, you can use several device options. Let's look at the two simplest to implement, for one of them we will use IR film used in a heated floor system, and for the second we will make a heating panel from improvised means. If you still have a film IR heater from the floor or have the opportunity to get it, then this will greatly simplify your task.
Film IR heater
To make such an infrared model, you will need a piece of rolled foil thermal insulation, a heating film, a power cable for connecting to the electrical network, terminals for connecting the wire to the film, a thermostat or other devices for changing the temperature of the heater.
The manufacturing process consists of the following stages:
- Choose a location, since the film heater cannot stand on its own on the floor or table; it must be attached to a wall, ceiling, frame or other hard surface.
- Cut the thermal insulation to the size of the infrared film and prepare the foil surface for gluing the film.
Rice. 4: Cut the thermal insulation to the required size - Glue the film to the prepared roll, ensuring a tight fit along the entire length.
To fasten surfaces, you can use both adhesives and double-sided tape. But the adhesive application points should not be located on the infrared emitters. Rice. 5: places for applying adhesive composition - Attach the terminals along the edges of the film; first solder a wire to the terminals to supply electrical energy.
Rice. 6: Solder the terminal to the copper bus bar - Insulate electrical connections using electrical tape, heat shrink, or bitumen tape.
This is necessary in order to eliminate the risk of electric shock from the heater when connecting the heating device to the network and to isolate live parts from walls and other structural elements of buildings. Rice. 7: Insulate electrical contact points - Include a thermostat in the design of the electric heater; the most convenient switching point is the power wire. Since the control element can be placed in the most convenient and accessible place. This will allow you to control the heat output of the heater to heat your garage.
- Mount the IR heater on a wall or other structural element. If you want to install it on the floor, you can make a wooden frame.
Electric stove connection diagram
The connection diagram for an electric stove of this type is called radial. There is also a ring scheme. With this connection scheme, several sockets can be placed on one cable. It is prohibited to connect multiple electrical appliances through the bug.
To answer the question of how to connect an electric stove with your own hands, you should know how many connection diagrams there are. Moreover, connecting a built-in electric stove is no different from connecting a stand-alone stove. There is a single-phase, two-phase and three-phase electric stove connection system. Since a single-phase system is common in our apartments, the stove should be connected using a single-phase circuit. For this purpose, appropriate jumpers are installed in the terminal block. Then the power cable should be connected to the block. The socket must be installed in the location you choose so that the cable length is sufficient.
When connecting an electric stove, special attention should be paid to connecting the burners. The connection diagram for the burners can be found in the passport, which is included when purchasing an electric stove.
Typically, a burner includes a steel housing, a terminal block, thermal insulation and flat-type heaters.
The heating element is installed in a cell of the appropriate size. The surface of the burner should be higher than the surface of the stove itself. There are special screws that regulate the horizontal position of the heating elements. The cable cores are connected to the screws and clamped with appropriate nuts. Connecting a burner is a rather labor-intensive and responsible process. If the heating elements are installed incorrectly, the electric stove may be damaged.
After you have installed the burners in the electric stove, you should check whether the connection in the electrical panel is made correctly. Only after this should you connect the stove and check its operation in test mode
Moreover, it is important to check in this mode all the options that are provided in the instructions. Based on many years of experience in using electric stoves, we can say that if connected correctly, the tiles will serve reliably and for a long time.
If you are not entirely confident in your abilities, then it is better to use the services of specialists.
We strongly recommend calling professional electricians if you are not confident in your abilities! After all, working with electricity is dangerous to health and life!
Heating element for electric stoves Dream
Next I followed the standard chain from the power incoming distribution terminals. Along the chain, I checked the thermostat of the Mechta electric stove - no complaints, and slowly but surely, following the visual diagram, I got to the power switch PM-16-5-01.
I immediately realized that zero did not pass through it, but I did not remove the switch or solve the puzzles of the zigzags of the five-speed switch, having decided to prepare myself and approach the process creatively.
Just as I quickly discovered a malfunction of the Mechta electric stove oven, I was unable to find a wiring diagram for this miracle of technology. But I found more important, the operating modes of the five-pin power switch. As for the Dream electric stove circuit, the issue was resolved as follows. Although I had a visual, and most importantly, no one had broken the circuit before me, having made a request to the manufacturer, to my surprise, I received a response quite quickly, and then the wiring diagram for the Dream 12-03 electric stove, for which special thanks to the manager Natalia, from this production.
Armed with the diagrams, I made a repeated attack on the repair of the Dream electric oven.
My initial assumptions were confirmed, the fault was hidden in the oven mode switch, and more specifically, two contacts “floated” to the side due to heating, and the contact plates had a reddened appearance from overheating. Verdict - the power switch for the Dream oven modes needs to be replaced.
But, since in our city there were no such switches in stock, only on order, at the request of the owners of the stove “to do at least something,” the outgoing contacts were restored to their place by heating, and the contact surfaces themselves were cleaned of charring with alcohol, (fortunately, their surface was not damaged when burned).
As an option, for the temporary operability of the power switch PM-16-5-01 and others from the same series, if the “burnt” contact has become deformed due to temperature and does not close the contact plate, it can be bent. This cannot be done locally, but by removing the contact group from the body, having first pulled out the contact jumper holding it (indicated by the arrow in the photo), it can be bent.
At the same time, taking into account temperature deformation and weakening of the metal, take the bending angle 20 degrees greater than the adjacent working contacts. Before installing the switch on the Mechta electric stove, make sure that, according to the operating modes, the “treated” contact closes the group, and in other modes there is a visible gap.
It is difficult to give a guarantee for such repairs of the Dream electric stove, but until the arrival of a new power switch, it will definitely last.
At the end of my description of how to repair an electric stove, I will post all the diagrams that I was able to find on the Internet and those sent by the manufacturer (by the way, in my case, the actual installation differed from the factory diagram).
Diagram of contact groups of power switch PM-16-5-01
This is what the oven switch itself (and the burners) of the Dream electric stove looks like:
Electrical diagram of an electric stove with a Dream oven (although it has two burners, the wiring of the oven switch is the same.
Wiring diagram for electrical connections of the Dream 8 electric stove
Wiring diagram for electrical connections of the electric stove Dream 12-03
Electrical diagram of a two-burner stove with oven model “Dream 221CH”
And just in case anyone might want to check it out:
User manual for electric stove Dream 12-03
User manual for electric stove models - 221Ch, 251Ch, 221T, 251T
Operation and maintenance manual Dream 12-06
Data sheet for electric stove Dream 15M
Operating and maintenance instructions Dream 29
Operation and maintenance manual for models - Mechta 341T, 341CH
Operating manual for electric stoves - Mechta 443Ch, 443Ch-01, 443Ch-02, 443Ch-03
Operating instructions for the gas-electric stove Mechta 450 GE, 450-01 GE, 451 GE
Service manual, characteristics of combined slabs Mechta 221 GE, 221-01 GE, 251 GE, 251-01 GE
Instructions, characteristics of tabletop electric stoves Mechta 111, 111T, 112, 112T, 211, 211T, 212, 212T
Passport for operation and maintenance of electric stove Zlata 231T (Dream)
If you have any questions about repairing the Dream electric stove, write to me by email, I will definitely answer and help as best I can.
When the oven heating element burns out, you will immediately understand it, since such a malfunction is obvious. The element itself does not turn red and does not generate heat. If you find that the heating element of the oven is not working, you should take replacement measures and return the oven to working condition. Replacing a heating element is not replacing a light bulb, so you can’t do it without professional help.
Connecting an electric stove with your own hands: wiring diagrams in an apartment
An electric stove is an excellent choice for a modern kitchen. If installed and used correctly, the device will serve well for many years. Of course, you can invite a qualified technician to connect the electric stove, but if you wish, you can do everything yourself and save a lot!
Connecting an electric stove yourself
Familiarize yourself with the basic requirements for connecting modern electric stoves, existing circuits, as well as guides for direct installation of the device and its grounding.
Connecting an electric stove yourself
Electric stove - what is it?
@sulpak.kz
An electric stove is a kitchen stove that runs on electricity.
For a physicist and technician, this is a heating electrical installation that releases thermal energy according to the Joule-Lenz law.
For a housewife, this is an alternative to gas appliances, which are considered unsafe and quite outdated.
Connecting the stove to the mains
The best way is to directly connect the stove to the safety circuit breaker. This makes it possible to avoid unnecessary connections that can overheat, which reduces the level of safety.
The absence of unnecessary connections is considered the most secure
But if you want to be able to disconnect the stove from the general power supply, you can install it using a terminal strip or a special socket.
Connection via terminal block
The terminal strip is mounted on the wall, after which the power supply line wires are connected to it on one side, and the power cable of the electric stove on the other.
Make sure the terminal block matches the power of the stove
Connection via socket
To connect an electric stove, you must install a special power outlet with grounding.
The terminals are marked with the same letters as on the plate itself
When connecting wires to a socket and plug, make sure that the wires connected to the phase, neutral and ground on the machine and the stove are connected to the appropriate terminals.
The electrical outlet must be grounded
The final step is to attach the protective cover to the back panel of the electric stove and plug in the stove.
Advantages and disadvantages
@My-BOSCH.com.ua
The main advantage of an electric stove over a gas stove is its high safety. Any domestic use of gas comes with serious risks of fire and explosion.
Classic electric stove
The time-tested model with disc metal burners is low in purchase price, but it is expensive during use. It heats up extremely slowly and also cools down slowly, which makes it difficult to adjust the power.
Ceramic electric stove
The advantages of a glass-ceramic electric stove with a classic heating element or Hi-Light heater are its affordable price, ergonomic design of the models and a long predicted service life. Disadvantages include the complexity of thermoregulation, fragility of the coating and significant energy consumption.
Attention! After cooking, the surface remains hot for a long time. Be careful not to touch the burners with your hands.
Halogen electric stove
The ultra-modern halogen stove saves up to 75% of energy. It differs from other types in its very high speed of heating and cooling, which allows you to easily edit the cooking temperature. Disadvantages include inconvenient cleaning and high cost.
Errors when connecting an Internet outlet
1
You can easily confuse the order of the wires on the connector and in the socket itself. Roughly speaking, turn them 180 degrees.
Here everything is checked by a more careful study of the inscriptions on the body of the socket and the color of the wires themselves. A tester with a signal generator and receiver is a good helper for identifying such errors.
If the wires are connected incorrectly, the lights on the tester will light up not in order from 1 to 8, but in random patterns. For example, first 1, then immediately 3, then 2, etc.
2
That is, immediately after placing them in their places in the slot. In this case, the core may accidentally fall out, and it will not be possible to insert it back after being cut. You will have to clean everything out again and go through the entire connection cycle again.
And if you left the supply of cable in the installation box small, then you will face a big headache.
3
As mentioned earlier, the result here is a deterioration in the speed and quality of the signal. Moreover, there is no need to first unravel the twisted pairs to the point where the insulation is cut, especially with a screwdriver. Simply embroider them by spreading the strands to the required length to fit them into the slots.
According to the standard, it is not allowed to unwind the twisted pair by more than 13mm, otherwise crosstalk errors will appear in frequency response tests. In practice, problems will begin when the network is loaded with traffic.
Sources – https://cable.ru, Kabel.RF
Operating rules
@giftforyou.shop
The slab must be installed level and firmly secured.
Attention! Incorrect connection of the electric stove can lead to electric shock and fire!
Before starting cooking, check the cleanliness of the surface. The bottom of the dish must be level. Make sure it fits snugly on the burner. At the beginning of work, set the maximum temperature to heat the stove as quickly as possible, then reduce the power to medium or minimum.
Fill pots to no more than 80% of their capacity to avoid spills and contamination of the work surface.
Important! Contact of water and grease on a hot burner can cause it to crack, as well as short circuits, fires and burns.
Before using the oven, check the condition of the door. It should press tightly against the body when closed, and occupy a horizontal position when open. Then set the required heating temperature and turn on the device.
Attention! Do not leave the stove on unattended. Do not clean hot, live surfaces.
Electrical connection diagrams
Sometimes you need to be able to read electrical diagrams. When connecting, you may need to find out the color of the wire, check the correct connections, etc. The diagram can be pasted on the back panel of the electric oven or can be found in a set of documents included with the machine. Similar schemes are inherent in hobs.
Each component is indicated on the diagram. You will see universal symbols and color abbreviations next to each wire. For example, R is red, Y is yellow. Wire colors with a hyphen indicate two-color wires (yellow-green, red-yellow, etc.). Always take into account the color marking of the cores, this will eliminate installation errors.
Some decryption tips:
- if you see lines inside the dotted triangle, this represents wires and connections running inside the timer or other switch box. There are diagrams where such wires are indicated by thicker lines than others;
- small white circles are contacts;
- small black circles are areas where one wire is connected to another. If the wires cross without a black dot in the diagram, they are not connected;
- letters or numbers indicate switches.
Single-phase connection
This is the most common option, which is found in multi-storey and other residential buildings. According to the diagram, the first, second, third terminals (L1, L2, L3) are connected by a jumper. A phase is connected to one of the terminals - a black, gray or brown wire. Jumpers are included in the kit or are made of copper wire with a cross-section of 6 mm2. If you make jumpers yourself using a flexible wire, to ensure better contact, use insulated ring or fork lugs - NKI or NVI. Crimping is carried out using press pliers.
The fourth and fifth jumpers are connected in a similar way. Zero is supplied here - a blue or light blue wire. The remaining sixth terminal is connected to the ground - a yellow-green wire. The terminal bolts must be well tightened. If the connection is poor, they may burn and the risk of fire will increase.
If a connection via a power outlet is provided, proceed as follows:
- the phase conductor is supplied to terminal L;
- zero goes to the terminal marked N;
- The ground is connected to a terminal marked PE, either marked with a grounding pattern, or – earth.
The same should be done on the fork.
Two-phase connection
This type is less common, but the connection is not more complicated.
The wiring will be like this:
- the first phase wire (yellow) is connected to terminals L1 L2 through a jumper;
- on L3 – second (red);
- on N1 N2 – through the jumper zero (blue or dark blue);
- on PE – ground (yellow-green).
Three-phase connection
This type is more common among owners of cottages and private houses. In this case, the supply wires consist of five cores. The voltage between phases and zero is 220 V, between phases – 380 V.
The wiring is carried out as follows:
- the first phase wire (yellow) is allocated to terminal L1, the second (green) to L2, and the third (red) to L3;
- to terminals N1 N2 – zero through a jumper;
- to the PE terminal - ground.
Electrical parameters and ratings of circuit breakers
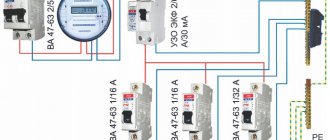
As we found out, there should be separate RCDs and a circuit breaker in the electrical panel. Through them the phase is supplied to the socket. This pair can be replaced with a difavtomat. These are the same two devices, but in one case. The negative is taken from the common bus, passes through the RCD, and the grounding is taken from the corresponding bus.
The rating of the machine is selected based on the maximum current consumption. This data is in the electric stove's passport and is usually in the range of 40-50 A. In this range, the ratings come in large increments - 40 A, 50 A, 63 A. It is better to choose the nearest larger one - this way there is less chance of a false shutdown when operating at full power . That is, if the declared maximum current consumption is 42-43 A, still take a 50 A machine.
Marking work
Marking work involves marking the cable route on the walls with chalk or charcoal, as well as the installation locations of its elements. To quickly and smoothly make an electrical wiring route, it is recommended to use a rope pre-painted with chalk (or charcoal). Such a rope is correctly called a marking or painting cord; you can see how to use it in the photo below:
All you need to do to create one of the sections is to secure one end of the rope in its original position and carefully pull it to the end point (so that the painted rope does not touch the wall). After this, the rope must be pulled tight and released sharply so that the mark remains on the wall. You can learn more about how to mark walls for wiring in our separate article.
After completing the marking, it is recommended to photograph the walls in a private house. This will allow you to quickly find electrical wiring when replacing or repairing it.
About connection diagrams
Before connecting the electric stove, you need to know exactly how many phases are supplied to the house. Typically this is one or three, that is, the mains voltage is either 220 or 380 volts. The first option is usually used in small private houses. The second is in houses with a large area, multi-story with a lot of household equipment in it. For example, it has electric heating boilers, boilers for the hot water supply system, an air conditioning and ventilation system.
The house's single-phase power supply consists of two wires that enter it from the nearest pole. Three phases are four wires. The essence of a three-phase connection at home is to divide the loads from household appliances into different phases, thereby reducing the load on them. And this makes it possible to reduce the cross-section of the cable used, the price of which is lower than a cable with a larger cross-section.
Three-phase power supply at home Source 2gis.com
Single-phase connection
To connect an electric stove to one phase, you will need a cable with three cores: one phase, another for neutral and the third for grounding. The latter has a colorful color, or more precisely, yellow-green. And its cross-section is usually slightly smaller than the other two. Not always though. The zero wire is usually blue. And the phase one can be of any other colors.
Now, regarding the contacts on the stove. There are usually several of them, and they are all designated by letters of the Latin alphabet. L is the phase contact, N is the neutral contact, and the grounding is designated PE. There is always only one last one on the connection panel, but there can be many others.
So, first of all, the phase wire is connected to one of the contacts marked “L”. The remaining contacts under this marking are connected by jumpers. Some manufacturers supply these jumpers with the slab. These are small metal plates or staples.
The terminals marked “N” are connected in the same way, to one of which the zero phase of the supply cable is connected. And the last thing to connect is the ground wire. The photo clearly shows how the connection to the electric plate was made, where copper jumpers were used.
Single-phase connection of an electric stove Source elektriki23.ru
Now the same connection is only using a socket. There are no special differences here, you just need to correctly connect the wires to the outlet itself. Because this device has its own contacts, marked just like on the stove panel. The main thing is not to confuse anything. In the photo below, just such an option for connecting an electric stove is shown.
Connecting an electric stove via an outletSource stroimaterials.ru
There is another option for connecting the electric stove to the power cable. Through the connecting block. This is a kind of intermediate option between a direct connection and a socket connection. This situation can arise when the socket is dismantled due to failure, and the owner of the house, thinking about safety, decides to completely remove it.
In this case, instead of a socket, a terminal block is installed, which is attached to the wall. The connection is made in the same way as in the case of a socket
It is important here not to confuse the contacts on the cable sticking out of the wall and the cable connected to the stove. Colors to help
Line security
So, we will assume that the wire for the electric stove is laid. Now a separate machine for the stove is mounted in the distribution board. An ideal option if a separate RCD is installed. In this case, all connections must be made using terminal blocks. No twists or other old-fashioned methods.
As for the other side of the cable, it is connected to the stove through terminals, which are an integral part of the household appliance. As mentioned above, the connection can also be made through an outlet. This is a more convenient option in terms of turning off the stove and moving it to another place. But less secure.
Modern stoves must be grounded. And we'll talk about this a little below.
To summarize all of the above, we can make a list of requirements for the installation process:
- To connect an electric stove, a three- or four-core cable with a cross-section of 4 or 6 mm² is required.
- In the distribution panel, a separate automatic circuit breaker and an RCD are installed on the stove.
- The household appliance is grounded.
And a few words about installing the socket, if you decide to connect the stove through it. What are the requirements for this process:
- The socket can only be mounted on a surface made of non-combustible material.
- Place of installation - away from heating devices and other heat sources.
- The ends of a multi-core copper cable must be soldered before connecting to the socket contacts.
- The main task is to correctly connect the cable both from the stove side and from the socket side. That is, pay attention to the colors of the wires.
Socket for an electric stove Source 24aul.ru
See also: Catalog of companies that specialize in electrical work