Amplifier for radio in car – Crafts for cars
Sometimes, due to a low-quality radio receiver on a car radio, you have to buy separate HF amplifiers for normal radio reception. At the same time, the choice of such amplifiers is quite difficult, taking into account the fact that there are now a lot of cheap Chinese products on the market that do not really work.
One day they gave me such an amplifier for repair, or rather, so that I could assemble a normal amplifier in the same case.
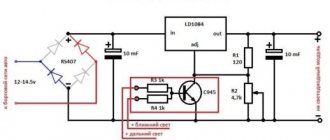
I would like to present the design of a cheap FM amplifier for a radio receiver. It turns out that this is not an amplifier at all, but God knows what. The circuit consists of only pairs of transistors, and one of them is simply for illuminating the LED.
Power is supplied from the vehicle's on-board 12 Volt network and... nothing happens, only the LED indicator lights up and that’s it - no other reactions are observed from the car radio, with or without an amplifier - the reception is the same.
The photo shows the board of such an antenna amplifier, note - I did not repair anything, and did not touch the board at all, but mistakes are visible on the board - a large piece of solder, it is not clear why, an extremely dirty board, oxides everywhere, and generally a non-working, useless thing.
The price of such an amplifier is around 200 rubles; in exchange, for pennies you can assemble an antenna amplifier at home. A couple of working circuits of such amplifiers are presented below
These schemes are very similar to each other, there are very few differences. Both have been tested and are quite workable options, they are clearly more useful than a Chinese trinket, and they also do not contain scarce components.
The entire element base can be found in an old radio or tape recorder. Just one low-power transistor KT368, which can be replaced with any other RF transistor; among imported analogs, SS9018/C9018 is perfect - in theory the same thing.
And I also want to note one point, if you decide to buy a bicycle, for yourself or for your children, then I would like to recommend Pegasus. Excellent value for money, offered to you by the Ultrasport company.
Similar articles:
xn—-7sbgjfsnhxbk7a.xn--p1ai
Simple antenna amplifier | DIY master class
The more I understand the modern element base, the more I am amazed at how easy it is now to make electronic devices that previously could only be dreamed of. For example, the antenna amplifier in question has an operating frequency range from 50 MHz to 4000 MHz. Yes, almost 4 GHz! In the days of my youth, one could simply dream of such an amplifier, but now even a novice radio amateur can assemble such an amplifier on one tiny microcircuit. Moreover, he has no experience working with ultra-high-frequency circuitry. The antenna amplifier presented below is extremely simple to manufacture. It has good gain, low noise and low current consumption. Plus a very wide range of work. Yes, it is also miniature in size, thanks to which it can be embedded anywhere.
Where can I use a universal antenna amplifier?
Yes, almost anywhere in the wide range of 50 MHz - 4000 MHz.
- — As a TV antenna signal amplifier for receiving both digital and analogue channels.
- — As an antenna amplifier for an FM receiver.
- — others
This applies to domestic use, but in the amateur radio field there are much more applications.
Antenna amplifier characteristics
- Operating range: 50 MHz – 4000 MHz.
- Gain: 22.8 dB - 144 MHz, 20.5 dB - 432 MHz, 12.1 dB - 1296 MHz.
- Noise figure: 0.6 dB - 144 MHz, 0.65 dB - 432 MHz, 0.8 dB - 1296 MHz.
- Current consumption is about 25 mA.
More detailed specifications can be found in the SPF5043Z datasheet. The low noise amplifier has proven itself to be excellent. The low current consumption is fully justified. The microcircuit also perfectly withstands high-frequency overloads without loss of characteristics.
Making an antenna amplifier
Scheme
The circuit uses an RFMD SPF5043Z microcircuit, which can be purchased on AliExpress
. In fact, the entire circuit is an amplifier microcircuit and a filter for its power supply.
Amplifier board
The board can be made from foil PCB, even without etching, as I did. We take two-sided foil-coated PCB and cut out a rectangle measuring approximately 15x20 mm.
Then, using a permanent marker, draw the layout along the ruler.
And then you want to etch, or you want to cut out the tracks mechanically.
Next, we tin everything with a soldering iron and solder SMD elements of size 0603. We close the bottom side of the foil board to a common wire, thereby shielding the substrate.
Setup and testing
No adjustment is required; you can, of course, measure the input voltage, which should be within 3.3 V and the current consumption is approximately 25 mA. Also, if you operate in the range above 1 GHz, you may need to match the input circuit by reducing the capacitor to 9 pF. We connect the board to the antenna. The test showed good gain and low noise level.
It will be very good if you place the board in a shielded case, like this.
A board for a ready-made amplifier can be bought on AliExpress
, but it costs several times more than a separate microcircuit. So it’s better to get confused, it seems to me.
Schema addition
To power the circuit, a voltage of 3.3 V is required. This is not entirely convenient, for example, if you use the amplifier in a car with an on-board voltage of 12 V.
For these purposes, you can introduce a stabilizer into the circuit.
Connecting the amplifier to the antenna
In terms of location, the amplifier should be located in close proximity to the antenna. To protect against static and thunderstorms, it is desirable that the antenna be DC-switched, that is, you need to use a loop or frame vibrator. A Biquadrat antenna would be an excellent option.
Watch a video testing a simple antenna amplifier
sdelaysam-svoimirukami.ru
Antenna amplifier for car radio: how to choose
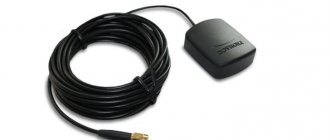
Antenna amplifier for car radio
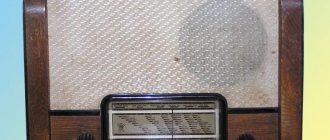
The antenna amplifier for the car radio is designed for better and more reliable reception. Recently, inexpensive car radios have begun to be produced, although with good functionality. Unfortunately, they are not able to provide reliable reception of radio stations. This is especially true for areas far from the city, where there is a signal level, but it is too weak. For a car radio, the antenna amplifier in this case acts as a device that sharply increases reception. If earlier cassette tape recorders were found quite often, today they can only be seen in vintage cars. Modern car radios are more multimedia complexes equipped with a huge range of options. Yes, modern equipment does an excellent job of navigation, plays excellent music from various media, helps the driver park, etc. But a motorist will always miss a radio or TV on the road - an experienced motorist knows this!
Antenna amplifier for car radio
As mentioned above, a modern multimedia center is not capable of providing a good radio signal, especially outside the city. Then you have to purchase an antenna amplifier - a special device that significantly increases the power and quality of the signal.
How to determine if the signal is weak
Antenna amplifier for car radio
This is not difficult to do. It will be enough to familiarize yourself with the signs of a weak radio or TV signal, which are given below:
- The sound is distorted when watching or listening. Frequent interference;
- The list of accepted stations is sharply reduced;
- Image synchronization is lost;
- The signal disappears completely;
- Small white dots are visible on the screen instead of a picture, only noise is heard.
Getting to know the device
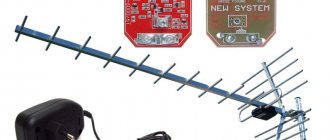
Antenna amplifiers for car radios and their installation
This amplifier is specially designed for efficient and reliable reception of stations. Most motorists who have installed an antenna amplifier in their car note that the signal has doubled, if not more.
Note. The device does not require any special skills to install. Its connection is simply connecting one contact to the head unit, and the other to the external passive dipole.
Antenna amplifiers for car radios
Almost all modern antenna amplifiers for cars are assembled using a two-stage design, although they may have some differences. But they must meet the standards of modern communication systems.
Selection options
Antenna amplifier for car radio circuit
When choosing an antenna amplifier, it is recommended to follow the tips below:
- Primary attention should be paid to the possibility of installing the amplifier not far from the antenna.
Note. You should know that connecting directly next to the car radio input, on the one hand, significantly increases the signal level, and on the other hand, it threatens interference emitted by electrical equipment.
- We remember that the operating band must cover the required frequency range;
- The amplitude-frequency response should be as uniform as possible;
- As for the gain, it is desirable that it be in the range of 15-25 dB;
- When the supply voltage varies, stable operation must be ensured;
- The dynamic range must also be high, which helps protect against overloads;
- Finally, the noise figure must be much less than the signal-to-noise value.
Note. The gain is worth paying the most attention to. The fact is that with its small values, the reception quality cannot be high. On the other hand, for the city these same indicators are quite normal. If this same coefficient is too high, the broadband amplifier may be overloaded, which can lead to its damage.
Inevitable factors that affect the signal
Note. Note that the best effect is achieved if you connect the amplifier to an external antenna. Thus, an active rather than a passive dipole is connected. Distance is also important. So, you should not count on high-quality reception if the station (main transmitter) is located at a distance of more than 120 km.
It is worth noting that there are side factors that in one way or another affect the signal level:
- In the city itself, signal over-amplification may occur. The manufacturer recommends either turning off the amplifier in a city area or reducing the gain;
- It is also not recommended to use the amplifier simultaneously with an active antenna. This can lead to the opposite effect: the signal will deteriorate and distortion will appear;
- After replacing the head unit, interruptions in signal reception may be noticed. It turns out that the problem may lie in the power supply, which was forgotten or could not be connected to the active antenna. Buying a special adapter or making one will immediately solve the problem.
What to choose
Today, the manufacturer offers not just one, but a whole host of amplifier options for a car antenna.
Domestic manufacturer
Amplifier Triad
It is interesting that our domestic manufacturer also offers a whole line of products called Triad. All models deserve praise, and especially the amplifier for the car radio antenna Triada-304 Dalnoboi, which is equipped with the function of turning off the device and operating in the FM/AM/VHF radio bands.
Foreign manufacturer
Amplifier from Prologi
Among foreign manufacturers, Prologi products take pride of place. For example, their model TFB-100 is capable of amplifying digital and analogue signals and simultaneously working with two antennas.
On your own
Yes, there is such an option. For radio amateurs, it offers special kits from which you can assemble a full-fledged amplifier with your own hands . Again, homemade amplifiers are assembled using a two-stage circuit. Well, now you have learned how to strengthen the radio signal in your car radio. Installing an amplifier purchased or made by yourself will not take much time and effort. All you have to do is follow the instructions, watch the video review and study useful photo materials. The price of amplifiers varies and it all depends on the reception range, as well as the manufacturer.
avtozvuk-info.ru
How to determine if the signal is weak
You should install a car antenna amplifier only if the signal level is low. The main features can be called:
- Frequent interference.
- Sound distortion when listening to a radio station.
- Lost image synchronization.
- Periodic complete disappearance of the signal.
For a radio, an amplifier is a device that can increase the signal level. In this case, the transmission quality can be doubled. You can install the device yourself, there are no problems with this.
Reasons for a bad signal
The amplifier for the car antenna is selected taking into account the reason that led to the problem. The main ones can be called:
- Malfunction of the antenna and other elements. High humidity often causes oxide to form, which impairs contact.
- Hissing and wheezing while listening to the radio indicates a malfunction of the receiver itself. In most cases, the problem is a cracked circuit board.
- Additional interference degrades the signal quality in the car. They can be created by mobile operator towers, power plants, and railway tracks.
- Moving away from the signal source also causes a decrease in the quality of reception.
- Additional interference may be created when the recorder is connected to a power source via the cigarette lighter. This problem can be solved by installing equipment that runs on a built-in battery.
Are you a car driver?! Then you can take this simple test and find out. Go to test »
In most cases, artificial interference and distance from the source cause signal deterioration. It is recommended to amplify the radio in case of frequent long trips.
ANTENNA AMPLIFIER FOR CAR RADIO
All car enthusiasts have radios in their cars, but not all radios pick up the radio well. Only expensive devices are equipped with serious receivers with good UHF, capable of receiving weak FM stations. Most cheap car radios only work acceptably in the city, so it makes sense to equip them with an antenna amplifier. There are two options here - buy a ready-made industrial one or solder it yourself.
Antenna amplifier Ratex
For those who have some amateur radio skills, a couple of circuits of such amplifiers are offered.
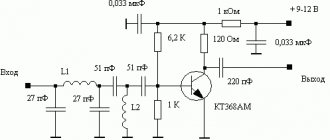
Schematic diagram of an FM amplifier for a car radio
The input coil L1 consists of four turns of enameled copper wire (frameless) on a mandrel more than 5 mm in diameter. Coil L2 is similar to L1, but has only three turns. The pinout of the 2SC2570 is shown in the diagram.
Second option FM UHF
Schematic diagram of an FM car radio amplifier
Together with a good directional antenna, this two-stage antenna amplifier for the VHF FM range will allow you to get clear reception even of distant radio stations. The amplifier will also significantly improve the reception quality of local city FM signals. It is recommended to use imported transistors, as the result is much better with them. Some of them, including the pinout, are shown in the table.
The gain of the second MOSFET is controlled by resistor P1, which sets the bias voltage for T2. For example, if you live near a powerful VHF-FM and TV transmission center, then you understand that high gain will lead to cross-modulation and other unwanted effects in the FM band.
The amplifier is assembled on a double-sided printed circuit board shown in the figure. Coils L1, L2 and L3 are wound on a 4.5 mm frame.
More about coils
FB1, FB2, FB3 = 5 turns of 0.15 mm wire on ferrite beads.
L1 = 7 turns 0.9 mm dia. enameled copper wire; internal diameter 5 mm.
L2, L3 = 7 turns 0.9 mm, winding diameter 5 mm;
L4 = 30 turns of 0.15 mm diameter enameled copper wire on a 1 MΩ resistor with a power of 0.5 W.
In the absence of instruments, tuning can be done by ear - to the maximum quality, using a bad antenna (a small piece of wire).
el-shema.ru
How to install and connect
After assembling the product, it should be connected. Recommendations for carrying out such work are as follows:
- The external antenna is connected to the amplifier input. For this, a cable with a resistance of at least 75 Ohms is used.
- It is recommended to insulate the cable. Do not forget that high humidity causes the appearance of oxide. At the same time, it is secured with clamps, since strong vibration may occur when moving.
- When connecting, polarity must be strictly observed.
- The power supply requires 12V voltage, which is often used in the car. The board is connected to the ANT radio output. Due to this, voltage will be supplied when the device is turned on.
- When installing the device outside the vehicle, ensure high-quality sealing of the housing. Moisture getting inside the device will cause corrosion.
The advantage of a homemade device is that it can be disassembled and changed at almost any time. By selecting a suitable circuit, the amount of interference is reduced.
Radio signal amplifier for car radio: antennas, FM signal, external
A radio signal amplifier for car radio improves reception quality in difficult conditions. This device is used with both radios and televisions.
When do you need an amplifier?
A car antenna amplifier is needed when the signal level is insufficient for comfortable listening to FM radio in the car. This most often occurs in small towns, remote from large radio stations or powerful repeaters.
When receiving on a passive car radio antenna while the vehicle is moving in unfavorable conditions, noises and clicks occur that interfere with listening to music and speech programs. If the car enters an area with an extremely low signal, then the interference is constant, blocking the radio transmission.
What affects the signal level
The level and propagation of the signal in the FM range is affected by:
- uneven terrain;
- high-rise buildings built from reinforced concrete;
- atmospheric phenomena;
- interference sources installed in the machine;
- distance from the transmitter to the car antenna.
What to choose
When choosing an antenna amplifier, you should pay attention to various parameters. This device must have a wide bandwidth and a uniform amplitude-frequency response. Also, a high-quality antenna amplifier has a low signal-to-noise ratio. To ensure stable reception and protection from interference, it is recommended to install the amplifier closer to the antenna. If you install it next to the radio, the level of interference generated by automotive electrical equipment will increase.
The device must be accompanied by instructions and all accompanying documentation. Please note that this device should not be used in conjunction with an active antenna. Because of this, the reception will greatly deteriorate, since the car radio will catch all the on-air garbage. And while tuning the receiver, you will constantly listen to signals from strong stations with distorted and noisy sound.
Domestic manufacturer
Among car radio amplifiers produced in Russia, the most popular device is called “Triad-304 - Long Range”. It improves reception at a distance of 60 to 120 km from the radio station, operates in all required ranges, and has a light indication of the presence of power.
Another feature is a city-highway switch, used to lower or increase sensitivity depending on radio reception conditions.
The connecting cable is long enough so that the radio amplifier can be installed closer to the antenna.
Other advantages include low price, high reliability and sensitivity.
Foreign manufacturer
The most popular foreign antenna amplifier is Prology TFB-100. It differs in that it amplifies both analog and digital radio and TV signals with equal quality.
You can connect several antennas to it, which will improve the quality and stability of the signal at the border of the stable reception zone. This accessory will be useful for those who have a multimedia system with a TV in their car.
How to make it yourself
You can also make an antenna amplifier for a car audio system yourself. This device is built according to the classical scheme. A high-frequency filter is installed at the input, assembled according to a P-circuit and providing an input impedance of 75 Ohms. It consists of a coil connected in series and 2 capacitors with a capacity of 27 pF connected in parallel. To protect audio equipment from accidental high voltage, a low-pass filter using a T-circuit is installed after the high-pass filter.
1 stage, built on a KT 368 AM transistor or its analogue, gives a gain of 15 dB in the FM range. Resistors can be used to more finely tune the characteristics of a radio-electronic device. The positive power is supplied to the collector of the semiconductor, the negative to the emitter.
To stabilize and filter the current, a zener diode D 814 G or its equivalent and a capacitor with a capacity of at least 100 μF are connected parallel to the power input.
The number of stages is determined by the required gain. The connection between them, as well as the car radio input, is capacitive. You can assemble an amplifier for a car radio using either a radio kit or existing parts. A short piece of coaxial cable with a suitable plug is connected to the output of the device. The entire structure is placed in a plastic or tin case of the required size.
How to install and connect
Installing and connecting the amplifier will not cause any particular difficulties. First, you need to remove the plug of the external external car antenna from the radio. The amplifier is then secured in a suitable location. If it is equipped with a city-highway switch, then for ease of control the device is installed on the instrument panel near the radio or in the glove box of the car.
The output plug of the amplifier is inserted into the antenna socket of the radio, and the antenna plug is inserted into the input connector. After this, power is connected to it. To do this, the wire coming from the amplifier is connected to the blue wire with a white stripe of the radio, which carries the power plus.
The negative is supplied to the amplifier through the side contact of the socket and the screen shell of the connecting cable. With a strong signal, the quality of reception on an antenna with an amplifier can be improved by folding the telescopic rod or bending the flexible one. It is worth considering that the receiving dipole should not come into contact with the car body.
autotuning.expert
How to do it yourself
Many car enthusiasts are interested in the question of how to make an antenna for a car radio with their own hands. For a homemade antenna, you will need to prepare all the necessary tools and strictly follow the step-by-step instructions.
Before installing the antenna in the car with your own hands, you need to prepare the place by clearing it of accumulated dirt and dust.
Required spare parts and tools
The set of necessary tools and spare parts includes:
- anchor bolt;
- soldering kit;
- about 3000 mm of soft wire made of copper;
- plastic case;
- circuit for an amplification device;
- transistor KT368A;
- wire that will lead into the car interior;
- for an active dipole - resistors and capacitors.
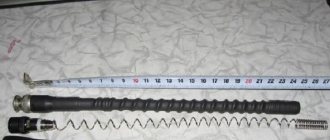
Manufacturing process
First you need to wrap the wire around the anchor bolt. All turns should be smooth, there should be no overlaps. Then you need to solder the wire leading to the car radio in the cabin to the winding. You should select a plastic case that matches the resulting design and the size of the standard location for the antenna.
You can proceed to installing the mechanism on the roof of the vehicle. There are several ways how this can be done:
- using magnets;
- using vacuum suction cups;
- clamps;
- install a place for a standard antenna;
- using thread.
The wire should be routed along the body, preferably along one of the vehicle pillars. You can drill 2 holes in the housing; it is advisable to lay the wire around the perimeter of the doorway and secure everything.
After installation, you should lay the cable along the side and connect it to the radio.
Installation of the radio receiving mechanism on the car body using the connector provided:
- Take the wire and cut the thread.
- On one side, the thread must be longer than the height of the insulator, because there will be 3 more nuts.
- Tighten the first nut.
- Insert the wire into the insulator connector and tighten nut No. 2.
- Secure everything with a locknut.
- Insert the insulator into the hole located on the transport body.
- Strip the central core of the radio cable.
- Wind several turns of the protected core and secure everything with nuts.
- Connect the wire shield to the vehicle body.
- Connect the antenna connector to the second end of the cable.
- Secure the cable in the interior. For these purposes, it is recommended to use heat-protective glue.
If the user has chosen an active type of receiving mechanism, then it must be installed on the windshield using the bracket of your choice with a vacuum suction cup.
All installation and connection work must be carried out with the vehicle's power unit turned off.
Antenna amplifier for car radio - features of selection and manufacturing + Video
A radio antenna amplifier is necessary to ensure reliable and uninterrupted reception of radio waves without interference in all directions. Despite the fact that in recent years, car audio manufacturers have been producing car radios with high functionality, this is not enough for high-quality reception of radio stations, especially outside the city limits.
1 What properties should a high-quality amplifier have?
Very often, motorists, succumbing to advertised brands, strive to purchase a “super-sophisticated” antenna, the manufacturer of which claims the high capabilities of the device for receiving radio signals. As a rule, the real operation of the device is far from the promises of advertising videos.
In order to catch radio in the entire frequency range, a high-quality antenna amplifier is sufficient. When choosing it, you should focus primarily on the highest possible reception of a high-quality signal in a certain area. In addition, it is assumed that the power of the radio signal amplifier will completely cover the entire broadcast frequency range.
Car antenna for receiving radio signals
A high-quality antenna amplifier for a modern car radio should:
- maintain operating mode even under conditions of a wide range of powers and temperatures;
- have a high dynamic range to prevent overloading due to a high input signal level;
- characterized by a minimum noise figure;
- have an amplification coefficient of the order of 15-25 decibels;
- cover the entire range of existing frequencies with the operating band of the amplifier.
High-quality antenna amplifier for a modern car radio
Thus, when purchasing a device or making an antenna amplifier with your own hands, you must, first of all, pay attention to the possibility of installing it on the antenna itself or in close proximity to it.
If you install a part in the area of the antenna input, this may cause an increase in the noise-signal ratio, and high-quality frequency reception may even be difficult in some areas.
2 How to choose the right antenna amplifier?
Amplifiers offered on the market from various manufacturers are usually assembled using a two-stage design, but their operation in different ranges may differ from each other. Such devices are designed to increase the signal, and almost all car owners who have installed this part on their car note a significant improvement in reception.
All antenna amplifiers found on store shelves must comply with communication system standards and be certified in accordance with GOST.
Device for increasing the signal of a car radio antenna
Regardless of the quality and cost of the device, there are a number of side factors that, in certain circumstances, can affect radio signal reception. Among them the following should be highlighted:
- Signal overload in urban areas. To avoid radio interference, it is recommended to turn off the amplifier or set the gain to minimum.
- Using an amplifier with an active antenna. This combination leads to the opposite effect and worsens the level of reception.
3 Review of popular antenna amplifier models
Perhaps the most popular amplifier option for car radios among domestic manufacturers is the Triad 304 model. Among the advantages of the device are a relatively low price, decent quality and optimal functionality, and the ability to turn off amplification in the zone of a strong signal.
Amplifier for antenna "Triad 304"
As for foreign-made amplifiers, the most popular are devices manufactured by Prology. For example, a model such as the TFB-100 is capable of working simultaneously with several antennas and qualitatively amplifying digital and analog signals with equal accuracy.
Model
In addition to the presented models, there are also a huge number of manufacturers of similar devices, each of which strives to surprise car owners with their “tricks”. However, many car enthusiasts prefer to make a radio antenna amplifier with their own hands, using a classic two-stage circuit and special kits for self-assembly. Such kits are produced by the company Master-Kit and others.
4 Making an amplifier using a two-stage circuit with your own hands
A do-it-yourself amplifier for a car radio is made according to the classic scheme with eight main resistors. Thus, resistors R1, R2, R4 and R6 are designed to stabilize changes in VT1 type transistors in case of voltage or temperature changes. The elements in the circuit are selected to ensure maximum amplitude and frequency performance of the amplifier.
DIY car radio amplifier
In addition, the circuit also uses special biopolar transistors of the 2SC29 type with a frequency of less than 1 GHz. This allows you to minimize the amount of noise produced by the amplifier itself. All elements of a two-stage circuit are mounted on a special board using soldering. You can solder the elements yourself or contact an electronics specialist who will make the connections in the correct sequence according to the diagram. The board can be purchased from a set of parts from the same Master Kit company. You can find the part in specialized stores.
After assembling a homemade radio amplifier, it is necessary to connect the contacts: the amplifier input to the antenna input, the output using a special cable with a resistance of at least 75 ohms goes to the radio receiver. The cable can be additionally insulated and secured directly to the board with clamps, threading them through specially provided holes. It is very important to strictly observe polarity when connecting the amplifier to the power supply of the car itself.
Car radio amplifier
For power supply from the network, it is better to use a voltage of 12 volts and connect the board to the output of the ANT radio. In this case, voltage will be supplied when the car radio is turned on. If you install the device on the outside of the car, you should take care of additional insulation and sealing of the case, but it is better to install the radio signal amplifier in close proximity to the antenna.
The advantage of making the part yourself is that, if necessary, you can change the circuit and get a clearer signal at the output and minimize the amount of interference that occurs.
tuningkod.ru
Best models
There are practically no popular models among amplifiers. Such devices are installed extremely rarely, since a modern multimedia system allows you to play music from various media. When determining a popular model, the following points are taken into account:
- Device cost. A proposal of domestic origin costs 1000 rubles. Do not forget that the price determines the basic properties of the device.
- Length of service life. Installing an amplifier involves changing the receiver connection circuit. Therefore, you should connect a device that can last for several years.
- Reliability. The device must operate under various operating conditions: voltage changes, temperatures, humidity and other situations.
- Signal level. This indicator can vary over a wide range.