It's not difficult to figure it out.
Finding out the connection diagram for a particular electric meter is quite simple.
As a rule, it is located in a wire with a yellow-green sheath. In addition, not only the owners and inspectors, but also unauthorized persons will have access to the shield. Ground pin
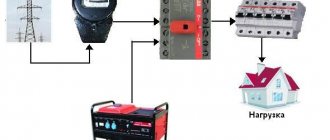
That is, connecting the wires to the meter looks like this: Taking into account all the requirements stated above, the connection diagram for a single-phase electricity meter should have the following form, since the connection diagram for an induction electric meter is identical to an electronic one, here is one general diagram with an electronic meter: Two-pole circuit breaker - to be able to relieve voltage from meter for its safe replacement Single-pole circuit breakers - to protect the electrical network from short circuits and overloads RCD - to protect against electric shock and fire.
A metal or plastic box protects the devices placed in it from physical impact, moisture and dust. Everything that energy network workers sell costs almost twice as much, has repair cases and, according to reviews from private home owners, has a huge measurement error.
It does not go into the meter, as well as into machines and RCDs.
Lack of an individual input machine in front of the counter.
Popular wiring diagrams for electric meters The manufacturer indicates the wiring diagrams on the inside of the covers covering the terminals. This will be discussed below.
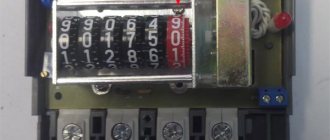
Connections of the electricity meter Mercury 201.5. Connection diagram.
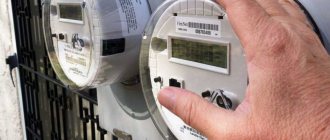
How to connect the meter yourself: single-phase and three-phase
Commissioning or reconstruction of electrical wiring in a house or apartment is rarely complete without installing or replacing an electric meter. According to the standards, work can only be performed by specially trained people who have permission to work in networks with voltages up to 1000 V. But you can install all the elements and connect the meter to the load (electrical appliances) without connecting the power supply yourself. Afterwards, you need to call a representative of the energy supply organization to test, seal and start up the system.
One of the housing options for the meter
Who should be responsible for replacing the electric meter and providing it for verification?
Who should monitor the condition of the electric meter?
How to change the electricity meter? According to the rules for electricity metering, replacement of the meter is carried out subject to the following conditions:
- you can begin dismantling only after coordinating your plans with the electricity supply authorities: upon a written request from the owner and receiving permission in the same form;
- The electric meter can only be replaced by a qualified electrician (that is, with a certificate of professional training) who has a Class 3 electrical safety permit.
Important! Reinstalling the meter without notifying the energy supplier is a violation of the home power supply contract and is fraught with serious fines.
To be completely confident in the correct installation and calibration of the device, it makes sense to apply for the service directly to the housing and communal services or electricity supplier.
Connecting a meter: rules and basic requirements
Exactly all the requirements are specified in the PUE, and the basic rules are as follows:
- Must be installed with protection from weather conditions. Traditionally they are mounted in special boxes (boxes) made of non-flammable plastic. For outdoor installation, the boxes must be sealed and must provide the ability to control readings (have glass opposite the display).
- Fixed at a height of 0.8-1.7 m.
- The meter is connected using copper wires with a cross-section corresponding to the maximum current load (available in the technical specifications). The minimum cross-section for connecting an apartment electric meter is 2.5 mm 2 (for a single-phase network this is a current of 25 A, which is very low today).
- The conductors are insulated, without twists or branches.
- With a single-phase network, the state verification date of the meter is no older than 2 years, with a three-phase network - one year.
The installation location of the meter in apartment buildings is regulated by the project. The meter can be installed on the landing or in the apartment - in the panel. If placed in an apartment, it is usually not far from the door.
Input panel complete set
There are also several options in a private house. If the pole is in the yard, you can place the meter on the pole, but it’s better to place it indoors. If, according to the requirements of the energy supply organization, it must be located on the street, they place it on the front side of the house in a sealed box. The machines going to groups of consumers (various devices) are mounted in another box in the room. Also, one of the requirements when installing electrical wiring in a private house: the wires must be visually inspected.
Installing a meter on a pole
In order to be able to carry out work on the electric meter, an input switch or machine is installed in front of it. It is also sealed, but there is no way to put a seal on the device itself, like on a meter. It is necessary to provide for the possibility of separate sealing of this device - buy a small box and mount it inside the apartment panel or place it separately on the landing. When connecting a meter in a private house, the options are the same: in the same box with the meter on the street (the entire box is sealed), in a separate box next to it.
Installation features and work progress
When installing electricity metering devices, great attention should be paid to safety regulations. All work must be performed by specialists licensed to work in electrical installations
Installation location
The installation location of the device is chosen so that there is access to regulatory authorities. In an apartment building, this place is the landing. And in a private house they select a place to which there is easy access.
Installation height
The operating rules for electrical installations require that the electricity meter be installed at a height of 0.8-1.7 m. In practice, specialists place the electricity meter in such a way that the data can be easily checked by an inspector. This installation height is 1.5 m from the ground. Which does not contradict the PUE.
Connecting protective electrical equipment
Protective electrical equipment is selected according to the connection diagram. This depends on the supply network - single-phase or three-phase.
The machines are mounted (if possible) on each load line. For example, lighting lines and sockets are protected by their own circuit breakers. The line supplying household appliances is protected by RCDs or differential protection devices.
All devices are connected to a common switch, which protects the electric meter from overload and short circuit currents. The general circuit breaker is selected based on the total load currents, and the devices protecting a separate line are selected taking into account the connected load.
On the input side, a disconnecting device is installed in front of the metering device. Such devices are automatic or batch switches.
Electric meter connection
If the panel is correctly assembled, connecting the meter should not cause any difficulties for specialists. The wires should be connected according to the existing diagram. It shows which conductors are connected to the contacts. It is available in each meter on the back of the cover that covers the meter contacts.
The correct connection must be checked by an electrician from the electrical network. He connects the electric meter and supplies electricity to the apartment.
Settings
Single-tariff metering devices do not require additional configuration. Once connected they are ready to go. The situation is more complicated with multi-tariff devices. After installation, they need to be configured.
However, configuration is only necessary if the data will be transmitted automatically to Energosbyt. Such services are not provided in every locality, and setting up a transmission port requires special equipment and knowledge. This is usually performed by Energosbyt specialists.
To do this, use the “enter” button to switch the device readings by tariff zones. This data is transmitted by the owner to Energosbyt. Where they make calculations and issue invoices for payment, according to the day and night tariffs.
Connection diagram for a single-phase electric meter
Meters for a 220 V network can be mechanical or electronic. They are also divided into single-tariff and two-tariff. Let us say right away that connecting any type of meter, including two-tariff ones, is carried out according to the same scheme. The whole difference is in the “filling”, which is not available to the consumer.
If you get to the terminal plate of any single-phase meter, you will see four contacts. The connection diagram is indicated on the back of the terminal block cover, and in a graphical representation everything looks like in the photo below.
How to connect a single-phase meter
If you decipher the diagram, you get the following connection order:
- Phase wires are connected to terminals 1 and 2. The phase of the input cable comes to the 1st terminal, the phase to the consumers goes from the second. During installation, the load phase is connected first, and after it is secured, the input phase is connected.
- The neutral wire is connected to terminals 3 and 4 using the same principle. To the 3rd contact there is a neutral from the input, to the fourth - from consumers (machines). The order of connecting the contacts is similar - first 4, then 3.
The meter is connected with wires stripped to 1.7-2 cm. The specific figure is indicated in the accompanying document. If the wire is stranded, lugs are installed at its ends, which are selected according to thickness and rated current. They are crimped with pliers (can be clamped with pliers).
When connecting, the bare conductor is inserted all the way into the socket, which is located under the contact pad. In this case, it is necessary to ensure that no insulation gets under the clamp, and also that the cleaned wire does not stick out from the housing. That is, the length of the stripped conductor must be maintained exactly.
The wire is fixed in old models with one screw, in new ones - with two. If there are two mounting screws, tighten the one on the far side first. Tug the wire slightly to make sure it is secure, then tighten the second screw. After 10-15 minutes the contact is tightened: copper is a soft metal and is pressed down a little.
Read how to do the wiring in your home yourself here. The features of electrical wiring in a wooden house are written here.
This applies to connecting wires to a single-phase meter. Now about the connection diagram. As already mentioned, an input machine is placed in front of the electric meter. Its rating is equal to the maximum load current; it is triggered when it is exceeded, excluding equipment damage. Afterwards they install an RCD, which is triggered when the insulation breaks down or if someone touches live wires. The diagram is shown in the photo below.
Connection diagram for a single-phase electricity meter
The circuit is not difficult to understand: from the input, zero and phase go to the input of the circuit breaker. From its output they go to the meter, and from the corresponding output terminals (2 and 4) they go to the RCD, from the output of which the phase is supplied to the load breakers, and the zero (neutral) goes to the zero bus.
Please note that the input circuit breaker and the input RCD are two-contact (two wires enter) so that both circuits open - phase and zero (neutral). If you look at the diagram, you will see that the load breakers are single-pole (only one wire goes to them), and the neutral is supplied directly from the bus.
Watch the meter connection in video format. The model is mechanical, but the process of connecting the wires is no different.
Tools and installation features
A meter is a device at the entrance to the electrical circuit of your home.
Therefore, when connecting it, you should pay attention to safety and correct grounding. Modern safety standards require the organization of switching of both “zero” and “protective zero” in electrical panels, using specialized plastic buses for this purpose.
It is most convenient to mount them on the already mentioned DIN rail, but this is not important. It is much more important not to confuse the colors of these slats, so as not to confuse the service personnel who will deal with them later:
- blue tires are designed for “zero”;
- Yellow tires are intended for “protective zero”.
All elements of the electrical panel must be connected to each other with a single-core copper wire of large cross-section. The larger its area, the lower the resistance, the lower the heating of the conductor and, as a result, the higher the safety in this area.
It is not recommended to carry out welding work inside the electrical panel - it is much more practical and technologically advanced to use a drill, metal drills and screws for this. In addition, you should foresee in advance that the wires will be single-colored and acquire multi-colored electrical tape to mark the phases and zeros with it. The following tools (besides a drill or hammer drill) will probably come in handy:
- mounting screwdrivers of both types;
- indicator screwdriver (to check the presence of load on the terminals);
- pliers (you can use wire cutters separately);
- knife;
- insulation stripper;
- roulette;
- level.
- A soldering iron will be needed if there are stranded wires.
All too often, accidents due to electric shock during the installation of electrical equipment occur due to simple overconfidence and oversight. In order not to add to the chronicle of accidents, you should begin work by checking the absence of voltage in the wires using an indicator screwdriver.
It is better to select the location of the shield and counter based on the ergonomics of working with it. It is more convenient to read data from it without bending over, as well as to replace and maintain accompanying electrical appliances. Hence the optimal location level – eye level – is approximately 1.7 meters. At this height, using a drill or hammer drill, holes are prepared for installing a panel box, or space is freed up in an existing panel on the rail
Particular attention should be paid to ensuring that all electrical appliances are located without any angle to the horizon. This is important for the correct operation of, for example, the same induction electric meter
Skew will reduce its accuracy.
A two-pole circuit breaker is installed first.
Next, the input cables are routed into the box (without load, of course)
If the box is placed outdoors, then special attention is paid to seals. They are rubber or threaded
The rubber ones are “cut to size” using a knife, and the threaded ones are tightened after the wires are passed through them.
The cable runs into the incoming holes in the sheath. The outer insulation is removed only from that part that is located inside the box, while an “outlet” must remain inside - a piece of insulated cable, at least 5 cm long. The outer insulation must be removed with great care so as not to damage the coating of the cores. You should estimate the layout of the wires in the panel in advance in order to:
- firstly, predict their required length;
- secondly, to prevent kinks and kinks.
How to connect a three-phase meter
There are three phases in a 380 V network, and electric meters of this type differ only in the large number of contacts. The inputs and outputs of each phase and neutral are located in pairs (see the diagram). Phase A enters the first contact, its output is on the second, phase B is the input on the 3rd, its output on the 4th, etc.
How to connect a three-phase meter
The rules and procedure are the same, only there are more wires. First we clean it, align it, insert it into the contact connector and tighten it.
The connection diagram for a 3-phase meter with a consumption current of up to 100 A is almost the same: input machine-meter-RCD. The only difference is in the distribution of phases to consumers: there are single- and three-phase branches.
Three-phase meter connection diagram
Source: stroychik.ru
Shield design
The type of product depends on how the box is designed. The device may be as follows:
- built-in – for hidden electrical wiring (Fig. below);
- overhead – in rooms with open wiring;
- floor-standing – mainly for industry.
The first type of box is inserted into a furnished niche and looks more attractive. Only the cover is visible on the wall and there are no protruding parts.
Built-in electrical panel
The inconvenience is the need to make a niche if it is not provided for in the design of the house. It is advisable to make a false wall from plasterboard. The box is attached through the back wall with the edges secured with glue or plaster.
It is prohibited to drill niches in load-bearing walls for electrical boxes!
The overhead model is universal. Open and hidden wiring can be connected to it.
The box for the equipment is made in the form of a box with a door (Fig. below). Inside it there are DIN rulers for installing a counter, machines and other equipment.
Overhead electrical panel
The metal box contains holes for wires at the top and bottom. Break-out hatches are made in a plastic case. The entry of wires into the box is protected using couplings and seals.
Rules for installing an electric meter in a house or country house
Normal operation of residential real estate is impossible without the availability of electricity.
Connecting a meter that records electricity consumption must be done correctly and very carefully. It is not easy to carry out such an event when the work is carried out at the dacha or in a country house.
There are quite a lot of difficulties with connecting an electric meter. Safety regulations require that the device must be freely and openly accessible. But often, due to certain technical problems, it is impossible to provide such an opportunity. Therefore, homeowners must first consider where the electric meter needs to be installed. Then subsequently the energy sales company will not make any claims.
What you should know before installing the device
Depending on the principle on which the meter operates, it can be electronic or induction. Experts believe that induction meters are not as accurate as electronic ones, so the former are gradually losing popularity. Before purchasing a device, you need to look at the integrity of the seal that is present on it, as well as at the time of its installation. For three-phase meters, seals made a maximum of one year ago are allowed. In the case of single-phase devices, the period increases to two years.
To install an electric meter, you can invite any electrician. But you will need to have a standard contract provided by the energy sales company. An act on the division of balance sheet ownership is attached to it. Such a document indicates how responsibility is distributed between the home owner and the electricity supplier.
Recommendations
induction (electromechanical) electricity meters
Compared to modern ones, they do not require expensive maintenance and are definitely more reliable.
So far they have not been surpassed in reliability and ability to work and function without breakdowns. In Europe, where most of the meters are electronic, over time, they again began to show interest in unpretentious and reliable electromechanical devices.
In any case, no matter what device is chosen, you should make sure that the seal is intact and undamaged. There is also an expiration date for fillings:
- for single-phase – 2 years
- for three-phase – 1 year.
It is recommended to install the meter as close to the entry point as possible. The meter must be located in a warm room, this can be a heated or insulated hallway, where the company employees will have easy access to the device.
If the company requires that household meters be installed on the facade of the house, if it was not possible to get the requirement lifted, you can cheat a little and place the meter where the warm terrace will subsequently be built.
You may also be interested in an article about three-tariff electricity meters.
Read an article on how to properly seal an electric meter here.
Watch the video in which a specialist explains the requirements for installing an electricity meter in a private home, as well as the general rules for operating electricity meters:
Meter connection diagrams
General rules for connecting meters
The first thing you need to do before connecting the meter is to study its passport, in particular the manufacturer’s requirements for the installation location, mounting method and operating conditions of the electric meter (for example, induction meters are designed for operation at temperatures from -10 to + 40 °C and therefore cannot be installed in unheated rooms without equipping them with a heating device in winter; electronic meters, as a rule, have a larger operating temperature range and can be installed in unheated rooms without installing devices for heating them).
In addition, it is necessary to take into account the requirements of current regulatory documents regulating the requirements for connecting electricity meters:
- For each house/apartment, only one single-phase or three-phase electric meter should be installed (clause 7.1.59. PUE) with the exception of cases of connecting electrical installations of different tariff groups (for example, installing high-power electric heating units)
- To safely replace a meter directly connected to the network, a switching device must be provided in front of each meter to remove voltage from all phases connected to the meter. In this case, disconnecting devices for removing voltage from settlement meters located in apartments must be located outside the apartment. (clause 7.1.64. PUE)
- After the meter connected directly to the network, a protection device must be installed. If several lines equipped with protection devices extend after the meter, installation of a common protection device is not required. (clause 7.1.65. PUE)
- Two-pole circuit breaker - for the ability to remove voltage from the meter for its safe replacement
- Single-pole circuit breakers - to protect the electrical network from short circuits and overloads
- RCD - for protection against electric shock and fire.
- Three-pole circuit breaker - for the ability to remove voltage from the meter for its safe replacement
- Three-pole circuit breaker - to protect three-phase electrical equipment from short circuits and overloads
- Single-pole circuit breakers - to protect single-phase electrical equipment from short circuits and overloads
- RCD - for protection against electric shock and fire.
Single-phase meter connection diagram
Single-phase meters are the most common electrical energy metering devices; they are used to meter electricity at loads, usually up to 12 kW (up to 60 Amperes) in residential buildings/apartments, small businesses (trade pavilions, stalls), etc.
Connecting a single-phase meter does not require deep knowledge of electrical engineering as it has a simple connection diagram. All single-phase meters, both electronic and induction, have only four terminals for connection:
Contact 1 - for connecting the phase supply wire; Contact 2 - for connecting the phase wire going to the electrical receivers; Contact 3 - for connecting the neutral supply wire; Contact 4 - for connecting the neutral wire going to the electrical receivers. Thus, the input power cable is connected 1 and 3 2 and 4 . That is, connecting the wires to the meter looks like this:
Taking into account all the requirements stated above, the connection diagram for a single-phase electricity meter should have the following form (since the connection diagram for an induction electric meter is identical to an electronic one, we present one general diagram with an electronic meter):
Three-phase meter connection diagram
Three-phase meters are used to meter electricity, as a rule, at facilities with a connected power of more than 12 kW (more than 60 Amperes), as well as in the presence of three-phase electrical equipment, regardless of power.
Connecting a three-phase meter is similar to a single-phase one, the only difference is in the number of connected phases. Three-phase meters have 8 terminals for connection:
Contact 1 - phase 1 input from input; Contact 2 - output of phase 1 to the load; Contact 3 - phase 2 input from input; Contact 4 - output of phase 2 to the load; Contact 5 - phase 3 input from input; Contact 6 - output of phase 3 to the load; Pin 7 - zero input from input; Contact 8 - zero output to the load.
Thus, connecting the wires to a three-phase meter will look like this:
However, it should be noted here that connecting the old meter has some features, namely, three-phase five-amp induction meters, which were previously used as direct-connection meters, have not 8 terminals for connection, but 11 for the possibility of connecting them through measuring transformers:
Direct connection of such a meter to the circuit is carried out as follows:
Contact 1 - phase 1 input from input; Pin 2 - jumper from pin 1; Contact 3 - output of phase 1 to the load; Contact 4 - phase 2 input from input; Pin 5 - jumper from pin 4; Contact 6 - phase 2 output to load; Contact 7 - phase 3 input from input; Pin 8 - jumper from pin 7; Contact 9 - phase 3 output to load; Pin 10 - zero input from input; Contact 11 - zero output to the load.
Since such meters are still found, we also present their connection diagram:
Taking into account all the above requirements, the connection diagram for a three-phase meter will look like this:
Was this article useful to you? Or maybe you still have questions ? Write in the comments!
Didn’t find an article on the website on a topic that interests you regarding electrical engineering? Write to us here. We will definitely answer you.
Source: elektroshkola.ru
Obtaining technical conditions
Technical conditions for electricity supply are issued by the electricity supply organization on the basis of an application.
The garage cooperative belongs to category III consumers. This means that there is only one input and interruptions in the supply of electricity are possible.
Depending on the required power, the application form and technical conditions are different. First of all, you need to take into account that a cooperative is not an individual, but a legal entity, and several types of technical conditions are possible, differing in requirements:
- For individuals, power up to 15 kW. These are private houses, retail stalls owned by individuals and individual garages. The connection is made from the nearest place where there is 0.4 kV.
- For legal entities, power up to 15 kW. These are retail stalls and other small facilities owned by large companies and small garage cooperatives consisting of several garages. The connection is the same.
- For legal entities, power from 15 to 100 kW. These are workshops, service stations and most garage cooperatives. The connection location is selected individually.
Electrical diagram
Distribution of electricity in garages The electricity meter in each garage must be located outside to provide access to regulatory authorities, however, if the payment agreement is concluded only by the GSK board, then the installation location of individual meters is determined by the board.
A common meter can be installed on the switchboard at the entrance to the cooperative.
The electrical design must include a single-line power supply diagram and an installation diagram drawn on the site plan. It should indicate the laying routes and types of cables, lighting fixtures and cable entry points into each of the garages.
Cable routing
Cables are attached to garage walls at a height of 2.5 meters or laid in pipes with a wall thickness of 2 mm. If this is not done, then the inspection authorities will require alterations, which will be quite expensive.
In the spaces between buildings, SNIP (self-supporting insulated wire) is laid over the air at a height of:
- Above the roadway - 6 meters.
- Above pedestrian crossings - 3.75 meters.
- Entry into the garage is carried out at a height of 2.75 meters.
The connection is made in junction boxes with a degree of protection not lower than IP44.
Attention! It is necessary to provide in the electrical design for the grounding of all metal parts (gates, frames) and a general grounding circuit. This is usually done by welding a metal strip with a cross section of 4*10mm
Grounding connections are also made to it in garage boxes.
Representatives will coordinate and design power supply in garage-building cooperatives in Moscow, the Moscow region and surrounding areas. Remote collaboration is possible. You can contact the company’s specialists by phone numbers listed on the “Contacts” page. There is also a feedback form there.
Rules for installing an electricity meter on a pole
In recent years, more and more often, electric meters are installed on a pole on the street. This is due to the fact that with this method of installing the metering device, it is much easier for employees of energy supply companies to take readings. After all, previously, even in private homes, electricity meters were installed indoors, and in order to gain access to them at the time readings were taken, it was necessary that someone was at home. Otherwise, it was impossible to obtain the data.
When installing meters outside the house, this problem solved itself. Moreover, modern street meters are specifically designed for this, and allow you to monitor the electricity consumed and clarify the readings taken at any time.
It should be noted that installing a metering device (for example, a three-phase meter on the street) requires compliance with certain rules. We will talk about the main ones in this article, and we hope that this information will be useful to you if you decide to install an electricity meter outside your residential premises.
Features of connecting electricity to a private home
The installation of an electricity meter in a private home has become a controversial issue between service organizations and subscribers over the past few years. The stumbling block is the requirement to install metering devices not inside, but outside of residential premises. RES motivates this by the fact that this way controllers get direct access to the meter to take readings, as well as carry out repair and maintenance work, and monitor the functioning of the meter.
But at the same time, this requirement contains a contradiction that can be resolved by referring to the PUE - the rules for the construction of electrical installations. They clearly regulate the rules for installing an electric meter in a private house. The main points that need to be taken into account when installing a measuring and metering device in the house are:
- the connected device must be accessible for maintenance and inspection;
- the meter must be protected from atmospheric moisture;
- the air temperature during operation of the electrical appliance in winter should not be below zero;
- the device should be installed on a vertical surface at a height of 0.8 to 1.4 meters.
Installing an electric meter in a private house on support poles and other external structures without additional protective boxes is a violation of the PUE. Exposure to moisture, dust, and low temperatures lead to incorrect operation of the electrical appliance and incorrect readings of electricity consumption.
Another problem with outdoor installation of an electric meter in the private sector is accessibility and vulnerability to third parties: vandals or unscrupulous neighbors who can easily connect to a dedicated power grid. Of course, there are also special anti-vandal meters, but their cost is several times higher than that of a standard Mercury or other model for residential buildings. Representatives of the energy supply company do not have the right to demand that residents install expensive meter models, thereby solving their problems at the expense of the subscriber. To conduct electricity, you will be offered several options for devices:
- single tariff electricity meter;
- multi-tariff meter;
- multi-tariff meter with the ability to take readings remotely.
It is rational to install a multi-tariff meter if in the future you are going to use two tariffs (for example, day and night). If you will use electricity mainly during the daytime, then a single-tariff electrical appliance will be sufficient.
But experts still recommend opting for a multi-tariff metering device, since in the future it is possible to change the tariff, during which it will be necessary to replace the electricity meter in a private house. You will have to pay for it out of your own pocket, so even if you are going to use only one tariff for now, a multi-tariff meter will not hurt. The difference in cost between it and a conventional device is only 10-15%.
Types of electric meters
All electricity meters that are installed to consumers are classified according to the following parameters:
- By connection method;
- By type of measured quantities;
- By type of design.
In apartments and private households, one of the 2 most popular types of electricity meters is now installed, namely:
- Electronic meter – controls consumption at differentiated tariffs (such devices can be monitored from a distance). The popularity of electronic meters is constantly growing.
- Induction meter - measures the electricity consumed by the subscriber using a rotating aluminum disk (this metering device is gradually being forced out of the market, since it is not completely reliable and in some cases allows dishonest subscribers to steal electricity).
Which of the above options is better to install depends both on the characteristics of power consumption by a particular subscriber and on the location of the meter (indoors or outdoors). In this regard, each of the meters has its own advantages and disadvantages.
Electronic meters are becoming increasingly common. The reason for this is their accuracy, as well as ease of use. In addition, if a subscriber wants to take the electricity meter outside, then this can be done with an electronic meter.
When purchasing an electric meter, you should pay attention to the presence of a seal and its integrity (such a seal is installed by the state trustee). Another important point is the timing of the sealing. For a 2-phase meter it should not be more than 2 years, and for a 3-phase meter - 1 year.
Where to find a free socket. Map of Rosettes - a truly useful social network
Appendix: Map of Outlets | Free | Universal application | Install
Nowadays, when smartphones and even watches barely survive the day, and cars are gradually switching to electric power, having a power source at hand is a real necessity. But what if your battery runs out while you are on the road, and even in an unfamiliar area? In this article, we will tell you about a new startup that can be extremely useful for you.
The Outlet Map service, as the name suggests, is an application that can tell you the location of the nearest available outlet, no matter where you are in the world. Are you nearing the end of your charge? Launch the program, find out the address of the nearest power point, specify the desired search parameters - and run to charge!
At its core, it is a kind of social network designed for those who are ready to help each other. For the convenience of users, the developers decided not to introduce an additional registration system. For full use, only availability is required. Having selected the desired outlet on the map or in augmented reality mode, you can explore its location using Google Street View or simply build a route to it.
To give back to users who leave information about the outlets they found, you can also add a power source to the service that has not yet been marked on the map. This is easy to do, but can bring a lot of benefits. The application will either add the outlet itself when the device is connected to charging, or you can do it manually.
After adding an outlet, it is automatically moderated. The user can also rate an outlet, and power points with an unacceptably low rating will be removed automatically.
The developers came up with a rather interesting idea, and if a large number of users hear about it, then the Outlet Map application will be able to bring even more benefits to mobile device owners. We hope that you will also contribute to replenishing its database.
Who has the right to install a meter on a street pole?
Anyone who has such skills can install an electric meter on a street pole, but only an authorized representative of the electricity supplier has the right to directly connect electricity to it. If you plan to install the meter on a street pole, the connection must be made exclusively by a representative of the electrical network.
If the electricity meter is taken out and installed on a street pole by employees of local electrical networks, then no claims should arise against the consumer. Even before the start of work, documents are prepared that indicate the boundary of division of balance sheet ownership, as well as the requirements for installing a specific meter.
In private houses, the balance sheet boundary is not indoors, but outdoors. In this case, the exact location must be determined by the relevant technical documentation. Removal of the electric meter outside is carried out only with the consent of the owner of the metering device.
What do you need to connect electricity in your home?
To install electricity in a private home, you need to conclude an agreement with the distribution network (the company serving the network should have a sample), based on the application you wrote. It must indicate data about the object: location, purpose of connection, required power and other parameters. You should also provide:
- a document confirming ownership of the object;
- situational plan indicating the location of the electrical installation and the proposed connection point;
- design of a metering unit with calculation of the rating of the input circuit breaker and the current of the PZR installation;
- plan for connecting the power cable from the support to the metering station;
- grounding project;
- calculation of the power characteristics of the transformer, the capacity of the distribution cabinet and the network (for a three-phase network, you can ask the service company for an example).
Drawing up plans and design work is a licensed type of activity that requires the participation of specialists, and it will not be possible to prepare documents on your own. You can contact your regional distribution center and ask specialists to do all the calculations. Based on the received documents, the company will develop a connection project and issue a list of technical requirements for the facility.
The specified requirements for the facility must be met within two years from the date of drawing up the connection plan. Installation of an electric meter in a private residential building on the street is carried out after supplying electricity to the private house, followed by sealing. The service company will issue an invoice for installation, which will include a detailed connection diagram, the cost of the meter and other measuring instruments (if any), and will also provide certificates of work performed.
Next, a contract for the supply of electricity is concluded. All activities are carried out only by employees of the service company. It is prohibited to independently connect the site to electricity, and if detected, the offense is punishable by a serious fine.
Electronic electricity meters: where to install
The current rules stipulate that electricity meters must be installed in dry rooms where the temperature does not fall below zero. This is explained by the fact that exposure of the device to moisture and negative temperatures negatively affects the correct operation of the electric meter. Thus, an electronic meter installed on a street pole in violation of these requirements will begin to work inaccurately over time. But, nevertheless, cases of taking the electric meter outside have become very frequent; in some cases, electric networks even illegally force consumers to do this.
Currently, the user himself determines the location of the electricity meter. This could be a house, a veranda, the facade of a house, or a pillar.
Now energy supply companies require the private sector to install meters on the street on nearby poles. This removal of the metering device outside the house makes it possible to have unhindered access to it at any time. Company employees can go to the electricity meter of any household and take readings even when the owners are not at home. This greatly simplifies the control and accounting procedure, and also allows it to be completed much faster.
It is advisable to install the meter on the border of the balance sheet (determined by mutual agreement of the parties). Such a border can be located either on the facade of the house or on the nearest pole in the yard. In some cases, it is possible to place the meter outside the site (on the street). To do this, you should choose the optimally suitable pole.
It should be noted that the requirements of energy supply companies to move the electricity meter outside in a private house are contrary to the current rules and instructions for installing the meter. Some subscribers defend in court their right to place the meter in the house, while others agree to the transfer.
Induction (mechanical) electricity meters
They are a group of well-known electricity meters equipped with a rotating wheel, which is installed inside the body of the electrical appliance. The faster it rotates, the more energy consumption increases. To display information about meter readings, special reels with numbers are used.
Single-phase induction type meter
Structurally, induction meters consist of the following elements:
- Voltage coils used to limit the level of alternating current. Protects the electronic device from the negative effects of interference created by third-party sources, and also generates a magnetic flux commensurate with the voltage;
- A current coil that creates a level of alternating magnetic flux commensurate with the current;
- Counting mechanism in the form of a worm gear;
- Aluminum disk;
- A permanent magnet that creates smooth movement of the disk.
Operating principle of an induction energy meter
When connected to the network, the current and voltage coils create magnetic fluxes that pass through the surface of the aluminum disk. It is worth noting that the flux created by the current coil is different from the flux that comes from the voltage coil with its U-shape, due to which it pierces the disk several times. As a result of the influence of flows, forces of an electromechanical nature are formed that set the disk in motion.
D - disk, M - magnet, 2 - disk axis, upper coil (voltage), and lower current coil
Then the axial side of the disk interacts with a counting mechanism made using a worm (gear-screw) transmission principle, which ensures the transmission of the necessary information signals to the digital reels.
A ring with a toothed rim on top, on which a “worm” is put on, equipped with torque elements
Over time, the signal power level decreases and at this moment the permanent braking magnet begins to work, leveling out the frequency fluctuations of the disk rotation. This occurs as a result of interaction with vortex-type flows. During its operation, the magnet creates an electromechanical force that is inverse to the torsion of the disk, which helps reduce the speed of the disk or stop it completely.
Representatives of this group of electricity control and metering devices were widely used during the Soviet Union, however, even now similar devices are installed in most apartments. Such popularity and demand is determined by the simple design and low cost of the devices.
Advantages and disadvantages of induction type meters
Advantages:
- High reliability;
- Long service life (about 20 years);
- High stability of operation (no dependence on voltage drop in the network);
- Low cost.
Flaws:
- Low accuracy class (ranging from 2 to 2.5 units);
- High level of current consumption for self-sufficiency;
- Increased reading error at low load;
- Impossibility of simultaneous accounting of active and reactive types of electricity;
- Unidirectional energy metering;
- Large dimensions.
In the process of collecting information about the performance and analyzing the shortcomings of induction meters, design engineers (power engineers) developed a more advanced and reliable type of electricity metering devices, which was called electronic.
Installing an electricity meter on a pole
The installation of an electric meter on a street pole can be done after agreeing on the specific location of its placement (a mandatory condition is that the height from ground level must be in the range of 0.8-1.7 m). Sometimes, to prevent vandalism, meters are mounted at a height of 3 m or more, but such placement is impractical, since taking readings at such a height is extremely inconvenient.
Electrical wires leading to the cabinet must be insulated.
An electrician who has an average level of qualifications can carry out the installation of an electricity meter outside without any problems. The work is carried out in stages in the following order:
Stage No. 1. Input line de-energized
This process is carried out with the consent of the electricity supply organization.
Stage No. 2. Electric wires
The electrical wires are first connected to the circuit breaker, and then directly to the electric meter.
Stage No. 3. Grounding arrangement
This measure is aimed at ensuring the safe operation of all electrical appliances in the house.
Stage No. 4. Wiring connection
At this stage, all wiring to the house is connected to the output of the electric meter.
Each of the stages performed must be carried out in strict accordance with the current norms and rules that apply for carrying out work of this kind.
After the meter is installed on the pole, employees of the energy sales company are invited to seal the electricity meter and register it.
Planned replacement of electricity meters in the private sector
If there is a need to change the electric meter as part of the planned mass replacement of outdated metering devices with new models, then a dispute about the location of installation of the new one may also arise between the subscriber and the service company. In this case, you may demand that the meter be installed indoors in a house, summer kitchen or garden house, explaining that the distribution network employees will have unhindered access to the electrical appliance.
If the company does not agree to make such a compromise, then an agreement should also be entered into with a division of the book value. If a meter installed on the street is stolen or damaged, the service company will pay for its replacement.
Replacement of electricity metering devices can be planned or unscheduled. In the second case, the need to change the meter arises when it is not working correctly or when there is visible damage to the seal and other components of the device. In this case, the cost of the meter and the work of specialists will have to be paid by the electricity consumer.
A planned replacement of electrical metering devices is also being carried out. Due to the growing number of energy-intensive consumers in the operation of residential buildings, old meter models are being replaced with new ones designed for high loads of up to 50 Amperes. Sometimes it is necessary to replace an already installed 2.5 accuracy class meter with devices with an increased accuracy class of 2.0 or 1.0. The procedure for replacing an electric meter, both scheduled and unscheduled, also involves the consumer contacting a service company with subsequent registration of all actions.
- A personal application is submitted to replace the electric meter in a private home.
- If it is possible to independently purchase a RES meter, a certificate is issued about the parameters of the required electrical appliance.
- If the meter is purchased directly from the service company, then a device passport is issued with it, which indicates the main characteristics for metering.
The passport must be kept; notes will be made in it during scheduled checks of metering devices by regulatory services. If disputes arise regarding the connection method and operating conditions of the meter, the subscriber has the right to refer to the Electrical Installation Rules, as well as take the necessary measures to protect the device from the effects of negative factors.
Metal cabinet for electric meter
As a protective measure, if an electronic electric meter was installed on a pole, a special metal box is installed for it. Such a box is installed before installing the meter and has a special viewing window (for unhindered readings).
The metal box performs several functions at once, namely:
- Protection against vandalism and theft. In order for the box to perform this function, it is securely fixed to a pole and equipped with a locking mechanism;
- Protection from moisture, which allows you to significantly increase the operational period of the electricity meter;
- Protection against hypothermia. If the ambient temperature drops below zero, the meter may begin to work incorrectly. The measurement error can be significant, which will affect the amounts of payments for electricity supplied to the consumer. It follows from this that good thermal insulation of the electric meter cabinet is a measure aimed at ensuring the correct operation of the meter.
The wires from the electric meter are hidden in a special protective metal pipe. It is advisable to leave the distribution panel with circuit breakers in the house, and place one circuit breaker on a pole.
In conclusion, it should be noted that installing and connecting an electric meter is not a very complicated procedure, however, without experience in carrying out such work, you should not perform it yourself.
It is better to contact specialists, since the power supply of the entire house, as well as the operation of all electrical appliances in it, depends on how correctly the meter is installed. In addition, we should not forget about our own safety when installing an electric meter on a street pole.
In addition to the above, we suggest that you familiarize yourself with the video instructions, which will help in assembling the control panel for installing an electric meter on the street on a pole.
Source: proschetchiki.ru
Types and sizes of electrical panels
We will talk about cabinets/drawers for installing automatic machines and other electrical equipment, and their varieties. Depending on the type of installation, electrical panels are available for outdoor and indoor installations. The box for outdoor installation is attached to the wall with dowels. If the walls are flammable, an insulating material that does not conduct current is placed underneath. When mounted, the external electrical panel protrudes above the wall surface by about 12-18 cm. This must be taken into account when choosing its installation location: for ease of maintenance, the panel is mounted so that all its parts are approximately at eye level. This is convenient when working, but can pose a risk of injury (sharp corners) if the location for the cabinet is poorly chosen. The best option is behind the door or closer to the corner: so that there is no possibility of hitting your head.
Electrical panel housing for outdoor installation
A panel for hidden installation requires the presence of a niche: it is installed and walled up. The door is flush with the wall surface; it may protrude a few millimeters, depending on the installation and design of the particular cabinet.
The cases are metal, powder-coated, and plastic. Doors are solid or with transparent plastic inserts. Various sizes - elongated, wide, square. In principle, you can find a suitable option for any niche or conditions.
One piece of advice: if possible, choose a larger cabinet: it’s easier to work in, this is especially important if you’re assembling an electrical panel with your own hands for the first time
Complete set and installation of a mounted distribution panel
When choosing a building, they often operate on such a concept as the number of seats. This refers to how many single-pole circuit breakers (12 mm thick) can be installed in a given housing. You have a diagram with all the devices listed on it. You count them taking into account the fact that bipolar ones have double width, add about 20% for the development of the network (suddenly you buy another device and there is nowhere to connect, or during installation you decide to make two from one group, etc.). And for such a number of “seating” places, look for a shield with a suitable geometry.
Technical requirements
For installation, you can buy a ready-made panel. You should follow the basic rules for installing electricity meters:
- the device must be installed in a place that is convenient for inspection or maintenance;
- During installation, the line must be de-energized; this should be ensured in advance by agreement with company representatives;
- the counter should be at a height of 80 to 170 cm from the floor;
- it is necessary to install a safety switch before connecting to the meter, before it;
- grounding is required;
- wiring (machines) are connected to the meter;
- if the integrity of the seals on the meter is broken, you must immediately call a specialist to seal it;
- After installation is complete, a test run is performed.
PUE (Electrical Installation Rules)
Owners of electric meters are required to install their devices in places that are fully accessible for inspection by specialists, as well as in places without excessive moisture. The temperature in such rooms or open spaces at any time of the year should not exceed 0 degrees.
The owner of the device has the right to install the device in rooms without heating and in the corridors of power plants and substations, as well as cabinets designed specifically for installing electricity meters in them. However, it is necessary to provide insulation for such cabinets during winter cold snaps so that the temperature inside them does not fall below 0 degrees; this can be achieved by heating the air from the inside with lamps or heaters. You should also ensure that the temperature does not go beyond +20 degrees.
Clause 1.5.29
The device must be installed in cabinets, on panels, in dedicated panels, in niches or on sufficiently rigid walls. Mounting electricity meters is only permissible on panels made of wood, plastic or metal.
You should also monitor the height from the floor to the installed electricity meter (the norm is from 0.8 meters to 1.7 meters). A height of less than 0.8 meters is permitted in some cases, but should not exceed 0.4 meters.
Where to install
When installing the meter outside, the following technical requirements must be observed:
- usually, if there are requirements from the provider company, the device is installed on the facade of the house at a height of 70 cm to 170 cm for ease of maintenance;
- It is also practiced to install the meter at the appropriate height on a concrete pole, while it must be located on the territory of the house, and the wiring is installed in the house itself.
The question of whether the requirement to move meters outside is legal is controversial. In fact, there are no regulations regulating the location of the meter.
The energy sales company motivates this by the fact that there should be easy access to the device for control purposes. However, in this case, no one is stopping them from installing a modern electronic device with a remote monitoring function in their home at their own expense and monitoring it at their own pleasure.
At the very least, these requirements are to the detriment of home owners and create inconvenience for them:
- When placed outside, the service life of the meter will be significantly reduced, since this device is not designed to operate in extreme conditions, in the rain, in frost, in heat. At low temperatures, readings may be incorrect.
- When installed on the street, the homeowner will have to put up with the fact that his meter has access not only to company employees, but also to everyone.
- Sometimes, to protect the instruments, they are installed at a height of 3 meters, which, to some extent, protects them from thieves, but the homeowner himself, without a ladder, will not be able to see his readings.
In fact, by forcing citizens to install meters on the street, they are deprived of the right to take care of the safety of their property, as provided for in the Civil Code of the Russian Federation.
This is beneficial for energy companies, as having the instruments outside makes it much easier for them to inspect and test the instruments, as well as take readings of energy consumption.
But this is the external side of the problem, and the flip side is that it will be possible to control not only the readings of the device, but also the connection to the network up to the meter. That is, ultimately, to solve their pressing problems at the expense of homeowners, and on a massive scale.
Read the article on the procedure for calculating electricity consumption standards without a meter here.
Installation Rules
Before making a connection, you must contact the company that supplies electricity with an application. In this case, you must additionally provide the following documents:
- Those that confirm ownership of residential real estate.
- Situational plan of the place where it is planned to install the metering device.
- Technical documentation for installing an electric meter. It should reflect the following issues: layout of the cable to the meter, the presence of grounding, calculation of the power and other characteristics of the metering device.
Technical documents are prepared with the participation of specialists.
The place where the meter is installed must be chosen in such a way that free access is possible for representatives of the controlling organization. Specific requirements for the installation location are not specified in the regulatory documents.
On a pole
This is important to ensure the ability to easily take readings, check the presence of a seal and monitor the technical serviceability of the device. Regulatory documents regarding the installation of electricity meters, as well as recommendations from the energy supply company, may have controversial or contradictory issues
Here are some examples:
Regulatory documents regarding the installation of electricity meters, as well as recommendations from the energy supply company, may have controversial or contradictory issues. Here are some examples:
- The rules for electrical installations state the need to install meters in premises. At the same time, it is more profitable for the electric company to have this done outdoors to ensure an easier opportunity to take current readings.
- The regulatory documents indicate that the maximum height of the box is 170cm. However, the company recommends a height of three meters or higher to ensure the safety of the device.
All controversial issues must be considered and recorded in the text of the document.
Important! When installing outdoors, it is important how protected the electric meter is from the influence of bad weather. If an appliance that was previously used in the house is taken outside, there is a risk that it will not be able to work during winter frosts
Typically, the places where an electric meter is installed in a private home are the façade of the house or a power line pole. The wiring is located inside a private house. The pole on which the box is mounted must be located in the local area.
Wiring diagram
A model that is installed outdoors must be protected from rain, snow, heat and frost. In winter, meter heating must be used to withstand frost. Since this device will be accessible to almost anyone, it is necessary to provide vandal-proof protection for it. An important issue during installation is who will pay for its work during operation.
The rules for installing an electric meter stipulate that after installation the devices must be checked regularly. For three-phase meters this period is 1 year, for single-phase meters - 1 year.
Connection box
Before use, you must ensure the integrity of the seal. If it is missing, installing an electric meter in a private house is impossible; you need to call a specialist from the company that supplies electricity to carry out sealing.
Documentation
You can try to negotiate the location of the meter in advance, and if you guarantee employee access to the house to inspect and check the device, the problem will be solved. If not, then it still won’t work without a counter.
To perform the installation work, an average electrical qualification is sufficient; you can invite an electrical engineer yourself if the services of the company’s specialists are too expensive.
If the installation will still be on the street, it is necessary to require a clear division of responsibility, which will be reflected in the contract.
Who pays and makes the replacement?
A person authorized under an agreement with the Criminal Code and the existing provisions of the Housing Code and Civil Code is appointed responsible for the acquisition and installation of a new device. However, this takes into account the reason why the replacement is being made, as well as the installation location. For homeowners and people who own an apartment on a rental basis, the rules are different.
Option #1 – own apartment
Most of the city apartments are owned by citizens - at one time housing was privatized, and ownership rights completely passed into the hands of the owners. One or more family members can dispose of the apartment at their own discretion, and they are also responsible for all technical property located in its area.
If the electrical panel with the metering device is apartment-based, that is, located in the hallway or corridor inside the apartment, then the responsibility for installing a new device lies with the private individual
The electricity meter installed on the floor area must be changed by the management company, since it belongs to the common property of the building. Replacement is required if the device has exhausted its resource, is outdated, or breaks down for reasons beyond the control of the consumer.
Responsibility for replacement falls on the apartment owner in three cases:
- if the meter breaks down due to his fault;
- if the contract stipulates in a separate clause its obligations for replacement;
- if he, on his own initiative, wanted to change the equipment.
Simply put, according to standard agreements, apartment panels are the property of the owners, floor panels are the property of the management company. Accordingly, the owners are responsible for any actions with meters.
But there are exceptions that are specified in the contract. So if you are forced to pay for a new device, be sure to review the agreement.
In 2012, a law was passed according to which residents of apartment buildings must independently change meters, regardless of where they are installed. However, the main regulatory document is the agreement between the owners and the management company.
Option #2 – public housing
If the apartment is not privatized, and its owner lives under a social tenancy agreement, all property, including electrical equipment, is the property of the municipality. Therefore, the city is responsible for installing or replacing equipment.
However, in practice, situations often occur when a management company or an energy sales company attracts residents to purchase a new device. This is wrong, since they are temporary employers, users.
Typically, an agreement is concluded between the management company and the municipality with the distribution of responsibilities of the parties. Therefore, in the end, one of them pays for new electrical equipment. If they still try to blame the purchase on the tenant, you must file a complaint with the housing inspectorate
A citizen living on municipal meters pays for the replacement of the meter only in one case - if the device breaks down due to his fault.
Option #3 – private house
Owners of cottages for permanent residence or seasonal houses (dachas), unless there is an additional clause in the agreement with the service organization, almost always bear the cost of replacing the meter themselves.
A metering device in private houses is usually installed together with an input machine on the street - on the facade of the house or on a support supporting an electrical cable, so that an employee of the controlling organization can take readings without disturbing the owners
If you own a home, you must purchase and install a meter yourself. If you plan to do the installation yourself, then commissioning and sealing cannot be done yourself - this must be done by a representative of Energosbyt.
It is also better to ask the specialists of the sales company which type of meter and outdoor box for the flow meter to buy, since the device must best comply with the network parameters and installation conditions.