Home » Useful tips » Homemade products » Making a homemade engine from a battery, wire and magnet
We continue to open useful homemade products for all our readers; today we’ll talk about how to make an electric motor from a battery, copper wire and a small magnet. Such an engine can be used as a decoration on your home table. In this article we will look at similar instructions, photos and watch video examples.
Stages of the experiment
- We bend a heart-shaped figure from copper wire; the ends of the wire should not connect.
- Using pliers, make a small dent on the positive terminal of the battery.
- We place the battery with a minus on the magnet, and put the “heart” on top of the battery. The free ends of the wire should lightly touch the magnet.
What do you do when the power goes out at night? Most likely, you light candles and spend the evening waiting for the electricity to come on. And you can spend this time usefully. For example, illuminate a room using a regular magnet and wire, which will allow the lamp to operate without electricity. Or make a motor that can work autonomously.
Making an electric motor
From copper wire (read), use thin-nose pliers to bend a heart-shaped figure (see photo below), which should be bent so as to have a fastening and center of gravity at one point (this is important for the stability and rotation of the structure). We place the minus battery on the magnet. Using thin-nose pliers, make a small dent on the positive side of the battery (one end of the copper wire will be placed on it). Now we put a copper wire structure on the battery and watch how our electric motor begins to rotate.
Electric motor made of battery and magnet
Speaker magnet, copper wire and lamp for making a lamp
The easiest way to bring a fluorescent lamp into working condition is to place it in the electromagnetic field of an ordinary magnet, which is used to work in old Soviet speakers.
The device consists of:
- Round magnet;
- Copper wire.
To make this device, you first need to remove the magnet from the speaker. Next, using a hammer, without using much force, knock the metal plates off the magnet with light blows.
Note! If the plates do not move away from the magnet, you can soak it in solvent for a while.
After the plates are removed from the magnet, it is necessary to clean it of dirt. To do this, use a regular rag or rag.
Next, the winding is manufactured. To do this, take a piece of copper wire insulated. The wire should be long enough to fold it in half and wrap the magnet with five turns. The double end of the wire is threaded into the resulting wire eye.
After the magnet is wrapped, a regular fluorescent lamp is inserted into the central part of the magnet. This design can be equipped with decorative materials and used as a stand-alone lamp.
The principle of operation of an electric motor made of a battery and a magnet
The coil, made of several turns of wire, is also a segment through which reverse current flows, and has both positive and negative charges on its sides. Which are attracted to the magnet placed below.
In order for the structure to rotate, it is necessary, firstly, to correctly calculate the distance from the magnet to the coil, and secondly, to make sure that the conductors are in good contact with the battery terminals. These same conductors must also be properly cleaned so that the enamel of the wire does not interfere with the passage of direct current.
Unique application of anti-stress balls
This electric motor can be used as a unique and interesting addition to the interior of a room or office. You can always buy such a toy in a store, but it is much more interesting and educational to make it yourself, using available materials and tools.
What can be made from a battery (video)
In order to assemble an almost eternal electric motor at home, all you need is ingenuity and ordinary knowledge in the field of electrical engineering. Which will undoubtedly come in handy in some cases.
For a basic electromagnetic motor you need an AA battery, two paper clips, an enameled wire with a diameter of 0.5 mm, glue or tape, plasticine for attaching the structure to the table, a small magnet, which should not be too large and not too small. The size of the magnet should be approximately the diameter of the coil. Buy them in this store.
How to make a simple motor
Bend the paper clips. Make a basic coil of 6-7 turns from enamel-insulated wire. Secure the ends of the wire to the spool with a knot and strip one end of insulation along its entire length, and the other along its entire length, but only on one side. Secure the battery clips with glue or other material. Place a magnet on top of the battery. Place the entire assembly on the table and secure it. Place the spool so that the ends of the spool are touching the paperclip with their stripped sides. When current flows through the wire, an electromagnetic field arises and the coil becomes an electromagnet. The magnet should be placed so that the poles of the magnet and the coil are the same, then the permanent magnet and the electromagnet coil will repel each other. This force turns the coil at the very beginning of the rotation due to the fact that one end is stripped along the length of only one side, it momentarily loses contact and the magnetic field disappears. By inertia, the coil turns, contact is restored again and the cycle begins again. As you can see, making a simple motor with your own hands is quite simple! it describes in more detail how to make a simple motor, which was discussed above.
The entire assembly of the magnetic motor on video
What to do if the homemade product does not work
If suddenly you have assembled a perpetual electric motor with your own hands, but it does not rotate, do not rush to get upset. Most often, the reason for the motor not rotating is that the distance between the magnet and the coil is too large. In this case, you just need to trim the legs a little yourself, on which the rotating part rests.
Also check whether you have cleaned the ends of the coil well and whether contact is ensured in this place. The symmetry of the coil also plays an important role, so try to do everything carefully and slowly.
That's the whole technology for assembling a homemade magnetic electric motor at home. If you watched the video lessons, you are probably convinced that you can make an engine from a battery, copper wire and a magnet with your own hands in different ways. We hope that the instructions were interesting and useful for you!
It will be useful to know:
- How to make a USB fan at home
- How to legally pay less for electricity
- How to solder wires correctly
A simplified model of a motor made from a battery and wire
There are many types of electric motors and they can be classified according to different criteria. One of them is the type of electricity supplied to them. We can differentiate between DC and AC motors.
One of the first DC motors was the Faraday disc, which like many motors was a reversible machine. After supplying mechanical energy, it produced electricity (unipolar generator).
Today we are going to build a simple but working model of a DC motor.
Materials
The materials needed to make a toy can be found in every home. We need:
A small amount of wire in enamel with a diameter of 0.3-0.6 mm R6 - 1.5 V battery The magnet can be small Auxiliary materials: tin, rosin, a piece of wire and part of a universal circuit board for the "deluxe" version Of course, we also need soldering iron with resistance or transformer resistance.
We are working
The enameled wires should be wound around the battery, creating a small circle that will serve as the motor winding. Then, with the ends of the wire, wrap the winding so that it does not develop.
To get the impeller ready, you must still remove the insulating enamel from the ends of the wire that will serve as the axle. Additionally, one of them will also be a primitive switch. Therefore, if on the one hand we remove all the enamel, on the other hand we must do it only on one side, top or bottom:
The easiest way to do this is to place the straightened end of the wire on flat air, such as a countertop, and then scrape away the enamel on top using a razor blade. I remind you that the other end must be insulated around the perimeter!
Finally, straighten the axle so that the impeller is as balanced as possible.
Then make two small hoops (bearings) in which the rotor will spin. The diameter of the rim should be about 3mm (it is best to use a winding nail).
Pieces of wire with bearings must be soldered to the battery. Then we will glue it together into a small magnet so that one of its poles points upward. It should all look something like this:
If you now turn on the rotor, it should rotate at high speed around its axis. Sometimes a little pre-start is required by gently turning the rotor until it "snaps" into place. This model of the electric motor performed during this action can be seen in the video:
We can also make a more durable version of this physical toy. I used a large magnet from an old speaker that I attached to a universal circuit board with wire scraps. Also, more rigid brackets are soldered to it. The 4.5V coin cell battery sits underneath the plate, and also underneath that are the cables that provide voltage to the brackets. The jumper visible on the right side functions as a switch. The design looks like this:
The work of this model is also depicted in the video.
How and why does it work?
The whole joke is based on the use of electrodynamic force. This force acts on every conductor through which electric current flows when placed in a magnetic field. Its action is described in the left-hand rule.
When current passes through a coil, an electrodynamic force is exerted on it because it is in the magnetic field created by a permanent magnet. This force causes the coil to rotate until the current is interrupted. This is due to the fact that one of the axes through which the current is supplied is isolated only along half the perimeter. Although the force is no longer working, the coil performs the second half of the rotation due to its inertia. This continues until the axis turns into its isolated side. The circuit will be closed and the cycle will repeat.
The presented electric motor is a simple but effective physical toy. The lack of any sensible practical applications makes the game very enjoyable.
Have fun and informative entertainment!
What do you do when the power goes out at night? Most likely, you light candles and spend the evening waiting for the electricity to come on. And you can spend this time usefully. For example, illuminate a room using a regular magnet and wire, which will allow the lamp to operate without electricity. Or make a motor that can work autonomously.
perpetual motion machine from a battery
Neodymium cylindrical magnet of axial magnetization, frame made of 0.8-1mm wire, 1.19V battery (rechargeable…
We will need: Magnet + Battery + Paperclip.
How to make a motor with your own hands from a battery and a neodymium magnet. Results of the last competition...
The simplest Electric Train - Sliding a battery with neodymium magnets inside a spiral of wire. Full...
Let's repeat the old school experiment and make a simple electric motor with our own hands using...
Part two is here:
The English version:
As you can see, there are no magnets in this motor...
Very good skillful hands))
Well, of course, it didn’t work out to bend the wire into the same smooth beauty as in the original source, but it still works! 
As promised, here is my “simplified DIY free energy generator” video. Select "HD 1080p",...
innos D6000 Buy directly from the manufacturer: https://Innos.com Cooperation - Author on VKontakte - https://vk.com/id2062...
How to make a cool motor from a battery and two neodymium magnets. DIY electric motor...
GO HERE: https://s.click.aliexpress.com/e/AaIUNF2zb YOUTUBE AFFILIATE: https://join.air.io/jonitran GO HERE: https://stroimizbetona.blogspot.ru/ …
At the request of subscribers. For those who cannot repeat. Explanations for the video https://www.youtube.com/watch?v=gVtuh-aELqg In the area...
How to make a motor from a battery and a magnet.
Perpetual motion machine to the explanation of Kanarev F.M. https://www.youtube.com/watch?v=Ce0K4k_lSs8&feature=youtu.be.
Visit my website https://sdelaitak24.ru/
Video about magnets and perpetual motion. https://www.youtube.com/watch?v=afvEjP3nxVY.
Win your jackpot for $1,000,000: https://goo.gl/DNw4xt SUBSCRIBE TO THE CHANNEL...
The motor is connected to lithium batteries through a Chinese voltage and current converter as a result...
Sale on Aliexpress https://ali.pub/1ts481 Unusual goods from Aliexpress https://ali.pub/1os6uo Bitcoin wallet. 15cMBCXxBZ7ff9uuNkCJP…
In this video I experimented a little and ended up with a perpetual motion machine using magnets))) Alternative to Aliex...
https://www.labroom.net/ Video address in the magazine: https://www.labroom.net/2011/10/blog-post.html How to make a motor from a battery, a magnet...
Unique bearing motor. Nobody knows how it works. Science is powerless! Seekers of free energy...
A successful experiment was carried out with the “Perpetual Motion Machine”. Electric motors are 3 volts each. LED 3 volts.
Earn money by playing: https://rich-birds.org/?i=1818403.
Detailed video instructions for making it https://www.youtube.com/watch?v=5mERXljsdHY Sponsor: https://grizli33.ru/ for those who...
How can you make a unipolar motor from a AA battery, a neodymium magnet and copper wire...
Buy a neodymium magnet in Novosibirsk (Barnaul, Kemerovo, Novokuznetsk, Tomsk). Free shipping…
It is forbidden to make a perpetual motion machine, but it is rampant to make a perpetual refrigerator, which practically does not...
The Perpetual Motion Machine works contrary to the laws of physics here
Aliexpress sale https://ali....
Free electricity from water, the oldest technology is still quite workable today. The simplest galvan...
Nano technologies)))
A perpetual motion machine made of an aluminum cylinder or the Battery of the FUTURE original video https://www.youtube.com/watch?v=bdbC6RQpvKs.
battery, neodymium magnet, wire! Look ! How to make 3 electric motors from a battery and a magnet...
60 seconds mutant family why did michael jackson bleach himself appnana friend codes sword craft online server iptv playlist player roku agario-powerups how to install husham on kodi clash of clans farming base th20 runecrafting 1-99 osrs como tener saldo gratis
debojj.net
Nail magnet
Today I would like to tell you how to make a simple electric magnet.
Maybe someone already knows this or learned it in physics or crafts class. I'm going to show this to those who don't know it yet. We need copper wire, electrical tape, AA battery, nail, scissors, there are test pins in the box.
First we need to wrap the copper wire around the nail.
It looks like this. The coils need to be tight. Cut off the ends and remove the insulation.
Then connect the terminals. Cut a piece of electrical tape. Connect one contact to negative and the other to positive. We have such an electric magnet. Let's check it out.
Thank you very much for watching.
https://crazyinvent.com
Electric motor application
This is a very interesting question. The use of conventional AC motors has been discussed for a long time. Such motors do not have a brush mechanism, so they are very easy to operate and operate.
But there are some factors that have to be taken into account. The first factor is the presence of an alternating voltage of 220 V. Alternatively, it is possible to install an inverter that can convert a direct voltage of 12 V into an alternating voltage of 220 V.
The second component is safety, because 220 V voltage is very dangerous for humans, especially on water. This requires special measures. But if there is water all around, it is difficult to even imagine what exactly these measures should consist of.
There is an almost ready-made option - this is the use of a motor from a trimmer or from a brush cutter. Almost everything is ready here, all that remains is to decide on the length of the device and install the propeller. There is no need for an upper gearbox and no need to modify the control system or engine power supply system.
The main task is to properly secure such a device on the boat. This is especially true if you have an inflatable boat.
Using the windshield washer motor
Some owners who decide to make their own electric motor for a boat use various 12V engines that are used on board the car.
Such engines are perfect for such functions, if only because they are designed to run on a car battery. Despite this, they require some improvement.
Boat owners are constantly experimenting and finding amazing solutions. The high cost of industrial designs forces them to do this. As a result, the idea of installing a lawn mower motor on a boat was born. These are engines with a power of about 6 hp, which are designed for long-term operation under load in various conditions. Such an engine can be adapted to a boat if you use various spare parts intended for repairing Soviet boat engines.
Motor from the Ural-2 chainsaw
Some craftsmen easily adapted motors from Soviet chainsaws as motors for boats. At one time, a huge number of chainsaws were produced, the quality of which needs to be discussed separately. Despite this, some motors installed on boats still serve today. The main thing is to calculate everything correctly.
Read more about how to create an electromagnet
It's quite easy to build an electromagnet. All you have to do is wrap a few turns of insulated copper wire around the iron core. If you connect a battery to a wire, electric current will begin to flow and the iron core will become magnetized. When the battery is disconnected, the iron core will lose its magnetism. Follow these steps if you want to build the electromagnet described in our Magnets and Electromagnets experiment:
Step 1 – Gather Materials
One iron nail 15 centimeters long. Three meters of insulated stranded copper wire. One or more D-cell batteries.
Step 2 - Remove some of the insulation
The copper wire must be exposed so that the battery can be connected well to the power grid. Use a pair of wires to remove a few inches of insulation from each end of the wire.
Step 3 – Wrap the Wire Around the Nail
Carefully wrap the wire around the nail. The more wire you wrap around the nail, the stronger your electromagnet will be. Make sure you leave enough wire unwind so you can attach the battery.
A wire is wrapped around a nail to create an electromagnet.
When you wrap the wire around the nail, make sure you do it in the same direction. You need to do this because the direction of the magnetic field depends on the direction of the electric current it creates. The movement of electric charges creates a magnetic field. If you could see the magnetic field around a wire carrying electricity, it would look like a series of circles around the wire. If an electric current flows directly towards you, the magnetic field it creates spins around the wire counterclockwise. If the direction of the electric current is reversed, the magnetic field also reverses direction and sends the wire clockwise. If you wrap part of the wire around a nail in one direction and part of the wire in the other direction,
Magnetic field around a conductive wire.
Step 4 – Connect the Battery
Attach one end of the wire to the positive terminal of the battery and the other end of the wire to the negative terminal of the battery. If all went well, your electromagnet is now working!
Don't worry about which end of the wire you attach to the positive terminal of the battery and which to the negative terminal. Your magnet will work just as well as it did anyway. Which will change the polarity of your magnet. One end of your magnet will be its north pole, and the other end will be its south pole. By reversing the way you connect the battery, you can reverse the poles of your electromagnet.
Tips for Strengthening Your Electromagnet
The more turns of wire your magnet has, the better. Keep in mind that the further the wire is from the core, the less effective it will be.
The more current passes through the wire, the better
Attention! Too much current can be dangerous! When electricity passes through a wire, some of the electrical energy is converted into heat. The more current flows through the wire, the more heat is generated
Try experimenting with different kernels. A thicker core can create a more powerful magnet. Just make sure the material you choose can be magnetized. You can test your core with a permanent magnet. If a permanent magnet is not attracted to your core, it will not make a good electromagnet. For example, aluminum rod is not a good choice for the core of your magnet.
Homemade powerful electromagnet at home - how to make a device with your own hands
Do you know that a magnet can not only be permanent, but also powered by electrical energy with the ability to turn the magnetic field on and off? So-called electromagnets are widely used in electrical engineering. You can make such an electromagnet yourself. Next, learn how to make an electromagnet at home.
How to make an electromagnet is described in detail in this manual.
Warning: the more current passes through the wire of a homemade electromagnet, the more the wire will heat up and this may even cause a fire. To reduce heat when creating an electromagnet, use thicker copper wire.
- Telephone wire (or enameled copper cable from a transformer).
- Cable stripping tool.
- Scissors.
- Pliers.
- Type D battery (or other power source).
- Adhesive tape or glue.
- Ferrous metal core, use a steel nail or piece of pipe.
- Small iron objects for testing (screws, nails, etc.).
- Your hands.
- electromagnetvid.avi
A little physics
As we remember (or don’t remember) from physics lessons, in order to convert electric current into a magnetic field, we need to create induction. Inductance is created using an ordinary coil, inside which this field arises and is transmitted to the steel core around which the coil is wound.
Thus, depending on the polarity, one end of the core will emit a field with a minus sign, and the opposite end will emit a field with a plus sign. But visual magnetic abilities are not affected in any way by polarity. So, when you are done with physics, you can begin decisive action to create a simple electromagnet with your own hands.
Advantages of using electromagnets
The main advantage of an electric magnet over a constant source of magnetic field is that it is brought into working condition under the influence of electric current. That is, when it is necessary to exert a magnetic influence on a certain part of space, the current is turned on. This allows for rhythmic operation of the EM, which is successfully used in various types of electrical equipment, instruments and devices.
An electromagnet can be found in electric meters, separator units, transformers, television and audio equipment and other devices.
Powerful magnets are installed on overhead cranes in the workshops of metallurgical plants and winches of scrap metal collection enterprises.
Lifting electromagnets
One of the first applications of EMs is as speakers. The sound device is based on an electromagnet, which causes the membrane to vibrate in the audio range.
EMs are used in metal detectors to detect metal-containing objects underground, in water and in various areas.
Materials for making the simplest magnet
First of all, we need any inductor with a copper wire wound around the core. This can be a regular transformer from any power supply. An excellent way to create electromagnets is to wind them around the narrowed back of picture tubes of old monitors or televisions. The conductor threads in transformers are protected by insulation consisting of an almost invisible layer of special varnish that prevents the passage of electric current, which is exactly what we need. In addition to the indicated conductors, to create an electromagnet with your own hands you also need to prepare:
- A regular one and a half volt battery.
- Scotch tape or tape.
- Sharp knife.
- Hundreds of nails.
The process of making a simple magnet
We start by removing the wires from the transformer. As a rule, its middle is located inside the steel frame. You can, after removing the surface insulation on the coil, simply unwind the wire, dragging it between the frames and the coil. Since we don't need a lot of wire, this method is the most acceptable here. When we have released enough wire, we do the following:
- We wind the wire removed from the transformer coil around a nail, which will serve as a steel core for our electromagnet. It is advisable to make turns as often as possible, pressing them tightly against each other. Do not forget to leave a long end of the wire at the initial turn, through which our electromagnet will be powered to one of the poles of the battery.
- When we reach the opposite end of the nail, we also leave a long conductor for powering. We cut off the excess wire with a knife. To prevent the spiral we wound from unraveling, you can wrap it with tape or tape.
- We strip both ends of the wire coming from the wound nail from the insulating varnish with a knife.
- We lean one end of the stripped conductor against the positive of the battery and secure it with tape or tape so that the contact is well maintained.
- We wind the other end to the minus in the same way.
A simple motor made from a magnet, batteries and wire
Then, with the ends of the wire, wrap the winding so that it does not develop. To get the impeller ready, you must still remove the insulating enamel from the ends of the wire that will serve as the axle. Additionally, one of them will also be a primitive switch. Therefore, if on the one hand we remove all the enamel, on the other hand we must do it only on one side, top or bottom:.
The easiest way to do this is to place the straightened end of the wire on flat air, such as a countertop, and then scrape away the enamel on top using a razor blade. I remind you that the other end must be insulated around the perimeter!
Then make two small hoop bearings in which the rotor will rotate. The diameter of the rim should be about 3mm, it is best to use a nail for winding. Pieces of wire with bearings must be soldered to the battery. Then we will glue it together into a small magnet so that one of its poles points upward. It should all look something like this:. If you now turn on the rotor, it should rotate at high speed around its axis. This model of an electric motor made during this action can be seen in the video:.
We can also make a more durable version of this physical toy. I used a large magnet from an old speaker that I attached to a universal circuit board with wire scraps.
Also, more rigid brackets are soldered to it. The 4.5V coin cell battery sits underneath the plate, and also underneath that are the cables that provide voltage to the brackets.
The jumper visible on the right side functions as a switch. The design looks like this:. The whole joke is based on the use of electrodynamic force. This force acts on every conductor through which electric current flows when placed in a magnetic field. Its action is described in the left-hand rule. When current passes through a coil, an electrodynamic force is exerted on it because it is in the magnetic field created by a permanent magnet.
This force causes the coil to rotate until the current is interrupted. This is due to the fact that one of the axes through which the current is supplied is isolated only along half the perimeter. Although the force is no longer working, the coil performs the second half of the rotation due to its inertia. This continues until the axis turns into its isolated side. The circuit will be closed and the cycle will repeat.
The presented electric motor is a simple but effective physics toy. The lack of any sensible practical applications makes the game very enjoyable.
Assembly sequence of a simple electric motor
The main thing is to carry out the sequence accurately and carefully, otherwise the result may not be entirely expected and the engine will not work correctly.
Electric motor assembly sequence:
- Wind several turns of copper wire around the battery. This is an improvised coil of a future electric motor, so the turns should fit tightly one to the other and retain their shape after being removed from the battery.
- Fix the turns of the coil with two pieces of wire and make short, even leads from the same pieces. It is necessary to remove the enamel at the ends of the terminals; a mechanic’s knife or a simple stationery knife is suitable for this purpose.
- From two short pieces of wire, make 2 clamps for the coil, with two small rings at the ends.
- Insert the battery into the socket.
- Insert the clips on both sides of the battery, where the “+” and “-” terminals are located. Make sure the latches are securely clamped.
- Insert the coil leads into the clamp rings.
- Place a magnet on top of the battery and lightly push the coil.
Finished electric motor
If the design is done correctly, the coil will begin to rotate rapidly until the battery charge lasts. Of course, such a motor will not bring tangible benefits at home or on the farm, but it is a direct example of the action of natural magnetism and in practice allows you to experiment with the basics of electrical engineering.
– We prepare materials
To make the simplest magnetic motor with your own hands, you will need the following available materials:
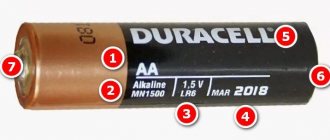
- 1.5 Volt battery, it is better to choose powerful options like Duracell or Energizer;
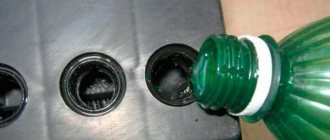
- a holder with contacts for a AA battery (as in the photo below) can be taken for one battery, but the design with two seats is more stable;
- a small magnet, preferably a powerful one - neodymium;
- a piece of necessarily enameled copper wire (in varnish insulation, such wire has a slightly yellowish color), with a diameter of 1 mm (assembly will require no more than 80 cm);
- 30 cm of uninsulated single-core wire, 1 mm in diameter.
Having prepared all the necessary materials, you can proceed to assembling a simple electric motor that runs on just one battery. Making a small electric motor at home is not difficult, as you will now see!
How to make a perpetual motion machine from a battery
In order to make this gadget, you will need basic tools that every home has, or that can be bought at any specialty store.
So, we will need:
1. Regular 1.5 volt AA battery
2. Copper wire
3. Ordinary round magnets, preferably not very bulky
4. Working compartment for batteries
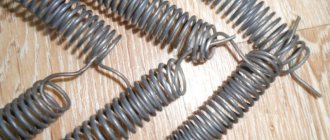
So, let's start directly assembling our miracle engine. We wind copper wire around a pen or pencil or other long stick so that we get the shape of a spring.
We attach magnets to both sides of the battery.
Insert the battery with magnets inside the wire spiral, and then connect the wires at the ends.
And now the battery with magnets will move in a circle inside the spiral. This craft is also popularly called the simplest electric train. Good luck.
maxpark.com
DIY crib canopy holder
The basis of the design is the holder. In ready-made kits it is attached to the canopy, but if you are sewing a canopy for your baby’s crib yourself, you can make it yourself.
An excellent material for making a holder is thick wire. It is rolled into a circle or oval shape and then secured to the ceiling or at the head of the crib using a hook.
If we are talking about a structure on a stand, you will need to build it too. To do this, you can use a wooden stick, as well as a metal or plastic tube. In this case, the holder will be attached to the stand using a clamp.
What is needed for a simple electric motor?
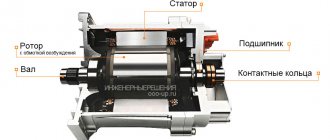
Please note that it is quite difficult to make a working electric machine designed to perform any useful work from the rotation of a shaft at home. Therefore, we will look at a simple model demonstrating the principle of operation of an electric motor. With its help you can demonstrate the interaction of magnetic fields in the armature winding and the stator. This model will be useful as a visual aid for school or as a pleasant and educational pastime with children.
To make a simple homemade electric motor, you will need an ordinary AA battery, a piece of copper wire with varnish insulation, a piece of permanent magnet no larger than a battery, and a pair of paper clips. All you need is a pair of wire cutters or pliers, a piece of sandpaper or other abrasive tool, or adhesive tape.
The manufacturing process of an electric motor consists of the following stages:
Wind 10 to 15 turns of copper wire around a AA battery - this will be the motor rotor. You can use not only a battery, but also any round base. Remove the winding from the battery, try not to greatly disturb the diameter of the turns. Fix the entire coil with two diametrically opposed turns, as shown in the figure below. Fig. 1: fix the winding with turns. Using fine sandpaper, clean the ends of the motor armature. Your task is to remove the insulation layer, since current will be collected through these ends. Using pliers, bend two paper clips so that you create round loops in the middle of the paper clip. As a base for bending the loop, you can use any hard object, for example, a match. Rice
2: bend the paper clip. Secure both paper clips to the terminals of the AA battery with tape, it is important to achieve a tight fit. If necessary, apply several layers of tape. Place the ends of the rotor in the loops, it will also act as the shaft of the electric motor
The stripped ends of the wire should be placed on paper clips. Rice. 3: Place the rotor in the loops. Fix a permanent magnet under the coil on the surface of the AA battery.
A simple electric motor is ready - just push the coil with your finger and it will begin a rotational movement, which will continue until you stop the motor shaft or the battery runs out.
Rice. 4: Start the reel
If rotation does not occur, check the quality of current collection and the condition of the contacts, how freely the shaft moves in the guides and the distance from the coil to the magnet. The shorter the distance from the magnet to the coil, the better the magnetic interaction, so the operation of the electric motor can be improved by reducing the length of the racks.
The simplest electric motor
Details Published: September 11, 2010
The other day I was showing my child how an electric motor works. I remembered a physics experiment from school.
Source materials:
- AA battery
- Enameled wire 0.5 mm
- Magnet
- Two paper clips, about the size of a battery
- Stationery tape
- Plasticine
Bend part of the paper clip.
We wind a coil of enameled wire. We make 6-7 turns. We fix the ends of the wire with knots. Then we clean it up. We completely clear one end of insulation, and the other only on one side. (In the photo, the right end is stripped from the bottom)
We fix the paper clips on the battery with tape. Install the magnet. We attach the entire structure to the table using plasticine. Next, you need to position the coil correctly. When the spool is installed, the stripped ends should touch the paperclip. A magnetic field arises in the coil, and we get an electromagnet. The poles of the permanent magnet and the coil must be the same, that is, they must repel each other. The repulsive force turns the coil, one end loses contact and the magnetic field disappears. By inertia, the coil turns, contact appears again and the cycle repeats. If the magnets are attracted, the motor will not spin. Therefore, one of the magnets will need to be turned over.
The process of building a homemade motor in the video:
Add comments can only registered users.
www.zabatsay.ru
DIY electromagnet
- Using simple items - a battery, insulated copper wire (at least 1.5 meters) and a large nail/bolt, you can make a powerful electromagnet. Wrap the wire around the nail from one end to the other. Each end of the nail should have “tails” for connection to the battery. As soon as you connect the ends of the wire to the battery, the structure will turn into an electromagnet. Look for or pick up any metal objects for them. After disconnecting the elements, the electromagnet loses power.
Items needed
To make a small electric motor, you will need:
- Basis for power supplies
. To put it simply, a socket with “+” and “-” terminals. An old camera - a point-and-shoot camera, an unnecessary children's toy or a broken tape recorder - will be suitable for this purpose. - Magnet
. The most generous source of small magnets is old speakers, which rarely take more than 15-20 minutes to disassemble. If you have extra funds, you can buy a small neodymium magnet at any radio equipment store.
Small magnet
- "Finger" battery
, voltage no more than 1.5 V.
Simple battery
- Copper wire with a cross-section of 1 mm2
, a piece of at least one meter.
When all the “ingredients” of the future electric motor have been collected, you can begin assembling it.