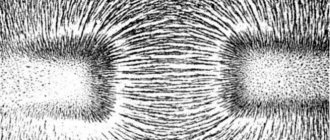
From early childhood, people never cease to be amazed at the amazing abilities of magnets - to attract various metal objects to themselves. Permanent magnets (PM) are the most common type of this phenomenon. They are distinguished by the strength of the magnetic field. There are especially powerful magnets made from alloys of various metals.
Types of magnets
Finished vertically oriented wind generator
There has been renewed interest in wind turbines, especially in recent years. New models have appeared, more convenient and practical.
Until recently, horizontal wind generators with three blades were mainly used. And vertical views did not extend due to the heavy load on the wind wheel bearings, which resulted in increased friction that absorbed energy.
But thanks to the use of the principles of magnetic levitation, a wind generator on neodymium magnets began to be used in a vertically oriented manner, with pronounced free inertial rotation. Currently, it has proven its higher efficiency compared to horizontal.
An easy start is achieved thanks to the principle of magnetic levitation. And thanks to the multi-polarity, which gives the rated voltage at low speeds, it is possible to do away with gearboxes completely.
Some devices are capable of starting to work when the wind speed is only one and a half centimeters per second, and when it reaches only three to four meters per second, it can already be equal to the generated power of the device.
How to make a strong magnet?
#1
Let's look at how to make a magnet. The easiest way is to magnetize the iron. A small piece of steel or iron, such as a nail or a screwdriver, should be placed on a magnet and left in this position for several hours. The object will be magnetized and in turn become a magnet. True, its strength will be less than that of the donor magnet. In order to get a strong magnet, you need to have a large and strong magnet - a donor. In industry, such magnets weigh more than 100 kg.
#2
This way you can make a permanent magnet. Its peculiarity is that it has two clearly defined poles, N-north and S-south. Even if you cut a magnet, you get two permanent magnets with two opposite poles. The poles cannot be separated. Usually the south pole is colored red, the north pole blue. The poles of the magnet can be checked using an oscilloscope or another magnet. Two like poles repel, opposite poles attract.
#3
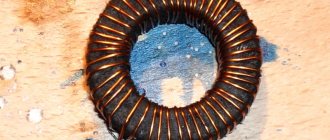
How to make a magnet so that it is stronger? For these purposes, you need to make an electromagnet. A coil of wire, preferably copper, needs to be wound around a small dielectric frame. The number of turns is approximately 1000. A direct current from a battery, accumulator or other direct current source is passed through the coil. As long as current flows, it is an electromagnet. The greater the current, the greater the strength of the magnet. After turning off the current, the magnet will lose its properties.
#4
A metal core, such as a bolt, can be inserted inside the coil. It’s even better to wrap the core with electrical tape or paper and wind the coil around it. The flowing current is capable of magnetizing iron, therefore, after turning off the current, the electromagnet does not lose its properties for some time. In order for objects stuck to the magnet to fall off, you need to pass a current in the opposite direction. This method is used when loading and unloading scrap metal and removing metal filings.
#5
So, here are the instructions on how to make a magnet with your own hands. There are no big difficulties in this. A homemade magnet can have different shapes, it can be painted, and used for various household purposes. It all depends on imagination and the availability of the necessary materials at hand. This is where you can show off your ingenuity and creativity!
Method four: magnet in a bag
If you're worried about scratches on your refrigerator, you can easily prevent them by making a fabric magnet. A simple manufacturing technique will allow you to change the so-called pouch whenever you want.
All you need for this little masterpiece is:
- magnets;
- colored rags;
- threads;
- needle;
- scissors.
First you need to create blanks for magnets from a flap. The size of the workpieces should be approximately 3 times the size of the magnet. The edge of the fabric must be folded and stitched so that the stitches lie as close to each other as possible. As a result, you got a bag like this. Place a magnet inside, tighten the thread, tie it and cut it.
You can put a little cotton wool or foam rubber between the magnet and the fabric on the front side. Then the product will gain volume.
What can you catch?
Fragments of historical monuments - knives, weapons from the times of the Great Patriotic War - are often recovered from the bottom of lakes and rivers. A magnet with good attractive force will pull out hidden treasures in wells and garbage pits. Cossack sabers were repeatedly raised from the Dnieper. All products containing iron and ferromagnetic metals will be attracted to the magnet.
Pure gold is not magnetized, but such jewelry also contains a ligature (a mixture to impart strength). For example, products of 585 standard contain 41.5% other metals, including nickel, which is highly attractive.
You can also find silver, but not all its varieties can be raised. Sets of past centuries, with the addition of ligature, are often mined from the depths of centuries-old lakes.
Stainless steel is magnetic to varying degrees, depending on the alloys added. Aluminum, brass, bronze, tin, lead and copper will not be attracted.
Often in your finds you can find metal sealed cylinders worn by German soldiers. They kept their valuables in them.
Places to find relics
Ideal search places are military crossings and centuries-old bridges. Valuable finds can be discovered when examining mill whirlpools and pre-revolutionary wells. The drains, cesspools and station toilets surprise you with their artifacts.
Search for valuable coins
Only cheap royal change will not be attracted to the magnet, but medium-denomination coins made with an admixture of nickel and chromium will delight their treasure hunter. You shouldn't count on expensive coins, because... They were made of gold and silver, which means they are very weakly magnetized.
Method two
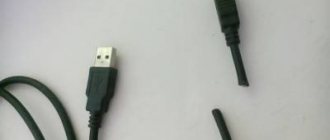
The production of permanent magnets can be carried out in another way. This requires a battery. With its help you can magnetize any suitable material. This is done quite simply and does not require special tools. An electromagnet gives a metal object magnetic properties.
Let's look at an example with a screwdriver. To begin with, the tool should be wrapped in an insulator, and then wound about 300 turns of wire. It is better to use the one that is used for the manufacture of transformers. After this, the wire must be connected to a battery or battery, preferably 5-12 volts. As a result of such manipulations, the electromagnetic field will magnetize the screwdriver.
Method seven: they also chip
To create a magnet that will not only magnetize, but that can also be pinned, you need:
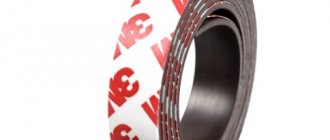
- magnetic tape;
- wooden clothespins;
- acrylic paint;
- thin brush;
- sparkles.
Now that you have everything ready, get to work. First, decorate the clothespin. Secondly, you can simply paint it. Thirdly, glue the tape on the other side. Everything ingenious is simple!
You can also buy souvenirs in the online store https://www.tex-tile.ru/8march_souvenirs/
Methods for demagnetizing a magnet
Loss of the ability to attract metal objects can occur both naturally and during a number of actions. Subject to the rules of operation and storage, the qualities of neodymium elements are maintained for 100 years or more, and ferrite analogues continue to attract metal for 8-10 years. Degaussing neodymiums naturally is not practical if the procedure is to be performed on a new item.
Product heating
This method is used both in industrial and domestic conditions: if the magnet is made of a standard alloy of neodymium with boron and iron, it will lose its properties when placed in water boiling at 80 degrees Celsius or in case of contact with a surface heated to the specified temperature. If we are talking about a product with increased resistance to thermal shocks, it is unlikely that it will be possible to perform the procedure at home: the demagnetization temperature of neodymium magnets with such properties is 200 degrees Celsius. To carry out the procedure in such cases, special industrial equipment is used.
Mechanical Actions
Neodymium can lose its qualities as a result of a strong directed impact, for example, an impact: this material has a powder structure that is destroyed when dropped from a height or when exposed to impact equipment. In addition, demagnetization can occur accidentally during the process of drilling or cutting a magnet: this is due to excessive mechanical pressure or an increase in the temperature of the product without forced cooling.
Treatment with external magnetic influence
Most often, if it is possible to use industrial equipment of increased power, another magnet is used, which allows the formation of a field with an induction force of about 4 Tesla. A neodymium magnet is demagnetized in a matter of seconds, so this method, despite its technological complexity, is characterized by the fastest possible result.
Making New Year's magnets with your own hands
When decorating your apartment for the New Year (NG), you can also use magnets. The symbol of 2022 is a yellow dog, which, as we know from one of the previous paragraphs, can be depicted from papier-mâché, as well as felt and nylon. This way, you'll have an interesting decorative craft that can hang all year long for obvious symbolism. In addition, using magnets, you can make New Year's decorations from satin ribbons, which do not require additional fastening, because the magnetic field itself will hold them in the place you need. Such a designer find will look extremely impressive and will be appreciated by your guests and family.
What it is
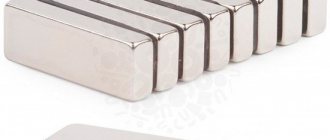
A neodymium magnet is a magnetic element that is composed of neodymium rare earth boron and iron material. It has a crystal structure, tetragonal shape and formula Nd2Fe14B.
Neodymium magnet is the most common type
It was first created by General Motors in 1982. It is the strongest permanent magnetic element, the power of which is several times greater than usual. Equipped with a large magnetic induction of 12,400 gauss.
Note! This is a brittle alloy with the formula NdFeB, as well as a hard nickel-plated protective layer and the corresponding class. It is very popular and comes in various forms.
Full material definition
Features of transportation and storage
When using search magnets, you need to follow several recommendations regarding transportation and storage:
- The unit must be kept in a special non-magnetic container. A wooden box or a special bag with shielding is perfect.
- The structure should be moved very carefully, keeping a distance of several meters from electrical equipment and machinery. A strong magnetic field will harm gadgets and computer devices.
Bags for magnets
Bags for search magnets with shielding are an indispensable accessory for any treasure hunter. It is made of wear-resistant material with sewn-in steel plates to isolate the magnetic field. A person will be able to move the unit without the risk of accidentally magnetizing it in the wrong place.
The bag is quite durable and perfectly protects the magnet from external damage, simplifying transportation.
Compound
Magnets based on this rare earth metal are designated by the formula Nd2Fe14B. The composition includes neodymium (Nd), iron (Fe), boron (B). The peculiarity of the technology is that this rare earth metal is difficult to isolate in its pure form. The sintering process with the remaining components in powder form must take place in an inert environment. Otherwise, its rapid oxidation occurs with loss of properties.
The technology for normal conditions is complex, so trying to make neodymium magnets with your own hands is impractical. Products are marked during production. The number after the letter N (25, 30, 45) indicates the code. The higher the indicator, the stronger the magnetic properties of the material. The maximum operating temperature of the magnet also depends on the number.
Method two: they are alive
A DIY refrigerator magnet can be a living creature. To make this, you should prepare:
- magnet;
- hot glue gun;
- screwdriver
- cortical plugs;
- small plants;
- some land;
- knife.
Manufacturing stages and features:
- Make a hole in the cork.
- In depth - up to the middle of the cork. It is important not to damage the edges.
- Using a glue gun, you need to glue the magnet to the cork.
- Immerse the soil in the resulting void and plant the plant.
- As a result, you got a kind of pot.
Don't forget to take care of the plant you planted. After all, it will grow up and ask to be moved to a new house, and in the existing one you can grow a new flower.
Search Magnet Care
To use a search magnet for a long time, it is important to properly care for it. There are no special requirements for processing the coating, but you need to wipe it with a dry cloth and clean it of small adhering metal particles. . The magnet is a fairly reliable tool; its service life depends on the characteristics of use.
Over a decade, it loses no more than 1% of power.
The magnet is a fairly reliable tool; its service life depends on the characteristics of its use. Over a decade, it loses no more than 1% of power.
Do not hit or heat the device. When exposed to temperatures above 80 °C, it will lose its magnetic properties and turn into a useless piece of metal.
Important! The design negatively affects the operation of electronics; the damage radius depends on the power. When searching for artifacts, you should keep smartphones and laptops at a safe distance, and it is better to store search magnets in special bags (more details below).
Demagnetization of search magnets
Even the most powerful magnets lose their properties over time. Ferrite products will last for several decades, but neodymium products will last 200-300 years.
Causes of involuntary demagnetization:
- Heat. When heated above 80 ⁰C, the magnet will completely lose its attractive force. Only some models have increased resistance to temperature changes and can withstand up to 200 ⁰C.
- Strong blows. Mechanical impacts on a magnet (impact, falling from a height) deprive it of its value.
- Errors when cutting and drilling. Strong pressure when processing a magnet with a grinder can lead to loss of characteristics.
- Impact of external factors. When exposed to a magnetic field with an induction of about 3-4 Tesla, the magnet can be demagnetized.
It will be possible to restore the lost properties only in large-scale production using an industrial magnetization installation.
Making your own salt dough magnets
Salt dough is an extremely cheap, accessible and extremely flexible material.
To prepare the test you will need:
- 2 tbsp. l. flour;
- 1 tbsp. l. salt;
- a little water and PVA glue.
1. Mix all the ingredients, knead thoroughly with your hands until it stops sticking to your hands.
2. Cover a baking sheet with foil or parchment and place directly on it. Using the stacks we sculpt the necessary figure (for us it will be a heart).
3. Smooth out any unevenness with a wet brush. Place in a cold oven, gradually raising the temperature to 130 degrees. The product must dry completely.
4. Turn off the oven and let the product cool. We paint it in any color. You can use watercolor or gouache. We paint the reverse side black and glue it with magnetic tape. The magnet is ready!
But what other materials can magnets be made from
- from polymer clay. An extremely effective material for modeling, which is ideal for realizing your wildest creative fantasies;
- made of plaster - perfect for creating small objects;
- made of felt - patterns can be found in the public domain;
- from beads. This material has enough options to realize creative potential;
- from foamiran. Plastic suede is gaining popularity in craft circles, and this material is also extremely easy to use;
- from a battery - discharged batteries can be given a second life in this interesting way;
- made of clay - a classic material for needlework. Perfect for creating magnets.
Strengthening the electromagnet
To understand how to increase the strength of a magnet, you need to understand the process of magnetization. This will happen if the magnet is placed in an external magnetic field with the opposite side to the original one. An increase in the power of the electromagnet occurs when the current supply increases or the turns of the winding are multiplied.
You can increase the strength of a magnet using a standard set of necessary equipment: glue, a set of magnets (you need permanent ones), a current source and an insulated wire. They will be needed to implement the methods of increasing the strength of a magnet, which are presented below.
Reinforcement with a more powerful magnet
This method involves using a more powerful magnet to strengthen the original one. To implement this, you need to place one magnet in the external magnetic field of another, which has greater power. Electromagnets are also used for the same purpose. After holding a magnet in the field of another, amplification will occur, but the specificity lies in the unpredictability of the results, since for each element such a procedure will work individually.
Strengthening by adding other magnets
It is known that each magnet has two poles, and each attracts the opposite sign of other magnets, and the corresponding one does not attract, only repels. How to increase the power of a magnet using glue and additional magnets. This involves adding other magnets to increase the final power. After all, the more magnets, the correspondingly greater the force. The only thing that needs to be taken into account is the connection of magnets with like poles. In the process, they will repel each other, according to the laws of physics. But the challenge is gluing, despite the physical difficulties. It is better to use glue that is designed for gluing metals.
Curie Point Enhancement Method
In science there is the concept of the Curie point. Strengthening or weakening of a magnet can be done by heating or cooling it relative to this point itself. Thus, heating above the Curie point or strong cooling (much below it) will lead to demagnetization.
It should be noted that the properties of a magnet when heated and cooled relative to the Curie point have an abrupt property, that is, having achieved the correct temperature, its power can be increased.
Method No. 1
If the question arises of how to make a magnet stronger if its strength is regulated by electric current, then this can be done by increasing the current supplied to the winding. Here there is a proportional increase in the power of the electromagnet and the current supply. The main thing is ⸺ gradual feeding to prevent burnout.
Method No. 2
To implement this method, the number of turns must be increased, but the length must remain the same. That is, you can make one or two additional rows of wire so that the total number of turns becomes larger.
This section discusses ways to increase the strength of a magnet at home; experiments can be ordered on the website.
Options for using magnets in everyday life
Neodymium magnet is widely used in everyday life. The main thing is to be able to show your imagination. There are both standard methods and very interesting applications.
Amazing spice rack
To ensure that spices are always at hand and do not take up much space, you can design a special shelf using neodymium. For this you will need:
- Metal jars with a transparent lid.
- Neodymium magnet with a diameter of 1.5x6 mm.
- Epoxy resin.
- 100 grit sandpaper.
We sand the bottom of the jars on the outside and use resin to attach magnets. After this, they will stick securely to any metal surface.
It turns out beautiful and neat.
Scissors and household tools at hand
Knives, scissors and other household utensils can also be attached to neodymium clamps. To do this, just choose a suitable place, create a strip of magnet and install it. And then kitchen utensils will always be at hand.
By the way, you can use magnets from speakers for this, the main thing is to design them beautifully.
Beer storage method
To prevent beer packaging from taking up extra space in your refrigerator, bottles can simply be hung from the ceiling of the refrigerator compartment. We simply purchase a tape with magnets https://mirmagnitov.ru/catalog/gibkie-magnity/magnitnaya-lenta/ and attach it.
The magnet power will be enough to hold the bottles securely.
Greenhouse using magnets
To surround yourself with house plants, you don’t have to buy large pots and put them on shelves. It is enough to create small containers, for example, from corks and plant your favorite plants.
Then arrange it around you in the way you like best.
Opener for bachelors
Such devices will be appreciated by any man whose house is not ruled by a woman. A decorative plaque with a beer opener is installed on the wall, on which a magnet is attached to the reverse side.
Tool Carrying Solution for Craftsmen
To ensure that tools and accessories are always at hand, you can make magnetic bracelets and belts with the alloy inside. This will allow you to attach a not very heavy tool to your belt, and sculpt accessories onto bracelets.
And since the magnet has healing properties, you get an additional bonus.
Place for studs
Any beauty has a huge number of hairpins, but, as a rule, they are often lost. Therefore, you can attach a magnetic tape inside your wardrobe or on the wall of your cosmetic bag, and then all the pins will always be in one place.
Shelf for cosmetics and women's accessories
This device is also created on the principle of a spice rack.
You will need a steel surface and magnets glued to the bottom of the cosmetic cases. A similar surface is installed nearby, on which hooks are attached using neodymium. You can hang your decorations on them.
Housekeeper
Near the exit (in the hallway), a magnetic panel and key fobs are installed on the wall. Never lose your keys again.
You can also attach lighters and other small items that you may need outside the home to these panels.
Don't forget anything
Using magnetic holders, you can leave notes or write a to-do list for tomorrow, and then attach it in the most visible place. This will allow you not to forget little things and always remember what needs to be done.
Order in the nursery
Toys with magnets installed in them are easier to store on metal surfaces. In this way, it will become more interesting for the child to clean the room, which will help achieve the long-awaited order in the nursery.
Study without leaving home
Every child needs to learn, but the time has passed when children wrote on desks. Now you can make a marker board for your child with a magnetic panel on it. You can attach all the necessary devices for studying to it.
DIY Lego
You can make or order small parts of various shapes and sizes, glue magnets to them and create a wide variety of designs on a large metal surface.
These figures can be built together, which will allow the little creator to develop in a creative way.
Healthy sleep on a magnetic pillow
An orthopedic magnetic pillow will allow you to fully relax while sleeping. But before using it, you should consult your doctor, as there are contraindications. For example, the presence of a pacemaker in a patient. A magnet can be used for various things, the scope of its application is almost endless and the properties of this alloy are of great importance when used. In skillful hands, you can use it to make a huge number of necessary and useful things and accessories.
Application
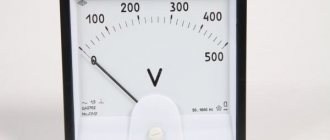
Traditionally, they are used in electronic devices and devices where it is necessary to create a constant magnetic field. The properties of the material make it possible to successfully use them when searching for and lifting metal objects from the bottom of reservoirs. Such structures, in addition to the eye for fastening the cable, are equipped with an eye bolt, which is simply necessary, since when screwed in, it allows you to separate two strongly adhered surfaces.
Magnets are available in sizes from 1 to 120 mm in diameter and in different thicknesses and shapes. The thinnest of them are widely used in the leather goods and furniture industries. They can be found in funny toys and devices for hanging various utensils. Powerful magnets are indispensable for filtering bulk and liquid materials. They are used to catch metal impurities and foreign objects in the conveyor flow.
The high adhesive force encourages people to use them to achieve “savings” when using water and gas. By purchasing neodymium magnets for counters, they thus try to stop or slow down the rotation of their mechanism. This possibility theoretically exists in devices where steel elements are used internally. A powerful magnet placed in a specific location on the housing can slow down the rotation of the impeller.
How to make it yourself
A wind generator based on neodymium magnets differs from other generator designs in that it can easily be made independently at home.
As a rule, they take as a basis a car hub or pulleys from a belt drive, which are pre-cleaned if they are used spare parts and prepared for work.
If it is possible to manufacture (turn) special discs, it is better to choose this option, because... in this case, there is no need to adjust the geometric dimensions of the wound coils to the dimensions of the workpieces used.
Neodymium magnets should be purchased, for which you can use the Internet or the services of specialized organizations.
One of the options for manufacturing a generator on neodymium magnets, using disks specially made for these purposes, is proposed for consideration by V.G. Yalovenko. (Ukraine). This generator is manufactured in the following sequence:
- Two disks with a diameter of 170.0 mm with a central hole and a keyway are machined from sheet steel.
- The disk is divided into 12 segments, and corresponding markings are made on its surface.
- Magnets are glued into the marked segments so that their polarity alternates. To avoid errors (in polarity), it is necessary to mark them before applying the sticker.
- The second disk is made in a similar way. The result is the following construction:
- The surface of the claims is filled with epoxy resin.
- 12 coils of 55 turns each are wound from wire (enamel wire) of PETV brand or equivalent, with a cross-section of 0.95 mm2.
- A template is made on a sheet of plywood or paper that corresponds to the diameter of the disks used, which is also divided into 12 sectors.
The coils are placed in marked segments, where they are fixed (insulating tape, adhesive tape, etc.) and disconnected sequentially from each other (the end of the first coil is connected to the beginning of the second, etc.). the result is the following construction
- A matrix is made from wood (board, etc.) or plywood, in which coils laid according to a template can be filled with epoxy resin. The depth of the matrix must correspond to the height of the coils.
- The coils are placed in a matrix and filled with epoxy resin. The result is the following workpiece:
- A hub with a mounting unit for the shaft of the manufactured generator is made from a steel pipe with a diameter of 63.0 mm. The shaft is mounted on bearings installed inside the hub.
- A rotating mechanism is made from the same pipe, ensuring the orientation of the generator in accordance with wind flows.
- Manufactured spare parts are put on the shaft. The result is the following design, plus a rotating mechanism:
- The design should rigidly mount the stator (a blank with windings filled with epoxy resin), on the one hand, and not impede the rotation of the rotor (discs with non-dimium magnets).
- Wind generator blades are made from pipes (polyethylene, propylaea, etc.) used for laying water supply or sewerage networks. To do this, the pipe is cut to the required length, after which it is cut and the blanks are given the appropriate shape.
- The tail of the wind turbine is being manufactured. For this, any sheet material (plywood, metal, plastic) can be used, after which the shank is attached to the assembled structure, on the side opposite to the attachment of the blades. The result is the following construction:
- The assembled installation is installed in the place provided for this purpose.
- A load is connected to the generator terminals.
The design of a wind generator using neodymium magnets can be different, it all depends on the available spare parts and the technical capabilities of the person who decides to make such a device on their own.
You will probably also like the following materials: Super flywheel - alternative energy storage
Thank you for reading to the end! Don't forget if you liked the article!
Share with friends, leave your comments
Add to our group on VK:
ALTER220 Portal about alternative energy
and suggest topics for discussion, together it will be more interesting!!!
How to make a magnet in the shape of a dog with your own hands?
For many centuries, the dog has been a faithful friend and companion of man on his life's journey. Therefore, a magnet with a picture of a dog placed on the surface of the refrigerator (or any other) will become a wonderful aesthetic decoration. You will find templates for making a dog below.
Regarding materials: the dog’s fur can be made from felt, and the ears can be made from nylon tights. In addition, the puppy can be made from papier-mâché. Such a product can be decorated and diversified with various design solutions, which will add realism to the decoration.
Experiments with neodymium magnets
Neomagnet is quite popular, its composition: neodymium, boron, iron. This magnet has high power and is resistant to demagnetization.
How to strengthen neodymium? Neodymium is very susceptible to corrosion, that is, it rusts quickly, so it is coated with nickel to increase service life. They also resemble ceramics and are easy to break or crack.
But there is no point in trying to increase its power artificially, because it is a permanent magnet, it has a certain level of strength for itself. Therefore, if you need to have a more powerful neodymium, it is better to purchase it, taking into account the required strength of the new one.
Conclusion: the article discusses the topic of how to increase the strength of a magnet, including how to increase the power of a neodymium magnet. It turns out that there are several ways to increase the properties of a magnet. Because there is simply magnetized metal, the strength of which cannot be increased.
The simplest methods: using glue and other magnets (they must be glued with identical poles), as well as a more powerful one, in the external field of which the original magnet must be located.
Methods for increasing the strength of an electromagnet are considered, which consist of additional winding with wires or increasing the flow of current. The only thing that needs to be taken into account is the strength of the current flow for the safety and security of the device.
Conventional and neodymium magnets are not capable of increasing their own power.
| 24.10.17, 19:10 |
Lesson 6. Magnets using papier-mâché technique
To create such magnets, you can use not only old newspapers and magazines. In the same way, you can create a collage from postcards or photographs.
You will need:
- magnets;
- round stamp with a diameter of 2.5 cm (or scissors);
- pieces of colored paper or clippings from magazines and newspapers;
- glue;
- double-sided adhesive tape;
- thin cardboard.
Cut out circles with a diameter of 2.5 cm from thin cardboard, and apply double-sided adhesive tape to each.
Cut colored paper or magazine clippings into small pieces and start gluing them onto cardboard circles, placing the pieces close to each other, sometimes gluing one on top of the other. Trim the overhanging edges to give them a smooth round shape, then cover the pieces with one or two layers of glue and leave to dry.
Glue a magnet on the back side. Ready!
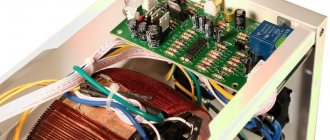
Phases - which is better - three or one?
Many lovers of electrical equipment follow the path of least resistance and, in order not to bother, opt for a single-phase stator for a windmill. However, it has one unpleasant feature that neutralizes the ease of assembly - vibration when loaded, due to the variability of current output. After all, the amplitude of such a stator is abrupt, reaching a maximum when neodymium magnets are located above the coils, and then dropping to a minimum.
But when the generator is made using a three-phase system, there are no vibrations, and the power indicator of the windmill has a constant value. The reason for this difference is that the current, falling in one phase, at the same time increases in the other. As a result, a wind generator operating in a three-phase system can be up to 50% more efficient than the exact same one using a single-phase system. And most importantly, a loaded three-phase generator does not produce vibration, therefore, the mast does not give rise to complaints about the wind generator to the supervisory authorities from ill-wishers among neighbors, since it does not create an annoying hum.
Tags: amplitude, battery, beat, sconce, wind generator, windmill, view, harm, choice, generator, house, , protective, sign, like, computer, design, , magnet, magnetic, matrix, power, load, voltage, nominal , oscilloscope, polarity, constant, rule, principle, wire, start, , work, size, edge, row, garden, network, connection, term, ten, current, transformer, three-phase, , installation, shield, effect