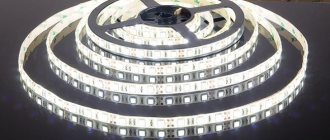
To give the light flux uniformity and directionality, it is necessary to attach a characteristic optical design to the lamp. For an LED strip, its role is played by a special diffuser. However, as a rule, ice strips are not supplemented with such devices when sold - they need to be made independently or ordered separately, depending on the conditions of use and the parameters of the lighting device based on them.
Let's consider what the operating principle of such a device is and what its function is, what types exist and where they are used, as well as how to make them yourself and what materials are required for this.
Purpose
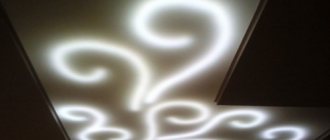
The LED strip is structurally composed of individual LEDs with high brightness, so the diffuser is designed to evenly distribute the light flux. Using it is important not only from the point of view of aesthetics and the beautiful appearance of your lighting system, but also for creating a soft light in the room.
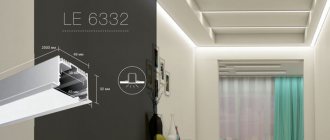
The figure shows a profile for an LED strip with a diffuser
Where can a reflector come in handy?
Reflectors can significantly improve the basic properties of LEDs, so their scope of application is not limited to any specific area of lighting technology. A reflector is equally useful in the following cases:
The debate over the best automotive optics does not subside, and what is better to use - lenses or refractors - everyone decides for themselves. Both devices help to achieve approximately the same reflectance; the issue here is rather the complexity of controlling the light beam.
For side lights or other light sources with a large number of LEDs, reflectors are not only a more economical option, but sometimes the only option. Instead of a huge lens, it is much easier to use a refractor or their system.
Principle of operation
The principle of operation of the diffuser for LED strip is to increase the angle of light distribution due to a special design made of light-refracting material. Its own geometry and location relative to the light source is designed in such a way that the luminous flux falling on it is effectively distributed over its entire area and passing through the body of the diffuser, ensuring uniform illumination of the entire room.
The photo shows the LED diffuser disassembled and assembled.
Materials for making the diffuser
To create a device that scatters light, you will need certain materials. Previously, glass was the main structural element. Today, the list has expanded to include more progressive materials.
Acrylic and plexiglass
Acrylic and plexiglass are almost as transparent as regular glass. However, the protective properties of the materials are much higher. They do not crack as a result of impacts and are able to withstand significant temperature changes - from 60 degrees below zero to 60 degrees above zero. The main disadvantage is ignition in the event of direct fire contact.
Polystyrene
Transparent polystyrene is a versatile, affordable and durable material. The degree of transparency of polystyrene is even higher compared to glass. High quality matte diffusers are made from polystyrene. Its disadvantage is its fragility and tendency to ignite. Polystyrene structures are offered in different designs - from transparent to rich colors.
Polycarbonate
The material is characterized by high strength, low weight and transparency. Able to maintain performance properties in fire, withstands significant temperature changes, is resistant to ultraviolet radiation, and durable.
Polycarbonate is resistant to mechanical stress, protecting the LED strip from damage. To further increase the strength of the structure, it is recommended to use monolithic polycarbonate. This material is much stronger than standard glass and is used for anti-vandal coatings on the street.
Note! Polycarbonate is the best material for making prismatic diffusers. The qualitative difference between polycarbonate and acrylic is a larger dispersion angle. Acrylic is suitable for opal diffusers with a small beam angle, while polycarbonate is suitable for clear devices with a significant beam angle.
Another quality of polycarbonate is its light weight. This is achieved due to the cellular structure.
The choice of a specific type of material depends on the purpose of application. Not all cases require an expensive polycarbonate diffuser. At home, an acrylic or polystyrene device is usually sufficient.
Kinds
Structurally, it consists of a metal or plastic profile of various shapes and, directly, a removable diffuser made of polycarbonate, polystyrene or methacrylate. This is advisable, since these materials are quite strong, but do not weigh down the structure much. The main profile shapes that are used are:
- corner;
- U-shaped;
- c-shaped.
The profile shape is selected depending on the planned installation location. A tape is attached to the profile, and the diffuser cover itself is snapped on top. It comes in two types:
- matte;
- transparent.
The photo shows a matte, plastic, corner aluminum profile.
Before making a purchase, you need to think about what lighting goals you are pursuing. If we are talking about illuminating a shop window in a retail space, then most likely a diffuser with a transparent surface will be more suitable for you. If you want to give a casual atmosphere to a cafe-bar, then you should give preference to matte.
We search for the problem
Troubleshooting a ceiling light begins with determining the cause of its occurrence. To calculate the section of the chain where the damage occurred, as a rule, three elements are evaluated before moving on to the chandelier itself:
- switch;
- light bulbs;
- electrical wiring.
You can start testing all parts in turn or be guided by the manifestation of any characteristic signs for each of them.
Switch
The first accessible element involved in powering the chandelier is the switch. Most often, key switch models fail in everyday life, this is due to the moving contacts in them, which constantly collide with each other, and creates additional vibration.
To check the switch:
- remove the keys and false panel;
- check the input voltage with an indicator screwdriver or tester;
- Close the switch key and check for voltage at the output to the chandelier.
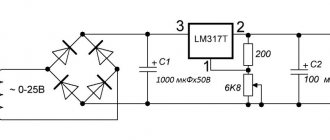
Rice. 1. Checking the key switch
If voltage is present in both cases, then the switch is working. If not, check the condition of the contacts; they may have oxidized or fallen away from the attachment point. In some situations, the core could break from the lamella or come loose, which is why there is no electrical contact through which power was transferred to the ceiling lamp.
Obvious prerequisites for failure are the blinking of the lamps when the switch is turned on or the need to apply force, to press the switching. Also in chandeliers with several groups of lamps turned on from different switches, when one group turns on and the second does not.
Light bulbs
Another reason for the lack of lighting may be a faulty lamp. Such a breakdown is typical for a chandelier with one shade and one lamp. In all other models of ceiling lighting devices, one bulb rarely affects the operation of adjacent ones, so a single burnout occurs.
The easiest way to check is an incandescent lamp in a chandelier; as a rule, the integrity of the tungsten filament is compromised.
Rice. 2. Burnt out light bulb
If LED lamps are installed or no abnormalities are visible in the bulb, then install the lamp in a known-good lamp and check its operation. You can also check any lamp using a multimeter, but the process will be different for halogen, incandescent and LED bulbs. If a malfunction is detected, replace the light bulb.
Wiring
If the two previous elements in the circuit turned out to be serviceable, you should check the condition of the connection of wires and cores in the area from the switch to the chandelier.
To do this, follow these steps:
- Turn off the switch that supplies power to the lighting fixtures.
- Check the lack of potential on the chandelier using an indicator screwdriver. If the switch does not break the phase, you should turn off the machine.
- Remove the chandelier cap to get to the wiring connection. If the chandelier design does not have a cap, remove the entire chandelier.
Rice. 3. Place of connection of wiring to the chandelier
While maintaining personal safety, apply power to the chandelier and measure the presence of potential differences at the phase and neutral terminals of the wiring. According to clause 2.1.31 of the PUE, the color marking must correspond to blue - zero, yellow-green - ground, other colors - phase.
If voltage is present at the terminals or contacts of the chandelier, then there are no wiring faults. Otherwise, to repair the electrical wiring, you can either find the location of the damage and restore contact, or replace the line completely.
Flexible
There is also a flexible profile of LED diffusers. It is fundamentally different from the designs described above. This type of component product is a silicone tube in which an LED strip is placed.
The photo shows LED strips of different colors in flexible silicone profiles
To choose the right diffuser for an LED strip, you need to consider the conditions. This includes a study of the surface to which you will attach the system, the overall dimensions of the LED strip itself and the climatic conditions of the room (or outside it, which is also possible).
It should be noted that despite the fact that diffusers are often made of fusible materials, there is no need to worry about their toxicity. During operation, the LED emits a very small amount of heat, which practically does not heat the surface of the diffuser.
Features of choosing LEDs
Requirements for lighting elements
Before you make an LED lamp with your own hands, you definitely need to decide which emitting diodes are optimally suited for these purposes.
Additional Information. In general, it is possible to make a lamp based on LEDs only if their efficiency exceeds 50% (compare: for a conventional incandescent lamp this figure is only 3.5-4%).
Features of the selection of these elements require taking into account the following determining factors:
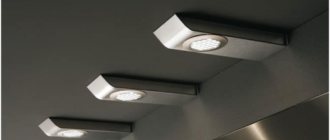
The ability to obtain a do-it-yourself lamp made from LEDs (red, yellow, green or white) suitable for given conditions. A sample of a product with a white glow is shown in the photo below;
Spotlight with daylight (white) spectrum
- High luminous efficiency of a homemade lamp;
- Low power consumption when powered from a household network;
- Long service life (at least 30,000 hours) and environmental friendliness;
- Reliability of the LED design (ability to withstand an unlimited number of switches on and off).
These products must provide the ability to control the intensity of the light flux, as well as ensure low temperature in the area where the emitting elements are located.
Selection order
All the above conditions are fully satisfied by modern LED lamps for the home, the range of which is widely represented on the domestic market.
Let us add to this that the manufacture of a homemade structure will not require the expenditure of additional material resources. For these purposes, old electronic components and products containing the corresponding parts may well be suitable.
An excellent example of a rational approach to their manufacture can be a lamp from a TV with an LCD screen (not working for some reason), from which you can “borrow” working LED backlights. An example of such a display is shown in the photo below.
Display with LED backlight
Fastening
The profile can be attached in an overhead manner to any surface. For this, self-tapping screws, liquid nails or even double-sided tape are used. There are options when special “ears” are attached to the wall, into which both rigid and flexible profiles are subsequently ideally fixed. Built-in installation of the diffuser profile is carried out using a pre-cut groove in chipboard or drywall. In the second case, you can create very sophisticated lighting in furniture. And if you use a flexible profile for an LED strip with a diffuser, then you will not have problems mounting it on curved surfaces, arches, and the like. In any case, all fastening methods are completely simple and are accessible even to a non-professional.
LED Strip Installation Guide
Step-by-step installation instructions:
- The total length of the tape is determined. To do this, the laying route is planned and the full length is measured, including the sections approaching the connectors and the controller.
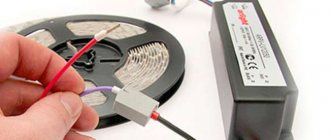
- Pieces of tape are connected into 1 line using connectors (or a soldering iron).
- The assembled tape is connected to the controller, and the controller to the power supply. The main nuance: the poles must be connected correctly, otherwise the duralight can be damaged when turned on.
- Connect the assembled line to the outlet and the lighting from the remote control for testing. If the backlight comes on, check the brightness and color settings (if provided).
- Disconnect the tape from the controller and mount it in the desired location.
When the duralight is attached, it is connected to the controller again and checked again. If the backlight works normally, the work is completed.
Application
The potential for application is enormous. Illumination of bookshelves and kitchen cabinets, display cases and aquariums. At home and in the office, in a store and a cafe - the use of LED strips with diffusers will be appropriate and attractive. And dust and waterproof ones allow you to use such lighting for outdoor advertising and any decoration on the street.
Don't forget about the possibility of using strips with LEDs of different colors and those that can change them. This will give a unique atmosphere of celebration and comfort.
Lesson 4.
So, we have more or less decided on the theory.
I would like to add one more thing (from my point of view, the most important advantage) of an LED lamp - this is the opportunity to try its effectiveness without spending a lot of money.
"What's this like?" – many will be surprised.
Now, the minimum set can cost (4 watts), 400 - 450 rubles.
What I will tell you below...
For now everything is in order.
Let's start with samples that can be made at home - “on your knees”.
1.
First, the more “complicated” option, i.e. requiring soldering skills, although not “super”, but accuracy is needed! But, you can find a friend who solders several ends. But this option is the cheapest, and it looks okay.
Upper side:
Back side:
2.
Simpler, but more expensive due to boards, but there’s not much soldering at all!
Guess what it is...
That's right - in a frying pan!
Great radiator! And if the tea doesn’t boil, it won’t cool down! (when the lamp is on).
There are many manufacturing options!
And if you think that it is possible to make only “kitchen” options, you are mistaken, such options are also possible, they are no more difficult!
So let's use our imagination!
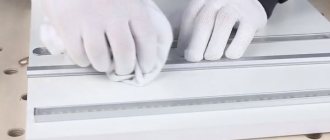
How to make it yourself
I would like to immediately add that there is an alternative to buying a ready-made LED diffuser - this is to make it yourself. What to make a diffuser for an LED strip from? Actually, this is not at all difficult; you can use a regular plastic box as a profile, which is used for laying wires in a groove, and polycarbonate or plexiglass as the diffuser itself.
To obtain a matte surface, you can use a mechanical or chemical method. The chemical method involves applying a special paste to the surface, which will destroy the crystalline structure and give an excellent matte effect, but at the time of application you need to be very careful, as the paste releases toxic substances. The mechanical method is much less harmful, since it involves treating the surface with an abrasive material, for example, emery, but it requires great physical effort.
The video shows a quick, easy and cheap way to create a homemade LED strip diffuser.
The photo shows the interior of the room, using LED strip lighting.
To summarize the above, I would like to draw your attention to the fact that the diffuser for an LED strip is an important, multifunctional component. Also, you see that the variety of design options will certainly be able to satisfy almost any conditions. Comfortable and original lighting is always a huge plus in creating a stylish, themed interior. It can be a classic style or a high-tech style, minimalism or kitsch, loft or avant-garde - the use of LED strips with diffusers will always highlight the best design ideas and leave a pleasant impression of the time spent in such a room.
What are modern reflectors like?
Manufacturers are constantly expanding their model range, significantly expanding the possibilities of light tuning. Refractors are available for a wide variety of LEDs and their combinations. Now you don’t have to limit yourself to just one shade.
The devices reflect light in the forward and reverse directions, thereby making the distribution of rays more uniform.
Reflectors can be designed for installation with an acrylic rod, and they will help to neatly hide the LEDs for their most effective use in the rear lamps of automobiles.
Refractors can correct and redirect LED illumination. They are designed to operate at right angles to the diode axis. When selecting a reflector, it is important to take into account all the parameters of the light sources. Case types and designs are constantly being updated, so it’s worth regularly monitoring new products so as not to miss out on the most interesting optics options.
Reflectors significantly improve the properties of the flow produced by LEDs. They are equally needed for tuning car optics and for assembling flashlights and lamps. You can try to make simple models with your own hands, but in some cases it is simply pointless to compete with manufacturers.
Source
No. 3. Translucent diffusers
The concept of see-through diffusers is very familiar to portrait photographers who use large white umbrellas to create soft, flattering light. These umbrellas are great for macro photography if you are working in a studio. Luckily, there are a few more practical solutions for this area:
The great thing about these diffusers is their large surface area, which covers the lens and therefore brings the light source as close as possible to the scene being photographed. The result is a perfectly even light that falls on the subject from almost all directions.
Flash without modifiers
Translucent diffuser
Character of light : The light is extremely soft and the most uniform of all the modifiers I tested.
Output : Normal. Compared to a bare flash (on camera), a store-bought model retains about half a stop of light, while a homemade model retains almost a full stop.
Flexibility : These diffusers will work with virtually any lens and camera and will always be as close to the subject as they attach directly to the lens. For the same reason, they cannot be attached to an external flash. The disadvantage is that a lens that adjusts focus by rotating the front element will change the orientation of the diffuser.
Size : In terms of size, see-through diffusers are ideal. Store models fold up and take up no space at all. The homemade version will be quite flat and fit into almost any bag.
Very soft light and practicality make this diffuser an ideal solution in the field. Especially if you use lenses with different focal lengths, as these diffusers will always be where you need them; at the front of the lens.
This photo was taken with the diffuser clear from a distance of half an inch.
No. 5. Lightbox
The lightbox I use is very similar to a regular softbox; it holds the flash and has a reflective coating inside.
However, instead of putting in a diffuser cover, I left it open on one side.
This allows you to get creative by using different materials or fabrics to create interesting effects and colorful, well-lit backgrounds. Something as simple as a plastic bag from the supermarket can end up being a great backdrop.
These are just a few ideas; in fact, there are an endless number of combination options and different materials.
Do it yourself
To make a light diffuser, you will need the starting material from the list above. In addition, you will need the following tools:
- cutter;
- glass cutter;
- nichrome thread;
- drill with a set of drills for working with various types of glass;
- construction hairdryer
Note! The choice of material and tools depends on the end result you want to achieve.
You will also need a constant light source to check the finished homemade product. The manufacturing procedure consists of the following sequential operations:
- choose frosted or transparent glass;
- We cut out a light diffuser of the required diameter from the original material. The size of this element is determined by the dimensions of the lighting fixture. And to be more precise - a lampshade and a light source;
Glass cutouts
Now all that remains is to attach the light diffuser to the lamp. For large lamps, such as Armstrong, this element is attached to aluminum profiles. The profile frame can have a round or rectangular shape. The first type is often used for home lamps and car headlights, but the second option is for office spaces and corridors.
For street lamps, it is important to make a diffuser so that it can withstand the different climatic conditions of the place where it is used. As you can see, making a light diffuser for LED lighting fixtures is not so difficult. The main thing here is to decide on the type of source material, as well as the final result, what kind of light you need to make - diffused or dim. After this, the matter remains small.
Source
Why do we need light modifiers?
Using flash for macro photography can be challenging; if it is attached to the camera, only part of the light will fall on the subject, the rest will be lost in the surrounding space. If your lens has a short working distance, it may cast a shadow on the subject you are trying to photograph. Once you remove the flash from the camera, you will be forced to hold it. Not very convenient, considering that a person has only two hands.
Most light modifiers fall into the category of diffusers and often have two purposes: to diffuse light and to direct it to the subject. This way our subject is illuminated evenly even at lower flash power.
Disadvantages of built-in flash
- When shooting a portrait, it creates unsightly deep shadows behind the person. Why are they bad, because a person will stand out brightly against a dark background? Not at all like that! A sharp transition creates a low-quality photo. And if you want the background to be visible, then the flash will simply “hide all rear view objects in the dark.”
- When shooting, white areas of skin on the face are created, so-called highlights, which spoil the skin of the subject;
- All shadows on an object or a person’s face (when shooting a portrait) disappear, so the image or face of the subject becomes “flat”, that is, they lose their volume, and, accordingly, their significance in the picture.
Many photographers simply eliminate these defects in a graphics editor. Firstly, this does not always work out correctly, and secondly, it takes a lot of time. But there is an easier way to get rid of all the shortcomings of the built-in flash - purchasing a diffuser for it.
The diffuser can soften deep shadows so that the image becomes smoother and does not have sharp transitions. The diffuser, which draws the shadows of the object, will help to draw and elongate the photo to an acceptable level, and will greatly weaken the glare.