Currently, addressable LED strips (NeoPixel LEDs) based on WS2812 LEDs are widely used in various fields. In this article we will look at connecting such a tape to the Arduino board and learn how to control it in various modes.
Previously on our website, the use of addressable LED strip (NeoPixel LEDs) was considered in the following projects:
- room thermometer on Arduino Nano;
- communication of two Arduino boards over a distance of 3 km using Lora E32.
Why NeoPixel?
The ability to individually control each LED in an addressable LED strip gives you the ability to create unique visual effects for your projects. But remember that if you require very high LED switching speeds, then using such an addressable LED strip is not advisable. Another advantage of the NeoPixel addressable LED strip is its low price compared to other types of addressable LEDs. NeoPixel LEDs are available in ring, strip, rectangle and round shapes - you can choose any type for your projects.
Note : The more NeoPixel LEDs you use, the more RAM and power required to drive them, and the processing time will also increase, so choose the optimal number of NeoPixel LEDs based on the capabilities of the microcontroller you are using.
List of necessary items
- Brain of the device – Arduino Nano – 1 pc. — 150 rub.
- Motion sensor – HC-SR505 – 1 pc. — 60 rub.
- Touch button TTP-223 – 1 pc. — 20 rub.
- Transistor IRF-3205 - 3 pcs. -150 rub.
- Resistor 10 K 0.25 W – 3 pcs. – 6 rub.
- Resistor 20 Ohm 0.25 W – 3 pcs. – 6 rub.
- Breadboard for soldering, dimensions 90x50 mm – 1 pc. 100 rub.
- Housing 100x60 - 1 pc. 60 rub.
A total of 14 parts for a total cost of approximately 600 rubles + the LED RGB strip itself, depending on the format of the planned lighting.
Everything except transistors and resistors is cheaper to buy in China, but transistors are better to buy in our stores. The Chinese sometimes send outright slag under the guise of transistors, and they sell resistors in large quantities, albeit quite cheaply.
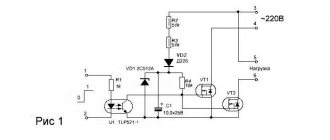
Project diagram
The connection diagram for the WS2812 addressable LED strip to the Arduino board is shown in the following figure.
A resistor in the circuit is necessary to protect the NeoPixel LEDs from damage and for correct data transmission. The best communication distance between the NeoPixel LED module and the microcontroller board is 1 to 2 meters.
Note : if you are using an addressable LED strip with a large number of LEDs, then in this case it is recommended to connect a large capacitor (approximately 1000 µF) in parallel with the + and – of the supply voltage.
The principle of load control via Arduino
The Arduino board has two types of output ports: digital and analog (PWM controller). A digital port has two possible states: logical zero and logical one. If you connect an LED to it, it will either glow or not.
The analog output is a PWM controller, to which a signal with a frequency of about 500 Hz is supplied with an adjustable duty cycle. What is a PWM controller and the principle of its operation can be found on the Internet
Through the analog port it is possible not only to turn the load on and off, but also to change the voltage (current) on it.
Command Syntax
Digital output:
pinMode(12, OUTPUT); — set port 12 to be the data output port; digitalWrite(12, HIGH); — we apply a logical one to discrete output 12, lighting the LED.
Analog output:
analogOutPin = 3; – set port 3 to output an analog value; analogWrite(3, value); – we generate a signal at the output with a voltage from 0 to 5V
Value – signal duty cycle from 0 to 255. At a value of 255, the maximum voltage
Ways to control LEDs via Arduino
Only a weak LED can be connected directly through the port, and even then it is better through a limiting resistor. Trying to connect a more powerful load will damage it.
For more powerful loads, including LED strips, an electronic switch – a transistor – is used.
Explanation of Arduino program for working with addressable LED strip
Before you start working with addressable LED strip in Arduino, you need to download and install the library for it - NeoPixel Adafruit library.
Arduino
| 1 | Adafruit_NeoPixel pixels(NUMPIXELS, PIN, NEO_GRB + NEO_KHZ800); |
This function determines the number of LEDs and the Arduino pin to control them.
Arduino
| 1 | pixels.begin(); |
This function initializes the addressable LED strip.
Arduino
| 1 | pixel.setBrightness(b); |
A function that sets the brightness of the LEDs. 1 – minimum brightness, 255 – maximum.
Arduino
| 1 | pixels.setPixelColor(Wich LED,Wich color(Red,Green,Blue)); |
This function sets the LED color using the RGB system by specifying the LED number (from 0 to NUMPIXELS-1).
Arduino
| 1 | pixels.show(); |
A function that activates the specified settings, that is, it turns on the LEDs with the previously specified settings.
Now let's look at sample programs that allow you to implement various options for controlling LEDs in an addressable LED strip.
WS2812b based tape
ws2812b-based tape
The ws2812b-based tape is more advanced than its predecessor. The PWM driver in the address strip is compact and is placed directly in the light-emitting diode housing.
The main advantages of ws2812b-based tape:
- compact dimensions;
- ease of control;
- control is carried out via just one line + power wires;
- the number of LEDs connected in series is not limited;
- low cost - buying three LEDs and a driver for them separately will cost much more.
The tape is equipped with four outputs:
- nutrition;
- data output;
- general contact;
- data input.
The maximum current of one addressable LED is 60 milliamps. Operating temperatures range from -25 to +80 degrees. The supply voltage is 5 V +-0.5.
PWM tape drivers are 8-bit - 256 gradations of brightness are possible for each color. To set the brightness, 3 bytes of information are needed - 8 bits from each LED. Information is transmitted via a single-line protocol at a fixed speed. Zeros and ones are encoded by high and low signal levels along the line.
1 bit is transmitted in 1.25 µs. The entire packet of 24 bits for one LED is transmitted in 30 µs.
Rainbow mode for NeoPixel LEDs
There is an interesting tool on the Internet for conveniently creating various effects for the NeoPixel addressable LED strip - NeoPixel Effects Generator. In it you can set the number of LEDs and the contact of the Arduino board to control them, and after creating the necessary effects for your tape in this generator, you can generate ready-made code for the Arduino board in this generator.
To do this, follow the following sequence of steps.
1. On the generator website, click Add Led Strip.
2. Set the number of LEDs in the strip and the Arduino pin number from which they will be controlled.
3. After that, click on Add Effect and select the desired effect.
4. Set the color of the LEDs.
5. Click on “generate Arduino code” and after that the program code for Arduino will be generated for you, which you can directly paste into the Arduino IDE.
The principle of load control via Arduino
Arduino control
The board has many outputs, both digital, having two states - on and off, and analog, controlled via a PWM controller with a frequency of 500 Hz.
But the outputs are designed for a current of 20 - 40 mA with a voltage of 5 V. This is enough to power an RGB indicator LED or a 32x32 mm matrix LED module. For a more powerful load this is not enough.
To solve this problem in many projects you need to connect additional devices:
- Relay. In addition to individual relays with a supply voltage of 5V, there are entire assemblies with different numbers of contacts, as well as with built-in starters.
- Amplifiers based on bipolar transistors. The power of such devices is limited by the control current, but you can assemble a circuit from several elements or use a transistor assembly.
- Field-effect or MOSFET transistors. They can control loads with currents of several amperes and voltages up to 40 - 50 V. When connecting the mosfet to PWM and an electric motor or other inductive load, a protective diode is needed. When connecting to LEDs or LED lamps, this is not necessary.
- Expansion cards.
FAQ
Main questions
Q: How to download from this fucking site? A: On the main page of the project (where you read this text) at the top right there is a green Clone or download button, click it, there will be a Download ZIP
Q: I downloaded some kind of .zip file, where does it go now? A: This is an archive. You can open it using standard Windows tools, but I think everyone has WinRAR installed on their computer, the archive needs to be right-clicked and extracted.
Q: The computer does not react in any way to connecting the Arduino! A: Perhaps you have a USB charging cable, but you just need a data cable through which you can transfer data
Q: Error! The sketch doesn't compile! A: The path to the sketch should not contain Cyrillic. Put it in the root of the disk.
Q: How much does it cost? A: I don't sell anything.
Suspended ceiling lighting options
The same sources as for suspended ceilings can be used to illuminate suspended structures. Usually these are LED strips. But there may be other options - from neon lighting to pendant lamps.
Kinds
To illuminate a suspended ceiling, the following are most often used:
- neon lamps, which are distinguished by a variety of colors, but are quite expensive and require the installation of sides for attaching lamps;
- duralight is an economical option, the disadvantage of which is the failure of the entire cord if at least one element stops working;
- LED strips are the most versatile type of lighting, suitable for both single-level ceilings and multi-level structures in rooms of any purpose.
The structure can also be illuminated by devices located along the edges of the plasterboard ceiling. It is easier to install such lamps than on a stretched canvas. And with their help they create not only backlighting, but also main lighting.
Installation procedure
The lighting of the suspended ceiling can be done open or hidden. Most often, the second option is chosen, the main stages of which are as follows:
- Lay and connect the wiring. One of the connection methods involves using a cable channel, the second involves laying wires in a corrugated area.
- If a cable channel is used, the wiring is placed inside the structure and attached to the wall.
- When laying in a corrugated cable, the wiring is secured with fastening clips; the cable to each lamp is laid in a separate corrugated tube.
- Make holes for the lamps in accordance with the drawing (such actions are not required for the tape).
- Install and connect lamps or LED strip to power.
Effects
- Static - No blinking. Just plain old static light.
- Blink - Normal blinking. 50% on/off time.
- Breath — Does the “standby-breathing” of well known i-Devices. Fixed Speed.
- Color Wipe - Lights all LEDs after each other up. Then turns them in that order off. Repeat.
- Color Wipe Inverse — Same as Color Wipe, except swaps on/off colors.
- Color Wipe Reverse - Lights all LEDs after each other up. Then turns them in reverse order off. Repeat.
- Color Wipe Reverse Inverse — Same as Color Wipe Reverse, except swaps on/off colors.
- Color Wipe Random - Turns all LEDs after each other to a random color. Then starts over with another color.
- Random Color — Lights all LEDs in one random color up. Then switches them to the next random color.
- Single Dynamic — Lights every LED in a random color. Changes one random LED after the other to a random color.
- Multi Dynamic - Lights every LED in a random color. Changes all LED at the same time to new random colors.
- Rainbow — Cycles all LEDs at once through a rainbow.
- Rainbow Cycle — Cycles a rainbow over the entire string of LEDs.
- Scan — Runs a single pixel back and forth.
- Dual Scan — Runs two pixel back and forth in opposite directions.
- Fade — Fades the LEDs on and (almost) off again.
- Theater Chase - Theater-style crawling lights. Inspired by the Adafruit examples.
- Theater Chase Rainbow — Theater-style crawling lights with rainbow effect. Inspired by the Adafruit examples.
- Running Lights — Running lights effect with smooth sine transition.
- Twinkle — Blink several LEDs on, reset, repeat.
- Twinkle Random — Blink several LEDs in random colors on, reset, repeat.
- Twinkle Fade — Blink several LEDs on, fading out.
- Twinkle Fade Random — Blink several LEDs in random colors on, fading out.
- Sparkle – Blinks one LED at a time.
- Flash Sparkle - Lights all LEDs in the selected color. Flashes single white pixels randomly.
- Hyper Sparkle - Like flash sparkle. With more flash.
- Strobe - Classic Strobe effect.
- Strobe Rainbow - Classic Strobe effect. Cycling through the rainbow.
- Multi Strobe — Strobe effect with different strobe count and pause, controlled by speed setting.
- Blink Rainbow - Classic Blink effect. Cycling through the rainbow.
- Chase White - Color running on white.
- Chase Color - White running on color.
- Chase Random — White running followed by random color.
- Chase Rainbow - White running on rainbow.
- Chase Flash – White flashes running on color.
- Chase Flash Random — White flashes running, followed by random color.
- Chase Rainbow White – Rainbow running on white.
- Chase Blackout – Black running on color.
- Chase Blackout Rainbow – Black running on rainbow.
- Color Sweep Random — Random color introduced alternating from start and end of strip.
- Running Color — Alternating color/white pixels running.
- Running Red Blue — Alternating red/blue pixels running.
- Running Random — Random colored pixels running.
- Larson Scanner - KITT
- Comet — Firing comets from one end.
- Fireworks - Firework sparks.
- Fireworks Random - Random colored firework sparks.
- Merry Christmas — Alternating green/red pixels running.
- Fire Flicker - Fire flickering effect. Like in harsh wind.
- Fire Flicker (soft) — Fire flickering effect. Runs slower/softer.
- Fire Flicker (intense) — Fire flickering effect. More range of colors.
- Circus Combustus — Alternating white/red/black pixels running.
- Halloween — Alternating orange/purple pixels running.
- Bicolor Chase — Two LEDs running on a background color.
- Tricolor Chase — Alternating three color pixels running.
- thru 62. Custom — Up to eight user created custom effects.
Getting ready for the new year: a simple garland on arduino
Where can I buy it?
Addressable LED strip can be easily found in any specialized store. Among the proven options, which are distinguished by low price tags and good quality of the product, we can recommend the online store www.giant4.ru. Addressable LED strips can also be purchased on the well-known AliExpress.com site.
To avoid problems with low-quality products, when purchasing a product on AliExpress, you should carefully study the product and customer reviews.
Sources used:
- https://alexgyver.ru/ws2812_guide/
- https://arduinomaster.ru/datchiki-arduino/adresnaya-svetodiodnaya-lenta/
- https://ledjournal.info/spravochnik/adresnaja-svetodiodnaja-lenta.html