Many people have heard about the benefits of LED lighting. The unique spectral composition close to daylight creates comfort even in the most inclement weather. Durability and efficiency make this solution even more cost-effective than conventional incandescent lamps. The variety of shapes and types of LED lamps allows you to create a unique interior.
But we already know all this. The LED strip has been purchased and it’s time for installation. And here a natural question arises: how to attach it to a wall or piece of furniture. The back of the LED strip is covered with double-sided tape, but will it be able to hold the entire structure on the plaster?
Sellers of LED equipment offer us an impressive range of various profiles (boxes) to solve such a difficult problem. Types of profiles are divided according to installation method:
- corner;
- mortise;
- invoices.
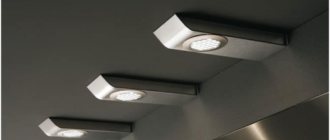
Corner profile
A corner box is necessary if the LED strip needs to be fixed in the corner of two perpendicular surfaces. This could be the junction of the wall and ceiling or the lighting of furniture.
Mortise profile
This type of profile is appreciated by gourmets of design solutions. It allows you to deepen the LED strip, creating an original and unique look.
Overlay profile
This is a classic solution for installing LED strips around the perimeter of a room or for creating local lighting.
Everything seems to be clear, except for one small detail... The price of an aluminum profile for an LED strip is several times higher than the LED strip itself. The question arises about the economic feasibility of LED lighting. Well, I’m not ready to pay $150 for a set of profiles for one room.
Installation of corner profile
Mounting such an element on self-tapping screws is not so easy, so it is much easier to use double-sided tape.
First, degrease the substrate with solvent or alcohol.
Then apply tape to both edges and cut off the excess.
Now degrease the surface itself. To do this, lightly spray it with water or “Mr. Muscle”.
Why is this being done? In most cases, the corner profile is mounted unevenly to two planes. And initially, setting it straight is very problematic.
And if you lightly spray the surface with water, the tape will not stick immediately and will give you time to adjust everything as needed.
For more reliable fastening, it is recommended to use polyurethane glue along with tape. All that remains is to stick the tape inside, insert the lens and close everything with plugs.
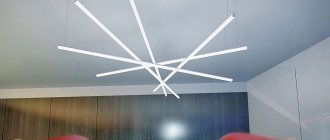
LED strips in the interior
As a rule, LED strips are used in the interior, in auto mechanics, instead of the main lighting in offices and factories. You can highlight furniture elements, a plasterboard box (special, now fashionable protrusions formed as decoration under the ceiling), a mirror with a simple pattern, etc. The backlight can be mounted in many different ways, emphasizing its aesthetics. Very often, LED is used to illuminate the ceiling. Lighting the ceiling with an LED strip creates a mesmerizing effect, giving the interior and all decorative items the necessary high cost. In many cases, your guests will not even understand where exactly the pure and diffused light is coming from.
Places of application
The use of profiles allows you to fully equip a room with LED lighting both outside and inside. In this case, the replacement of previous light sources will be absolutely complete. The profile will protect lighting elements from the effects of various unfavorable factors and will perfectly complement any design thanks to variable mounting methods.
For main lighting
Places of application:
- apartments, houses, offices;
- entrances, street areas;
- industrial premises.
For decorative lighting
The compact, fairly flexible and almost inconspicuous profile allows you to develop your design imagination. The decorative and at the same time practically significant role of LED lighting is suitable for a variety of places:
- on roads and sidewalks;
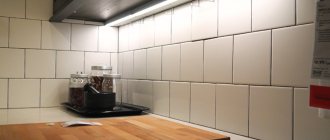
- locally in kitchens for dining tables, cabinets, sinks, hoods;
- inside chests of drawers, bookcases, sideboards;
- for illuminating paintings, vases, shelves, paintings and other interior items;
- in the bathroom, bathhouse, sauna, swimming pool;
- for ceilings and floors (recessed lighting);
- in the windows of jewelry stores.
Kinds
Profiles are divided into 3 types:
overhead - those that are placed on top of the surface or suspended from it
corner - placed in the corner of a cabinet or ceiling and usually shines at an angle of 45 degrees to the surface
mortise - have protrusions on the sides that cover irregularities and chips along the edges of the groove, where they are inserted
The groove is specially created on the surface, and the profile, after immersion in it, is obtained at the same level with this very surface.
Since the main function of the LED profile is heat removal, a very important parameter that you should pay attention to is its surface area. Keep in mind that heat is dissipated not only from the bottom substrate, but also from the side edges.
Keep in mind that heat is dissipated not only from the bottom substrate, but also from the side edges.
The higher they are, the better. Therefore, when installing, be sure to maintain free air access to each side.
For example, when installing an overlay profile, at least one surface (bottom) is already insulated. Therefore, it is necessary to make special spacers on it.
These can be plastic or metal elements. It is best to use factory mounting clips for this.
The main thing is to ensure air passage under the substrate.
It is advisable to maintain the distance from the wall to the bottom surface at least 3 mm.
There are also profiles that come complete with a removable base. In them, the base is first attached to the surface, and the profile itself is inserted into it. The necessary gap is provided between them.
The rules for creating gaps also apply to the sides. They cannot be mounted, as they say, end-to-end with another surface.
In addition to better cooling, high sides have another advantage. Thanks to them, special connectors for connecting pieces of tape can be easily placed inside.
If the sides are low, you will have to remove the top closing cover from the connector. And insert the connector itself from the side, after grinding it down a little with a file.
Based on the above, it is best to use overhead profiles. In any case, other types will be closed from air on either side.
As soon as the mortise profile is inserted into the groove, three sides are immediately insulated. Only the area of the upper protruding side remains, and this will clearly not be enough.
It is recommended to choose models in which this area will be as wide as possible. Firstly, better cooling, and secondly, you don’t need to cut a groove in the furniture with millimeter precision. Make a mistake and the profile will simply fall through there.
In fact, mortise views perform only one function - decorative. For powerful LED strips, if there are no voids or gaps, it is better not to use them, maximum for strips up to 9.6 W/meter.
The same applies to corner models. When you put them in a corner, you immediately isolate it on both sides.
Therefore, it is not advisable to use such profiles specifically as a heat sink when working with bright and powerful LED strips SMD 5050, 5630, 5730.
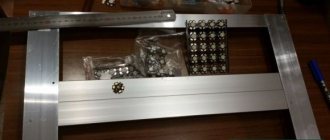
Several types of aluminum profiles from Klus, their components and sizes:
LED difference
The LED itself consists of a housing in which emitting crystal chips are placed. The whole thing is filled with compound on top. The chips in cheap and expensive tapes are different.
What are the differences?
in size
In inexpensive tapes, they are smaller in size and, accordingly, produce a lower luminous flux.
conductive thread material
For high-quality ribbons they are gold. In standard versions they are made of alloys. Over time, under the influence of a phosphor or compound, the alloy threads are destroyed. Therefore, the service life of the LED itself is shorter.
quality of phosphor filling
For the elite class, it has less impact on the chips themselves and their contact does not affect the service life of the LED.
difference in chips
The so-called binning. This is when neighboring LEDs, due to different crystals, can shine with different fluxes and shades.
How can you see all this clearly in the store? Unfortunately, this cannot be done visually without applying voltage. But by turning on the tapes in parallel, one next to the other, you can see the difference.
The premium LED will appear to be slightly larger. Actually this is not true. Both may have SMD3528, but the high-quality version will simply have a larger chip. Because of this, this impression is created.
But it’s best to look not at the LEDs themselves, but at the surface illuminated by them. LEDs from different companies may have different scattering angles (according to the standard it should be 120 degrees). A chip with a smaller angle (90-100 degrees) will visually seem much brighter to you, although in fact this will not be the case.
Do-it-yourself profile for LED strip - can it be made and how?
Due to the availability of LED strips, their good technical characteristics in terms of energy saving, as well as the possibility of creating an individual style using them, the issue of making a profile for their installation is quite relevant for many users. The main conditions for successfully making a profile with your own hands are: availability of free time, the ability to think creatively, and the ability to work with hand tools.
To make a profile yourself, basic skills in working with hand tools are sufficient.
Firstly, for the manufacture of a profile that serves as the basis for the subsequent installation of LED strips, electrical cable channels, which are widely represented on the electrical products market, can be used. In this case, the cable channel is mounted as when laying electrical and low-current wires, and the LED strip is placed in its internal space. In this case, there is no need to install the cable channel cover, and you can use decorative film as a diffuser or do without it altogether. Another option is to use an electrical or decorative baseboard, equipped with a channel for laying wires and cables.
Using plastic frames for steps for mounting LED light sources
The installation of such elements is carried out in accordance with their intended purpose, and the LED strip is laid in the internal space of the channel existing on the baseboard.
With a detachable design of the product, the removable part is removed, and the diffuser, as in the case of using an electrical cable channel, can be a decorative film or other transparent material fixed to the surface of the baseboard. In the case of using one-piece products, it is necessary to make a cut on the outer surface of the plinth, thereby ensuring the penetration of light emitted by the source into the interior space of the room, as well as ensuring the removal of heat generated by the LEDs during operation.
Using a construction plastic profile for mounting LED strip
When it is necessary to illuminate the steps of a staircase or other building structures on which special elements that have voids (slots, cracks, etc.) must be installed, then LED strips can also be installed in these places. In this case, it may be necessary to expand the existing voids, after which they can be used as profiles for mounting lighting and decorative elements. When illuminating the corners of building structures or pieces of furniture and interior design, plastic or aluminum building profiles, which are used for finishing work, can be used to mount the LED strip. In this case, they are mounted in the place of intended placement using fastening elements suitable for these purposes. An LED strip is used that has an adhesive base, with which it is attached to the building profile used.
Thanks to the adhesive base, the LED strip can be attached directly to the surface of building structures and decorative elements
Related article:
Advantages of using boxes
Installing an LED strip in a box has the following advantages:
- the lamp is protected from all unwanted influences;
- ensures removal of excess heat;
- the appearance of the lighting is more neat and attractive, allowing the strip to fit harmoniously into the interior;
- connection security is ensured;
- it becomes possible to increase the service life of the tape;
- The installation of such a box is simple and can be done by hand.
Important! Justice requires naming the shortcomings. Among them is the need for certain labor costs when installing the box, especially on the cornices of ceiling structures. It is not very convenient to work; it is necessary to follow the sequence of actions so that as a result there are no wires or protruding ends of the tape on the surface.
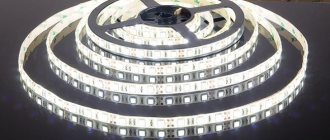
Types of LED strips
LED strips come in several types:
monochrome or monochrome
colored or RGB=Red-Green-Blue (red-blue-green)
You can distinguish one-color from RGB by the number of soldered wires. There are only two of them on monochrome, and four on color.
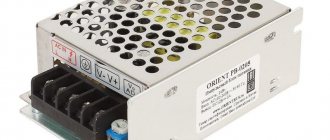
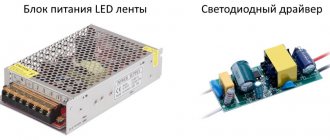
At the same time, to connect a single-color strip, you only need a power supply, and for an RGB strip, a controller is also required.
open
protected from moisture
They are also divided according to the size of the LEDs and the method of their application. The most common are:
SMD3528
SMD5050
Less popular:
SMD2835
SMD5630 (5730)
What is SMD and how does it stand for? SMD from English Surface Mounted Device - surface mount device. That is, the LED is soldered to the substrate on top.
The numbers after SMD indicate the size of the LED in millimeters - its length and width.
Nuances
Familiarize yourself with some of the nuances to avoid any difficulties.
- Before starting installation, calculate the entire cost of the work if you plan to invite specialists to carry out the work. This way you can be sure that the savings will be significant if you do everything yourself.
- After the protective layer is removed, gluing should be done quickly. Do not forget that before this you need to completely prepare the surface so that it is clean and without any defects.
- When cutting profile pieces, this must be done in specially marked places.
- When you connect the power supply, pay attention to the correct polarity. If you use a connector, then it has all the necessary symbols.
It doesn't matter which installation option you choose, as long as you follow the sequence. With the right approach, you will get gorgeous lighting under the ceiling covering
Installation of the overlay profile
Fastening is carried out in three ways:
on double-sided tape
on screws or dowels
on glue
Use a tape measure to measure the distance at the fastening site.
Then use a hacksaw to cut off the required length of the profile.
At the base, drill several holes with a diameter of 3 mm for 3.5 mm screws.
Some types of plugs already have holes for fasteners. Therefore, before drilling the edges, check what kind of plugs you have.
The pitch between the holes is 100-200mm. Do not forget to countersink each hole under the screw head, otherwise the tape in these places will peel off.
Using screws, mount the base backing in place of the backlight.
Measure the required length of the LED strip according to the length of the substrate and cut according to the cutting marks.
Remove the protective layer of double-sided tape and glue the tape. Install the diffuser and plug.
After that, all that remains is to insert the profile into the base already fixed to the surface and connect the power wires to the block.
Stubs
End caps can be installed on each side of the profile. They also serve as a decorative element to give the lighting a finished look.
The plugs have holes for the wires to come out. If you want no wires to be visible on the mounted backlight, you can file the profile from the end and secretly bring out the power from the back side.
It turns out that using 4 components - a tape, a profile, a diffuser and plugs, you can independently assemble your own lamp of any size. It can be used on the ceiling, hung in the middle of the room on special hangers like factory models.
Only straight profiles are commercially available. If you need to make semicircular lighting on any arch or round ceiling, then there are two options:
- independently bend to the desired radius
- use low-power LED strip P=9.6 W/m max without profile
Three main types of profiles
From a design point of view, the LED profile is an aluminum guide containing a screen. Diffusers are available in transparent or matte finishes. The profile design must cope with the following difficult tasks:
- effectively remove heat, thereby positively influencing the shelf life of the LED strip;
- protect the light source and accompanying wiring from mechanical influences;
- distribute the light flux equally (this becomes possible thanks to the diffuser);
- be a housing thanks to which LED elements can be easily mounted and dismantled on a wall, ceiling, furniture, etc.
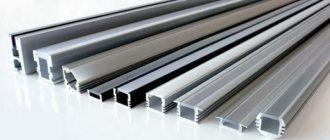
The most common material from which profiles are made is aluminum. For an aluminum profile, installation is the simplest, since the metal is not only light, but also quite durable, although it has malleable properties when assembling the profile.
Aluminum LED profiles come in a wide variety of shapes and types:
- aluminum box for LED lighting;
- flexible aluminum profile;
- overlay profile used for LED strip.
Metal profiles are made not only from aluminum, there is also a brass profile and copper structures. Also, plastic is used to make profiles; polycarbonate profiles are widely used. The LED profile, which is made from this material, is often either overhead or corner.
The aluminum profile for the LED strip is a flexible, lightweight and elastic design with very high thermal conductivity parameters. The aluminum profile for LED lighting will not darken and will cope with the task perfectly.
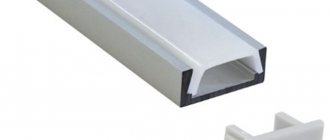
Overlay profile
The overlay profile for the LED strip is made in the “U” shape, has the widest applications, and is attached to the bases with screws (more often, self-tapping screws are used). The depth of the profile strip corresponds to the width of the existing LED strip. When installing the overlay profile, the diffusers are inserted into the groove, snapping tightly along the entire strip. Most often, this type of structure is made of metal. The overlay aluminum profile for LED strips is quite expensive, but is very resistant to oxidation, easy to clean and looks extremely aesthetically pleasing.
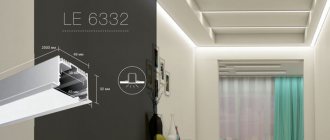
Corner profile
Profiles for LED strips, including those used for ceiling lighting (the joint between the wall and the ceiling is used to attach such corner strips), have a wide variety of shapes, but corner profiles are most often used.
The corner aluminum profile for the LED strip is designed in such a way that the profile panels are located at an angle of 90 degrees to each other. Along the edges of the slats there is a groove for diffusers. Inside the profile, at an angle of 45 degrees, there is a small shelf designed for gluing the LED strip to the wall. Thus, during operation of the tape, the light does not come out in all directions, but at an angle of 45 degrees, which creates uniform lighting throughout the room. A large number of LED lamps (especially models created for stretch ceilings) and lamps are produced specifically on the bases of corner profiles. They are great for lighting a retail space or display case. Such lamps do not take up space, do not blind potential clients, and do not create clear, contour shadows.
Embedded profile
Built-in (also called mortise) profiles are designed to install LED strips in special niches. It, like the invoice, has a “U” shape - like, it has an edge along its entire length. The LEDs are placed on the shelf of the product itself, while it is hidden and has a diffuser on it. The light comes from the panel at an angle of 90 degrees, the tape is attached to the base of the profile using screws or strong industrial adhesive. To make the profile look aesthetically pleasing, special caps are placed on its edges. Built-in profiles are widely used in kitchen furniture, wardrobes and other places where it is customary to save every millimeter.
Dimensions
The aluminum box designed to hold the LED strip can have different sizes. There are both wide and narrow designs with different structures.
The size of the aluminum profile is adjusted to the dimensional parameters of the light source itself. Thus, LED strips are produced with a width from 8 to 13 mm, a thickness from 2.2 to 5.5 m. The length can be 5 meters. If it comes to side glow tapes, then the parameters will be slightly different. The width will be 6.6 mm and the height will be 12.7 mm. Therefore, the average size reaches about 2 or 3 meters. However, the most common profiles are with a length of 1.5 to 5.5 m. The width of the boxes varies between 10-100 mm, and the thickness - 5-50 mm.
On sale you can find a variety of aluminum boxes with different dimensional values. For example, designs with parameters 35x35 or 60x60 are often found. The dimensions can be completely different - different manufacturers produce a variety of aluminum structures.
Kinds
The profile for the diode strip is most common in the following configurations:
- Band;
- Corner profile;
- Overlay profile;
- Built-in (mortise).
Aluminum strip
An aluminum strip profile for ice tape, as the simplest and cheapest option, is used only to improve cooling and ease of mounting a flexible light source. It does not have protective functions, but is convenient for mounting on curved surfaces. The overhead strip takes up virtually no space.
Corner aluminum profile
As the name suggests, the lamp is designed in the form of an angle, the side walls of which are located at an angle of 90 degrees. relative to each other. Inside there is a shelf for attaching the tape, and on the side walls there are grooves into which the diffuser is installed.
Corner design
This type of profile is intended for installation instead of a plinth at the joints of walls and ceilings, between furniture shelves. The corner format is most widely used when it is necessary to decorate a suspended ceiling with lighting, since a straight strip is attached to the wall surface through one of the sidewalls.
Overlay profile
The overhead element has a U-shape and is widely used. Designs are available with different heights of side walls. The smallest one is a few millimeters and is not much higher than the height of the strip profile, but at the same time it has protective glass.
Surface mounted lamp
Important! Even a small height does not allow bending, since the resulting deformation will not allow the scattering screen to be fixed. The overhead profile for lighting allows for mounting on any flat surface:
The overhead profile for lighting allows for mounting on any flat surface:
- Drywall;
- MDF;
- Kitchen apron made of any material.
The disadvantage of such lighting is that it is not always possible to hide the step that forms between the lamp and the surface.
Built-in or mortise aluminum profile
The mortise design is designed for installation in specially made grooves. Structurally, this profile differs from the overhead profile by specially designed edges that hide the junction of the lighting element and the surface.
Recessed lamp
Visually, the overlay profile for the tape looks much more aesthetically pleasing than the overlay, but requires special additional work at the stage of furniture design. An additional effect from the use of recessed lighting elements is space saving, since in this case the external glass diffuser practically does not protrude above the surface.
Diffuser
The matte lamp diffuser performs several functions:
- Protection of internal elements from moisture and dust;
- Uniform distribution of light from light-emitting elements located far apart from each other.
The material used for manufacturing is glass or transparent plastic. Special tempered glass is used, since ordinary glass is quite fragile. It is used in designs with high-power LEDs, since glass is not exposed to elevated temperatures. The most commonly used is transparent polycarbonate. Its positive qualities are:
- Resistance to ultraviolet lighting (does not change characteristics in the sun);
- Temperature resistance;
- High strength;
- Durability;
- Resistance to chemical reagents.
Stubs
To visually hide the end of the profile, special plugs are produced for each standard size. The plugs have slots with latches into which the bottom and walls of the profile fit, so the use of glue is not necessary.
Diffuser
Special polycarbonate diffusers can be selected for all profiles. Polycarbonate has high mechanical strength and is not subject to destruction from ultraviolet radiation.
The glow angle of the LED strip is 120 degrees and it simply illuminates the space in front of it without any screens. At the same time, with low-power diodes you can visually observe pronounced points of glow, and sometimes dark spaces between them.
Here is a clear difference in the luminous flux with and without a diffuser:
To increase the area of the illuminated space and smooth out dark stripes, a diffuser is used. In addition, it also performs a protective function against accidental damage from foreign objects and splashes.
Diffusers are:
- transparent
- matte or milky - they transmit 60% of light
- semi-matte – throughput 70-75%
- internal - inserted into the groove
- external - put on over the sides
Why do you need a profile for LED strip?
The popularity of these light sources is explained by their compactness, economical energy consumption, durability and other well-known advantages. However, practical application for ordinary users and professionals is associated with certain difficulties:
- it is difficult to handle miniature products during installation;
- there is no protection from splashes or other adverse external influences;
- in the basic version, heat removal is not efficient enough;
- individual emitters are visible, an uneven light flux is formed.
The minimum cost of such a solution is the only advantage.
A typical tape glued to a wooden surface overheats. It is not protected from the outside, so it is easily damaged by careless action when cleaning the room. Poor aesthetic characteristics limit the scope of application to areas hidden from direct view. The listed disadvantages are eliminated using a specialized profile for LED strip.
Even when carefully examined at close range, such products look flawless
Official operating warranties for typical LED strips range from several months to 3 years or more. However, the metal profile is capable of performing the functions of a radiator. This design reduces the rate of degradation of the semiconductor emitter and significantly increases the service life.
Main types of profiles for lighting
Based on the material they are made of, profiles are divided into aluminum and plastic. Plastic boxes contain polycarbonate. The advantage of this material is its elasticity, which allows you to make rounded frames. Other advantages of plastic profiles:
- low cost;
- ease of installation;
- elasticity;
- the ability to choose a transparent or plastic case;
- different texture (surface, color).
Metal profiles are made only from aluminum. They come in different lengths - 1150, 2000, 2500 mm. The advantage of the material is the removal of heat from the lighting source, in this case diodes.
Appearance of LED strips SMD 3528 and SMD 5050
LEDs such as SMD 3528 and their analogues do not require a heat sink. SMD 5050 samples must be installed on surfaces with low thermal conductivity.
Aluminum boxes are most often used to decorate lighting in the kitchen, in public places and on steps. To seal the case, use a special tape if it is mounted outdoors or in rooms with high humidity levels.
Products are divided into several types and according to installation method.
Corner
Using an LED strip using an aluminum corner profile
This type is used for installing LED strips in the corners of building structures, cabinets or, for example, commercial equipment. With their help, it is possible to effectively hide all the unevenness of the joints.
This option is preferable if you need to provide lighting at an angle. Diode light sources themselves emit light that is irritating to the eye, so you must additionally install a diffuser (almost always included in the kit).
Built-in or mortise
Appearance and example of using a mortise profile
The main difference between the built-in type is the presence of special protrusions that hide uneven edges of the material at the installation site. There are two installation methods:
- A groove is made in the material, and the profile itself is inserted into its cavity.
- Installed in places where the material changes. Example: a line connecting a slab and drywall, plastic panels of different colors. The hidden structure is beyond the reach of the human eye; it sees only a light stripe.
The second method is more common, since modern room design involves the use of different materials and textures, which can be combined thanks to LED strips.
Invoices
Overlay profile
These models are considered one of the most popular and popular products. They can be installed on any flat surface. They are attached to it using high-quality double-sided tape, screws and glue.
As a rule, the kit includes not only a profile, but also a special cover made of plastic. Matte or transparent polycarbonate serves as a diffuser. The type of cover will depend on the purpose of the lighting. Matte profiles are used for decorative purposes, while transparent ones are used for lighting. The end side is closed with a plug.
The bodies have different geometric shapes - circle, cone, square, rectangle.
General recommendations
Let's look at some useful tips for fixing the products in question.
- The aluminum frame must be fastened as firmly as possible. The reliability of the installed part will depend on the quality of fastening.
- Choose profiles that will fit harmoniously into the interior. If necessary, they can be repainted in black, white, blue, silver and any other harmonious color.
- Don't forget to install the end caps. Please check before purchasing if they are included with the box.
- Linear lamps will be an excellent solution for interior design in a modern style. If you don’t know what kind of lighting to choose for such situations, you should take a closer look at beautifully designed LED strips.