LED chandeliers are becoming more and more popular. Such devices last longer, and due to their low power they are much more economical to use. The main disadvantage is the high price of ready-made models. But you can assemble the lighting device yourself, using LED strip and various types of available materials as a basis. In this article we will show photos of interesting homemade options, and also tell you how to make such lamps yourself.
Is it possible to make an LED chandelier with your own hands?
LED strips and panels of varying brightness and colors are available for sale. Using them, you can assemble homemade lamps. But you will need knowledge of basic electrical engineering and some construction skills (soldering and others, depending on the materials chosen).
The shape of a LED strip chandelier can be:
- square or rectangular;
- round;
- more complex - for example, in the form of a structure made of slats, pipes, etc.
For the latter case, a flexible LED strip, which is glued to the base, is more suitable. The sticky layer is already applied on the back side; you just need to remove the protective film and press the strip to a clean surface.
For round devices, it is convenient to take a ready-made panel of the same shape. LEDs are attached to the base; often each has a miniature lens that magnifies the outgoing rays.
For a rectangular case, a ready-made module is also used. You can take the tape, cut it to size and place it in several rows or in a more complex pattern. A translucent plate that scatters light (made of frosted plexiglass or other similar material) is placed on top. Then the flow becomes uniform.
And for square models, you can take an LED module from an Armstrong cassette ceiling.
Peculiarities! Some panels have a built-in ability to change the brightness and temperature of the lighting. It is convenient to connect the systems to the remote control, then control is available from anywhere.
LED lighting for aquarium
There are many options for LED lamps that are installed to illuminate an aquarium. Let's consider the process of making a simple model. The following materials will be useful to you:
- Diode tape.
- A flask or other container to ensure the tape is waterproof.
- Power supply and connectors for it.
- Soldering iron, silicone, awl, knife.
It is necessary to remove the back part from the connector for connecting to the power supply and strip the wires. These wires need to be prepared for the soldering process with the contacts of the diode strip.
The wires are placed in a glass flask with a stopper. To do this, a hole is pierced in the bulb plug with an awl, through which the connector wires are passed and sealed there with the contacts of the tape. Next, the puncture in the cork is sealed with a silicone compound.
The coating covering the adhesive layer is removed from the tape and the tape itself is glued to the wall of the flask. After this, the flask is tightly closed and additionally sealed with silicone on both sides. All you have to do is connect the finished lamp to the power supply, and then place it in the aquarium.
What materials are suitable for the chandelier body
Standard strips heat up during operation, although significantly less than incandescent lamps. Therefore, the base is assembled from materials that remove heat. These are metals in the form of plates, pipes, “corners”, old cases, etc.
Ready-made LED modules (for example, OPPLE brand) have a built-in cooling system. Such panels are safe to use even with wood, fabric or paper. With these materials, the ice chandelier turns out to be more comfortable and homely; technological notes, which are not appropriate in every interior, disappear.
Making small spotlights
When making such a lamp, you need to take into account that the light emanating from the LED blinds a person. It is best to hide such light sources in niches or behind ceiling plinths. Only frosted glass is suitable for creating a lamp
It is important to choose a suitable housing to which the LEDs will be attached. For this purpose, you can use an old fluorescent lamp or an unnecessary incandescent lamp
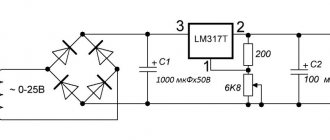
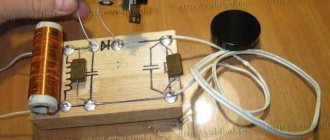
Remote control
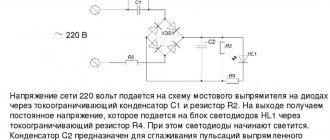
For operation, capacitors marked 400 nF and 10 μF are required, the first is used to control the current strength, and the second so that the light from the lamp does not blink, but is uniform. You will also need a resistor operating with a resistance of 100 ohms, which will protect the system from possible voltage surges. We use an old light bulb as a base.
It must be carefully disassembled without damaging the base. Carefully clean and degrease the surface
Next, capacitors and a resistor are placed in the base. After which you can solder the rectifier, this must also be done very carefully. Assembly adhesive is well suited for insulation; it will fill the space of the base and securely fasten all the parts of the lamp.
General connection diagram
At the next stage of work, you need to solder the board to the capacitor. We must try to ensure that the boards are evenly spaced, this will ensure uniform lighting in all directions. Next, insulation is carried out again using mounting adhesive. Then a resistor (100 Ohm) and a capacitor are soldered to any board and everything is also insulated with glue. The resulting light source can be inserted into a chandelier - it will turn out very beautiful.
Ideas for inspiration
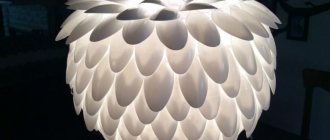
Interesting ceiling lamps are made from wood - for example, assembled from rough, untreated beams. They also use plywood, in which various patterns and images can be cut out, slats assembled into structures of various shapes, etc.
A variety of options is provided by the use of paper, white or colored. Simple shapes look good - a sphere, a cylinder. A more sophisticated option is to assemble the body of a diode chandelier using origami (kusudama ball, structures of connected flowers, buds, etc.).
The lampshade is also made from wooden hoops covered with fabric. The material is selected for the interior. Remnants from curtains will also work. A more original idea is to use feathers, arranged in the shape of a sphere.
The body is often assembled from metal tubes or corners. They are easy to connect into square or rectangular structures. They also use other available materials. The main thing is that they match the style of the interior.
Types of garlands
You definitely won’t encounter a paucity of choice in this matter; there are very, very many varieties of garlands and lighting structures that can be used to illuminate curtains. Let's list some of them.
An additional light source that consumes minimal electricity visually enlarges the room.
- universal linear garland (lamps arranged in series on a long wire)
- curtain garland (long wires not connected to each other)
- fringe garland (branches of different lengths from the main wire)
- mesh (looks almost like a fishing net, only with small lamps)
- duralight (flexible cord with LEDs, especially suitable if you need to give the light picture a certain shape)
Cozy and comfortable rooms in small spaces will become much more spacious and brighter thanks to LED lighting.
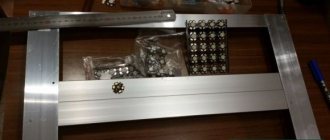
How to make a simple LED chandelier from LED strip
Let's consider an easy-to-use option - a square-shaped outline. Dimensions are selected according to the size of the room. This chandelier can be used not only as illumination, but also as main lighting.
For assembly you will need:
- ice strip running on 12 volts (preferably with LEDs arranged in 2 rows - it will be brighter);
- power supply for connecting to the network;
- U-shaped aluminum profile with plastic cover;
- pieces of PCB (for example, from unnecessary boards);
- short screws;
- pencil;
- screwdriver;
- soldering iron
First, the frame is assembled. The profile is divided according to the size of the side of the square (you will need 4 identical parts), the ends are filed at 45°. Cut out the textolite with the letter “G”. The thickness should be such that the pieces fit into the corners of the frame. The squares are assembled with screws.
The diode strip is cut to size. Remove the protective layer and glue it inside the body. Solder the wires or use special connectors for connection. For a square design, corner ones will be required.
Important! Only tin is suitable as solder. Acids attack conductors and can cause short circuits.
The ends are pulled out and connected to an adapter that converts 220V AC to 12V DC. The power supply is usually hidden in a niche, above a cabinet, or in another inconspicuous place. The length of the wire is selected taking into account the distance from this point to the lamp.
The plastic cover is trimmed at an angle of 45°. Insert into frame. The chandelier is ready.
Lightweight and elegant cardboard lampshade
For a paper lampshade, paper or thin cardboard is suitable. Such a lampshade can be either rectangular or square. First you need to think about the size of the lampshade; the larger the room, the wider the structure can be.
- You need to make two circles of wire of the required diameter. They are connected to each other using a fishing line, the distance between the lower and upper frames is 12 - 15 cm, the hoops are fastened with fishing line in three or four places. The larger the diameter of the base, the more connecting elements need to be made.
- On a piece of paper you can draw circles of different diameters and figures of cartoon characters. Outline drawings can be taken from the Internet and printed, then redrawn using carbon paper.
- A special ruler is suitable for drawing circles, or you can outline lids or buttons of different diameters. Some designs are cut out completely with a stationery knife, others are cut along the contour.
- The paper is tried on the base and glued with an overlap. Then glued to the wire; it can also be secured with thin wire.
- To do this, first make a hole in the paper with a thick needle or awl, then thread the wire and carefully tie it to the frame. It is advisable to glue thin paper, as it can easily be damaged.
A selection of photos and videos of master classes
Ceiling lamps made from LED strip are a beautiful and economical solution that is appropriate in any interior. When assembling it yourself, the design turns out to be even more original, and the initial costs are also reduced.
Ceiling chandelier
LED lamp
Features and stages of installation work
To create an unusual lamp from a diode strip, a variety of objects are suitable - from a standard incandescent lamp base to the body of a fluorescent light source.
Such procedures are accompanied by numerous requirements, the main of which are:
- When connecting a homemade device, you need to use multi-core wiring. One end is equipped with a tip with a cross section of 0.75 mm and is connected to the controller, and the other is soldered to the ends of the LED board. To increase fixation, heat shrink tubing should be used.
- If the device is mounted on suspended ceilings, it is advisable to use self-adhesive tape. Before gluing, first clean and degrease the surface of the ceiling, allowing it to dry thoroughly. The protective film on the back of the flexible board must be removed immediately before installation. The slightest dirt or dust deposited on the adhesive layer will lead to poor adhesion. The presence of moisture also has a negative effect on adhesion. If the tape is installed in a room with high humidity, then ventilation must be provided. Outdoors, such actions should be performed exclusively in dry weather.
- If the distance is more than 7 m between the power supply and the homemade tape, you need to increase the cross-section of the wire.
The adapter is connected in compliance with the polarity and terminals:
- for single-color tapes, the technology is as simple as possible - “plus” is soldered to “plus”, and “minus” to “minus”;
- Multi-colored tapes have their own markings - V+ (voltage), R, G, B to switch colors (to the controller).
Additionally, multi-colored LED boards are equipped with dimmers designed to change the brightness and change the color of the glow. They come with a remote control. Low-voltage equipment for 12 or 24 V is an ideal solution for a home or apartment, high-voltage flexible boards are for organizing street lighting.
By following a number of technical recommendations and safety rules, you can easily create unusual lighting for interior items, an aquarium, a swimming pool, a ceiling, etc. The cost of lamps made using this principle with your own hands is much lower than factory LED devices.
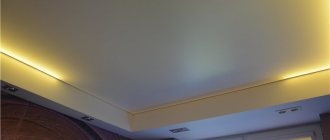
LED strip for ceiling lighting is a popular type of lighting in an apartment, with which you can add a spirit of comfort and romanticism to a room. Instructions and photographs of the process will help you install the tape yourself.
LED strip is most suitable for suspended and plasterboard ceilings.
How to attach to the ceiling: installation
During installation, use the following tools:
- Terminal blocks.
- Pliers.
- Construction knife.
- Screwdriver.
- Cable with sufficient length.
- Distribution boxes.
- Drill.
Installation of LED lamps: connection diagram
Any number of built-in lamps with lamps requires the use of non-flammable cable VVG ng 2*1.5. Let's say option 3*1.5. Wiring with grounding requires the use of a three-wire wire.
When using diagrams, it is important to remember what goes with what.
Essential tool for networking
Junction boxes, wires and corrugations are the main devices that are used during installation in such situations. The location and configuration of each lamp is thought out at the design stage.
Wire selection
As a standard, it is recommended to choose exclusively copper products for all sections. It is better to solder and insulate the products if there are twists on them initially
It is important to connect a separate flexible wire to each of the lamps. Copper sleeves or a special “terminal block” help connect the elements together. In the latter case, tape is then used for insulation
In the latter case, tape is then used for insulation.
Marking and laying cables
At this stage, you also need to perform several actions.
Planning a common space.
Ceilings on several levels require the allocation of lighting along separate contours. For each of them, control is organized by a separate 220 V switch. It is necessary to accurately work out the wiring diagram in advance.
Pulling cables and securing them.
For fastening it is recommended to choose metal profiles. The design increases reliability thanks to plastic ties. Special loops are formed at the places where the light points are attached. They are easy to hook and reach through the holes in the ceiling. A slight sagging of such components is quite acceptable.
After installing the ceiling surface, the fastening scheme should take on its final form. It is better to place lamps in the center of the panels when it comes to aluminum and plastic. A drill and a special attachment called a “crown” will help create suitable holes.
Main conclusions
You can make a lamp yourself using improvised means and inexpensive radio products. Also, this will require direct LED elements - lamps or strips. They can be both low-power and strong. When choosing a material for the body, you need to proceed from the parameters of their heat transfer. To connect such a device to a network without a power supply, you will need to make a driver with a quenching capacitor, having previously calculated it using the formula.
Using the proposed technology, it is possible to produce lamps of any shape and parameters for installation as the main or decorative source of lighting. You can mount them with your own hands on the ceiling and walls in lampshades, chandeliers and table lamps, as well as in any other specially made artistic design.
Previous LEDs Formula and example of calculating the limiting resistor for an LED Next LEDsDetails about the characteristics of LED lamps
Benefits of remote control
Advantages of a remote control for controlling room lighting in an apartment or house:
- the design of lighting fixtures allows you to install remote-controlled lamps in a room with any stylistic design;
- By connecting via Wi-Fi and smartphone software, control can be performed from a mobile device, which opens up additional possibilities;
- there are additional functions - changing the color and brightness of the lighting, turning on music, setting a timer;
- the intensity of the luminaires can vary for the entire system or its individual parts or lighting lines;
- electricity is saved by turning on only when necessary;
- turning on the light is not accompanied by clicks or other sounds, and can be done from anywhere in the room, which is especially convenient for families with small children, people with disabilities and other residents with special needs.
What will you need?
Due to its high flexibility, a lighting device based on LED strip can have a wide variety of formats. However, the basic principles of manufacturing such a lamp remain unchanged, therefore, in addition to the diode strip itself, it is expected to prepare materials and basic tools, presented:
- screws;
- aluminum corner 10x10 mm;
- small-sized switch;
- electric drill;
- marker;
- ruler;
- electric jigsaw;
- pliers.
If necessary, the aluminum corner can be replaced with a standard plastic electrical box. The functionality and quality characteristics of the manufactured lighting device, in this case, will not be affected.