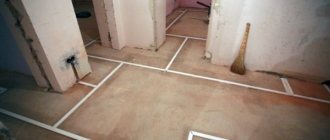
Today, several methods are used to create electrical wiring. It can pass through special shafts in the thickness of the wall. To do this, you have to trench the walls, which significantly complicates the repair work. Many property owners install electrical cables in an open way. In this case, the wires run along the surface of the base.
One option for installing open wiring is to lay the cable in the baseboard. This method allows you not to disturb the harmonious appearance of the interior. At the same time, it is possible to connect not only electrical, but also other types of communications (Internet, television) to all consumers.
general characteristics
Laying the cable in the baseboard (photo below) is easy and quick to install. When installing electrical communications, the owners of an apartment or house do not always decide to carry out major repairs. In some cases, keeping the existing finish in its original form remains a priority. It is in this case that property owners choose to install the wire in an open way. In this case, using a special plinth is a good solution.
Wall chipping significantly increases the cost of repair work. For example, the cost of creating a linear meter of a groove for electrical communications ranges from 100 to 200 rubles. At the same time, a lot of dust and construction waste is generated in the room. This procedure is carried out only during major repairs.
It should also be noted that not all premises are allowed to run the cable in a hidden way. For example, if the house is very old or it is built of wood, it is recommended to install communications in an open way. The cost of the plinth is only about 80 kopecks. per bar (2.5 m). This makes the presented installation method popular.
Design features
Laying TV cables, electrical communications or Internet cables in the baseboard is possible using special baseboards. They are distinguished by their special design and performance characteristics.
The basis of such a product is a cable channel. All the wires will go through it. Unseemly communications are covered with a decorative cover. Its configuration completely corresponds to the appearance of the plinth.
Electrical wires have an increased risk of fire. Therefore, increased demands are placed on the material from which the plinth is made. It should be strong enough, but flexible. Inside such a structure there may be one or more cable channels. The interior space of a structure can vary significantly depending on the application.
Kinds
Floor skirting boards for wiring are available in different types, configurations and sizes. The elements differ in the methods of fastening along the wall. Liquid nails, self-tapping screws, adhesives, and dowels are used. The choice of technology depends on the textures of the walls and floors.
Products come in single-channel and multi-channel designs. A plinth with one channel involves laying up to 5 wires and cables. Multichannel has a compartment in which a larger number of electrical networks are located.
The planks are made of polyvinyl chloride, MDF, wood, aluminum, etc. The decorative strip with which the wires are attached also has different sizes.
There are low, medium and high products, as the width ranges from 30 to 150 mm. A variety of sizes allows you to choose the optimal finish for your home or apartment.
Design and configuration
The design of the cable channel, regardless of the configuration, consists of:
- frame;
- connection strips;
- elements fastening corners;
- plugs;
- finishing panels;
- accessories that help route wiring in the required direction.
The frame consists of a housing and a mounting plate. The structure distributes network and low-current wires; wiring can be laid in the baseboard in one recess or by distributing the cords over several channels and shelves. Some devices require securing electrical wiring in baseboards with clamps. The dimensions and number of wires depend on the design features of the strip.
The edges of the products are in contact with the floor and walls, protecting the surfaces from contamination, so the edging is made of dense or soft compounds. Structures with edging made of elastic material fit as tightly as possible to the walls.
Types of frames with a groove for wires
Framing the groove for electrical wires: a product with a hidden channel for cables and a fillet with a removable decorative element. The first model holds up to 6 wires. Closes with a decorative strip and is easy to use. The disadvantage of the design is the narrow groove for the wires.
A fillet with a removable part is used to hide massive electrical cable cords and can accommodate more than 10 wires. Not as aesthetically pleasing as the first option. Product parameters also depend on the manufacturer; custom-made skirting boards can be manufactured to order.
Material
There are requirements for the material in terms of strength, elasticity, and fire safety. They are made from plastic, natural wood, fiber boards, and aluminum alloys. The technological parameters of the planks and compliance with the color scheme and textures of the interior are important.
Polyvinyl chloride (PVC) is a widely used composition for skirting boards for wires in apartments and private houses. The advantages of the material are fire safety, affordable price, durability, strength, and elasticity. Polyvinyl chloride is resistant to water and chemicals. But mechanical damage should be avoided, as plastic skirting boards can break.
Fiberboard (MDF) involves securing the wires with clips. The material is non-flammable, but the fire safety indicators of the composition are lower than those of products made from polyvinyl chloride. Models of MDF strips will help in hidden installation of communication wires.
Aluminum baseboard options are the most fire-resistant. Models accommodate a variety of high power wires. An aluminum product with a cable channel consists of a base with a groove, in the upper part of which a decorative metal strip is fixed. Products are in demand in rooms with difficult operating conditions and high traffic. The price of aluminum models is higher than their plastic counterparts.
Width
Cable width – from 30 to 150 mm. The optimal size is 50–60 mm, as it is suitable for typical premises. In rooms with ceilings up to 2.6 m, planks up to 70 mm wide are laid. For ceilings of 3 m, floor fillets from 70 to 90 mm are required. For spacious rooms, models from 80 to 100 mm are required.
Varieties
Laying cables in a baseboard with cable duct is a relatively simple task. However, it is important to study all the intricacies of this process before starting the installation. There are two main types of construction. The first category has a profile with a groove in the center. It is closed with a special insert. The second type of design includes a profile of a certain configuration. After placing the wires inside the cable channel, it is completely closed with a special cover.
The first category of skirting boards is chosen if it is necessary to hide up to 6 wires. If there are about 10 cables or even more, you should give preference to the second type.
The presented designs are made from various materials. The most popular among consumers is PVC skirting board. It has a reasonable price. There are many shades and textures of decorative overlays for such cable channels on sale. Therefore, such designs will easily fit into almost any type of interior.
Fire safety
Most electrical cables are made of plastic, which raises questions about fire safety. If you don’t take into account the very cheap options on the market, all the rest are made of plastic, which does not support or propagate combustion. More serious material is used. From a fire safety point of view, such an electrical baseboard is an acceptable option.
Electrical safety is guaranteed subject to cable operating conditions
Well, to be sure of fire safety, also take cables with a spare cross-section and in non-flammable sheaths. And it is cables, not wires, when it comes to wiring. There is a difference and not only in price.
Baseboard device
The floor plinth for cable laying is mounted on the base of the wall. One or more cable channels run inside it. This allows you to carry out almost any communications to equipment and lighting fixtures. After laying the wire, the entire system is covered with a decorative panel.
Regardless of the model and purpose, such designs include several main components. These include a frame and a decorative connecting strip. Also, when installing the structure, connectors for external and internal corners are used. The entire system is covered by a decorative outer panel.
The frame must be mounted on the base of the wall right next to the floor. Self-tapping screws are used for this. The remaining structural elements are assembled by hand. You don't need to use a special tool for this. This greatly simplifies and speeds up installation. It’s easy to do this kind of work yourself, even without having high qualifications in the field of repair work.
Material
Floor plinths for laying cables can be made of different materials. Most often, plastic, wood and aluminum are used for such structures. This determines the main operational characteristics of the plinth.
Plastic structures are mounted at the base of the floor. The cable channel in them is located in the center. Connectors can be routed outside the profile. For this purpose, special output sections are used. The profile rail has separators that allow for laying several types of wires inside the structure.
It is much less common to find wooden baseboards with a cable duct inside for sale. Most often, such products are created to order. Only one wire can be laid inside such a product. It must have a high insulation class. Otherwise, there is a high probability of the wiring catching fire during operation.
Aluminum baseboards are characterized by the greatest fire resistance. It can accommodate many different wires that have high power.
Selecting and installing floor moldings
A floor plinth with a cable channel eliminates the need to ditch the walls in order to remove the wiring in them. Previously, we had only one alternative to gating: fireproof boxes that are laid on top of the walls. Now we can put everything into the floor molding, except, perhaps, the wires for the ceiling lights. The most common version of such molding is made of PVC. Models are made from this material in different sizes and colors. and some even have a transparent cable channel. Aluminum is used less often and wood is used very rarely.
Plastic moldings
Firstly, we are all familiar with the floor molding with a channel in the center. It holds a small amount of wires, and is suitable if you just need to hide the TV cable. There is even special fittings for bringing the connector out. You simply install several of these output points in the right places, and thereby rid yourself of the “snakes” of wires lying here and there. In the next photo you can see what it all looks like.
PVC plinth with cable duct and connector outlet
The next plastic plinth with a cable channel is designed to accommodate more wires. For this purpose, there are special dividers on the mounting rail. Just like for the previous molding, all types of fittings are available for sale for this: corners, connectors, sockets and leads for wires.
High plinth with cable channel has several compartments inside
And the moldings that you see in the next photo are themselves boxes for wires. The correct name is plinth cable channels. If you need to hide all the apartment electrical wiring, then it is better to opt for them. These moldings have increased fire safety and are very well protected from the penetration of dust and moisture. They are made from high quality self-extinguishing PVC and can withstand very high temperatures.
Cable plinth for distributing electricity throughout an apartment or house. Color can be white, steel or natural wood
Wooden and aluminum baguettes
Wooden plinth with cable duct is almost never found on sale, and, as a rule, it has to be made to order. More often you can find this option, as in the photo, when the wire is pulled along the recess in the clips from the moldings. However, nothing except a television or Internet cable can be laid here due to fire safety rules. This is due to the fact that the contents will be in direct contact with the wood. The veneered MDF plinth with a channel has approximately the same appearance and the same operational limitations.
How to lay a cable in a wooden baseboard: mounting clip
An aluminum plinth with a channel for wires also serves its purpose perfectly. It is slightly inferior to plastic and wood in terms of aesthetic qualities, but in terms of fire safety, aluminum is, of course, better than other options. Designs can be designed for different numbers of wires, and the plinth itself is made entirely of aluminum or with a plastic mounting rail.
Wide aluminum plinth for wires
Installing moldings
Installing a plinth with cable duct will take you no more time than installing any other type of molding. All we need for this is the baguette itself, a drill and/or screwdriver, screws and dowels (40mm).
We mark the location of our molding on the wall, set it up, and then drill holes for the screws. We transfer these points to the plinth and drill it out. If you bought a molding with ready-made holes on the mounting rail, then we make markings on the wall in accordance with them. We screw the baguette to the wall, lay the cable and/or wires.
Fastening of skirting boards with cable ducts is carried out using self-tapping screws and dowels. Next comes cable laying
If you need to install a socket or switch on the plinth, then leave a gap of 60-70 mm between the sections of the molding. We pull the wire through the hole in the wire housing and attach the socket/switch to the wall with self-tapping screws, attach the contact pair inside.
How to lay electrical wiring and install a socket on a molding
And now the final part of the work. You need to install the inside and outside corners, connectors, and end caps on the molding. We snap the outer part of the plinth onto the mounting rail.
Important: all work on electrical wiring must be carried out in accordance with fire and electrical safety rules. There should be no damage to the electrical wiring in the baseboard, and all exposed areas must be insulated with materials intended for this purpose.
How to lay a floor plinth with a cable channel: installation of fittings and the outer part of the molding
Advantages
There are many advantages to laying cables in the baseboard. This installation method requires a minimum amount of working time. After installing the electrical wiring, there is practically no dust or construction debris left. This allows you to carry out repair work without damaging the finish, furniture and other interior elements.
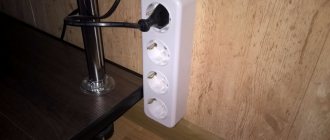
If you need to create an additional outlet, connect a new TV, or perform other similar work, using a plinth is the optimal solution. All wires will be hidden from prying eyes. In this case, the integrity and harmony of the interior will not be compromised.
When using the presented design, the sockets are mounted close to the floor surface. This allows you to avoid wires from household appliances hanging along the wall surface. It also greatly improves the overall appearance of the interior. The cost of installation will be affordable for almost everyone. Therefore, many owners of apartments and private houses choose to install wires in the baseboard.
Combined electrical option
However, there is no need to take all of the above as an axiom and install electrics in your apartment only on the ceiling, or only on the floor.
A very common option is a combined solution to this issue. Some of the wires run on top, and some on the bottom.
Sometimes equally, sometimes not. The reason for this may be the very large volume and ramification of the entire wiring architecture.
If you have at least two or three dozen modular protection devices in your electrical panel, and at the same time you also have a low-current panel, then when installing all this equipment on the floor, you would get a huge trail of wires.
The wider it is, the higher the likelihood of overlaps and intersections of corrugations with each other. Such intersections are not good. And in some cases they can even lead to an increase in the thickness of the screed.
Therefore, the ideal solution here would be a combined option. A small amount of corrugations (primarily low-current) can be run along the ceiling.
And lay the power wires in a screed.
Also, in the future, it will be possible to run additional lines along the ceiling that you did not initially plan, for example, for the air conditioning system.
Flaws
There are also certain disadvantages of laying cables in the baseboard. These include low heat dissipation from internal structural elements. If the wire is located in channels in the thickness of the wall, this figure will be much higher. This feature significantly reduces the scope of application of such structures. The plinth cannot be used for wires whose rated load exceeds 3.5 kW.
It is almost impossible to lay several three-core wires with a cross-section of each element of 2.5 mm² inside the cable channel. It will be much easier to lay such wires in the groove.
When choosing the installation of electrical communications when using a plinth, you cannot connect sockets in series. Each of them must have a separate line. Otherwise, the system may overheat. This is a fire hazard. If the requirements of building codes and regulations are not observed, such installation can lead to a short circuit. This threatens the life and health of people and their property.
Cable selection
In order for electrical appliances to operate without overloading the network, the cable of each line must be of the appropriate cross-section. And if there are several consumers on the same line (for example, to the kitchen) (and there will be), then it is necessary to calculate their total power and leave a margin of “strength” for the cable, that is, select the required cross-section (wire thickness). The power of all household appliances is always indicated by the manufacturer. For example: an incandescent lamp is 40W, and a hob is 6000W, etc.
| Wire cross-section (sq.mm) | Current (A) | Power, W) | Machine denomination |
| 1,5 | 15 | 3300 | 16 |
| 2,5 | 21 | 4600 | 20 |
| 4 | 27 | 5900 | 25 |
| 6 | 34 | 7400 | 32 |
Each device (consumer) has its own declared maximum power, measured in Watts.
Simplified power formula
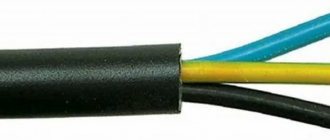
The cable must be three-core (phase, neutral, ground). Zero is always blue, ground is yellow or yellow-green, phase is any other color. If you change the wiring, do not skimp on the material - always take a cable with a third core (with grounding), because all modern devices have an additional protective terminal, and automatic protection works only using grounding.
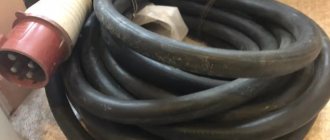
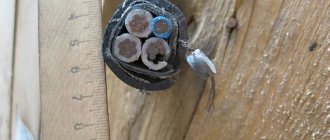
To replace electrical wiring, it is best to use a VVG-ng cable. You can, of course, use NYM or PVS, but the advantages of the VVG cable over others are obvious. Firstly, VVG does not need to be crimped with sleeves (soft ones need to be crimped). And secondly, it is smaller and flat, which allows you to make smaller grooves, and it is possible to insert the cable into a thin slot (3mm for a three-core cable with a cross-section of 1.5mm)
Uncrimped wire with sleeveSome recommendations
Cable laying in the baseboard has several features. Experts strongly recommend that you familiarize yourself with them before starting installation. It should be noted that it is quite difficult to find sockets on sale intended for installation on baseboards. Therefore, most often such structural elements are displayed on the wall. In this case, you will need to either ditch the wall (which you would like to avoid) or route the wire through the baseboard. In this case, the decorative overlay of the structure will have to be cut. The wire will run along the surface of the wall. By violating the integrity of the decorative overlay, you can end up with a sloppy appearance of the structure. It is best to route wires to create sockets in an inconspicuous place, hidden from view.
Where the wiring will go around doorways, you will need to choose a different method of installing the wire. Here, for obvious reasons, it will not be able to pass inside the baseboard. In some cases, the owners of an apartment or house hide electrical communications under the platbands. Sometimes you can’t do without gating the walls.
Preliminary measures before installation
Before you begin installing electrical wiring inside the baseboards, you will have to carry out a number of preparatory measures. They should not be neglected, because through them it will be possible to ensure the fastest and most correct installation, while also taking into account decorative aspects.
First you need to decide on the color and size of the skirting boards. Our article will help you with this. Here everything will depend on the wishes of the apartment owner, as well as on the interior of the rooms and their dimensions. So, in a room with high ceilings you should not install narrow baseboards. In dark rooms, radically light or dark finishing strips are not used unless they are combined with other interior elements. Light floor plinth in the interior
Even before you begin installing the baseboards and laying the wires, you should decide where the various electrical devices will be located. This will allow you to choose the correct location of sockets and lay the cables as secretly as possible
It is best to immediately draw up a diagram of where and how the wires will be laid. It is important to calculate the amount of plinth - it will depend on the perimeter of the room. Don’t forget to take into account the amount of possible waste that is generated during cutting of the material.
This is about 5-10%. At the design stage, the size of the cable channel is also calculated. Here the choice will depend on how many wires will be laid in it.
The procedure for performing work when installing skirting boards
At the preparatory stage, it is important not to forget to calculate and purchase components in the required quantity. They will not only facilitate the installation process, but also make the entire structure beautiful and neat.
In this case, the components must match the color and size of the baseboard itself.
Accessories for plastic skirting boards
Preparation for installation
Before starting installation, you must review the detailed instructions for laying the cable in the baseboard. First you will need to perform several preparatory operations. The material must be selected in accordance with the interior of the room. The number of planks is purchased by calculating the perimeter of the room.
You need to create a plan that will indicate where household appliances, lighting fixtures, as well as sockets and switches will be installed. It is necessary to prepare a cable routing diagram. At the same time, its purpose is taken into account. Next, the quantity of cable and its cross-section are calculated (in accordance with the rated load).
In accordance with the existing need, you need to determine how many cable channels the baseboard should have. Telephone, television and electrical wires must run in separate channels. It is important to take into account the rated power of the cable. It should not exceed 3.5 kW.
Common mistakes when laying wiring
When installing electrical wiring, both beginners and professionals in this field make common mistakes. All this can lead to negative consequences. Let's look at typical mistakes when wiring:
- Wiring around the house is carried out according to a carefully thought-out scheme. Under no circumstances should you carry out wiring in each separate room and then connect all the wires in one unit. This method will entail a reduction in the electrical network.
- Do not use low-quality electrical products. They quickly fail and cannot withstand rated loads. Quite often, cheap Chinese equipment causes short circuits and fires in houses.
- Incorrect calculation of wiring without reserve. Installing electrical wiring with a 20% margin ensures that the network can withstand high loads. In addition, by purchasing wire with a reserve, you can be sure that you will have enough consumables to install all the necessary sockets and switches.
- It is not recommended to connect powerful electrical appliances to special 16-amp outlets. To use powerful heat guns, boilers or hobs indoors, it is worth running a separate cable from the panel, since a powerful outlet will withstand the load, but the cable will not.
- Carefully calculate the cable cross-section at the input. A low cross-section may cause a fire.
- Many people make a common mistake when installing electrical wiring in a wooden building - they lay the cable close to the wooden walls. If you hammer a nail into the wall, you can damage the cable insulation and simply get an electric shock. Wires must be laid in wooden walls in special cable channels.
- Do not connect power and low-voltage wires in the same junction box. Newbies in this business connect computer, television and power cables in one box, which leads to equipment failure.
- Don't use twists. To connect the wires, you should use special terminals.
- Do not connect aluminum and copper conductors. In modern construction, aluminum wires have long been abandoned - they are not able to withstand heavy loads.
- Do not work under voltage! When doing electrical work, you should turn off the electricity supply to the entire house.
- Distribution boxes are mounted under the ceiling, at a distance of 20 cm down.
- Do not pre-cut the wires into individual pieces. You can make a mistake in the calculations and then you will not have enough material.
- Always follow the specific color markings.
It is quite possible to carry out electrical installation work in a wooden house on your own. The main thing is to comply with all norms and requirements, choose the right consumables and follow the stages of work.
Surface preparation
Also, before starting work, it is necessary to consider in detail how to remove the baseboard for laying television cables, electrical and other communications. Existing structures will need to be carefully removed. This must be done very carefully so as not to damage the surface of the wall and floor.
All nails, screws and screws must be removed. There should be no foreign elements on the surface of the walls and floor. If the finishing in this place begins to crumble, it is necessary to clean it and prime the base. Next, a new layer of plaster is applied. Installation of plinths is carried out exclusively on flat walls. Otherwise, large gaps may appear between the base and the baseboard.
Next, you need to make sure that the mounting surface is clean and free of dust, dirt and other unnecessary substances. After this, you can study the technology of installing the baseboard itself. It is presented by the manufacturer. This procedure is easy to perform yourself.
Fixing a profile
First you need to attach the planks to the wall. The channels through which the cable will pass must be turned outward. Using a marker, you need to mark the places for screwing in the screws. Some models do not have holes in the slats. You will need to drill them yourself. The distance between fasteners should be no more than 35 cm. From the corner and edge of the plank, the first screw should be located at a distance of no more than 10 cm.
Holes are drilled at the designated points using a hammer drill. The plank is attached to the base.