Electrician in the house
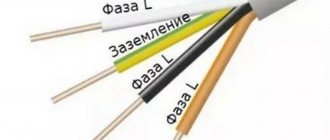
Encyclopedia about electricity from A to Z
Masters catalog
Find the best master or company in your city
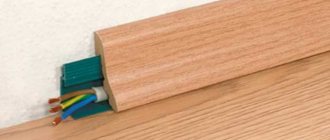
Electrical wiring in the baseboard in the author's house
Today, my dear reader and I have to find out how practical wiring is in electric baseboards. We will weigh the pros and cons of this solution, and also learn how to properly wire the electricity and connect the outlets to the wiring. Let's get started.
- Solution evaluation Costs
- Delight and adoration
- A spoon of tar
Purpose of the cable channel
At their core, baseboard-type cable channels are a kind of moldings that perform several functions at once.
Additional Information. In construction practice, the term molding (from the English molding - casting, molding, cast part) is used to refer to overhead convex strips used to decorate walls, ceilings, fireplaces, doors, etc.
Skirting moldings with cable channels are intended for:
- hiding the gap between the wall and the floor or the wall and the ceiling;
- performing the function of an electrical box for laying wires and cable lines;
- hiding wires laid in a box inside the baseboard;
- protecting wires from possible mechanical damage, exposure to open moisture, dust and other contaminants (for example, in the kitchen or production);
- masking the laid cable line by arranging a decorative floor edging with sockets and connectors.
Floor edging made from plinth cable ducts
Selecting the type of electrical installation
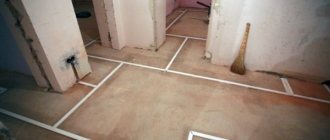
The first thing you need to start with is to decide on the method of installing the line. Today, open and hidden wiring is used. Open electrical wiring involves fastening all the constituent elements on top of finished walls (the routes are laid in special cable channels).
The advantage is as follows:
- the damaged area can be repaired without any problems (no need to cut wallpaper, destroy plastered walls, etc.);
- simpler installation and preparatory work (no need to tap the walls along the electrical wiring in the house);
- convenient to add new branch points.
Disadvantages of this installation method:
- very often it does not fit into the overall interior of the rooms (cable channels do not look very attractive);
- open wiring is more susceptible to mechanical damage and, as a rule, has a shorter service life.
Hidden electrical wiring in the house is becoming more popular. This option involves installing the wire in specially created grooves in the walls and ceiling (grooves), as well as in a suspended ceiling, under plastic, in a special baseboard.
Advantage:
- does not spoil the interior of the rooms with its appearance;
- is fireproof (except for a wooden house);
- cheaper (compared to the open method of laying electrical wiring);
- the likelihood of damage is much less;
- high durability of all elements.
Among the disadvantages are:
- complexity of repair and operation (to replace the electrical wiring in the house or connect a new point, it is necessary to damage the finishing material);
- when a breakdown occurs, it is very difficult to find the exact location of the breakdown unless you use special devices, for example, a homemade metal detector;
- more complex electrical installation work.
We recommend that you still opt for the latter method, since it is more durable and the entire line is not striking! When choosing high-quality components and correctly installing electrical wiring in the house, the likelihood of a breakdown is extremely low.
How to lay electrical skirting boards
Before starting work, you should calculate the required length of wires. It is better to purchase them with a margin of 10-20%. Then the type and length of the baseboard itself is selected
In this case, it is worth paying attention to how many and what cross-sectional conductors will be laid in it
At the same time, it is important to take into account color, design
Preparation of the workplace
Before installing a new electrical skirting board, it is necessary to disassemble the old one. Crude tools such as a pry bar or a heavy-duty screwdriver are suitable for this. The workplace is cleared of debris, dust and dirt. If necessary, the defects in the corner between the floor and the wall are covered with putty.
Next, the new channel is applied to the installation site. It is more convenient to do this together. Mark the mounting holes on the wall with an awl or pencil. They must be done with a hammer drill in impact mode.
Removing the old baseboard
Installation of cable channel
A plinth with a channel for wiring can be easily installed even by a person without experience. There are several important points to consider:
- To determine the required length, you need to calculate the perimeter of the room. You need to subtract the width of the doorway from the obtained value, because the corner tray will not be laid in it.
- It is better to fasten the dowel using nails or self-tapping screws, since the glue is too demanding on the materials it holds together.
- Corners and various adapters. If you forget to install at least one, the structure will have to be disassembled and reinstalled.
Installing the Removable Cover
The cover is installed with latches. This method is convenient and does not require third-party tools. The successful closing of the lid can be judged by a characteristic click.
It is important to ensure that there are no gaps left. Therefore, after snapping the lid into place, its correct position can be checked visually or by touch.
Plastic skirting board with snap-on lid
Skirting board with separate front part
This type includes products made from MDF. The fastening strip is installed strictly parallel to the floor. It is better to monitor the accuracy of measurements using a level. Or you can resort to a life hack. Cut two small fragments from the front part and use them as templates (samples, standards) when installing the mounting strip.
How to start and remove wiring
To remove the cable from the baseboard, you can use one of three methods:
- Carefully cut the groove in the required location. The method requires skill and is dangerous to perform, because the knife blade can easily slip off your fingers.
- Drill a hole. It will turn out neatly. But it can only be done if you have a thin drill of the required diameter at hand.
- In the place where the wire is removed, slightly heat the plastic with a lighter and carefully press the groove under the wire. This method should be used only with knowledge of the matter and some experience. However, the end result is the most aesthetically pleasing.
Cable pulling in the baseboard
Installation of sockets
Expensive manufacturers often produce sockets that are sized specifically for their electrical baseboards. In this case, installation is the simplest. There is no need to cut anything or adjust it to fit. Universal sockets are also available for sale. For them, you will have to cut off part of the baseboard and carry out more complex work. In terms of money, the second option will be cheaper.
Box for socket on baseboard
Fire safety
Most electrical cables are made of plastic, which raises questions about fire safety. If you don’t take into account the very cheap options on the market, all the rest are made of plastic, which does not support or propagate combustion. More serious material is used. From a fire safety point of view, such an electrical baseboard is an acceptable option.
Electrical safety is guaranteed subject to cable operating conditions
Well, to be sure of fire safety, also take cables with a spare cross-section and in non-flammable sheaths. And it is cables, not wires, when it comes to wiring. There is a difference and not only in price.
What about the corners?
Working with external corners
If the wall has internal corners, it is necessary to join the longitudinal skirting boards using special elements. The plank is applied to the adjacent wall and joins the internal corner stop strip. One side of the “internal corner” must be inserted into the end of the plinth, and the other must be pressed against the plinth on the other wall.
If you need to move to the outer part from the inner corner, then:
- The position of the internal stop is marked on the face of the outer and inner joint.
- Both elements are applied to each other, and the approximate distance between the mark is determined.
- A part of the strip with the cable channel is cut according to the intended dimensions, adding 2-3 mm on both sides for possible gaps. This will be the frame on which the other parts will be attached.
- After this, the internal and external elements are installed on the cut part.
There are also situations when you need to connect external corners. To do this, both skirting boards are trimmed so that 3 mm is missing from the end connection. Then the adjacent plank is attached to the wall as described above. Next, the cable is laid into the channel, fixed, and a decorative part is applied. The corner joint is inserted into one side of the baseboard, and the other is inserted into the groove. After this, the bar snaps along its entire length.
When installing corner joints, the main thing is to correctly calculate not only the number of strips, but also the connecting elements. Leave comments: share your opinion about the article, add comments, tell us about your experience!
Preliminary measures before installation
To do this, you need to compare the characteristics of the cable channels in the baseboard with the cables being laid. The width, height, and cross-section of the channels in mm2 are provided in the documentation for them. Let's look at a separate example:
Comparison of two versions of three-channel skirting boards of the MEX series
| MEX series plinth | Total channel cross-section in mm2 | Useful section. mm2 | Useful cross-section by channels mm2 | Capacity of wires of different sections per channel in pieces. | |||||||||||||
| 1.5 mm2 | 2.5 mm2 | 4 mm2 | 6 mm2 | ||||||||||||||
| 1 | 2 | 3 | 1 | 2 | 3 | 1 | 2 | 3 | 1 | 2 | 3 | 1 | 2 | 3 | |||
| 60x16/3 | 702 | 502 | 163 | 176 | 163 | 20 | 22 | 22 | 14 | 15 | 14 | 11 | 12 | 11 | 8 | 9 | 8 |
| 75x20/3 | 1113 | 800 | 232 | 331 | 232 | 29 | 42 | 29 | 20 | 28 | 20 | 16 | 23 | 16 | 12 | 17 | 12 |
In the cable lines of floor skirting boards, you can lay not only power supply wires; the following fits perfectly there:
- Coaxial cable for TV or Internet signal input;
- Telephone pair, from city PBX;
- Cables for local computer networks and wires for other purposes.
When choosing the design of skirting boards, consider all factors.
There are three main methods for diverting sockets from baseboard wiring:
Having counted the quantity and purchased all the necessary elements, you can begin installation work.
Installation methods
Installation of the plinth begins from the inner or outer corner (if the dimensions match, installation from the door is possible). Straight long pieces are installed first, then, after careful measurements, the remains are cut into sections mounted in niches, around columns or in finishing areas. With all methods, the plinth is cut at a right angle (in this regard, plastic materials are easier to process than wooden materials, which are adjacent at an angle of 45 °).
It is necessary to pay attention to the lack of margin in the areas where straight sections are connected with couplings (the smoother and neater the edges are, the better) and the provision of the required 3-5 mm under the joining elements for connection in the corner. Methods for installing plastic floor plinths
Methods for installing plastic floor plinths
In this case, the installation itself is performed in one of the following ways:
- With glue fit.
- Fixation with staples.
- Screwing it to the wall with self-tapping screws.
Selection of constituent elements
At this stage, it is necessary to select all planned electrical products for wiring installation
We draw your attention to the fact that when choosing materials you do not need to save money, because
Low-quality Chinese products very often cause accidents (including short circuits) and are also subject to breakdowns.
We recommend that you choose the following elements (see photo above):
- distribution boxes and channels made of non-flammable or self-extinguishing materials;
- open-type sockets and switches (they are easier to install, and the cost of the products is an order of magnitude lower than that of hidden ones);
- copper cable (its service life is much longer than that of an aluminum product). In addition, copper conductors can withstand higher loads. We recommend giving preference to brands such as PVS, VVGng or NYM;
- cross-section of cores per socket group is not less than 2.5 mm. sq. (withstands current up to 25 A, which is enough for home use, although it is better to calculate the cable cross-section for individual application conditions). To install lighting, you can choose a cable with a core cross-section of 1.5 mm2, but to connect powerful household appliances you will have to purchase a thicker conductor - 4 mm2.
Technical specifications
There are several ways to produce products. Depending on the technological process, the following types of skirting boards are obtained:
- Semi-rigid. During manufacturing, the material is exposed to increased pressure, as a result of which its molecular structure changes. The longitudinal bonds in the polymer are strengthened, and the final product receives the necessary flexibility. When installed, such models bend around possible surface irregularities and do not form cracks.
- Tough. The most common finishing element. Its installation is carried out in straight sections, and corner connections are made using special elements.
- Foamed. The lightest structures with low thermal conductivity. Due to this, they are often used as additional thermal insulation.
FAQ
Question No. 1. Is it possible to lay cables with a wire cross-section of Ø – 6 sq/mm in the plinth, for electric stoves or other high-power household appliances?
It is possible, preferably a separate line in a multi-channel baseboard, but you must be sure that the following conditions are met:
- the power consumption of the device and the cross-section of the wire are calculated correctly, there will be no heating of the wiring;
- A reliable circuit breaker with appropriate ratings is installed in the distribution board;
- The baseboard body and mounting strip are made from non-combustible materials.
Question No. 2. It is impractical to install switches in the baseboard structure, how do you route the wiring to the light switches and lighting fixtures in the ceiling?
The picture shows one of the options for how to bypass the doorway and connect the switch.
In most cases, this technique is used as a complementary element to already finished wiring. For laying telephone, computer networks, cable television, and separate power lines.
If you want to do a complete installation of electrical wiring on this basis, you must understand that wiring in baseboards significantly reduces gating, but does not eliminate it completely. This article describes how to make bends from baseboards into grooves of closed wiring and for cable ducts of open wiring.
Question No. 3. If there is not enough space in the baseboard cable channel for the wire, in order to simplify and save money, can a branch be made to the opposite wall under the floor?
Following fire safety regulations, you can lay the cable in a corrugated tube and run it under the floor covering, if the design allows this.
Calculation of the required number of plinth slats
Floor plinths are usually produced in a length of 2.5 m. Before installing the plinth, it is necessary to calculate the required number of slats. The calculation is performed according to the formula, as for the ceiling plinth. You need to divide the perimeter of the room by the length of one rail. A specialized online calculator will help you with this.
| Online calculator for calculating the required number of skirting boards |
| Room length, m: |
| Room width, m: |
| Rail length, m: |
To eliminate additional joints, you should buy one more rail, since in addition to appearance, there will be additional costs for joining elements, the price for the heels of which can reach the cost of one rail.
Features of acquiring a PKK
Installation of skirting boards is carried out at the final stage of renovation of the premises, when work on finishing the walls, ceilings and laying floor coverings is completed. Before installing floor edging and ceiling fillets, it is necessary to select products that meet the operational requirements for the cable line and the decorative criteria for the artistic framing of the home. PCCs are purchased taking into account the following factors:
- The overall dimensions of the molding must ensure the laying of cables in the quantity required to accommodate electrical wiring and low-current lines. It is recommended to purchase products that have spare parts;
- The color of the molding should be selected in accordance with the color of the floor covering. It is recommended to install baseboards in darker shades to create a distinctive contour.
Note! When calculating the length of plinth panels required for purchase, the width of the doorways is subtracted from the measured perimeter of the room, however, it is necessary to have a reserve of 2-5% in excess of the calculated molding in case of eliminating possible installation defects that arise during the installation of the PKK
Types of material
There are several main varieties of this product, each of which has its own characteristics:
- PVC plinth with cable duct is rightfully considered the most popular of all, due to its many advantages and affordability.
- Wooden floor elements. This option is not so common, because its cost is quite high.
- MDF products are not as in demand as plastic skirting boards, but they have a number of positive parameters. For example, they harmonize perfectly with laminate and solid wood.
- Aluminum parts for framing the joint between the floor and the ceiling are not suitable for every interior, but the prospects for such material are enormous.
Almost all types of floor skirting boards have models equipped with cable ducts, but PVC products are deservedly considered the most capacious.
Thus, it is possible to choose the most suitable solution.
Depending on the location of the cable channel, there are two groups of skirting boards:
- The channel is located in the center. This is the most common type. It allows you to place a small number of wires in an empty space, without the need to remove the entire panel, just separate the plug.
- The channel is located behind the removable panel. Suitable for laying fairly thick cables. The disadvantage is that you have to disconnect the entire structure.
Compared to floor skirting boards, ceiling fillets with cable ducts are less capacious and more problematic to install and repair.
Advantages of PVC options
Undoubtedly, PVC products have the most advantages compared to other varieties:
- In most cases, a plastic plinth has a channel located in the center, which makes it possible to hide the wiring even for a beginner without special skills. Installation also does not require experience.
- Many products have flexibility and rubberized lining on the edges, which allows you to completely hide small irregularities and defects.
- A rich decorative choice that is significantly superior to the aluminum or wooden option.
- Easy to use: does not absorb dirt and is easy to clean.
- There are sizes for different situations.
- Low price. Undoubtedly, it is this advantage that makes such a floor plinth accessible to most buyers.
Plastic floor edging for wiring has only one relative disadvantage - during installation it is necessary to pay special attention to protection from moisture
Selecting and installing floor moldings
A floor plinth with a cable channel eliminates the need to ditch the walls in order to remove the wiring in them. Previously, we had only one alternative to gating: fireproof boxes that are laid on top of the walls. Now we can put everything into the floor molding, except, perhaps, the wires for the ceiling lights. The most common version of such molding is made of PVC. Models are made from this material in different sizes and colors. and some even have a transparent cable channel. Aluminum is used less often and wood is used very rarely.
Plastic moldings
Firstly, we are all familiar with the floor molding with a channel in the center. It holds a small amount of wires, and is suitable if you just need to hide the TV cable. There is even special fittings for bringing the connector out. You simply install several of these output points in the right places, and thereby rid yourself of the “snakes” of wires lying here and there. In the next photo you can see what it all looks like.
PVC plinth with cable duct and connector outlet
The next plastic plinth with a cable channel is designed to accommodate more wires. For this purpose, there are special dividers on the mounting rail. Just like for the previous molding, all types of fittings are available for sale for this: corners, connectors, sockets and leads for wires.
High plinth with cable channel has several compartments inside
And the moldings that you see in the next photo are themselves boxes for wires. The correct name is plinth cable channels. If you need to hide all the apartment electrical wiring, then it is better to opt for them. These moldings have increased fire safety and are very well protected from the penetration of dust and moisture. They are made from high quality self-extinguishing PVC and can withstand very high temperatures.
Cable plinth for distributing electricity throughout an apartment or house. Color can be white, steel or natural wood
Wooden and aluminum baguettes
Wooden plinth with cable duct is almost never found on sale, and, as a rule, it has to be made to order. More often you can find this option, as in the photo, when the wire is pulled along the recess in the clips from the moldings. However, nothing except a television or Internet cable can be laid here due to fire safety rules. This is due to the fact that the contents will be in direct contact with the wood. The veneered MDF plinth with a channel has approximately the same appearance and the same operational limitations.
How to lay a cable in a wooden baseboard: mounting clip
An aluminum plinth with a channel for wires also serves its purpose perfectly. It is slightly inferior to plastic and wood in terms of aesthetic qualities, but in terms of fire safety, aluminum is, of course, better than other options. Designs can be designed for different numbers of wires, and the plinth itself is made entirely of aluminum or with a plastic mounting rail.
Wide aluminum plinth for wires
Installing moldings
Installing a plinth with cable duct will take you no more time than installing any other type of molding. All we need for this is the baguette itself, a drill and/or screwdriver, screws and dowels (40mm).
We mark the location of our molding on the wall, set it up, and then drill holes for the screws. We transfer these points to the plinth and drill it out. If you bought a molding with ready-made holes on the mounting rail, then we make markings on the wall in accordance with them. We screw the baguette to the wall, lay the cable and/or wires.
Fastening of skirting boards with cable ducts is carried out using self-tapping screws and dowels. Next comes cable laying
If you need to install a socket or switch on the plinth, then leave a gap of 60-70 mm between the sections of the molding. We pull the wire through the hole in the wire housing and attach the socket/switch to the wall with self-tapping screws, attach the contact pair inside.
How to lay electrical wiring and install a socket on a molding
And now the final part of the work. You need to install the inside and outside corners, connectors, and end caps on the molding. We snap the outer part of the plinth onto the mounting rail.
Important: all work on electrical wiring must be carried out in accordance with fire and electrical safety rules. There should be no damage to the electrical wiring in the baseboard, and all exposed areas must be insulated with materials intended for this purpose.
How to lay a floor plinth with a cable channel: installation of fittings and the outer part of the molding
Technology for fastening skirting boards with liquid nails
Installing skirting boards using liquid nails is quite simple - this is one of the easiest methods for installing this type of product. You just need to level the walls and you can start working. This installation method is best suited for plasterboard walls. Installation of the plinth is carried out starting from one corner. Liquid nails are applied dropwise to the wall at a distance of about 3-5 cm from each other. It is desirable that the step be the same. Next, the plinth simply adapts to the walls. The glue can also be applied to the product itself. The plinth is pressed against the wall very tightly and is kept pressed for about 60 seconds.
Installing MDF plinth (white enamel) on liquid nails
Installing skirting boards is a job that even a beginner in the field of repairs and construction can do. The main thing is to understand the principles of working with these products, and there will be no problems
And it is also important to choose high-quality material - both fastening and base
Advantages of plastic framing
Central location of the cable channel
Plastic skirting boards with a cable channel can be:
- With a central channel for laying wires;
- With a channel placed in the upper part, which can be removed.
Skirting board, with removable top part and cable channel
By choosing a plastic plinth with a cable channel, you get reliable communications and a pleasant appearance. In addition, plastic skirting boards have a huge number of advantages:
Possibility to hide electrical wiring; Easy to install. There are no special requirements for the type of flooring, no special skills are required; Easy dismantling. If necessary, a new cable can be easily laid and fixed. At the same time, the elements do not lose their qualities; Flexibility
This quality is especially important for those with uneven floors. And the presence of a rubber gasket, which ensures a tight fit to the floor, makes such a plinth irreplaceable; A wide range of colors, thanks to which you can choose the planks to suit absolutely any interior; Practicality and unpretentiousness
Easy to clean using cleaning products; Resistance to direct sunlight; Cheapness. A plastic plinth with a cable channel is slightly higher in cost than a traditional one, but cheaper than a wooden one.
Color range of plastic skirting boards
Preliminary measures before installation
Before you begin installing electrical wiring inside the baseboards, you will have to carry out a number of preparatory measures. They should not be neglected, because through them it will be possible to ensure the fastest and most correct installation, while also taking into account decorative aspects.
First you need to decide on the color and size of the skirting boards. Our article will help you with this. Here everything will depend on the wishes of the apartment owner, as well as on the interior of the rooms and their dimensions. So, in a room with high ceilings you should not install narrow skirting boards. In dark rooms, radically light or dark finishing strips are not used unless they are combined with other interior elements.
Even before you begin installing the baseboards and laying the wires, you should decide where the various electrical devices will be located. This will allow you to choose the correct location of sockets and lay the cables as secretly as possible
It is best to immediately draw up a diagram of where and how the wires will be laid. It is important to calculate the amount of plinth - it will depend on the perimeter of the room. Don’t forget to take into account the amount of possible waste that is generated during cutting of the material.
This is about 5-10%. At the design stage, the size of the cable channel is also calculated. Here the choice will depend on how many wires will be laid in it.
The procedure for performing work when installing skirting boards
At the preparatory stage, it is important not to forget to calculate and purchase components in the required quantity. They will not only facilitate the installation process, but also make the entire structure beautiful and neat.
In this case, the components must match the color and size of the baseboard itself.
Accessories for plastic skirting boards
Flaws
There are also certain disadvantages of laying cables in the baseboard. These include low heat dissipation from internal structural elements. If the wire is located in channels in the thickness of the wall, this figure will be much higher. This feature significantly reduces the scope of application of such structures. The plinth cannot be used for wires whose rated load exceeds 3.5 kW.
It is almost impossible to lay several three-core wires with a cross-section of each element of 2.5 mm² inside the cable channel. It will be much easier to lay such wires in the groove.
When choosing the installation of electrical communications when using a plinth, you cannot connect sockets in series. Each of them must have a separate line. Otherwise, the system may overheat. This is a fire hazard. If the requirements of building codes and regulations are not observed, such installation can lead to a short circuit. This threatens the life and health of people and their property.
general characteristics
Laying the cable in the baseboard (photo below) is easy and quick to install. When installing electrical communications, the owners of an apartment or house do not always decide to carry out major repairs. In some cases, keeping the existing finish in its original form remains a priority. It is in this case that property owners choose to install the wire in an open way. In this case, using a special plinth is a good solution.
Wall chipping significantly increases the cost of repair work. For example, the cost of creating a linear meter of a groove for electrical communications ranges from 100 to 200 rubles. At the same time, a lot of dust and construction waste is generated in the room. This procedure is carried out only during major repairs.
It should also be noted that not all premises are allowed to run the cable in a hidden way. For example, if the house is very old or it is built of wood, it is recommended to install communications in an open way. The cost of the plinth is only about 80 kopecks. per bar (2.5 m). This makes the presented installation method popular.
Installation of plinth with cable duct
Initially, it is recommended to make all the necessary measurements and calculations to purchase the required amount of material. Don't forget about the doorway; skirting boards are not needed here. After all calculations, 10% is added as a margin for trimming and scrap. In addition, you need to count all the external and internal corners, caps and connectors.
Components and components of skirting boards
Externally, the plinth is monolithic, but in fact it consists of two parts:
- Main. It contains a channel for the cable and fastening to the wall;
- Upper. It seems to be put on and covers the cable channel. Thanks to it, the bar acquires an attractive appearance.
For installation you will need a minimum of tools:
Unlike wooden skirting boards, plastic is fixed to the wall. Before installation, you should decide on the mounting method. It depends on what material the wall is made of. You can simply nail the plinth to a wooden surface.
Installation of plinth on dowelsThere are few options for wall mounting:
Before installing a plastic skirting board, you should check how smooth the walls are. It is better to level uneven walls to avoid gaps between the plinth and the wall, but if this is not possible, then you can use a little trick: in the place where a gap is most likely to form, a hole is made for fasteners and the product is pressed against the wall.
To avoid mistakes, after all measurements it is necessary to cut the skirting boards, adjusting them to the required size, taking into account all the corners and connecting plugs.
Installation always starts from the corner of the room, it is better if it is the far corner, as it is the most noticeable. Thus, the material is used as rationally as possible, and the amount of scraps will be kept to a minimum, and this will have a positive impact on the overall cost.
Installation is carried out in the following sequence:
- The bar is placed on the floor and pressed with your hand. Several holes are drilled; their depth should match the size of the plastic dowels.
- After the first hole is made, the strip is removed and the fasteners are inserted. Then the lower part of the plinth is applied and fixed with a self-tapping screw.
- Next, you can attach the plank to the floor and fasten it in increments of 30 cm.
- Dowels are inserted into the drilled holes, the plank is applied to the wall and fixed with a screwdriver. For evenness, the bar can be tightened or loosened in the right places.
The central decorative profile snaps into place very easily
- When the lower parts are secured, the upper part of the cable channel is installed. No tools are needed and it snaps into place without much effort. At this stage the wires are laid. It is better to press the wire a little into the channel so that it fits well.
- When the plastic plinth with cable channel is completely installed, plugs are fixed on both edges. It often happens that these plugs do not hold well and constantly fall off, especially if there are pets in the house. In this case, experts advise securing them with transparent sealant or glue. The main thing is that the retainer is transparent.
Assembly
Measurements
The first step is to take measurements of the flooring along the wall. Don't forget to subtract the length of the doorways. You also need to take into account the outer and inner corners, and at the end add another 9% for trimming. If mounting boxes are installed, this will also need to be calculated. Now that all the sizes are known, we go to the store.
Preliminary work
Installation of plastic skirting boards is carried out not on the floor, but on the wall. There are three options: liquid nails, special dowels, self-tapping screws. If the wall is concrete, then it is best to use the second option (another name is quick installation). If it's made of drywall, then you can take self-tapping screws with drywall plugs, or glue it.
Next, we run the walls level to avoid too frequent fastening. If it is unrealistic to level the walls, then you can proceed as follows. We apply the baseboard and mark where it does not fit well against the wall. Here you need to make a mark: this is the attachment point. If everything is perfect, then we fix it every 40–50 cm.
Fastening
You need to start fastening from the farthest corner of the room. Moreover, it is worth choosing a wall with the maximum length. This way you can save a lot of money by getting a minimum of scraps at the end.
Remove the plug and insert the plinth into the corner. We put a plastic jumper on the other end. We insert another piece into it. Only the back part of the plinth is attached: we will install the front part at the very end, when everything is secured and all the wires are in place.
Remember! You need to drill through the baseboard!
This is done like this: we press the plinth with one hand, and with the other, using a hammer drill, we make a hole. You need to fix everything right away so that you can drill later without fear of shifts.
We remove debris from the floor and panel with a vacuum cleaner, insert a quick installation into the hole, and then fix it with a self-tapping screw. When everything is done, you can install the cable channel itself. We put the wires in it.
The procedure for performing work when installing skirting boards
Accessories
The installation box is very easy to install. Along its length you need to leave some space in the baseboard. We apply the box, mark it, drill it, and fasten it.
Accessories for plinths for cable duct
It is worth choosing fittings from the same manufacturer, as there may be discrepancies in sizes, which will lead to additional headaches, waste of time and disappointment. You should never chase a lower price at the expense of quality. You need to choose carefully: if the slats are made of PVC, then everything else should also be made of the same material.
Product sizes
The floor plinth with cable duct has several standard sizes:
- Wooden parts up to 80 mm wide. It is the tall elements that often have the necessary space for wires. The length of the plinth varies from 200 to 300 cm.
- The dimensions of aluminum products are similar to the previous type.
- MDF and plastic floor plinth have a width from 40 to 120 mm and a standard length of 250 cm.
Much depends on the manufacturer. Of course, it is necessary to take into account the availability of specific products in hardware stores.
The appearance and dimensions of the plinth do not always correspond to the capacity of the cable channels
Profile device
The structure of any cable plinth includes two elements: a cavity for wiring and a cover. The structure fits tightly to the floor and walls. This is necessary to protect the wires from dust and moisture when cleaning. Fastening is carried out using self-tapping screws or dowel-nails 20-40 mm long.
Materials and sizes
Wood, aluminum, PVC plastic or MDF are used in production. These materials are equally easy to install and adjust to the required size. The plastic version is somewhat more durable due to its increased resistance to moisture. Wooden and MDF products are among the most expensive.
Aluminum plinth with cable channel
The standard size is considered to be a length of 2.5 m. The height and width depend on the cross-section and the number of wires laid in it.
Fire safety
Improperly installed electrical wiring is a common cause of fire. Therefore, reliable manufacturers of cable skirting boards include substances that prevent combustion and smoke emission. The most heat-resistant material is aluminum.
Installing a plinth with a cable channel
We have previously talked about installing floor skirting boards. Features of installation of electrical baseboards depend on its design. The one with a built-in gutter is mounted like a regular one - pressed tightly against the floor with its lower edge. When installing models with a removable front panel, you need to know one trick.
With removable cover
Pieces of the required length are cut using a regular hacksaw with a fine-tooth blade. It cuts well with a blade on metal. Cut the entire plinth assembly with the lid on.
Before installation, the strip covering the cable channel is removed. Screws or dowels are screwed into a recess, which is the cable channel. If the wall is thin, it is better to place a washer under the cap.
To decorate corners, there are special additional elements: external and internal corners, connectors for planks. The pieces of skirting boards are simply inserted into them. But the trouble with such a system is that these “spare parts” pop out. Therefore, it is recommended to seal them with transparent silicone sealant. The system is first assembled, then wires are laid into it.
One caveat. After laying the wires, the cover is not always easy to put back in place. It may rest against the cable, which prevents it from latching. Try placing the cable in the cover itself, this will make it easier to close it.
And one more point about installation. It is not always easy to route cables into an already assembled system. Some additional elements are made inconveniently and make it difficult to pull wires. Therefore, it makes sense to stack them as they are installed. And also, if you are going to tuck cables not only into the recess, but also into the space formed below and above, they definitely need to be laid before attaching the baseboard to the wall.
Electrical plinth with removable front part
When installing an electric skirting board of the second type with a front part and a “back” that is attached to the wall, the situation is similar. But the point here is that the bar must be fixed at the same distance from the floor. Otherwise, putting on the decorative part will be problematic. The soft bottom edge makes things easier, but it's only one or two millimeters. So the installation has to be really precise. How to be? Use "samples".
- We cut off two small pieces from the front part - 7 centimeters long. And we use them to set the bar at the desired level.
- From the point where we plan to install the fasteners, we retreat a few centimeters and place a piece of decorative strip - on one side and the other. This area is set to exactly the height that is needed.
The second type of electrical skirting boards is with a removable front panel
- We place the fasteners in the space between the two “samples”.
- We move on and so on until we install all the segments.
This method will allow you to screw the plank at the same level relative to the floor covering, even if it is not very level. So there are no problems when installing the decorative strip.
Ceiling cable channel: how to enter and exit the cable
When laying cables in an electrical baseboard, it is necessary to insert the cables and remove them. Most plastic ones have a soft edge. It looks more like rubber than plastic. In this case, running the wires will not be difficult. Due to the elasticity, the edge will simply move away.
If the edges are hard, try warming them up slightly and bending them back. Another option is to make small cuts. But this looks the worst, since it’s difficult to do everything perfectly. It's easier to heat it up and bend it. But heating not on an open fire is okay. And practice, for starters, on an unnecessary segment - that’s two.
Ceiling cable channel several sockets
Some companies are developing sockets that can be installed between two pieces of strip anywhere. There is no need to cut anything. Everything is designed in such a way that the module is fixed on the strip (until it clicks), and the missing part is covered with a decorative strip of the same type. Usually these are expensive systems that are made in Europe and certified there.
Floor covering for water and electric heated floors
Sequence of installation work
- If there is an old wooden baseboard, carefully dismantle it so as not to damage the smooth surface of the walls and floors.
- Remove any remaining nails or screws from the walls and flooring, and sand the walls if necessary until the base of the floor is level. A typical mistake of novice installers, this point is very important; on an uneven surface there may be large gaps between the baseboard and the wall.
- Disassemble the plinth panel box, take the frame of the installation strip, the first stages of installation and cable routing are carried out on it.
- Installation starts from the outer corner along the entire perimeter of the room, so attach the corresponding corner connecting element to the end of the plank. Place the structure in the corner between the wall and the floor so that the channels where the cable is laid are on the outside, facing you.
- Use a marker to make marks on the wall through the mounting holes in the plank. In some models, the plastic strip does not have these holes; drill them yourself.
Option for installing a socket above the baseboard
- Depending on the design features, the cable strips are stacked in one cable channel or on separate shelves. If compact installation is necessary, you can use a plastic bundle that tightly ties the wires into a single bundle.
- When laying out the wiring, especially when you tie it together with a bundle, do not forget to make bends in the planned places. Leave loops for cutting wires and connections in universal boxes that are built into the baseboard structure. This is one of the typical errors that has serious consequences; the wiring will have to be disassembled and re-installed. It is not advisable to build up or make unnecessary connections in the new wiring.
Universal box with socket
After installation is complete, the decorative panels can be secured in place, creating a perfectly smooth baseboard, under which all communications are hidden.