Almost everything is known about the power supply of any objects (regarding the installation of power input). There are Rules for the Construction of Electrical Installations (PUE), Construction Norms and Regulations (SNiP), proven technologies and the experience of generations of electricians. However, the object is not always just a free-standing building. Most often, this is an area surrounded by a fence.
Between the premises in this territory, it is necessary to lay power, information, and signal wires. How to do it? Traditional methods (overhead line on supports, or underground installation) are too expensive, especially for a private home. Running a separate line for each object is completely irrational.
Which exit? Use existing infrastructure. If the distance between objects is small, you can use self-supporting insulated wire (SIP) with anchors. This will be an overhead line. And when the distance is several tens of meters? All that remains is to lay the cable along the fence.
No associations with sensitive objects and energized barbed wire: we will talk about the fence as a supporting structure for electrical wiring.
The neighbor decided to run an electric cable along the fence on his side. What to do?
Very often, in garden plots, to save money, the electric cable is run along the fence.
Is there a danger for residents of the site and neighbors when laying cables, especially from a metal fence made of corrugated sheets? What to do if a neighbor decides to save money and run a cable line right along the fence?
I think that first, before you panic, you need to find out the purpose of the cable. Perhaps this is a low-current cable that does not pose a great danger.
But if the fears are justified, and they plan to lay an electric line along the fence, then you need to promptly seek advice from qualified electricians.
I think that a competent electrician will dissuade the neighbor from such an undertaking, since if the cable is placed according to all the rules on the fence, it will not be cheaper than laying the cable underground using a specialized cable.
But if your neighbor is unshakable in his decision, you need to know how to properly and safely install the cable along the fence.
You will not be able to interfere with or prohibit such placement, provided that all wiring complies with the Rules for the Operation of Electrical Installations. Therefore, first of all, you need to take care of connecting the fence to a reliable grounding source, so that if something happens, the fence does not turn into an electric fence.
Here are the rules I found on a specialized portal:
The electrical cable placed on the external supporting structure must be protected.
A cable that has an armored sheath or is laid in a durable box (pipe) is considered protected.
The distance from the ground to the unprotected wire must be at least 2.75 meters. That is, if your fence is at least 3 m high, the task is simplified.
The shell material for open installation (without a protective box or sleeve) is selected taking into account the external environment. Protection from frost, overheating, ultraviolet sunlight.
Of course, the insulation must be airtight.
It is necessary to provide for temperature changes in length: both the fence and the cable. Under any conditions, the occurrence of gravitational force is unacceptable.
Along their entire length, the wires must have access for visual inspection of condition and repair.
At the connection points (boxes, couplings), it is necessary to provide a supply of wiring in the form of a loop for reconnection.
It is prohibited to use the cable as a supporting structure for other objects (even if the cable is self-supporting).
In any case, you cannot leave this matter to chance and do everything on your part to ensure that the design complies with the PUE standards and is as safe as possible. For supervision, you can contact specialists from the resource supply organization.
Article on the topic: My summer car, how to get the car into the garage
How did you resolve this issue? Write in the comments.
Subscribe to My channel in Zen so as not to miss new articles.
And with you, my dear readers, was the self-builder Sergei Gorbunov, also subscribe to my YouTube Channel of the self-builder BUILDING YOURSELF.
— Premier1Supplies
Before you buy or build an electric fence... a few general key questions:
Q: Where to start?
With proper planning, installing your own fences doesn't have to be intimidating. Use the following questions and answers as a guide. We've gathered the knowledge and advice we've gained from over 40 years of experience in the industry and from installing and using electric and non-electric fencing on our own farms. Pay close attention to what we suggest doing and not. These are hard lessons learned from things that didn't work properly, from cattle escapes, repairing damaged fences and the time spent managing it all. Let's start!
Q: Will the fence be moved? If yes, how often?
Q: Do I really need a fence blocker?
The fence power supply accepts electrical energy from an external source (either a 110V outlet or battery) and then pushes the energy through the positive terminal of the fence in very short pulses of high voltage and high current. This is absolutely necessary for the correct operation of the electric fence. Why?
- An electric fence is a pain barrier, not a physical barrier. A common mistake is not to electrify it. If you don't constantly keep the fence energized, your animals will stop being afraid of it. Then they will walk under it, walk under it, or walk through it—at the risk of becoming entangled (and possibly dying). Retraining is difficult.
- If one is live, fewer wires are required. As a result, both material and labor costs for installing the fence are reduced.
- Live fences last longer and require less maintenance because animals don't crowd, rub, or scratch. Therefore, fence wires (including wires that aren't energized) require less tension to do their job. And spacers and corner posts will last longer.
Q: How much grounding do I need?
As practice shows, the length of the ground rod depends on the output joules of the power supply. Higher wattage means more ground rods. Our standard recommendation is 3 feet of ground rod per joule of power supply output. If insufficient grounding is used, only a partial amount (not the full strength) of the pulse will be returned to the power supply.
Q: Where will the fence be located?
The best design depends on the following: Is the terrain level? Fewer posts are needed to maintain tension (lower cost per foot). Vil.
Laying cables along fences and metal structures
Almost everything is known about the power supply of any objects (regarding the installation of power input). There are Rules for the Construction of Electrical Installations (PUE), Construction Norms and Regulations (SNiP), proven technologies and the experience of generations of electricians. However, the object is not always just a free-standing building. Most often, this is an area surrounded by a fence.
Between the premises in this territory, it is necessary to lay power, information, and signal wires. How to do it? Traditional methods (overhead line on supports, or underground installation) are too expensive, especially for a private home. Running a separate line for each object is completely irrational.
Which exit? Use existing infrastructure. If the distance between objects is small, you can use self-supporting insulated wire (SIP) with anchors. This will be an overhead line. And when the distance is several tens of meters? All that remains is to lay the cable along the fence.
No associations with sensitive objects and energized barbed wire: we will talk about the fence as a supporting structure for electrical wiring.
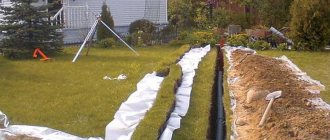
Advantages of underground wiring
Laying cables underground has a number of advantages over above-ground ones:
- Reducing the chance of network damage. If all installation standards are observed, the cable will be difficult to transfer or move, and its condition will not be affected by weather conditions and trees.
- It's easier to determine the length of the wire. If a cable is selected for underground installation, then during selection it is necessary to take into account the cross-section and length of the entire line. For an overhead cable, the weight and tension would have to be calculated to avoid overloading.
- Lower costs. To connect, you only need a forced network shutdown device, as well as small expenses for the project.
- Less risk of fire.
- Exposure to electromagnetic waves and thunderstorms is also reduced.
- Aesthetics. Since the wires are underground, the area can be used according to your preferences. The main thing is to remember where the wire is located so that there are no problems when planting trees.
Area before digging a trenchSource s00.yaplakal.com
Cable on the fence: what do PUEs say about this?
Actually, there is no such concept as a “fence” in the Electrical Installation Rules. There is a definition: “...cables laid along structures and walls...”. For such cases, there are many rules and restrictions. At least one thing is clear: this will be an open gasket, with all the ensuing consequences.
For example, geometry: depending on the height of the power wire route, it should have different degrees of protection. The material of the base of the wall (structure) also affects the laying conditions.
Article on the topic: How to properly assemble a log house from timber
We will not try to find special privileges or restrictions for fence power networks. Let's look at the rules related to the definition of “construction...”.
Briefly about the main thing
Underground cables are available for dry, wet and cold soil. Everyone has their own brand.
When laying, it is advisable to exclude tensile loads. There is no need to protect it with bricks if there is no kindling in that place.
The depth of the trench should be from 50 to 100 cm, depending on the placement.
There are certain standards for distance from static objects. For installation, it is necessary to make a diagram of the area so that in the future you will know where the wire is located.
The pillow must be at least 10 cm, 20 cm when entering the house. There should be no sharp objects in the ground.
In winter, the wire must first be warmed up to prevent cracks and breaks from appearing.
General safety rules for unprotected insulated wire
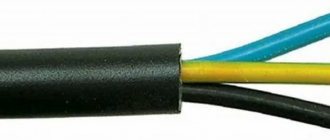
From the point of view of the danger of touch, an unprotected insulated wire is considered as uninsulated, that is, bare. What is an unprotected cable? This is a conductor that has only core insulation and an outer sheath (or without it, like self-supporting insulated wire). That is, under mechanical influence with a sharp object, you can touch the conductive wires.
A cable that has an armored sheath or is laid in a durable box (pipe) is considered protected.
- The distance from the ground to the unprotected wire must be at least 2.75 meters. That is, if your fence is at least 3 m high, the task is simplified.
- The shell material for open installation (without a protective box or sleeve) is selected taking into account the external environment. Protection from frost, overheating, ultraviolet sunlight.
- Of course, the insulation must be airtight.
- It is necessary to provide for temperature changes in length: both the fence and the cable. Under any conditions, the occurrence of gravitational force is unacceptable.
- Along their entire length, the wires must have access for visual inspection of condition and repair.
- At the connection points (boxes, couplings), it is necessary to provide a supply of wiring in the form of a loop for reconnection.
- It is prohibited to use the cable as a supporting structure for other objects (even if the cable is self-supporting).
An informal recommendation is that it is better to use a cable with a white outer sheath. On a bright sunny day, the wiring heats up less.
Let's consider each option depending on the fence material.
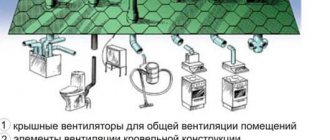
Why are they needed?
The use of low-current networks makes it possible to do the following:
• receive and distribute both terrestrial and satellite television • provide access to telephone communications • normalize work and provide access to the Internet • complete the design of wired broadcast networks • achieve the effective functioning of fire protection systems, as well as warning and alarm systems • receive access to various objects • automate the accounting of the management system for all kinds of energy resources • ensure the correct operation of local computer networks • achieve interaction between intercom devices • obtain a complete structuring of cable systems
Before installing low-current networks, you need to know that a full-fledged project of the future network is initially organized, including determining the future placement of the switchboard, sockets, relays and other devices included in the system. In the process of laying cables, installers carry out all work in full compliance with specialized rules and accepted standards. The installation of low-current networks itself consists of telephone, computer or television lines, installation of specialized information sockets and other means of communication, intercoms, video surveillance devices, security and fire alarms and other equipment.
There are certain recommendations that must be followed when installing low-current networks. They are as follows:
- Compliance with the minimum distance at which power and low-current cables and laid wires should be placed
- The distance between Internet lines and specialized power cables must be at least 0.3 m
- Do not run low-current cables into a riser where other electrical cables are located.
- Splicing wires is strictly prohibited. Installation is carried out only when using a solid cable
- If telephone communication wires are laid in a certain direction, they are placed in parallel, tightly pressed against each other
- If there is open wiring, the minimum distance at which it is necessary to place the telephone network cables is 15 mm or more (with a length of 10 m)
- The junction box is placed on the wall, but not above doors, windows or other openings
- The smallest distance allowed when installing a junction box on a wall is 300 mm relative to the ceiling
- Cables of different capacities, when crossing each other, must lie against the wall or go around it from above or below (this depends on the capacity of the wires)
- It is imperative to provide reliable cable protection. This especially applies to external low-current networks installed directly under windows or drainpipes.
- You should take care of grounding using special buses made up of well-insulated copper conductors.
- When laying open low-current networks for telephone communication, the cables must be placed at a distance of at least 200 mm from the floor and 150 mm from the ceiling
- With a closed installation method, the wires can be located at any height that seems convenient
- If all kinds of digitized signals are transmitted along the lines, low-current electrical networks can be placed along the walls in grooves, PVC sleeves in a raised floor or floor screed. In addition, suspension above a false ceiling is allowed.
Materials for low-current wiring in an apartment, house
To complete the full installation of a computer, television or telephone network, various types of wires are used. For installation of low-current computer systems and networks, cables made of copper are used. They are presented as a twisted pair format. As for class membership, they should be classified as B and E, respectively. There are also specialized fiber optic wires. If it is necessary to lay telephone networks, in this situation it is enough to use standard low-current cables of the 3rd category.
Low-current networks, types of wires
It is worth noting that for installation of low-current networks, electrical wires should be used. Through them you can transfer data, which is achieved with a clock frequency of up to 1 MHz. The use of optical cables is often observed when it is necessary to lay backbone networks. This is explained by the fact that in this case there is a need for a fairly high data transfer rate. As for the cable brand, it is initially indicated in the installation diagram.
Laying cables along a stone or concrete fence
From the point of view of the PUE, the work is carried out by analogy with the stone wall of a building. With a line height of 2.75 m, an unprotected insulated rein with an outer sheath is sufficient.
Article on the topic: At what distance from the fence can thuja be planted?
According to the Rules, a regular VVG of the appropriate section will do. However, given the layout of the wiring, it is better to use a double-jacketed power cable.
If the fence is monolithic (stone or brickwork, or cast from concrete), the cable is laid directly on the surface using standard clips (clamps) for street installation. They can be plastic or metal.
There are separate rules for self-supporting insulated wire (SIP). Since it has a single layer of insulation, a 60mm clearance is provided during installation. Special mounting clamps are available for this purpose.
If the fence is assembled from concrete panels, you cannot attach the cable directly to the plane. Under wind loads, the panels may move and the wiring will sooner or later break. In this case, the cable is attached to a supporting cable, and the suspension points are placed on support posts.
If the installation is at a height of less than 2.75 m from the ground, external cable protection is required. Firstly, it may be accidentally damaged. Secondly, at such a height there is a risk of electric shock. The wiring is placed in a box, cable sleeve (corrugation), or pipe. The material does not matter - the main thing is to provide mechanical protection.
Laying cables along a wooden fence
The height requirements are the same as for concrete. The main restrictions according to the PUE are fire protection. If the cable has a sheath made of fireproof or hardly flammable materials, it can be attached directly to the fence. For a shell made of combustible materials, there are a number of requirements. It is enough to do at least one of them:
- The power wire is laid at a distance from the wooden surface using rollers made of fireproof dielectric (most often ceramic).
- The wiring is placed in a non-flammable sleeve (corrugation). It can be metal or plastic that does not support combustion.
- Installation is carried out inside a fireproof box.
- A backing made of non-flammable material is used, with a width of at least 10 mm to the sides of the cable. You can use a supporting structure made of a profile pipe. Just don't let the wire touch the wood.
A common option is a steel strip nailed to the fence boards. At the same time, it serves as a supporting structure.
Laying cables along a metal fence
According to the Electrical Installation Rules, there are no restrictions, with the exception of general safety requirements (see above). The most important thing is to ensure the electrical safety of people. If the shell is damaged for any reason, the entire surface of the fence will become a source of electrical hazard. Therefore, a metal fence with electrical wiring must be grounded.
Article on the topic: How to choose doors for a bathhouse
Steel support pillars concreted to any depth on which the fence is attached are not grounding. It is necessary to organize a protective circuit and connect it to the plane of the fence.
Moreover, all shields must be connected to each other by reliable conductors.
The cable is installed using standard fasteners, just like on a regular wall.
If the fence consists of a strong frame welded from profile pipes, the optimal installation route is the upper horizontal guide. Of course, subject to the height rules: if the distance to the ground is less than 2.75 m, the cable must be in a sleeve or box.
A separate topic is fences made of mesh or lattice. The easiest way is a support cable. Suspension points are located on support posts. But such fences rarely exceed a height of 2.5 meters, so you will still have to lay the cable in a sleeve or box. The second option is preferable from an aesthetic point of view.
At the same time, the box or corrugation can be attached either to poles or directly to the mesh. The same goes for installing junction boxes.
How to Build a Chain Link Fence | instructions
Start with the first post and extend the mesh to the post. Starting at the top, thread a tension bar (Image 1) through each diamond and each tension band. The three tension straps should be equally spaced across the height of the rack. Roll out the mesh around the outer perimeter of the fence line and temporarily attach wire ties every five or six feet to keep the mesh upright.
Stop a few feet away from the fence post to stretch the mesh. This gives your partner room to work. Pull a tension bar through each diamond to the ground. Attach the carabiner to the tension strap bolt on the terminal block and the other hook to the tension bar (Image 2). Rotate until the mesh is tight. Once the section has been stretched, cut off the excess length with wire cutters. Repeat until done.
Once all the mesh is stretched, go back and place wire ties every five or six feet along the top rail and at least three ties per post (Image 3).
Bypassing the “fence infrastructure”
There may be a gate or wicket in the path of the power cable. How to get around an obstacle? If the opening has a “U” shaped box, or there is a supporting plane (ridge) above the gate (wicket), the problem solves itself. The wiring is attached to a stationary surface.
The rules for laying geometry are the same as on building facades: no closer than 50 cm to the opening. However, in practice this arrangement is rarely carried out. Therefore, to protect against damage, the cable around the wicket or gate should be placed in a box.
If there are no stationary structures above the gate or wicket, an aerial laying of the power cable is required. In this case, it is necessary to ensure a distance to the ground of at least 2.75 meters (or more if there is a need for large equipment to enter the territory). If the fence is below this height, guy posts are installed.
Organization of lightning rods
If electricity is introduced into the room using the TN-S grounding system, there is a conductor inside the cable that is connected to the physical ground. If there are no higher height grounded structures near the installation site, the wiring may be “attacked” by lightning. How to protect the power cable and premises during a thunderstorm?
Article on the topic: Where to complain about car service in a garage
The ideal option is a lightning rod on a structure that dominates in height. If the fence is metal, you already ground it, no additional work is required. If these conditions cannot be met, the cable must be protected locally.
- Armored cable - requires grounding of the outer conductive sheath.
- Laying in a metal hose or metal box - the casing itself is connected to the “ground”.
- The cable is laid along a steel strip - it is grounded.
In the case where a regular power wire is laid along a wooden or stone fence, a lightning rod is required in the immediate vicinity.
2.5.236
In the span of the intersection of LAN and LPV with overhead lines up to 750 kV, on which high-frequency communication and telemechanics channels are provided with equipment operating in the same frequency spectrum as the LAN and LPV equipment and having a power per channel:
1) more than 10 W - LAN and LPV must be made with underground cable inserts. The length of the cable insert is determined by calculating the interfering influence, while the horizontal distance from the base of the cable support of the LAN and LPV to the projection of the outermost wire of the overhead line onto the horizontal plane must be at least 100 m;
2) from 5 to 10 W - the need to use a cable insert in the LAN and LPV or adopt other means of protection is determined by calculating the interfering influence. At the same time, in the case of using a cable insert, the clear distance from the undeviated wires of overhead lines up to 500 kV to the tops of the LS and LPV cable supports must be at least 20 m, and from the undeviated wires of the 750 kV overhead line to the tops of the LS and LPV cable supports - no less 30 m;
3) less than 5 W or if the high-frequency equipment of the overhead line operates in a non-matching frequency spectrum, or the LAN and LPV are not sealed with HF equipment - the use of a cable insert when crossing with an overhead line up to 750 kV due to interference conditions is not required. If the cable insert in the LAN and LPV is not equipped according to the conditions of interfering influence from high-frequency channels of the overhead line, then the horizontal distance from the base of the cable support of the LAN and LPV to the projection onto the horizontal plane of the outermost non-deviated wire of the overhead line up to 330 kV must be at least 15 m. For overhead lines 500 kV, the clear distance from the outermost undeviated wires of the overhead line to the top of the cable supports LS and LPV must be at least 20 m, and for a 750 kV overhead line - at least 30 m.
Article on the topic: How to grow a thuja fence
Video description
How to warm up the wire in winter conditions is shown in the video:
Warming up the cable and installing the bottoms of the BKTP
With any of these methods, it is necessary to seal the ends of the cable using special couplings to prevent condensation from penetrating.
The cable needs to be warmed up only after the entire line has been fully prepared, since in winter the installation of the electrical network is strictly regulated in terms of timing. Installation of a warm wire must be carried out at a certain time:
- 60 minutes – from 0 to -10 °C;
- 40 minutes from -10 to -20 °C;
- 30 minutes – from -20 and below.
A cable for laying in the ground that has been heated should not be bent too much. After installation, it must be covered with a small layer of fluffy earth and wait until it cools, and then bury the hole.
If your budget allows, you can purchase a cold-resistant cable (CL). It is designed for low temperatures and is not damaged by severe frosts. This cable has its advantages: a good range of temperature conditions for installation (from +50 ° C to -60 ° C), as well as use without heating in frost conditions of -25 ° C.
Cold-resistant wireSource hostingkartinok.com
Features of replacing cable glands in the house
In most cases, the power supply to a private home is carried out via a tap from an overhead power line, for which a self-supporting insulated wire with aluminum conductors of the SIP grade is used. It is possible that part of the introductory line will be laid along the facade of the building. Replacing part of the input from the pillar to the wall does not cause any special problems; it can be easily done by specialists.
It is very important to install wiring along the wall of the house in accordance with the requirements of electrical fire safety standards, as well as to correctly enter into the wall. If the facade is made of non-combustible materials and is not finished with siding, the input cable can be laid in a box or corrugated pipe. The owner of a private house needs to know that the SIP has a flammable sheath, and therefore it is prohibited to lay such wiring on wood, therefore, before attaching the line to a wooden wall, it is necessary to connect to a cable with copper conductors using special sealed clamps
In the case of walls or their decoration made of wood and other combustible materials, the SIP, even if it is laid in a protective shell, must be at a distance from the wall of at least 6 cm (according to Chapter 2.4 of the PUE, clause 2.4.60), although the PUE only says the following: “The clear distance between the SIP and the wall of the building or structure must be at least 0.06 m.” As you can see, there is not a word about the degree of flammability, so it is recommended to maintain this distance when laying on brick walls and walls made of other non-combustible materials.
The entrance to the building through a wooden wall is equipped with a metal sleeve, which is a thick-walled pipe (in accordance with Chapter 2.1. PUE, clause 2.1.58 and SNiP 3.05.06-85 (in clause 3.18) - these clauses of these documents contain the requirements for passage of cables through walls.
A special issue is replacing the input cable in a wooden house, as it requires strict compliance with fire safety standards. In this case, it is better to use a metal cable channel for installation, or even better - a pipe
It is important to remember that only cable products with a three-layer non-flammable sheath are allowed to work. Of the domestic products, the VVGng-LS brand is best suited
Article on the topic: Can children go to the Turkish bath?
The entrance to a wooden wall should be equipped with a metal cup, wrapped in asbestos and fixed with an alabaster mixture. Placing the cable in metal protective equipment is possible only if there is a grounding loop, since they will require mandatory grounding.
Installation requirements
The entire set of elements intended for laying a cable in a classic design is called a cable structure; the fence on the site is not included in this category. The PUE allows installation on so-called non-cable structures, which can be a fence, but during installation it is necessary to fulfill the conditions so as not to deviate from the requirements of regulatory documents.
Installation requirements are much lower if an armored conductor is used for installation, but this is not always convenient and affordable, so in the future we will consider the option of working with PVS or VVGng-LS cables, which have deservedly won the widest use due to the successful combination of such parameters, both price and quality. Their conductors are made of copper, and the insulation is made of polyvinyl chloride (PVC).
PVS and VVG cables, as unarmored ones, must be laid at a height of at least 2 meters, otherwise they must be protected from mechanical damage, that is, in accordance with the PUE, they must be laid in a pipe, in a box or protected with a steel corner etc., as specified in paragraph 2.3.39 of the PUE (Chapter 2.3).
2.3.120
In cable structures, it is recommended to lay cables in entire construction lengths, and the placement of cables in structures should be done in accordance with the following:
1. Control cables and communication cables should be placed only under or only above power cables; however, they should be separated by a partition. At intersections and branches, it is allowed to lay control cables and communication cables above and below power cables.
2. Control cables may be laid next to power cables up to 1 kV.
3. Power cables up to 1 kV are recommended to be laid over cables above 1 kV; however, they should be separated by a partition.
4. Various groups of cables: working and backup cables above 1 kV of generators, transformers, etc., supplying power receivers of category I, it is recommended to be laid at different horizontal levels and separated by partitions.
5. The dividing partitions specified in paragraphs 1, 3 and 4 must be fireproof with a fire resistance rating of at least 0.25 hours.
When using automatic fire extinguishing using air-mechanical foam or sprayed water, the partitions specified in clauses 1, 3 and 4 may not be installed.
On external cable overpasses and in external partially enclosed cable galleries, the installation of dividing partitions specified in clauses 1, 3 and 4 is not required. In this case, mutually redundant power cable lines (with the exception of lines to electrical receivers of special group I category) should be laid with a distance between them of at least 600 mm and are recommended to be located: on overpasses on both sides of the span supporting structure (beams, trusses); in the galleries on opposite sides of the aisle.
Types of electrical wiring for installation in the ground
Electrical networks come in different types and are classified according to their purpose and method of solving the tasks. It is possible to organize energy supply to a building not only by air, but also by ground. For comparison, the main options for laying wires in soil or water will be discussed below.
The most commonly used cables are the following types:
- armored VBBShV with three-layer insulation - suitable for laying in the ground and under the road surface (in the ground it can be replaced with VVG with two-layer insulation);
- armored SKLU, ASKLU, OSKU, AOSKU with a lead sheath, produced with copper and aluminum conductors - used for installation in reservoirs;
- well-known AAshv, AAshp, AVVG, AABL - suitable for soil with low corrosive activity;
- power AAB2l, ASB, ASPL - another ideal option for laying in soil with low corrosion activity;
- AAPl2Shv is suitable for soil with high corrosive activity;
- PvKShp with reinforced armor is often used in the northern regions of the country, where it is necessary to work with frozen soil.
Article on the topic: How to make a stove for a camp sauna
Cable AAB2l 3x120 for underground installation
The best solution for laying an electrical line in the ground is an armored cable with several insulating layers, which has increased protection from mechanical influences and does not require additional protective equipment (corrugations, pipes). Wires of other brands acceptable for laying in the ground must be laid in polyvinyl chloride pipes.
In water, the cable is laid either manually or mechanically. The first option is suitable for shallow waters, the second involves the use of a special pontoon equipped with an electric cable on a drum. The pontoon moves from one bank to the other along a pre-tensioned cable; the cable slowly unwinds and sinks to the bottom, where divers lay it. We allow installation in winter from the icy surface of a reservoir.
Thus, the simplest, fastest and most inexpensive solution for electrifying a country house or cottage is laying cables along the facade of the building. The requirements discussed above are actually not that strict. Having a minimum level of knowledge, you will be able to apply it in practice. But in case of the slightest doubt, it is better to contact trusted specialists who provide the appropriate documentation upon completion of the work.
The procedure for installing cable ducts: step-by-step instructions
Cable laying work includes the following:
- The necessary calculations are made and a design drawing is drawn up. It is imperative to take into account the presence of other communications and coordinate the digging of trenches with their owners.
After carefully marking the area, you can begin digging a pit. In this case, the width of the pit should be 40 cm greater than the width of the well. A 15 cm thick sand cushion is poured onto the bottom. If the soil in this area is characterized by a high groundwater level, the bottom is concreted. Special equipment is used to dig trenches, but in the case of nearby external communications, the digging is done manually. The width and length of the trenches depends on the number and material of pipes. If the soil crumbles, the walls are reinforced with sheets of wood. Pipes are laid taking into account the slope from the center of the pipe to the wells. Wells are installed. They must stand level on a concrete base. Wells must be freely connected to cable pipes. If there is a loading chamber, it is filled with cement. Pipes are laid in prepared channels. Most often these are pipe packages, which should be located at a distance of 20-25 cm from each other. The same distance should be between the underlying layers. Free spaces are filled with clean soil. The well is connected to the pipes, all joints are checked and sealed. Backfilling is carried out and compacted every 0.2 m.
Installation of communication cable ducting is not an easy task, and not only installation and laying of cables, but also design. Therefore, it is best if professionals do this.
Methods for connecting wires to a support
To connect the SIP wire to current-carrying power lines on a support, several options are used, depending on the power line cable.
For insulated cable lines, special piercing clamps are most often used, which are available in a wide range for various sections and types of insulation. Some clamps can be used without removing the voltage from the line: in their design, the stripping head is made in insulation, which allows you to safely connect the self-supporting insulated insulated insulated wire to the power line. At the same time, the design of the piercing clamps does not allow them to be reused, so everything must be calculated correctly, without any room for error.
But for bare conductors, special clamps are used that have contacts with a smooth surface and do not have piercing elements.
When connecting a house to a power line, it is better to coordinate all actions with the energy supply organization. Such organizations may have their own requirements for connections and materials used.
Article on the topic: And the dawns here are quiet 2015 at what minute is the bathhouse
Some “masters” lower the SIP along the pole and lay it underground to the house
But it is important to understand that the self-supporting SIP cable is not intended for such installation, since it does not have special protection from harmful influences and armor from mechanical damage, as a result of which it is intended only for laying in the air
Structural differences of SIP
In networks with voltages up to 1 kV, only two types of insulated wires are used, although there are more of them. To understand what the difference is between them, we have provided a small informational list:
SIP – 1
- SIP-1 is a bundle of twisted phase wires with insulation and one uninsulated neutral conductor made of high-strength ABE alloy. Has from one to four conductive cores.
SIP - 2 A distinctive feature of SIP-2 is the presence of insulation not only on the phase wires, but also on the neutral core, and naturally, it has a higher cost. That is why it is used mainly on high-voltage lines.
SIP - 4 This type of wire has at least two current-carrying wires, but it does not have a carrier (zero) wire. It is designed specifically for making branches from power lines towards buildings and laying along walls.
Note! Other types of SIP differ from each other not only in the type of insulation, but also in the number of cores. However, to carry out electrical inputs into the house, only SIP-1 and SIP-4 are most often used - the rest are intended for lines with voltages up to 35 kV.
Due to the presence of insulation, the SIP wire has an aesthetic appearance. This is, of course, an important nuance - but more for the consumer. Energy supply organizations value SIP because the insulation does not allow for “throwing” onto the wire, and thus using the resource bypassing metering devices. Another advantage is that the sheath makes it possible to connect two wires to each other without removing the voltage from them - however, this requires special fittings.
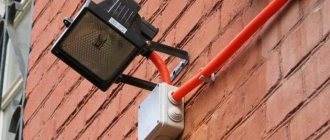
What problems does fence lighting solve?
Fence lighting solves a number of important problems.
- Functional lighting. The equipment illuminates areas of areas that are used at night. Lanterns are often placed at driveway and garage gates, gates, outbuildings, garden paths, etc.
- Object security. Lanterns provide illumination of the area at night, facilitate the correct operation of video cameras and have a psychological effect on intruders.
- Design. In this case, lighting technology performs decorative functions. These include complementing and highlighting various architectural elements, illuminating garden plants, creating contrasts and accents on landscape details.
Photo #1: Lighting on fence posts
Video description
This video shows how to install a wire into a house:
Cable entry into the house
Everything is connected to the forced disconnection device in the electrical distribution board and power line wires using special clamps. The wire can be fixed on the pole with clamps in increments of no more than 1 m.
Grounding armor wireSource i.ytimg.com