What does the word "markup" mean?
If we turn to the explanation of the verb “mark” in the explanatory dictionary of the Russian language, then it explains it as measuring, marking, designating the dimensions of something.
In relation to electrical wiring, as well as any technical systems, this means that to carry out markings you must have:
1. object - a house building or apartment premises in which it will be necessary to lay electrical wires;
2. the owner’s plan embodied by the work project.
In other words, the marking process means transferring paper drawings prepared in advance by the project directly onto the structural elements of the building (walls, floor, ceiling) for laying cable routes and wires, installing sockets, lamps, switches, junction boxes.
Electrical installation work: price per point.
When calculating the cost of electrical installation work, we start from the concept of “point”. I repeat once again - every electrician calls something different as a point!! “Point” we consider the wire output for: socket, switch or dimmer, power supply for stationary equipment - kitchen appliances and splits, directly connected outputs (chandeliers, sconces, bell, etc.), TV/Internet cable output (UTP ) and power lines from the switchboard to the distribution boxes. The output of the wire under a socket or a block of 5 sockets is still considered a point! The price of one “point” is 250 rubles.
We also consider the junction box (the place where the wires are connected) to be a “point”, also known as the distribution box. It is not always possible to count the junction box, but, as a rule, there are 3-6 of them in one room. With a high saturation of points, there are correspondingly more of them, since there are more places to connect the wires. A competent electrician can always indicate their number and installation location when meeting at the site.
The situation is the same with lighting fixtures, no matter how many lamps hang on one switch, they are all considered as separate points.
We count the “points” themselves; their price includes:
- preparation and marking of the surface, make a mounting hole for further installation;
- drill the cable passages in the wall;
- installation of cable routes;
- cable pulling;
- switching wires in the distribution box and welding them;
- securing the wiring in the groove.
Chasing walls for wiring
Grilling is paid for as a separate item. Perhaps this is the most labor-intensive and noisy process in electrical installation. We also install socket boxes as a separate item. The complexity of laying the grooves is largely determined by the material of the walls: brick, concrete or foam concrete. Let me give you a simple example: you are renovating your apartment and decide to replace the old wiring. You immediately need to decide what kind of ceiling will be in the apartment. If you leave the existing ceiling, then it will be necessary to completely ditch the entire apartment and, accordingly, the cost of electrical installation increases. If a suspended or suspended ceiling is made, the cost of electrical installation will be reduced due to the fact that most of the cable will go under the ceiling and only a small part will go down the groove to sockets and switches.
Apartment panel. Installation of machines
Assembling an apartment panel depends on the configuration of the internal layout, because this is the heart of the electrical system of your apartment and a lot depends on its proper assembly! It should be noted that a minority of the country’s residents have an apartment panel located in the apartment itself. Most are forced to be content with a section in the floor electrical panel. When choosing the ratings and parameters of the cable, circuit breaker and sockets, you should remember that the circuit breaker protects not the devices connected to the line (load), but the line itself - the cable! Its task is to save the cable from overload, overheating and fire. Some users are careless about this task, and can without hesitation install any available machine, as long as it works, or when choosing, they are guided by the following criteria: cheaper, so that it won’t cost too much, or more powerful, so that it won’t break the bank again.
Finishing installation
The final stage is finishing installation. Installation of fittings for sockets and switches RUB 100. one mechanism. Installation of lighting fixtures: sconces, chandeliers.
Preparatory stage
When marking, the master must have the following documents on hand:
- detailed electrical circuits for each room and the entire building as a whole, developed on the basis of already working standard solutions;
- installation drawings indicating the location of each electrical wiring element, supplemented by information on the laying of low-current circuits (telephone, computer networks, intercom, antennas, alarms and other circuits), gas pipelines, water supply systems, heating systems, sewerage systems to take into account their mutual influence.
If you neglect this rule, relying on the rich life experience of the owner or the extensive experience of performing electrical work by an invited electrician, then there is a high probability of making mistakes that will have to be corrected in the future.
As a last resort, when there is no longer time for design, for reference and guidance, you can use the simple recommendations for the placement of electrical wiring relative to the elements of building structures, shown in the picture, although it is still better to refer to building codes and regulations.
All wires and cable channels here are placed only in their horizontal and vertical directions at right angles. It is impossible to arbitrarily mark routes at an angle to save distance. During operation, after a few years, there is a possibility that when attaching furniture to walls, hanging pictures... the drill bit will get into an electrical wire and create an emergency situation.
The height of placement of sockets and switches is not strictly regulated, but is chosen according to the habits and preferences of the apartment owners. When placing electrical wiring in relation to a door, window, radiator, gas stove, adjacent walls and ceiling, one must be guided by the requirements of regulatory documentation.
Wiring marking is the process of drawing lines on walls and ceilings. To carry it out, you need to use at least simple drawing devices:
- ruler or tape measure for measuring distances;
- marker, pencil or ballpoint pen to mark lines;
- plumb line and level to determine the horizon and verticals.
Preparatory activities and necessary tools
If all documentation is available and thoroughly studied, it is necessary to prepare all the necessary materials for marking. There are several methods for applying markings for grooves. Depending on your capabilities, you can use ancient methods, using available means, plumbs, levels, cords that are available in any household.
Tools for marking electrical wiring
If funds are available, you can use modern devices, electronic, laser rangefinders; professionals in construction companies can afford this . Regardless of the method you choose, the technique boils down to drawing lines on the walls and ceilings; for this you will need:
- marker pencils or felt-tip pens, or crayons for drawing;
- for measuring distances, rulers or tape measures or electronic rangefinders;
- to determine horizontal or vertical levels, use a plumb line and levels or laser systems to mark levels;
- construction cord.
After preparing all the tools and devices, you can begin marking.
STAGES OF ELECTRICAL INSTALLATION WORK
Preparatory stage
installation work consists of transferring the markings from the plan diagram to the walls of the apartment.
The places where the wires will be laid are marked; it is advisable to mark them on the side, indicating what type of wire will be laid in this place. The installation locations of sockets, switches, distribution boxes, and stationary lamps are indicated.
Channeling.
Grilling is best done using special equipment. However, such professional-grade devices are quite expensive. If you have the opportunity to rent a wall chaser, you should definitely take advantage of it. The cost of rental will more than pay for itself with the high speed and quality of work performed.
An alternative (in our case it is the most common) option is a combination of an angle grinder and a hammer drill. For an angle grinder you will need a circle for working with stone, and for a hammer drill several attachments:
- chisel (25-30 mm) and drill (16-20 mm) for working on concrete;
- core drill with a diameter of 100 mm;
- set of pobedit drills.
Tracing is performed exclusively in horizontal and vertical directions. Horizontal grooves are located at a distance of 50 cm from the ceiling slabs.
Wiring.
The VG cable with a cross-section of 3x2.5 stretches from the side of the shield to the distribution box. Then from the box to the installation site of the socket, switch or lamp. To power electrical appliances with low and medium energy consumption, a VVG cable with a cross-section of 3x1.5 is sufficient.
Equipment with increased energy consumption is installed directly into the panel of an individual RCD, bypassing distribution boxes. In this case, the cable type and cross-section must be selected depending on the technical requirements of the connected device.
The wires in the grooves are secured with a small amount of plaster, usually starting gypsum. It must be applied in such a way that the main mass is located in the groove, and does not rise above the general level of the wall.
The electrical wiring in the central distribution panel in the new building is connected to automatic circuit breakers and RCDs. Connection to the meter and external power supply lines is carried out by a professional electrician. Attempts to connect without authorization are fraught not only with herbs, but also with penalties from energy supply organizations.
By installing electrical wiring in a new building yourself, you can save a lot of money. But it should be borne in mind that the power supply network is a source of increased danger. Therefore, all actions must be performed extremely carefully.
* * *
2014-2020 All rights reserved. The site materials are for informational purposes only and cannot be used as guidelines or regulatory documents.
Creating a Wiring Diagram
In new apartment buildings, the general building electrical network is connected only to the apartment. The entire layout of the electrical network inside the apartment is already carried out by the owner, depending on the developed plan for the arrangement of furniture and electrical appliances. This is convenient, because owners of apartments with a ready-made network will have to partially or completely dismantle the old one in order to change it.
You can draw up a wiring diagram for your apartment and carry out its installation yourself, or you can entrust this task to specialists. The second option requires a fairly expensive investment, but it is worth remembering that working with electricity is life-threatening.
If you do not have certain skills, then it is better to entrust the installation to specialist electricians, and you can draw up the wiring diagram yourself.
The diagram can be made on a small piece of paper, but be sure to apply all the elements in accordance with generally accepted designations
Any installation begins with the development of a diagram of the future electrical wiring.
But before that you need to:
- think in detail about the placement of all electrical equipment and appliances in the apartment;
- choose the optimal locations for the location of switches and sockets;
- depending on the location of windows and natural lighting, select placement points for chandeliers and other lighting fixtures;
- calculate the required footage of the electrical line and the number of electrical points throughout the apartment.
The planning process should not be rushed; it is a very important step and must be taken seriously. Indeed, in case of miscalculations at this stage, in the future it will be necessary to install furniture not so conveniently, but because it will correspond to the location of the sockets. Or use extension cords, which will litter the apartment with their wires and interfere with free passage.
After deciding the issue with the location of furniture and electrical appliances, you can begin to create an electrical circuit. The drawing must be as detailed as possible and drawn up to scale. To do this, you can take a plan diagram of the apartment, on which all the main parameters of the rooms are indicated, or using a ruler and pencil, you can independently transfer the apartment plan to a sheet of paper. In this case, in addition to the intended location of objects, the diagram must indicate door and window openings.
When the plan of the apartment itself is drawn up, we proceed to the next stage - the location of electrical points and wiring lines. It is worth noting that all output elements from the general network are considered electrical points, that is, sockets, switches, light sources operating directly from the network, distribution boxes.
You can create a diagram using special programs such as archicad or Adobe Illustrator. However, using these programs requires certain skills that specialists possess. But such diagrams will help to visually assess the future location of electrical points in the apartment
From the point of view of everyday operation and convenience in the event of malfunctions, the best option is to distribute electrical points along separate electrical wiring lines. The type of such distribution is called a “trail”; it will be discussed later in the article.
The following must be marked on the diagrams with extreme accuracy:
- A panel from which the main conductor of the electrical wiring line is routed into the apartment.
- Routes of laid cables . The basic rule that must be followed when laying cables is its strict horizontal and vertical location. Also, the distance from ceilings and openings should be at least 20 cm.
- Distribution boxes are considered the main connection point for cables inside the apartment. With proper distribution of the electrical network inside the apartment, they should be located on each branch of the network line. Thus, distribution boxes should be in each of the living rooms, hallways, and kitchens.
- Sockets - there can be any number of them. The law does not limit the number of sockets that can be located in an apartment. However, when calculating their location, it is worth taking into account their location relative to doors, windows, batteries and pipes, gas pipelines. So, they can be located in any convenient place, but not less than 20 cm from door and window openings and 40 cm from gas pipelines, radiators and heat pipelines.
- Switches . Their location is also not regulated by the legislator in any way and depends entirely on the wishes of the designer. It is most convenient to place them no higher than the level of the head (on average 150-170 cm from the floor), or in the area of the hand with the arm lowered down (50-70 cm from the floor). The location relative to the doorway does not matter and can be either on the right or on the left, depending on whether the owner is left-handed or right-handed and how it is more convenient for him to turn the light on and off.
- Light sources that can be located in any convenient place, both on the ceiling and on the walls. Their number is also not limited and depends on the illumination of the rooms and the desire of the designer to illuminate one or another corner of the apartment to a greater extent.
A well-executed diagram of the location of electrical points and wiring lines will allow you to freely navigate in the future when laying apartment electrical wiring.
Using symbols when creating a diagram will help in case of further contact with specialists. This way they can figure out what the author intended
Preparing for work
Before you begin installing electrical wiring in the apartment, prepare the following tools:
- A fence cutter, grinder, hammer drill or drill (for cutting furrows).
- Screwdriver Set.
- Pliers, wire cutters.
- Building level.
- Phase indicator.
- Drills, hammer drill bits.
- Knife and hacksaw.
At the next stage, clear the walls of all foreign objects that may interfere with the marking and installation of wires. Then, according to the drawn up diagram, you can start marking:
- Using a laser level or a stretched cord, mark lines on the surface of the walls for cable passages, according to your project.
- Also make appropriate notes at the locations of sockets and switches.
Approximate layout of electrical wiring in a house
When you are finished with the markings, proceed to preparing the walls. When organizing hidden wiring, it is necessary to make grooves along the intended lines, as well as niches for sockets, junction boxes and switches.
To do this, use a wall chaser or grinder; with their help, the most even recesses are obtained. If you don’t have such a tool, it doesn’t matter, you can try to do everything with a hammer drill, but for large areas this is not the best option. Holes for sockets, boxes and switches are made with a hammer drill using a special attachment - a milling cutter (crown) for concrete.
If you don't have a professional tool, try renting one.
To install open electrical wiring, it is enough to level the walls so that the cable channels lie smoothly, without distortions.
Instructions for laying electrical wires
Before drawing up a diagram and starting installation work, you need to familiarize yourself with a number of documents regulating the location of electrical wiring in the apartment from the point of view of fire safety and safety for human life during operation.
Step #1 - study the requirements for circuits
Basic requirements and prohibitions when laying wiring in an apartment:
- it is prohibited to connect the grounding of sockets to the neutral wires or to water supply and heating systems - the grounding connection must be made only to the grounding bus;
- mandatory compliance with the vertical and horizontal arrangement of power line routes;
- avoid crossing wire lines relative to each other; the laying path should be made as convenient as possible from a household point of view, so as not to accidentally break the wires in the future when carrying out minor repairs or installing any equipment on the walls;
- the distance between parallel wires must be at least 5 mm;
- conduct wires to sockets from below, and to switches - from above;
- mandatory installation of a machine with a nominal value of 63A for apartments in which electric stoves are installed. Read more about choosing slot machines in this article.
The height of electrical cable routes relative to the ceiling or floor is not regulated by law. However, from a domestic point of view, it is better to place them closer to the floor or ceiling in order to free up most of the wall surface for further use.
Compliance with the basic requirements will ensure the electrical safety of the installed electrical wiring and protect against short circuits and fires.
Step #2 - Wiring
There are several basic options for creating working electrical wiring in apartments.
They are used depending on the type of apartment:
- star wiring;
- “loop” type wiring;
- wiring using distribution boxes.
Let's look at the features of each of these options.
Option #1 - star wiring
“Zvezda” is convenient for laying electrical wiring in studio apartments or one-room apartments. Its peculiarity is that a separate cable line is connected to each electrical point, which is connected to the central electrical panel.
The disadvantage of such wiring is the high cost of the length of the electrical cable used and the installation of a large electrical panel. A plus is the ability to control the operation of each element of the home electrical network.
With this wiring diagram, in the event of a malfunction of one of the electrical points, there is no need to check the entire home electrical network
Option #2 - “loop” type wiring
The “loop” is similar in principle to the previous circuit, but in this case several outgoing electrical points can be connected to one line of the electrical wire. This wiring format will be more economical and can be used in apartments with any number of rooms.
Also, this type of wiring makes it possible to quickly find faults in the event of a failure of one of the electrical points, since they are divided and each connected to its own line. But, it is worth understanding that the load on the machine will increase depending on the number of electrical points connected to one line.
The cable wiring method was considered the main one in construction in the 20th century. It saved the length of the electrical cable, while maintaining the ability to check a certain direction in the event of a malfunction of one of the electrical points
Option #3 - distribution boxes
The use of distribution boxes is the most modern method of installing electrical wiring in an apartment. The principle is to conduct powerful electrical wiring strands from the main electrical panel to each of the rooms, where the electrical wiring lines are redistributed point by point in the distribution box.
To create an optimal electrical network inside the apartment, it is worth using all types of wiring simultaneously. So, for example, it is better to make connections for high-power electrical equipment and electric stoves in the “star” version, electrical appliances in the corridor are provided with a network supply through a “loop” type wiring, and lights, switches and sockets in living rooms can be made using distribution boxes.
Step #3 - marking the apartment
After creating the diagram, several steps will follow for wiring inside the apartment. Each of them has features that must be strictly observed.
The second stage after drawing up the diagram is considered to be “marking”. This is a very important stage, the essence of which is to accurately transfer the developed electrical wiring diagram directly to its place in the apartment. That is, it will be necessary to apply marks on the surface of the walls, which, in accordance with the diagram, will later be the locations of electrical points and electrical wiring lines.
When transferring the diagram directly to a place in the apartment, you should use the same colors and symbols. This will help you better navigate when starting work.
The markup should be done as follows:
- designate the places where sockets and switches, light sources will be located;
- select places where cables will be routed for TVs and wi-fi routers;
- designate the locations of distribution boxes;
- determine and mark the locations of the cable laying lines from the distribution boxes to each of the electrical points (the walls will be chipped along them later during installation);
- determine the location of cable routes from the main apartment electrical panel to each distribution box.
Carrying out markings allows you to “on the spot” determine the correctness of the calculations on the diagram and finally confirm the decision on this arrangement of electrical wiring in the apartment.
Step #4 - laying electrical cables
There are several ways to lay the electrical cable:
- hidden;
- open.
Let's talk about each option in more detail.
Method #1 - hidden wiring
The first method is considered more labor-intensive, but it will allow you to hide all the cables inside the walls, which looks more aesthetically pleasing and will not be conspicuous by the presence of boxes or open cables. To execute it, you will have to trench the walls, making grooves for cables in them.
Hidden electrical wiring will protect the cable from external influences and possible mechanical damage, such as pets
Laying and further applying plaster will hide the electrical lines from view. It is worth noting that caution must be exercised when using this method, as damage to the cable can lead to loss of electricity in a section of the network.
A more acceptable option for laying cables this way is to install electrical wiring under the floor covering. In this case, it is necessary to enclose each wire in a corrugated tube, which gives it additional protection from damage.
It is important to remember that before finally sealing the walls and floor, you need to use a tester to check the proper operation of all electrical outlets.
Method #2 - open option
Open installation is suitable for apartments and premises where it is technically prohibited or impossible to install wires inside walls or floors.
This is a simple installation, which is often carried out along the upper part of the apartment at the junction of the wall and ceiling. The cables are enclosed in special boxes or cable channels.
The open method is suitable for wiring without major renovations in the apartment. So, for example, when installing electrical equipment that requires a separate output to the electrical panel
The main advantage of open installation is considered to be easy access to cable networks.
We talked in more detail about installing wiring from the panel in the following material.
Marking cable lines to the distribution board
In private households, usually the input cable from the power line comes directly to the distribution board (distribution board), and grooves are possible in short sections. In apartment buildings and other administrative and industrial premises, markings for the input cable are made from the floor panel to the apartment or from the general switchboard to the building. It is necessary to immediately separate the groove markings for power cables and information networks. From the entrance entrance to the apartment they are laid separately. Based on the brand of cables indicated in the explanatory note to the plan and power supply diagram, calculate the width and depth of the required groove. Usually this is a four or three-core cable with copper wires of 6-8 mm/sq. The width of the groove for it is 2-3 cm, the depth is 1-2 cm. Width limitation lines are clearly marked on the walls from the power source to the control panel of the house or apartment.
Contents of the explanatory note and layout plan for electrical wiring elements
Each building, a private house or apartment in a multi-storey building, is built according to a project; the project includes power supply diagrams in a separate section with applications.
Attached are plans showing exact locations of the following elements in all rooms:
- distribution board;
- distribution boxes;
- sockets;
- switches;
- lighting fixtures, usually they are located on the top of the walls, or in the center of the ceiling of the room.
Sometimes, in addition to power supply networks, projects provide for hidden wiring of telephone lines, cables for television antennas, computer networks, all this must be taken into account. There is a description for the electrical diagram of the apartment, which indicates the number of groups in the distribution board, which wire is used for wiring in each individual section.
Table of symbols for wiring elements:
Based on this information, you can see the number of wires and their diameters between each distribution element. This allows you to determine the required depth and width of the groove in each section.
Methods for applying markings to the ceiling
To perform the work you will need to climb to a small height. For this purpose, it is convenient to use a regular construction stepladder. To prevent falls, it must be firmly installed and securely fixed with locking strips and screws.
Usually in small rooms there is one central lamp located in the middle of the room. To determine its installation point, it is convenient to use the method of diagonals drawn from different corners on the ceiling.
Sometimes, if the geometry of the floor and ceiling is respected, it is more convenient to draw a diagonal on the floor and mark the center of the room on it. Then they raise the plumb line to the ceiling so that the sharp end of the weight rises slightly above the floor and points to the point of intersection of the lines. Then the location of the upper end of the cord will coincide with the central point of the ceiling. It will need to be circled.
If the work project plans to hang several lamps, then in this case it is necessary to draw a center line along the ceiling, which is formed first by dividing the opposite sides into equal sections, and then connecting the formed points with a straight line.
When the room is large and the ceiling needs to be divided by several axial lines, then the corresponding opposite sides are divided into additional equal parts.
What do you need to have to install hidden electrical wiring?
Without a diagram, it is not possible to carry out electrical wiring since the diagram indicates the routes for laying the wire, power and lighting load lines, connections and locations of sockets and switches, etc.
2) Construction level and pencil.
They are needed for marking straight lines on the wall so that the prepared groove, and subsequently the wire laid in it, are even.
3) As already mentioned, hidden wiring wires are laid in a groove.
These grooves can be made with a wall cutter specially designed for this purpose - a wall cutter with a vacuum cleaner, or an angle grinder with a diamond attachment, or a regular hammer drill and concrete drill. Among the people, the last two methods are more popular than the first.
4) Installation material - wire, corrugation (plastic pipes), distribution boxes, undercuts, electrical tape, etc.
Marking hidden electrical wiring.
First of all, the location of the junction box is marked in the room. Next, lines are marked from it to the place where the proposed sockets and switches will be located.
Wire laying lines must be marked in such a way that they are perpendicular to each other. A slight rounding is made at the corners so that the wire does not bend too much during installation. The route for marking and laying the cable must be planned in such a way as not to make unnecessary grooves in the wall (laying two or more wires in one groove).
Wall chipping.
Once the necessary elements have been marked out, you can begin gating the walls. When using a grinder or wall chaser, two strips are cut along the marked line at a distance of approximately 30-40 mm (the width of the groove) and a depth equal to the diameter of the wire being laid, plus a margin of 10 mm. The partition between the cut strips is knocked down with an ordinary chisel and hammer.
If a hammer drill is used, then in this case, holes are drilled at a distance of approximately 5-10 mm from each other along the entire marked line. Then, using a hammer and chisel, the partitions between the holes are knocked down and a groove is obtained.
When gating walls, you must not forget about sockets, switches and distribution boxes. To install them, you also need to make recesses in the wall. This can be done using a special diamond bit and a hammer drill.
If you don't have a crown, you can use a drill. In this case, many holes are drilled within the circumference of the sill box and, using a hammer and chisel, all excess is knocked out so that the box fits in freely. The depth of the groove should be such that the box is completely hidden in the wall.
Installation of distribution boxes and trim boxes.
When installing hidden wiring, the first to be installed are distribution boxes and undercut boxes (boxes in which sockets and light switches are installed).
The box is fixed to the wall using putty or cement mixture. It is installed in such a way that its edges do not protrude and are recessed at the level of the wall. Whether or not a switch or socket is installed depends on the correct installation of the trimmers.
Laying the wire.
After the junction boxes are securely fixed in the wall, you can lay the wires. For hidden electrical wiring, VVG, PPV wires (less often AVVG or APPV) are used.
The wire is laid in a groove, having first put a corrugation or a plastic PVC tube on it. They don’t have to be used, but for this, electrical wiring must be installed using a double-insulated cable, for example VVG, VVGng, NYM.
To make it convenient to connect and twist the wires in places where sockets, switches and distribution boxes are installed, a margin of 10–15 cm is left at the ends.
If some of the wiring will not be laid in grooves, for example, under a ceiling frame or in plaster partitions of walls, then in such places the wire or cable must be laid in a corrugated or plastic tube.
When the wire is completely laid, the grooves can be puttied. Before doing this, you need to finally make sure that everything is done correctly. Installation of hidden wiring is completed.
Requirements of governing documents for the placement of hidden electrical wiring
In addition to the information specified in the explanatory note, when marking electrical wiring, it is necessary to take into account the general requirements specified in the PUE. In order to avoid mistakes and not to redo work already completed, pay special attention to the requirements for the placement of electrical wiring in relation to the gas pipeline, water supply, sewerage and heating lines. In apartment buildings, developers work according to standard projects; usually all these requirements are taken into account.
In the development of a private home according to an individual project, some details may not be taken into account. In this case, a competent and stubborn fire safety inspector may not sign the act of putting the facility into operation. Will issue an order to eliminate deficiencies; if you are interested in the safe operation of your structure, you should not solve the issue using traditionally known methods in our country. Wise people prefer to foresee these pitfalls in the process of marking hidden electrical wiring.
When laying cables in parallel with gas pipes, the distance between them must be at least 4 cm. When crossing these lines, the gap must be at least 10 cm.
PUE clause 2.1.56
When crossing electrical wires and cables with pipelines, the gap must be more than 5 cm, with pipes containing flammable and flammable liquids or gases, the distance is at least 1 cm. If the distance is less than 2.5 cm, the wires or cables are additionally protected from mechanical influences along a length of up to 2, 5 cm on both sides of the pipeline. In cases of intersection with hot pipes, wires or cables are protected with heat-insulating materials
PUE clause 7.1.50.
The distance from switches, sockets and other distribution elements of electrical wiring to gas pipelines must be more than 50 cm.
Marking electrical wiring in the apartment
Method of placing wiring relative to windows and doors
The distance of the grooves from the ceiling should be more than 15 cm, above the cornices of doors and windows more than 10 cm. Cables to switches, sockets, and distribution boxes must be laid only in vertical and horizontal directions. Diagonal connections are not allowed in order to shorten the distance and save wire. This requirement was established so that consumers can navigate where hidden wiring runs so as not to damage it when installing furniture, household appliances and other work.
If a malfunction is identified, it is easier to determine the location of the damaged section. The installation height of sockets and switches can be chosen by the developer independently based on the operating conditions of household electrical appliances and the location convenient for the owner. There are no strict rules established by governing documents on this matter.
Preparatory work before wall slitting
After studying the requirements of SNiP and drawing up a diagram for laying channels for hidden communications, you need to check the walls for the presence of old electrical wiring. This is a necessary event, since hitting and drilling walls without knowing its location is extremely dangerous to health, and maybe even life.
Old wiring can be detected using a special detector. It determines the depth of the wire, its location and current strength. This device is expensive, so it is quite expensive to buy it for rare use. But you can use an indicator screwdriver. It can also be used to find old wiring hidden in the wall, although with less accurate results. It will not be reliable if the wire is located at a depth of more than 1.5 cm from the wall surface or if the power cable is laid in double insulation. In addition, the indicator does not respond to low-current networks. The results of this check must be displayed on the gating diagram and, if necessary, appropriate changes must be made to it. At the final stage of preparation for work, markings are applied to the walls according to the plan developed on paper; after its completion, you can begin the main process.
Wire power calculation
The wires are calculated based on the total power of the electrical appliances that are planned to be connected. First of all, household appliances with high energy consumption, such as irons, vacuum cleaners and other equipment, are taken into account. Separately, you should take into account the possible power consumption in the bathroom and kitchen. It is here that the most powerful household appliances are installed in the form of electric stoves, dishwashers, ventilation systems, washing machines, heated towel rails.
After determining the total power, the cross-section of the wire, measured in square millimeters, is calculated. One square millimeter usually accounts for from 1.65 to 2 kW of load, therefore, calculations must be made with a certain margin.
Features of marking hidden electrical wiring for individual household appliances
According to the requirements of the PUE, electric heating devices with high power consumption:
- electric stove;
- boiler with heating elements for heating water;
- washing machine;
- split system or air conditioner and other powerful household appliances are connected to separate circuit breakers in the distribution board.
The wiring is laid from the switchboard with separate copper wires with a cross-section of 4-6 mm to the device connection point, bypassing all distribution boxes, directly with one three or four-core cable.
When marking, you must try to avoid the intersection of these lines with other groups; to do this, they are laid in the topmost horizontal row or the bottom. If intersections cannot be avoided, you must choose the option where there will be the least number of them.
Sequence of marking work for cable lines
It is advisable to begin this operation after the marking of all other electrical wiring elements has been completed, since the cables must connect them along the optimal path.
The locations of the cables in future grooves are immediately drawn so that the required width is clearly defined. It is easier to run a wall chaser along such lines or cut grooves using other available methods.
The marking of cable channels begins from the floor, apartment or entrance panel to the house. First of all, it is always necessary to decide on the method of supplying voltage to the distribution board, from which all the lines will extend. This will make the rest of the installation and selection of optimal paths easier.
After the power supply route to the distribution board is marked, power circuit lines are drawn sequentially, diverging throughout all rooms. In this case, questions may arise related to project inconsistencies. They need to be clarified and resolved in a timely manner.
When the location of the cable routes to all rooms has been drawn, you can gradually begin marking the electrical wiring inside each room. It is carried out according to the above rules and ends when all the lines for connecting sockets, switches and all terminal devices have been drawn.
In some cases, the space under the floor covering is used for laying electrical circuits. With such a project, hidden wiring of cable routes is carried out and there are quite possible places where they intersect with each other, which will be further protected from damage.
The cables must pass entirely under the floor covering without creating switching points or connections.
In conclusion of the article, it should once again be emphasized that fully completed electrical wiring markings serve as the basis for creating an executive diagram of the electrical supply of an apartment and house, which, during the operation of the building, greatly facilitates the planning and implementation of any subsequent work.
Apartment owners do the right thing by taking photographs of the final stage of marking and storing the photographs taken on several storage media, using the disk space of Internet services and cloud storage. This method allows you to clarify the detailed location of all electrical wiring elements in a few years, even if all information is deleted from the computer and camera.
Methods for drawing straight lines on the ceiling
There are several techniques for drawing diagonals and axes of connecting points along the ceiling.
The first method is based on the use of construction beating cord impregnated with coloring powder. To use it, it is advisable to work with an assistant who stands on a stepladder and firmly places the beginning of the cord at the first intended point for drawing the line.
The second worker unwinds the prepared cord to the end point, pulls it and also securely fixes his end with one hand. When the thread is well stretched, one of the workers pulls it away from the surface of the ceiling like a bowstring, and then sharply releases it.
The thread, returned under the force of the applied tension, abruptly moves to the ceiling and marks a clear and even line on it with its paint.
If you don’t have a special construction thread at hand, you can use ordinary twine or a long cord, which must be soaked in chalk, coated with soot or some kind of powder paint. The quality of the line made in this way was tested by our distant ancestors.
However, the safety of lines painted in this way should first be assessed. If the paint crumbles easily, then it is better to draw additional lines with a stable color.
The second method of drawing lines on the ceiling is based on the use of modern laser pointers or levels that use them in their design.
The relatively low cost of these devices makes them accessible to the home craftsman. The laser beam is clearly visible on any surface. It is very easy to orient and fix in space.
One worker aims the laser beam, while the second one applies markings to the ceiling surface. After drawing the lines, it is advisable to make a control check of the completed marking to eliminate possible errors.
Features of the wall gating process
In principle, it is impossible to do this work incorrectly, unless you make grooves that are too large. Then their subsequent sealing will require more solution and time. However, there are rules that make the gating process simple and, most importantly, safe.
The first thing you need to pay attention to is safety measures when working with cutting tools. In addition to the large amount of dust generated during the process of cutting grooves in the wall, large fragments that can cause injury can fly out from under the abrasive wheels.
Therefore, you should work in protective glasses, gloves, special clothing, and protect your respiratory system with a gauze bandage or a respirator. It is also worth considering the presence of existing hidden communications in the floor and walls. Their damage during the gating process can cause unpredictable consequences such as flooding or electric shock. Before starting work, the room must be de-energized and the water supply in it must be temporarily turned off. Before you start marking walls for gating, you must familiarize yourself with the requirements of building codes and regulations, the main ones of which read:
- Grooves can only be made in vertical and horizontal directions. It is prohibited to install them at any angle.
- The distance of horizontal furrows from floor slabs should not exceed 150 mm. The placement of vertical grooves is allowed at a distance of at least 100 mm from door, window openings and corners of the room, as well as at a distance of at least 400 mm from gas supply pipes.
- The route of the groove running from the distribution box to the switch or socket must have a minimum number of turns.
- Horizontal chipping of interpanel seams and load-bearing structures is prohibited.
These rules are taken into account when planning work. The wall gating diagram should show the cable routing plan, installation locations of electrical fittings, wire cross-section and water supply pipe diameters. The last two parameters affect the cross-sectional dimensions of the channels.
Carrying out marking work
When repairing, expanding or initial installation of electrical wiring, markings begin with marking on the walls and ceiling the future locations of lamps, switches, sockets, junction boxes and the apartment panel. That is, first, from the project drawings to the building structures of the premises elements, the overall dimensions of all terminal devices of the apartment’s electrical equipment, which must be connected by cables and wires, are transferred on a real scale.
To place these elements in hidden wiring, it is necessary to draw the boundaries of the recessed areas of the installation boxes.
It is necessary to take into account that:
- apartment walls can be leveled, covered with a layer of plaster or construction finishing sheets;
- Suspended or tension structures can be attached to the base ceiling;
- the height of the floor can be raised by additional flooring made of parquet, laminate or other floor coverings.
All these elements reduce the internal space of the room and thereby affect the accuracy of determining the location of electrical wiring.
It should be taken into account that the strict rectangular geometry of apartments during the construction of a building, as a sad rule of our reality, is often not maintained. Therefore, as a starting point for measuring dimensions, it is necessary to use the distances set aside from the upper and lower corners of the walls, to which adjustments have been made for alignment.
Start of marking
Marking begins with marking with a marker, in accordance with the installation plan, the placement of lamps on the ceiling, on the walls of switches, sockets, distribution boxes and distribution panels. The distances specified in the project between the wiring elements and other reference points are measured.
Tip No. 1 In order to clearly outline the boundaries for punching holes, it is recommended to have samples of electrical boxes and cables.
All electrical wiring elements are outlined on the walls, the lines that connect them are drawn strictly vertically and horizontally. Depending on the number of wires and their thickness, the width of the groove in each section is selected; for clarity, two lines are drawn indicating the boundaries for groove.
Table with parameters of various cables used in hidden wiring
B – cable width along external insulation;
H – cable height along external insulation;
These values are used when calculating the width and depth of the stubs.
For one three-wire cable with a wire cross-section of 0.75 - 4 mm from the box to the socket box, the grooves are made 1 cm wide and up to 1.5 cm deep.
Possible deviations as a result of subsequent work after marking must be provided for:
- the height of the floors becomes higher after filling the level and laying the floor covering;
- tension or suspended structures can be used on ceilings;
- the walls are leveled with plasterboard sheets or plaster;
These modifications reduce the volume of the premises and may affect the accuracy of the location of electrical wiring elements. In most cases of our reality, during the construction of premises, rectangular geometry is distorted. The length of the wall under the ceiling may differ from the length under the floor; these details must also be taken into account and adjustments made.
Inputting electricity into the house
First of all, it should be taken into account that the initial stage of installation of electrical wiring begins at the input located on a pole or support of the power line. For input, it is imperative to select a cable containing aluminum conductors. This is due to the fact that power line wires are also made of aluminum.
In the future, aluminum conductors will have to be connected to a copper cable, and this is a very bad combination. In case of direct contact, rapid oxidation occurs. At the junction of these materials, resistance begins to increase sharply, which is why the power may spontaneously turn off. This situation does not exclude the burnout of the input aluminum cable, as well as the main power line wire itself. To avoid such cases, the connection of copper and aluminum conductors must be made through terminal blocks.
Electrical wiring installation, what do you need to know?
If the walls are wooden, then the wires must be inserted into metal pipes
When running an electrical cable into an apartment, you need to know that the holes for laying are made in the voids of concrete slabs (if the floor is concrete). If you have wooden floors, then the wire should pass through a metal pipe (15-35 cm wide).
After the power supply wire is brought into the living space, you need to independently design the location of the power points (sockets and switches) and, based on this, lay the cable.
In addition, it is necessary to mark in advance on the wall the places where the distribution boxes and nodes where the wires will be connected will be located.
Every owner should know that when laying a wire between the connection and output points, you should always leave the ends of the conductor at least 30-40 cm for convenient connection of devices and installation of sockets and switches.
Old wiring can be detected with a locator
Before installing wiring under the plaster, you need to make sure that there is no old connected cable under the finish.
To do this, you can invite the appropriate specialists with an electric locator or simply turn off the old power supply.
When organizing wiring in a brick or concrete wall, remember the following rules:
- the wire is mounted below the ceiling by 25-35 cm;
- the distance from the floor to the wiring should not be less than 15-20 cm;
- power points and connections must be at least 10 cm away from corners;
- It is not recommended to mount spliced wires in the wall; all wiring must be solid.
Electrical equipment, light, lighting
0 votes
+
Vote for!
—
Vote against!
Just 15–20 years ago, the load on the power grid was relatively small, but today the presence of a large number of household appliances has provoked an increase in loads significantly. Old wires are not always able to withstand heavy loads and over time there is a need to replace them. Laying electrical wiring in a house or apartment is a task that requires certain knowledge and skills from the master. First of all, this concerns knowledge of electrical wiring rules, the ability to read and create wiring diagrams, as well as electrical installation skills. Of course, you can do the wiring yourself, but to do this you must adhere to the rules and recommendations outlined below.
- Electrical wiring rules
- Electrical wiring design and diagram
- Electrical wiring installation
- Marking and preparing channels for electrical wiring
- Installation of open electrical wiring
- Installation of hidden electrical wiring
Electrical wiring rules
All construction activities and building materials are strictly regulated by a set of rules and requirements - SNiP and GOST. As for the installation of electrical wiring and everything related to electricity, you should pay attention to the Electrical Installation Rules (abbreviated PUE). This document describes what and how to do when working with electrical equipment. And if we want to lay electrical wiring, then we will need to study it, especially the part that relates to installation and selection of electrical equipment. Below are the basic rules that should be followed when installing electrical wiring in a house or apartment:
- key electrical wiring elements such as distribution boxes, meters, sockets and switches must be easily accessible;
- Switches are installed at a height of 60–150 cm from the floor. The switches themselves are located in places where an open door does not prevent access to them. This means that if the door opens to the right, the switch is on the left side and vice versa. The wire to the switches is laid from top to bottom;
- It is recommended to install sockets at a height of 50–80 cm from the floor. This approach is dictated by flood safety. Also, sockets are installed at a distance of more than 50 cm from gas and electric stoves, as well as heating radiators, pipes and other grounded objects. The wire to the sockets is laid from bottom to top;
- the number of sockets in the room must correspond to 1 pc. for 6 m2. The kitchen is an exception. It is equipped with as many sockets as necessary to connect household appliances. Installation of sockets in the toilet is prohibited. For sockets in the bathroom, a separate transformer is installed outside;
- wiring inside or outside the walls is carried out only vertically or horizontally, and the installation location is displayed on the wiring plan;
- wires are laid at a certain distance from pipes, ceilings, etc. For horizontal ones, a distance of 5–10 cm from the floor beams and cornices and 15 cm from the ceiling is required. The height from the floor is 15 - 20 cm. Vertical wires are placed at a distance of more than 10 cm from the edge of the door or window opening. The distance from gas pipes must be at least 40 cm;
- when laying external or hidden wiring, it is necessary to ensure that it does not come into contact with metal parts of building structures;
- when laying several parallel wires, the distance between them must be at least 3 mm or each wire must be hidden in a protective box or corrugation;
- The wiring and connection of wires is carried out inside special distribution boxes. The connection points are carefully isolated. Connecting copper and aluminum wires to each other is strictly prohibited;
- grounding and neutral wires are secured to the devices with a bolted connection.
Electrical wiring design and diagram
Electrical wiring work begins with the creation of a project and wiring diagram. This document is the basis for future wiring of the house. Creating a project and diagram is quite a serious matter and it is better to entrust it to experienced specialists. The reason is simple - the safety of those living in a house or apartment depends on it. Project creation services will cost a certain amount, but it's worth it.
Those who are accustomed to doing everything with their own hands will have to, adhering to the rules described above, and also having studied the basics of electrical engineering, independently make a drawing and calculate the load on the network. There are no particular difficulties in this, especially if there is at least some understanding of what electric current is and what the consequences of careless handling are. The first thing you need is some symbols. They are shown in the photo below:
Using them, we make a drawing of the apartment and mark lighting points, installation locations for switches and sockets. How many and where they are installed is described above in the rules. The main task of such a diagram is to indicate the location of installation of devices and routing of wires. When creating an electrical wiring diagram, it is important to think in advance where, how much and what kind of household appliances will be installed.
The next step in creating the diagram will be to route the wires to the connection points on the diagram. It is necessary to dwell on this point in more detail. The reason is the type of wiring and connection. There are several such types: parallel, sequential and mixed. The latter is the most attractive due to the economical use of materials and maximum efficiency. To facilitate wiring, all connection points are divided into several groups:
- lighting of the kitchen, corridor and living rooms;
- toilet and bathroom lighting;
- power supply for sockets in living rooms and corridors;
- power supply for kitchen outlets;
- power supply socket for electric stove.
The above example is just one of many options for lighting groups. The main thing to understand is that if you group the connection points, the amount of materials used is reduced and the circuit itself is simplified.
Important! To simplify wiring to sockets, the wires can be laid under the floor. Wires for overhead lighting are laid inside the floor slabs. These two methods are good to use if you don’t want to scratch the walls. In the diagram, such wiring is marked with a dotted line.
The electrical wiring project also indicates the calculation of the expected current in the network and the materials used. The calculation is performed using the formula:
I=P/U;
where P is the total power of all devices used (Watt), U is the network voltage (Volts).
For example, a 2 kW kettle, 10 60 W light bulbs, a 1 kW microwave, a 400 W refrigerator. Current strength is 220 Volts. As a result (2000+(10x60)+1000+400)/220=16.5 Amperes.
In practice, the current strength in the network for modern apartments rarely exceeds 25 A. Based on this, all materials are selected. First of all, this concerns the cross-section of electrical wiring. To make your choice easier, the table below shows the main parameters of the wire and cable:
The table shows extremely accurate values, and since the current strength can fluctuate quite often, a small margin will be required for the wire or cable itself. Therefore, it is recommended that all wiring in an apartment or house be made from the following materials:
- wire VVG-5*6 (five cores and cross-section 6 mm2) is used in houses with three-phase power supply to connect the lighting panel to the main panel;
- wire VVG-2*6 (two cores and cross-section 6 mm2) is used in houses with two-phase power supply to connect the lighting panel to the main panel;
- wire VVG-3*2.5 (three cores and cross-section 2.5 mm2) is used for most of the wiring from the lighting panel to the distribution boxes and from them to the sockets;
- wire VVG-3*1.5 (three cores and cross-section 1.5 mm2) is used for wiring from distribution boxes to lighting points and switches;
- wire VVG-3*4 (three cores and cross-section 4 mm2) is used for electric stoves.
To find out the exact length of the wire, you will have to run around the house a little with a tape measure, and add another 3 - 4 meters of reserve to the result obtained. All wires are connected to the lighting panel, which is installed at the entrance. Circuit breakers are installed in the panel. Typically these are 16 A and 20 A RCDs. The former are used for lighting and switches, the latter for sockets. For an electric stove, a separate 32 A RCD is installed, but if the power of the stove exceeds 7 kW, then a 63 A RCD is installed.
Now you need to calculate how many sockets and distribution boxes you need. Everything is quite simple here. Just look at the diagram and make a simple calculation. In addition to the materials described above, you will need various consumables, such as electrical tape and PPE caps for connecting wires, as well as pipes, cable ducts or boxes for electrical wiring, and socket boxes.
Electrical wiring installation
There is nothing overly complicated about electrical wiring installation work. The main thing during installation is to adhere to safety regulations and follow the instructions. All work can be done alone. Tools for installation will require a tester, a hammer drill or grinder, a drill or screwdriver, wire cutters, pliers, and a Phillips and slotted screwdriver. A laser level will not be superfluous. Since without it it is quite difficult to make vertical and horizontal markings.
Important! When carrying out repairs and replacing wiring in an old house or apartment with hidden wiring, you must first find and, if necessary, remove the old wires. For these purposes, an electrical wiring sensor is used.
Marking and preparing channels for electrical wiring
We begin installation with markings. To do this, use a marker or pencil to place a mark on the wall where the wire will be laid. At the same time, we follow the rules for placing wires. The next step will be to mark the locations for the installation of lighting fixtures, sockets and switches, and the lighting panel.
Important! In new houses, a special niche is provided for the lighting panel. In the old ones, such a shield is simply hung on the wall.
Having finished with the markings, we proceed either to install the wiring in an open way, or to groove the walls for hidden wiring. First, using a hammer drill and a special bit, holes are cut for installing sockets, switches and distribution boxes. For the wires themselves, grooves are made using a grinder or a hammer drill. In any case, there will be a lot of dust and dirt. The depth of the groove of the groove should be about 20 mm, and the width should be such that all the wires fit into the groove without obstruction.
As for the ceiling, there are several options for solving the issue of placing and securing the wiring. The first is that if the ceiling is suspended or suspended, then all the wiring is simply fixed to the ceiling. The second is to make a shallow groove for wiring. Third, the wiring is hidden in the ceiling. The first two options are extremely simple to implement. But for the third one you will have to make some explanations. In panel houses, floors with internal voids are used; it is enough to make two holes and stretch the wires inside the floor.
Having finished with the gating, we move on to the last stage of preparation for wiring installation. Wires must be pulled through the walls to bring them into the room. Therefore, you will have to use a hammer drill to punch holes. Usually such holes are made in the corner of the room. We also make a hole for running the wire from the distribution panel to the lighting panel. Having finished gating the walls, we begin installation.
Installation of open electrical wiring
We begin the installation by installing the lighting panel. If a special niche was created for it, then we place it there; if not, then we simply hang it on the wall. We install an RCD inside the shield. Their number depends on the number of lighting groups. The assembled and ready-to-connect panel looks like this: there are neutral terminals at the top, grounding terminals at the bottom, and automatic circuit breakers are installed between the terminals.
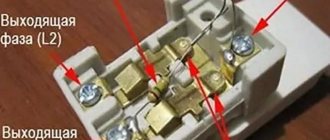
Now we insert wire VVG-5*6 or VVG-2*6 inside. On the switchboard side, the electrical wiring is connected by an electrician, so for now we will leave it unconnected. Inside the lighting panel, the input wire is connected as follows: we connect the blue wire to zero, the white wire to the top contact of the RCD, and the yellow wire with a green stripe to ground. We connect the RCD circuit breakers to each other in series at the top using a jumper from the white wire. Now we move on to open wiring.
Along the previously outlined lines we fix boxes or cable channels for electrical wiring. Often, with open wiring, they try to place the cable channels themselves near the baseboard or vice versa, almost under the ceiling. We secure the wiring box using self-tapping screws in increments of 50 cm. We make the first and last hole in the box at a distance of 5 - 10 cm from the edge. To do this, we drill holes in the wall using a hammer drill, drive a dowel inside and secure the cable channel with self-tapping screws.
Another distinctive feature of open wiring are sockets, switches and distribution boxes. All of them are hung on the wall, instead of being built inside. Therefore, the next step is to install them in place. All you have to do is place them on the wall, mark the mounting locations, drill the holes and secure them in place.
Next we proceed to wiring the wires. We start by laying the main line and from the sockets to the lighting panel. As already noted, we use wire VVG-3*2.5 for this. For convenience, we start from the connection point towards the panel. At the end of the wire we hang a label indicating what kind of wire it is and where it comes from. Next, we lay the VVG-3*1.5 wires from switches and lighting fixtures to the distribution boxes.
Inside the distribution boxes, we connect the wires using PPE or carefully insulate them. Inside the lighting panel, the main wire VVG-3*2.5 is connected as follows: brown or red wire - phase, connected to the bottom of the RCD, blue - zero, connected to the zero bus at the top, yellow with a green stripe - grounding to the bus at the bottom. Using a tester, we “ring” all the wires to eliminate possible errors. If everything is in order, we call an electrician and connect to the distribution panel.
Installation of hidden electrical wiring
Concealed electrical wiring is quite simple. The only significant difference from the open one is the way the wires are hidden from view. Otherwise the actions are almost the same. First, we install the lighting panel and RCD circuit breakers, after which we start and connect the input cable from the side of the distribution panel. We also leave it unconnected. An electrician will do this. Next, we install distribution boxes and socket boxes inside the made niches.
Now let's move on to wiring. First we lay the main line from VVG-3*2.5 wire. If it was planned, then we lay the wires to the sockets in the floor. To do this, we insert the VVG-3*2.5 wire into a pipe for electrical wiring or a special corrugation and lay it to the point where the wire exits to the sockets. There we place the wire inside the groove and insert it into the socket box. The next step will be to lay the VVG-3*1.5 wire from the switches and lighting points to the junction boxes, where they are connected to the main wire. We isolate all connections with PPE or electrical tape.
At the end, we “call” the entire network using a tester for possible errors and connect it to the lighting panel. The connection method is similar to that described for open wiring. Upon completion, we seal the grooves with gypsum putty and invite an electrician to connect it to the distribution panel.
Installing electrical wiring in a house or apartment is quite easy for an experienced technician. But for those who are not well versed in electrical engineering, they should take the help of experienced professionals from start to finish. This, of course, will cost money, but this way you can protect yourself from mistakes that could lead to a fire.