Asynchronous electric motors, widely used in production, are connected with a “delta” or “star”. The first type is mainly used for motors with prolonged starting and operation. The joint connection is used to start high-power electric motors. The “star” connection is used at the beginning of the start-up, then switching to the “delta” connection. A connection diagram for a 220-volt three-phase electric motor is also used.
There are many types of motors, but for all of them, the main characteristic is the voltage supplied to the mechanisms and the power of the motors themselves.
When connected to 220V, the motor is subject to high starting currents, which reduce its service life. In industry, delta connections are rarely used. Powerful electric motors are connected in a star.
To switch from a 380 to 220 motor connection diagram, there are several options, each of which has advantages and disadvantages.
Reconnection from 380 volts to 220
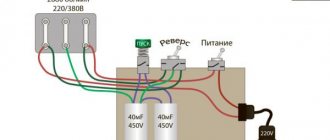
It is very important to understand how a three-phase electric motor is connected to a 220V network. To connect a three-phase motor to 220V, note that it has six terminals, which corresponds to three windings. Using a tester, the wires are pinged to find the coils. We connect their ends in twos - we get a “triangle” connection (and three ends).
To begin with, we connect the two ends of the network wire (220 V) to any two ends of our “triangle”. The remaining end (the remaining pair of twisted coil wires) is connected to the end of the capacitor, and the remaining capacitor wire is also connected to one of the ends of the power wire and coils.
Whether we choose one or the other will depend on which direction the engine starts to rotate. Having completed all the above steps, we start the engine by applying 220 V to it.
The electric motor should work. If this does not happen, or it does not reach the required power, you need to return to the first stage to swap the wires, i.e. reconnect the windings.
If, when turned on, the motor hums but does not spin, you need to additionally install (via a button) a capacitor. At the moment of starting, it will give the engine a push, forcing it to spin.
Video: How to connect an electric motor from 380 to 220
Calling, i.e. resistance measurement is carried out by a tester. If this is not available, you can use a battery and a regular flashlight lamp: the identified wires are connected to the circuit in series with the lamp. If the ends of one winding are found, the lamp lights up.
It is much more difficult to determine the beginning and ends of the windings. You can't do without a voltmeter with an arrow.
You will need to connect a battery to the winding, and a voltmeter to the other.
By breaking the contact of the wire with the battery, observe whether the arrow deviates and in which direction. The same actions are carried out with the remaining windings, changing the polarity if necessary. Make sure that the arrow deviates in the same direction as during the first measurement.
Methods for obtaining 380 Volts from 220
Let's look at the main ways to convert 220 volts into full three-phase current, 380 V:
- using an electronic voltage converter;
- by using a transformer;
- using three phases;
- using a three-phase motor as a generator;
- using a capacitor circuit.
Voltage transformer
The easiest and most reliable way to convert 220 V to 380 is to buy an electronic voltage converter. (see Fig. 2). This device is often called an inverter. The gadget is easy to operate and generates high-quality three-phase current. True, the power of inverters is not very large, but, as a rule, it is enough for most three-phase household appliances.
Rice. 2. Voltage converter
The converter is also good because it has a built-in overload and short circuit protection function. This means that the electric motor will not overheat and will not fail as a result of a short circuit.
High quality current is achieved thanks to the operating principle of the device. The inverter first rectifies single-phase alternating current and then generates three-phase voltage at a given frequency and with a standard phase shift. In this case, the number of phases can be more than 3 (with a corresponding shift angle).
Using a transformer
Using a step-up transformer, you can get any voltage, including 380 V. However, if you are interested in three-phase voltage, then you need a special three-phase transformer. converting single-phase current into three-phase. Such transformers are commercially available.
The transformer windings are connected in star or delta. Single-phase network voltage is supplied to two primary windings directly, and to the third through a capacitor. In this case, the capacitor capacity is selected at the rate of 7 μF for every 100 W of power.
Please note that the rated voltage of the capacitor should not be lower than 400 V. Such a device cannot be turned on without a load.
Although we will obtain the necessary 380 V in this way, there will still be a decrease in the power of the electric motor (if you plan to connect it to a transformer). Accordingly, the engine efficiency will also drop.
Using 3 phases
If you live in an apartment building, then 3 phases are already connected to it, which, in order to optimally distribute the loads, are separated into individual apartments. On each floor there are distribution boards, from where you can bring the missing two phases into the apartment. But this will require permission.
If you wish, you can obtain permission from the energy supply company or coordinate with Energonadzor the installation of three-phase power in your apartment. In this case, you will need to install a three-phase electricity meter.
Using an electric motor
You probably know that the rotor of a conventional three-phase motor, after starting, continues to rotate after one phase is disconnected. It turns out that there is an EMF between the terminal of the disconnected winding and the activated terminals.
The phase shift between the stator windings depends only on their location. In a three-phase motor, these coils are located at an angle of 120º, which means they provide the same phase shift angle. This circumstance suggests that an asynchronous three-phase motor can be used to obtain 380 volts from a conventional single-phase network. A simple diagram for connecting an electric motor is shown in Figure 3. The capacitor in the diagram is needed only to start the engine. Once launched, you can disable it. We take the capacitor type MBGO, MBGP, MBGT or K42-4, the operating voltage of which must be at least 600 V. You can use the capacitor K42-19, with an operating voltage of at least 250 V.
For an example of connecting a phase-shifting capacitor, see Fig. 3.
Rice. 3. Connecting the starting capacitor
We select the parameters of the capacitor depending on the power of the motor. Note that the parameters of the phase-shifting capacitor do not affect the quality of the generated current. We connect the load to the stator windings according to the diagram shown in Fig. 4.
Rice. 4. Three-phase current from an electric motor
The rotor rotation speed is almost independent of the single-phase network voltage, so it can be considered constant. This means that the frequency of three-phase current at rated loads will not change.
It should be borne in mind that the power of a three-phase motor operating from a single-phase network decreases. Accordingly, the rated power of a three-phase load will be approximately one third lower than that stated in the electric motor’s passport.
Electric motor as generator
Another way to get 380 from 220 V is to create a motor-generator system. As a motor, you can take any electric motor operating from a 220 V network, and as a generator, you can take a modified three-phase asynchronous motor (see Fig. 5 for the installation diagram).
Let us immediately note that the effectiveness of such an installation is questionable, but it is possible to obtain the required voltage of 380 V in this way. In this circuit, it is necessary to ensure such a rotor speed that the generator produces current with a frequency of 50 Hz. To do this, it is necessary to rotate the shaft at an angular speed of 1500 rpm.
Rice. 5. Three-phase motor as generator
At home, you can use a single-phase motor from a washing machine or other household appliances as a drive. It is only important to ensure the required angular speed of rotation of the rotor.
Since the rotation of the shaft of electric motors operating, for example, in a washing machine is about 12 - 20 thousand rpm, it is necessary to use pulleys whose diameters have a ratio of 1 to 10. That is, to ensure rotation of the generator rotor at a speed of 1500 rpm min. you can take a pulley that is already mounted on an electric motor from a straightening machine, and put a pulley with a diameter 10 times larger on the shaft of a three-phase motor.
Star-delta circuit
In domestic engines, the “star” is often already assembled, but the triangle needs to be implemented, i.e. connect three phases, and assemble a star from the remaining six ends of the winding. Below is a drawing to make it easier to understand.
The main advantage of connecting a three-phase circuit with a star is that the motor produces the most power.
Nevertheless, such a connection is loved by amateurs, but is not often used in production, since the connection diagram is complex.
For it to work you need three starters:
The stator winding is connected to the first of them, K1, on one side, and the current on the other. The remaining ends of the stator are connected to starters K2 and K3, and then to obtain a “triangle”, the winding with K2 is also connected to the phases.
Having connected to phase K3, slightly shorten the remaining ends to obtain a “star” circuit.
Important: it is unacceptable to turn on K3 and K2 at the same time, so that a short circuit does not occur, which can lead to the shutdown of the electric motor. To avoid this, electrical interlocking is used. It works like this: when one of the starters is turned on, the other is turned off, i.e. its contacts open.
How to measure phase voltage?
Phase In order to obtain phase connection readings, you will need special equipment, for example, a multimeter, voltmeter. In order to measure currents and voltages in three-phase circuits, it is usually enough to know the data of one linear current and one linear current. FN is measured when the linear sag (falls).
Interesting materials:
How to change the date a photo was taken on your phone? How to change DPI on a Samsung phone? How to change your Facebook email on your phone? How to change the background in a video using your phone? How to change a photo in messenger from your phone? How to change a photo in YouTube on your phone? How to change screen borders on your phone? How to change screen brightness on a Samsung phone? How to change shortcuts on your phone? How to change the keyboard language on HTC phone?
How the scheme works
When K1 is turned on using a time relay, K3 is turned on. The three-phase motor, connected in a star configuration, operates with more power than usual. After some time, the contacts of relay K3 open, but K2 starts. Now the motor operation pattern is “triangle”, and its power becomes less.
When a power cut is required, K1 is started. The pattern is repeated in subsequent cycles.
A very complex connection requires skill and is not recommended for beginners.
Socket installation
Let's look at the procedure for connecting three-phase sockets using the example of an ABB socket.
- First, we disassemble the socket into its component elements by unscrewing a couple of mounting screws on the front. It consists of a base (base), a cover, an O-ring with a 20 mm hole and a socket mechanism; in addition, the kit includes a rubber gland for hidden connection of wiring from the wall or for bringing cables inside without corrugation.
- First you need to fix the base in the selected location. Why do we place the base against the wall, leveling it in place using a level. Then, using a simple pencil, we make marks at the locations of the mounting holes. If the wall is wood or plaster, then the base can be immediately secured with self-tapping screws. If the wall is brick or concrete, then first use a puncher to make holes with a diameter of 6-8 mm, into which dowels of the appropriate diameter are installed, and then the base is secured by screwing in the screws.
- Then prepare the power cable. To do this, insert the corrugation into the gland 1-2 cm, and pull the cable another 9-10 cm inside the housing.
- Next, remove the general protective sheath, leaving 25-30 mm, and expose the ends of the wires by 10-12 mm. In this case, the protective grounding conductor is made slightly shorter than the others, but more insulation is cut off from it.
- After the manipulations have been carried out, insert the ends of the wires into the appropriate places according to the markings and fix them with a screwdriver.
- The next step is to check the reliability of the cable fastening and correct assembly, close the cover and tighten the screws.
- As a result, after simple steps, the device is ready for use.
Other motor connections
There are several schemes:
- More often than the option described, a circuit with a capacitor is used, which will help to significantly reduce power. One of the contacts of the working capacitor is connected to zero, the second - to the third output of the electric motor. As a result, we have a low-power unit (1.5 W). If the engine power is high, a starting capacitor will need to be added to the circuit. With a single-phase connection, it simply compensates for the third output.
- It is easy to connect an asynchronous motor with a star or triangle when moving from 380V to 220V. Such motors have three windings. To change the voltage, it is necessary to swap the outputs going to the tops of the connections.
- When connecting electric motors, it is important to carefully study the passports, certificates and instructions, because in imported models there is often a “triangle” adapted for our 220V. Such motors, if you ignore this and turn on the “star”, simply burn out. If the power is more than 3 kW, the motor cannot be connected to the household network. This can lead to a short circuit and even failure of the RCD.
Read also: Do-it-yourself repair of a Bosch hair dryer
We recommend:
Voltage check
Power parameters are determined with a multimeter or voltmeter. Between any phase contacts the readings are about 380 V, between the working zero and the phases the voltage is 220 V, between the protective zero and the phases it is also about 220 V. If all the indicated numbers match, then the three-phase socket is ready for use.
Thus, you can independently supply power to a three-phase outlet or eliminate small faults associated with such equipment, avoiding errors associated with connecting the cable.
Connecting a three-phase motor to a single-phase network
The rotor connected to the three-phase circuit of a three-phase motor rotates due to the magnetic field created by the current flowing at different times through different windings. But, when such a motor is connected to a single-phase circuit, no torque arises that could rotate the rotor. The simplest way to connect three-phase motors to a single-phase circuit is to connect its third contact through a phase-shifting capacitor.
When connected to a single-phase network, such a motor has the same rotation speed as when operating from a three-phase network. But the same cannot be said about power: its losses are significant and they depend on the capacity of the phase-shifting capacitor, the operating conditions of the motor, and the selected connection diagram. Losses approximately reach 30-50%.
The circuits can be two-, three-, or six-phase, but the most commonly used are three-phase. A three-phase circuit is understood as a set of electrical circuits with the same frequency of sinusoidal EMF, which differ in phase, but are created by a common energy source.
If the load in the phases is the same, the circuit is symmetrical. For three-phase asymmetrical circuits it is different. The total power consists of the active power of the three-phase circuit and the reactive power.
Although most motors cope with operation from a single-phase network, not all can work well. Better than others in this sense are asynchronous motors, which are designed for a voltage of 380/220 V (the first is for star, the second is for delta).
This operating voltage is always indicated in the passport and on the plate attached to the engine. It also shows the connection diagram and options for changing it.
If "A" is present, this indicates that either a delta or star circuit can be used. “B” indicates that the windings are connected in a “star” and cannot be connected in any other way.
The result should be: when the contacts of the winding with the battery are broken, an electric potential of the same polarity (i.e., the arrow deflects in the same direction) should appear on the two remaining windings. The start (A1, B1, C1) and end (A2, B2, C2) terminals are marked and connected according to the diagram.
Advantages and disadvantages
Like everything material, three-phase current has its pros and cons. The positive aspects of using systems with three or four wires include:
- efficiency. To transmit electricity over long distances, cores made of non-ferrous metals with low resistivity are used. The voltage is divided proportionally to the number of cables. By distributing loads, engineers can reduce the number of wires and their cross-section, which, given the cost of rare materials, provides noticeable savings;
- efficiency. The power parameters of three-phase transformers are an order of magnitude higher than single-phase transformers with smaller magnetic core sizes;
3-phase current transformer
- simplicity. When consumers are simultaneously connected to a three-phase system, an additional electromagnetic field is generated. The phase shift effect has made it possible to create simple and reliable brushless electric motors, the rotor of which is made according to the principle of a conventional blank and is mounted on ball bearings. Asynchronous electric drives with a squirrel-cage rotor are widely used as power units. The main advantage of such motors is the ability to change the direction of rotation of the axis by switching to different phase wires;
- variability. In circuits with several phases, it is possible to obtain different voltages. The user will be able to change the power of the heater or servo drive by switching from one cable to another;
- reducing the stroboscopic effect. It is achieved by independently connecting different lamps to individual phases.
Along with its advantages, three-phase current has its disadvantages. They include:
- connection difficulty. To connect a three-phase network to a private or industrial building, you must obtain special permission and technical specifications from the local energy sales company. This event is quite expensive and troublesome. Even if all conditions are met, a positive result is not always guaranteed;
- application of enhanced security systems. The three-phase network supplies a voltage of 380 V, so additional devices for protection against electric shock and short circuits are required, which can lead to fire. In such cases, another three-pole circuit breaker with higher ratings is installed at the input. It will help avoid fire in the event of a short circuit;
- the need to install auxiliary modules to limit overvoltage in the distribution board. It is necessary in case the neutral cable breaks, which will lead to an increase in voltage in one of the phases.
The transition to three-phase current is advisable for owners of premises whose area is more than 100 square meters. meters. This applies to private homes and industrial buildings. This connection scheme will allow you to redistribute the load evenly across all consumers and avoid power surges.
Using a magnetic starter
The good thing about using a 380 electric motor connection diagram is that it can be started remotely. The advantage of a starter over a switch (or other device) is that the starter can be placed in a cabinet, and the controls can be placed in the work area; the voltage and currents are minimal, therefore, the wires are suitable for a smaller cross-section.
In addition, connection using a starter ensures safety in the event that the voltage “disappears,” since this opens the power contacts, and when the voltage appears again, the starter will not supply it to the equipment without pressing the start button.
Connection diagram for a 380V electric asynchronous motor starter:
At contacts 1,2,3 and start button 1 (open), voltage is present at the initial moment. Then it is supplied through the closed contacts of this button (when you press “Start”) to the contacts of the coil starter K2, closing it. The coil creates a magnetic field, the core is attracted, the contacts of the starter close, driving the motor.
At the same time, the NO contact closes, from which the phase is supplied to the coil through the “Stop” button. It turns out that when the “Start” button is released, the coil circuit remains closed, as do the power contacts.
By pressing “Stop”, the circuit is broken, returning the power contacts to open. The voltage disappears from the conductors and NO supplying the engine.
Video: Connecting an asynchronous motor. Determination of engine type.
If you have a three-phase electric motor, you know it doesn't come cheap. Therefore, if you need to use a single-phase motor, the thought of buying new equipment will only come to you when you do not know how to make an electric motor at home. We will tell you how to convert an electric motor from 380 to 220 Volts with your own hands.
Fan heater installation
It is best to use fan heater mounts offered by manufacturers. Of course, this also depends on the location of the device. For example, to mount a fan on the ceiling, you can use studs, purchasing them on the market (not all models of fan heaters may have this option).
So let's get started. In the example, I will use mounting brackets from manufacturers; the mounting method is on the wall.
Its convenience also lies in the fact that you can use different angles of inclination to mount the fan heater. Quite convenient for wall mounting.
We mark the necessary fasteners (corners with holes) on the wall, drill holes and screw in, but not completely, the screws. Screws with plastic dowels, suitable for fastening to brick, concrete and cement walls. The length of the screws (or studs) should be sufficient (I used 150 mm) to securely fix the fan heater to the wall.
By not fully tightening the screws (leaving a small gap), we make it convenient to fasten the console, since the likelihood of absolutely accurately securing the corners is low.
We bring the heating pipes to the place where the fan heater is attached, if we have not done this in advance.
We fasten the mounting console, keeping in mind the direction we have chosen to tilt the fan heater.
Mounting options for the fan heater console can be seen in the photo below.
Next, you can hang the fan heater on the mounting console, securing it with two bolts. We first vented the fan heater pipes, metal hoses and Mayevsky’s machine gun. Metal hoses provide the ability to change the direction of the heated air flow when turning the fan heater on the console. Mayevsky's automatic machine - ensures the removal of air from the heating system.
As a result, it will look something like this.
After making sure that the fastenings are secure and that all the bolts and screws are tightened, we can connect the flexible hoses (metal hose) to the heating pipes.
Pay attention to the correct connection. Supply and return must be connected as indicated in the instructions for the fan heater
It is important. Here, in the photo below, is a water fan heater fixed and connected to the heating system
Here, in the photo below, is a water fan heater fixed and connected to the heating system.
Now you can power the fan heater with coolant and bleed the air (check the protective cap on the Mayevsky machine; it should be unscrewed a little or completely, depending on the model).
The following material describes the connection of the command controller and external sensors to the fan heater control circuit.
What can be redone
Low-power 380 Volt electric motors are suitable for conversion: up to 3 kW. Theoretically, powerful motors are also reconnected. But this will additionally entail the installation of a separate circuit breaker in the electrical panel and special wiring. And this work becomes meaningless if it suddenly turns out that the input cable cannot carry such a load.
Read also: Message about brass in chemistry
Even if your network carries high loads, and you managed to convert a 3 kW motor from 380 to 220 Volts, you will be upset the first time you put it into operation. The launch will be difficult. You will decide that the work was in vain. Therefore, if you redo it, then it will be low-power models.
Three-phase power supply in the house: does it make sense?
The debate about which power supply is better, single-phase or three-phase, like the eternal confrontation between good and evil in the Game of Thrones, never ends. There are dozens of arguments for and against each option. You will learn about the advantages and disadvantages of connecting three-phase power, allowing you to make a thoughtful, informed decision.
What is a three-phase network?
Before putting into operation, any house or apartment is connected to the local power grid. Such a network can be single-phase or three-phase. With a single-phase connection, two wires are supplied to the house, a phase and a zero, between which the voltage is 220 V. A three-phase network is characterized by the presence of four wires: three phases and a zero. Between each phase and zero the voltage is 220 V, and between the phases themselves 380 V (as shown in the image).
To account for electricity in such a network, a three-phase meter is required, which is installed by the local distribution zone. A typical example of such a meter is INCOTEX Mercury 231 AM-01, designed for metering active electricity.
Three-phase power: advantages
The presence of three phases brings a lot of advantages to the owner of a private house or cottage. Here are some of them:
- Increased capacity
Every year the number of household electrical appliances in each home increases, which means their total power and the load they transfer to the electrical grid increase. Today in Russia, local Oblenergos offer the opportunity to draw up a contract for the consumption of 5 kW for single-phase networks and 15 kW for three-phase networks.
Let's assume you have one phase and the total power of all electrical appliances in your house is 4 kW. But time passed, and you decided to buy yourself a 3 kW welding machine. By the way, you can read about which welding machine to buy here. In this case, the total power will be 7 kW, and you will not be able to use all devices at the same time. And if in the future you plan to install pumping equipment or an electric heating system, then you should think about connecting a three-phase network.
- Even load distribution
Thanks to the operation of three phases simultaneously, it is possible to evenly distribute the load between them to avoid distortion. For example, if you regularly weld in the garage, it is best to do it on a different phase to which the TV, computer equipment or light bulbs in the house are connected. You can calculate the load for each household appliance and distribute them proportionally across phases.
There are also cases when, due to increased load (not through your fault), the voltage drops to 170 V or even lower on certain phases. This often happens if the house is located at a great distance from the transformer substation, and there are dozens of other consumers in front of it. In this case, the equipment can be temporarily switched to a less loaded phase, and when the imbalance “goes away”, everything can be returned to its place.
- Operation of three-phase equipment
Although most household appliances operate on 220 V, there is still equipment for three-phase networks of 380 V. The following types of such equipment can be distinguished:
- Pumping stations. Some deep and surface pumping stations require 380 V.
- Transformer welding machines.
- Heating boilers. Most electric heating boilers have a rated power of 7 - 9 kW - a single-phase network simply would not cope with it. For example, for a single-circuit boiler EVAN Warmos-IV-9.45 with a power of 9.45 kW, three phases are required.
- Possibility of installing automatic circuit breakers and RCDs with lower nominal values
Remodeling stages
To convert an electric motor from 380 volts to 220, first open the motor cover to see how many ends there are on the stator windings. There can be 6 or 3 of them. If there are 6, then it is possible to change the connection diagram: if there was a “star”, you can switch to a “triangle”, and vice versa.
If there are only 3 ends, it means that inside the box the windings are already connected either by a “star” or a “triangle” (there are 6 ends in total, which are connected in pairs by terminals, there will be 3 of them, since there are 2 ends for each terminal). In this case, you will have to leave the previous scheme.
Attention! If you decide to change the connection diagram of the stator windings with three ends outside, you will have to open the motor housing with your own hands. It's labor intensive, but possible.
Winding connection
It doesn’t matter what the power source is, three-phase or single-phase, the stator windings can be connected in any of the following ways (you can read more about methods for connecting electric motors):
The windings are usually connected with a star if the motor will be powered from a 380 V network. Thanks to this, the start becomes smooth, although a third of the power is lost. The triangle is recommended when powered from 220 Volts. Inrush currents are not so high compared to those that arise from three-phase power. But the power is equal to that provided by a “star” connection if the motor is connected to 380 V.
See the diagrams below. The difference is that in the first case, all the beginnings are connected so that a three-pointed star is obtained. And in the second, the end of one winding is connected to the beginning of the next so that a figure with three vertices (a triangle) is formed.
Calculation of capacitors
When the ends of the windings are connected in a star or triangle, there are 3 places where they are joined. Terminals are placed at these places. When powered by 380 Volts, a phase is supplied to each of them. But our task, having the same 3 contacts, is to supply only 1 phase 220 Volts and zero. This can be done with your own hands, compensating for the lack of three-phase power supply with capacitors. The launcher will be active only for the duration of the launch, and the worker will be active permanently.
In order for an electric motor to start and operate well, you need to choose the right capacitor capacity. For a working drive it depends on the connection scheme. If it is a star, then the formula works:
If it is a triangle, then the formula changes its form:
Wed is the required capacity of the working storage element. U – network voltage (220 Volts). I is the current strength, which is found by the formula:
P – power, U – voltage already known to us, ƞ – efficiency, cosine “phi” – power factor. All these values can be found in the technical data sheet of your three-phase motor.
Calculating the capacitance of the starting capacitor (Cn) is simple: multiply Cp by 1.5 or 2. If Cp = 50 µF, then Cp will be from 75 to 100 µF. Alternately place one container, then another, starting the motor each time. Listen to the sound of the move: if there is no hum, then everything is in order.
Attention! Capacitors must be paper. For rebuilding an engine with your own hands, MBGP or MBGO work well. If you don’t find a drive of the required capacity, then connect several in parallel.
Assembly according to the diagram
The diagram above shows how to correctly connect the stator windings with capacitors and wires of a 220 V network with your own hands. You need to connect storage elements parallel to each other to one of the vertices of the triangle or star (provide a key to manually turn off the starting drive after overclocking). Then they are brought either to phase or to zero: it doesn’t matter. Only the direction of rotation of the shaft will depend on this.
Socket device
Three-phase devices may vary in design, but they always have at least four contacts. Three contacts are phase, and the fourth is ground. The figure below shows a three-phase connector with a plug. These devices together form detachable contacts.
The selection of the required number of connectors is carried out in accordance with the following recommendations:
- To connect using a “triangular” diagram, you will need four connectors (three phases - A, B, C - and a protective zero PE).
- If the circuit is designed in the form of a “star”, five sockets are needed (three phases - A, B, C, zero - N and protective zero PE).
- If you need very high quality protection from electrical damage, seven connectors are used (three phases with three zeros and PE). In this case, each phase is equipped with a separate RCD.
The four-pin connector is used only in delta load connection circuits. Five contacts can be used in both delta and star configurations. Power is connected only to certain terminals. After this, you can connect all kinds of electrical devices through the outlet.
The wires connected to the three-phase connector must have a diameter of at least 2.5 square millimeters. In the case of high loads, the need for diameter can increase to 6 square millimeters.
The classification of sockets is carried out according to the following criteria:
- Installation method. Open type modifications are mounted for external wiring and fixed on the wall (overlay fittings). Such models are used both in the interior of the house and in the façade. Overhead fittings are also used in high humidity environments. If the wiring is hidden, closed connectors are most often used, which are recessed into the wall during installation. Installing such sockets is more labor-intensive, since you will need to create a recess in the wall and install a socket box.
- Resistance to environmental factors (degree of protection) is determined by two letters - IP and two numbers. The first digit indicates the level of protection against foreign particles: 0 - no protection, 6 - the greatest protection. The second digit indicates the level of moisture protection: 0 - the device is not protected, 8 - the device can be used even under water. The most common protection class is IP44, which allows you to protect the device from both dust and moisture.
- Purpose. Sockets are produced without the use of grounding, which are connected to electrical appliances without a grounding contact. If the device is equipped with a contact, the connection is made using special connectors (CEE 7/5) using elastic side contacts (CEE 7/4). There are connectors on the market with protective curtains made of plastic. The curtains open only if the plug pins are directed evenly into the sockets. Some modifications may be equipped with plug ejectors, timers or RCDs.
How to change the direction of rotation
If you need to change the direction only once, then this can be done at the rework stage. To do this, it is enough to swap any two stator windings. The same goal is achieved by transferring a branch of capacitors from zero to phase, or vice versa. But if you need to frequently reverse a three-phase converted motor, a switch is needed. By assembling the electric motor according to the diagram below, you will free yourself from changing the windings every time you need to set the direction of rotation of the shaft in the opposite direction.
There is nothing difficult about converting a three-phase electric motor to a single-phase network with your own hands. The greatest difficulty will be only the calculation of the capacitance of the working capacitor and the experimental selection of the capacitance from the calculated range for the starting accumulator. But this becomes easy if you haven’t lost your technical passport and have a calculator at hand.
Read also: Checking field-effect transistors without soldering
When operating or manufacturing this or that equipment, it often becomes necessary to connect an asynchronous three-phase motor to a regular 220 V network. This is quite realistic and not even particularly difficult, the main thing is to find a way out of the following possible situations if there is no suitable single-phase motor, and a three-phase one is lying without business, and also if there is three-phase equipment, but in the workshop there is only a single-phase network.
conclusions
It is possible to obtain 380 volts from a 220 V network in several ways. The most effective way to use an electronic inverter is:
- stable current parameters;
- safe operation;
- ensuring the declared output power;
- compact installation.
All of the above methods of converting 220 Volts to 380 work, therefore they have the right to exist. But you must be prepared for power loss and difficulties in achieving other current parameters, including its frequency characteristics.
Network connection diagrams
To begin with, it makes sense to recall the diagram for connecting a three-phase motor to a three-phase network.
Connection diagram for a 220 V three-phase electric motor according to the “Star” and “Triangle” circuits
For ease of understanding, the magnetic starter and other switching units are not shown. As can be seen from the diagram, each motor winding is powered by its own phase. In a single-phase network, as its name suggests, there is only one “phase”. But it is also enough to power a three-phase electric motor. Let's take a look at an asynchronous motor connected to 220 V.
How to connect a three-phase electric motor 380 V to 220 V through a capacitor according to the “Star” and “Triangle” circuit: diagram.
Here, one winding of a three-phase electric motor is directly connected to the network, the other two are connected in series, and voltage is supplied to their connection point through the phase-shifting capacitor C1. C2 is the starting button and is turned on by button B1 with self-return only at the moment of starting: as soon as the engine starts, it must be released.
Several questions immediately arise:
- How effective is this scheme?
- How to ensure engine reverse?
- What capacities should capacitors have?
Theory
At industrial power plants, generators generate three-phase current and increase its voltage to tens and even hundreds of kilovolts. Electricity is supplied to consumers through power lines. But before this, the current enters the power transformer, which lowers the voltage to 380 V. From the distribution substation, the electricity enters the consumer network.
In a three-phase network, the current is supplied in such a way that all three are shifted relative to each other by 120 degrees. The voltage between phases is 380 V, and between phase and neutral 220 V (see Fig. 1). It is this voltage that is supplied to each apartment.
Rice. 1. Three-phase current structure
Since our goal is to obtain 380 V from a single-phase network, we will move on to methods of converting 220 V to 380.
Reversing the engine
In order to make the motor rotate in the other direction, it is enough to “reverse” the phase arriving at the connection point of windings B and C (Triangle connection) or to winding B (Star circuit). The circuit, which allows you to change the direction of rotation of the rotor by simply clicking the SB2 switch, will look like this.
Reversing a 380 V three-phase motor operating on a single-phase network
It should be noted here that almost any three-phase motor is reversible, but you need to select the direction of rotation of the motor before starting it. It is impossible to reverse the electric motor while it is running! First you need to de-energize the electric motor, wait for it to stop completely, select the desired direction of rotation with the SB1 toggle switch, and only then apply voltage to the circuit and briefly press button B1.
Installation check
After installing a three-phase outlet, before starting operation, always check the circuit for errors.
For most devices, phases to a plug or socket can be connected to any terminals, except those intended for working and protective cables.
In some cases, some equipment with three-phase motors will not work correctly, because... The direction of rotation of the engine will be opposite. For normal operation, any two wiring with phases should be interchanged with each other.
At the same time, if you confuse the connections of the working and protective zero, this can lead to dire consequences: the protection against short circuit and electric shock will be disrupted, and there will be a risk of using the electrical installation.
Immediately after completion of installation work, perform the following actions: Carry out a thorough inspection of all contacts for their reliability. Measure the parameters of the insulation resistance of the cores.
The insulation resistance is checked with a multimeter or tester.
To do this you need:
- One probe is placed on the terminal with the protective wire, the other touches the remaining terminals in turn.
- The first probe is placed on the terminal with the working zero, the second is alternately passed along the contacts with the phases.
- One probe is applied to the phase point, the other is carried out along the remaining phases.
- Check the remaining phases.
If during any test there is a small resistance, this indicates an installation error or a malfunction of the wiring itself. If everything is done correctly, there will be a dash on the dial of the device, indicating a very high resistance. Only under this condition can the position of the machine petal be moved to “ON”.
Capacitances of phase-shifting and starting capacitors
To calculate the capacity of a phase-shifting capacitor, you need to use a simple formula:
- C1 = 2800/(I/U) - for inclusion according to the “Star” circuit;
- C1 = 4800/(I/U) - for switching on according to the “Triangle” scheme.
Here:
- C1 is the capacity of the phase-shifting capacitor, μF;
- I is the rated current of one motor winding, A;
- U is the voltage of a single-phase network, V.
But what to do if the rated current of the windings is unknown? It can be easily calculated by knowing the motor power, which is usually printed on the device nameplate. To calculate we use the formula:
I = P/1.73*U*n*cosф, where:
- I—current consumption, A;
- U—mains voltage, V;
- n - efficiency;
- cosф - power factor.
The symbol * denotes the multiplication sign.
The capacity of the starting capacitor C2 is selected 1.5–2 times greater than the capacity of the phase-shifting one.
When calculating a phase-shifting capacitor, you need to keep in mind that an engine operating at less than full load may overheat at the design capacitor capacity. In this case, its denomination must be reduced.
What is better: 1 phase network or 3?
Advantages of a three-phase network compared to a single-phase network. The most important advantage, in my opinion, is that when transmitting the same power, the voltage drop in a three-phase line is 6 times less than in a single-phase line. ... Voltage losses in a single-phase line will be 7.8%, and in a three-phase line, 1.31%.
Interesting materials:
Is it possible to pet a cat's tail? Is it possible to iron linen items? Is it possible to cook in clay pots over a fire? Can you say kilogram? Can you microwave a tin can? Can I use a spray can? Can hair conditioner be used on dry hair? Can a booster seat be used instead of a car seat? Can I use a larger diameter pan? Is it possible to use porcelain tiles for walls?
Efficiency
Unfortunately, a three-phase motor, when powered by one phase, will not be able to develop its rated power. Why? In normal mode, each of the motor windings develops a power of 33.3%. When the motor is turned on, for example, in a “triangle” mode, only one winding C operates in normal mode, and at the point of connection of windings B and C, with a correctly selected capacitor, the voltage will be 2 times lower than the supply voltage, which means the power of these windings will drop 4 times - only 8.325% each. Let's do a simple calculation and calculate the total power:
33,3 + 8,325 + 8,325 = 49.95%.
So, even theoretically, a three-phase motor connected to a single-phase network develops only half of its rated power, and in practice this figure is even less.
How to protect yourself from zero loss
How to deal with this? There are several ways to protect yourself from increased voltage when the zero line breaks.
The first method is to reliably re-ground the neutral conductor. Looking ahead, I’ll say that this method is bad and harmful.
This method can be used in private homes
It doesn’t matter if you have single-phase or three-phase input. The most important thing is to make a high-quality grounding circuit
After this, connect the neutral conductor busbar to this circuit with a separate conductor. In the event of a break in the neutral wire, the power supply to your household appliances will remain in balance and no major imbalance will occur.
The current will flow from the phase through the consumer resistance and go through the zero busbar and its conductor to the ground. And so on for all other phases.
A slight imbalance will of course be present here, but its magnitude will depend on the quality of your ground loop. However, this method of protection has one big drawback that negates all its advantages.
Of course, a grounding loop needs to be made, no one argues with that. The question is whether to connect it to the neutral conductor.
After all, if it is of high quality (10 Ohms or even 4 Ohms) only you have along the entire street, and a break in the neutral wire happens not near your house, but at the very beginning of the overhead line, then all your neighbors will immediately “sit” on this circuit.
In fact, the entire total current will go through your neutral conductor. If you set zero through a two-pole or four-pole circuit breaker, it will most likely break due to overload. Otherwise, expect a fire and melted wiring.
Therefore, a correctly assembled shield (an input circuit breaker selected for the load, grounding a copper conductor with a cross-section of at least 10 mm2) is the key to your safety.
Another disadvantage of such “circuit protection” is the danger of getting energized yourself. Let's say you made a great outline a few years ago.
But due to the presence of salts in the soil, it gradually rotted, and you don’t even know about it.
As a result, with the next neutral break, all grounded electrical equipment in your home will be energized. There is no land anymore. And the phase potential will begin to flow through the instrument housings.
I went to open the refrigerator and got an electric shock; I went into the shower and got electrified.
Therefore, it is more reliable and safe to use another method.
Selection of materials and equipment
Input components and the meter are placed on the distribution panel, the dimensions of which are determined by the number of connection points. Metal boxes with protection from moisture are placed outside, steel and plastic cabinets are used inside.
Set of components for connection:
- corrugated tubes, self-extinguishing or non-flammable cable ducts;
- copper cable VVGng;
- three-phase meter;
- connecting switches: combs, buses, terminals;
- protective and safety fittings;
- automatic circuit breakers complete with RCDs or combined automatic circuit breakers;
- a relay that protects against voltage surges in the circuit.
A DIN rail is prepared for high-quality fastening of automatic machines and protective devices; mounting spaces for these devices are provided on the bar.
To carry out internal wiring , you need wires, boxes for changing the direction of wiring, socket boxes and for switches. You will need alabaster or plaster to fix the cables in the wall grooves, clamps, electrical tape, and adapters.
Requirements for connecting 380 volts
The rules for connecting the site are prescribed in the text of Federal Law No. 35 “On Electric Power Industry” dated March 26, 2003 (Articles 20 – 26), edited on December 27, 2019. The work of electric grid companies is regulated by Federal Law No. 135 “On the Protection of Competition” dated July 26, 2006.
Example specifications
Basic Rules:
- the user cannot independently connect electricity to the house; an energy supply organization is needed;
- connection is possible after fulfilling the requirements of the technical specifications;
- use cables with aluminum (not less than 16 mm²) or copper (not less than 10 mm²) conductors; armored cables are laid underground;
- with an aerial connection, the cable does not sag below the road below 6 m, above the sidewalks - below 3.5 m;
- the underground line is buried 0.7 - 1 m or lower;
- entry into the dwelling - not lower than 2.75 m from the ground;
- devices installed upstream of the electricity meter must be sealable.
In a 380V network, it is allowed to connect a three-phase meter in a private house with a maximum current strength of 50A, accuracy class - 2, last check - no more than 1 year ago. It is fixed on the DIN rail of the distribution panel, but it can be located outside the switchboard. The house must have a grounding system.
How to apply for a permit
The consumer has the right to connect to any electrical facility within 300 m from the site (power line supports, transformer substations, cable lines). The contract is concluded for a new connection, increasing power or moving the entry point.
List of project documents:
- site plan in the general layout of the development;
- connection diagram for power receivers;
- internal wiring diagram;
- PPR for connection.
The application is written at the company’s office, or submitted in your personal account through the website.
Information to be submitted with the application:
- Full name of the applicant;
- address of the connected site and the actual location of the user;
- project development period and commissioning time;
- power separation between phases;
- highest required power;
- type of load.
The company must meet deadlines for making decisions on the application. For individuals with a required power of up to 15 kW, this period is equal to 15 days, with other indicators or for a temporary connection - up to 30 days. After signing the contract, the specifications are given, which the user must exactly carry out on his site.
The owner notifies the company about the completion of preparation; in response, the electrical network checks the compliance of the specifications and the actual work in the presence of a representative of the supplier’s supply organization. A certificate of compliance is drawn up (within 3 days), the owner of the site signs the document within 5 days. This is followed by: an agreement on technological connection, an agreement on the supply of electricity. After this, 380V is supplied to the site.