The question often arises for owners of private households: is it possible to lay power cables underground? Which wire is better to use? What standards should be followed?
The main method of laying power lines to a private house or dacha is overhead or underground. To transfer electricity to the point of consumption, a method such as laying cables in the ground is used. This is an economical option for installing power lines. The advantage of this method is that the wiring is hidden, which does not spoil the appearance of the building, the wires do not get caught in the wind, and the wires will not interfere when moving oversized loads. Well, as a bonus, the cable is cooled in the ground, which prevents it from overheating and damage.
Advantages of using this laying method
Laying wires and cables underground has many benefits. When installing this wiring, it is necessary to follow a special technological process. The following advantages can be highlighted:
- Cost-effective, the cost of work will not exceed the cost of the materials used. The most acceptable option, in comparison with laying an overhead line, which requires special approval, additional materials, and equipment;
- To avoid damage to the cable, a shallow trench is made and no material or other means are required to maintain the line;
- The ability to lay the cable yourself without resorting to the help of installers and without using special equipment in the form of a tower;
- The wiring location is hidden from view, so it does not spoil the appearance of the area;
- This method allows the use of high-voltage electrical cables of various cross-sections, without the use of reinforcements for suspension devices.
Cautions
The underground cable for electricity in a private house should only be armored.
The metal pipe for wiring should not be solid, since when it is filled with groundwater, the ice formed in severe frost will damage the cable.
The wiring must be grounded. To do this, a separate insulated wire is soldered to the armor. The second end is connected to ground on the shield or neutral terminal. In the event of an emergency, the machine will turn off the power.
Choosing the right cable and complying with all requirements during its installation is the basis for long-term and safe operation of the electrical main.
When installing an electrical input into a house, each of us thinks about how it is better to do it - overhead or underground?
Installation of air SIP is always much faster and several times cheaper.
Firstly, it is more reliable. And secondly, it does not spoil the facade of the building or the appearance of the surrounding area.
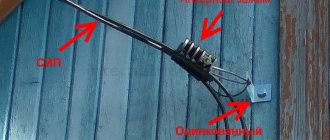
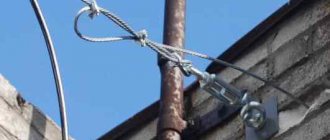
Often these two methods are combined. Initially, an input is made to a special pipe stand from a support.
And from this distribution cabinet the cable is laid in the ground and brought into the house. When the support is located not far from the building, some SIP wires are mounted directly on the facade.
But we will turn specifically to the underground input. Let's look at what difficulties you will encounter when laying cables in the ground and place special emphasis on common mistakes when performing this work, which ultimately, sooner or later, lead to failure of the cable line.
Cable installation in the ground can be done in two ways:
- without any protection (using armored KL grades)
- in pipes or special corrugation
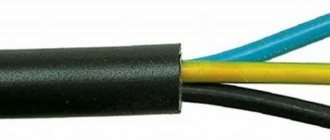
Let's look at the first method first. Here, as a rule, a cable with tape armor is used - VBBbShv or AVBbShv.
It is not at all necessary to use armor of the type AABL, AAShV, where there is a one-piece cast protective shell made of aluminum. It could just be ribbons overlapping each other.
In this case, armor protects not so much from external influences (someone started digging where they shouldn’t), but from deformation and traction forces during soil heaving.
The same applies to the SIP wire. It cannot be laid in the ground, even in pipes.
You can often find videos on YouTube where copper CLs with 6mm2 conductors or 10mm2 aluminum are used. This is explained by the supposedly small number of electrical appliances in the house or country house.
In terms of load, this may be enough for you, but in terms of compliance with the requirements for the minimum cross-section of the PEN conductor, you will have a violation. For single-phase power supply, the cable must be three-wire, for three-phase power supply, it must be five-wire.
The selected cable should be carefully laid in the trench. What size should it be, what distances should be maintained when excavating it?
It is necessary to maintain a certain distance of 60cm.
After laying in the ground, the cable should not fall on the line of action of the foundation force, directed at 45 degrees from the base.
Standardized clearances from plants and trees on your site are also required. Here are the minimum dimensions for underground cable laying from nearby utilities, structures and obstacles.
Rules that must be followed for laying wires underground
Installation is carried out in compliance with PTEEP and PUE, regardless of the purpose and type of wire used. The following points must be observed:
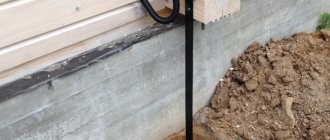
- The cable is laid at a depth of 70 cm or more. If the power line is short (less than 5 meters) and the cable is protected in the form of a pipe, then laying at a depth of 50 centimeters is allowed;
- It is not permissible to lay wiring under the foundation of a building. A minimum of 60 centimeters should be measured from the foundation to install the line. If a wire stretches from one building to another through the foundation, then it must be protected with a steel pipe. Such protection is mandatory since any cable is susceptible to all sorts of harmful influences;
- The distance in the trench between the wires is usually at least 10 centimeters. Based on this, the size of the trench is calculated;
- When laying cables, a distance of at least 2 meters from trees on the site should be maintained; a distance of -75 cm from the bushes is required. These rules can be violated if there is additional protection, for example, in the form of a steel pipe;
- From communications such as sewerage, water supply, it is necessary to make a distance of -1 meter or more, from a gas pipeline -2 meters or more;
- If cables intersect in trenches, they should be insulated from each other with an earthen layer of 50 cm or more in size;
- If an underground wiring method is used, then the wire should be armored, specially designed for this purpose. This is necessary to create protection from the influence of physical influences and underground pests;
- When laying using a winch, which unwinds the drum, it is necessary to equip the mechanism with a limiter. In this case, installation with a snake is possible, then the line will not have tension;
- If it is necessary to connect an electrical wire, metal couplings are used independently. This connection method gives good contact for a long time;
- For additional protection of the power line, an asbestos-cement pipe or a special brick structure is used;
- After laying the wiring, a warning tape is laid on top with a designation and warning about the electrical wiring.
Correct cable routing
The cable itself is laid in a “snake” trench.
SNiP 3.05.06-85 stipulates that cables in trenches should be laid with a margin of 1-2%. This reserve is precisely provided by the snake.
Just don't go overboard with the bends.
Error No. 7: It is not allowed to make a reserve in the form of rings.
Why are these extra bends needed at all? As it turns out, not for emergency repairs at all. If the CL is laid in a perfectly straight straight line, then the temperature deformations that will accompany the operation of the CL will sooner or later damage the input. Error No. 8 Before and after laying, do not forget to test the insulation of the cable cores with a megometer.
A small layer of sand is again poured on top of the laid cable.
Selecting an electrical cable for underground wiring
In underground wiring, types of armored cables are used - VB 6ShV, as well as VB6ShVng, these products have steel protection. This option is resistant to mechanical damage and will prevent rodents from damaging the wiring. With such protection, the cable will last for many years. The armored cable is laid without a pipeline, but the use of a pipe is recommended to avoid damage to the wiring by government employees. organizations in the process of carrying out work. The electrical wire for laying in the ground should be selected taking into account the required power of the facility's consumers. For example:
- The VBShvng 4x6 cable is designed for a power of 11 kW;
- The VBShvng 4x10 cable is designed for a power of 15 kW;
- The VBShvng 4x16 cable is designed for a power of 21 kW.
About twisted pair
Twisted pair has been used for over a hundred years, even if it originally looked a little different. It was first used on American telephone lines. It got its name due to the fact that the paired conductors through which the signal travels were twisted together along the entire length of the line. This protected against interference and interference, and if changes did occur, they affected both cables equally.
Twisted pair is still used to build low-current networks up to 24 V: telephones, Internet, cameras, alarms, security and industrial networks. For a home, the conductors are too thin to organize electrical wiring. Will not withstand high stress.
Has the following characteristics:
Advantages and disadvantages
Cheapness
Difficult to damage until the signal is completely lost
Can be bent at large angles
Resistant to interference
Often receives microdamage when bending too much or when pinched by heavy objects, which leads to a weakening of the signal
Susceptible to electromagnetic fields as standard
Twisted pair cable ensures stable data exchange between devices in the apartment and the Internet at a speed of 1 Gbit/s, if all devices have the appropriate connectors. A good choice for carrying out the last few tens or hundreds of meters to the final equipment. For longer distances or connection speeds, optics are used.
Stages of electrical wiring work
To create underground wiring, you must have special knowledge:
- The first step is to mark the route on the ground for the power line in a summer cottage, suburban area, etc.;
- When marking, it is possible to use all kinds of stakes and ropes. It is necessary to carefully ensure that there is no intersection with communication networks;
- It is worth creating a cable layout plan. The drawing indicates the distances for the cable exiting the ground, as well as its turns. It is important to check before installation whether the wiring is disconnected from the mains voltage;
- Then a trench is dug according to the markings made. As a rule, its depth is 80 cm, the width for laying one cable is 20 cm. The bottom of the dug trench should be compacted;
- There is an option - the bottom of the trench is lined with red brick;
- If you plan to conduct electrical wiring across the road, then in this case the depth should be at least 120 cm;
- When laying the cable in the ground, it is necessary to clear the trench of branches, stones and other objects;
- Next, a cushion of sand -12 cm is poured in. It will protect against the possibility of a wire break;
- The de-energized wire must be placed so that it is not too taut. As a rule, they lay the whole wire without connecting sections;
- The final stage is backfilling the trench with electrical wiring. After this, the cable is checked for short circuits and its armor is grounded.
Be sure to watch the video on how to lay cables in the ground correctly:
In winter, underground installation of the electrical wiring line is permissible; the following must be taken into account:
- Before installation, the cable is warmed up in the living room. The heated cable is laid, preventing freezing. If the frost is more than 20 degrees, the possibility of installation is excluded;
- If the air temperature is minus 5 or higher, it is possible not to carry out the warm-up procedure if the wire is high pressure;
- At a temperature of minus 7, it is permissible to lay a conductor protected by insulation;
- If the temperature is minus 15 or higher and the conductor is protected with PVC film or a rubber sheath;
- Laying at minus 20 degrees is possible, if the wire is protected with PVC sheath or rubber insulation and if there is a lead sheath on top.
There are details that are worth considering; they will help to carry out the work more correctly:
- Armored cable is used for wiring;
- If electrical wiring passes through the foundation, protection is required in the form of a pipe with a diameter 3 times larger than the diameter of the cable;
- When the soil freezes deeply (more than 70 cm), the pipe protecting the cable is strengthened to avoid deformation or breakage;
- Plastic and corrugated pipes cannot be used for protection. These pipes are short-lived and do not have the required strength;
- It is not recommended to lay wiring in areas where there is parking (playgrounds, sidewalks), where there is an increased load.
These rules for laying underground wiring must be followed for safe work and subsequent operation. If the rules are violated, troubles may arise that will be difficult to correct.
Pinout and connection
After running the cable, you need to connect it. This will require RJ45 or 8P8C connectors. Twisted pair crimping is described in detail in a separate article. To crimp, remove the shield and protective sheath from the twisted pair. Next, distribute the pairs in the connector as shown in the left figure.
On both ends, crimp in the left direction. The right one is needed only in the case of a computer-to-computer connection, then one end is crimped using the left option. There is a special tool for crimping, which costs from 500 rubles. If you don’t want to buy, then after inserting the twisted pairs into the connector, use a thin screwdriver to press the gold plates on top. They have to cut through the wire to make contact.
This is how the pairs are located in the connector itself and this is how it looks. The connector is inserted into the crimping tool, you need to press the handles and you're done. If you quickly and forcefully press on the contact plates with a thin screwdriver, you can achieve the same effect.
Country affairs
If you still haven’t decided which method of laying cables in the ground to choose, we recommend following our simple tips. There are a lot of ways to accomplish this task. Professionals still cannot decide which method is better - ground or air.
We suggest that you give preference to the earthly method. It's easy to explain. Usually the distance from the pole to the house is large and most likely you will want to install outdoor type lighting. In these cases, the earthly cable laying method is ideal.
To lay an electrical cable underground, follow these simple instructions. First of all, you need to purchase an electrical cable for laying in the ground at your dacha.
After this, you can start choosing the most suitable cable route. In this case, certain features should be taken into account. The cable must be placed 1 m from massive trees. Please take this into account.
Laying a cable is not as simple a process as it seems at first glance. You need to make sure that the wires do not get tangled, and you should not place it in places with high load.
You should start by creating simple markings, and then move on to excavations. The trench where the cable will be located should be no narrower than 70 cm.
As for the depth, cable lines up to 20 kV should be laid to a depth of 0.7 m, up to 35 kV - 1 m, with streets and squares - 1 m, regardless of voltage, oil-filled cable lines should be laid to a depth of 1. 5m.
Once you have created the required trench, you can begin filtering it. In other words, remove all stones and other objects. The next step is to create the pillow. It is better to make it from a material such as sand.
The depth of the pillow should be approximately 10 cm. We recommend that you give preference to the ABVg cable. This is a universal option. To ensure cable protection, we recommend that you use asbestos cement pipes. The cable should be laid freely so that unnecessary pressure is not placed on it. We advise you to create a separate cable layout plan.
Important! Lightning rod in a private house, here!
After all the preparatory steps, you can start filling the cable. This should be done with sand. Its layer must be at least 10cm. The final stage will be laying the warning tape. The final stage will be filling the trench with earth.
Laying electrical cables underground
The laying of electrical cables underground must be carried out in compliance with all technical standards. You should know that it is better to plan the route initially; its radius should have clearly defined dimensions, which should not exceed the permissible norm for each individual cable.
You must take into account the presence of distribution couplings. The cable must be delivered on cable drums, which in turn are delivered on special vehicles.
You should note that the drums should be unloaded very carefully. We recommend that you consult a specialist if you doubt your capabilities. Laying cables underground requires careful preparation and the necessary knowledge.
Laying an electrical cable in the ground
Pay attention to cable selection. The successful installation of an electrical cable in the ground depends primarily on its quality. We recommend that you give preference to copper cables
We recommend that you give preference to copper cables.
They must be armored. The cable that you must purchase must necessarily have technical documentation, which will indicate exactly what it is intended for.
In our case, this is a gasket in the ground. The cable should only be laid from a special drum. You must take this into account.
The cable itself must also have some protection. Let it be a steel braid. Such a cable will cost more, but you will not doubt its quality for a minute.
Take into account all the recommendations given, and you will successfully lay an electrical cable in the ground
Special attention should also be paid to safety precautions. Use special clothing and accurately carry out the necessary calculations. The cable must fit with a certain margin
The cable must fit with a certain margin.
It is very important. Do not put tension on the cable. The margin should be approximately 2%
To correctly connect cable joints, use couplings. Clearly determine the distance between the coupling and the cable. It should be approximately 250 mm
The margin should be approximately 2%. To correctly connect cable joints, use couplings. Clearly determine the distance between the coupling and the cable. It should be approximately 250 mm.
Conclusions: should you choose an overhead or cable line?
An air line is suitable for you if:
- You want to significantly save time and money on input installation.
- You don't want the wire to be stolen by intruders.
- A hanging wire will not spoil the appearance of your site.
- You don't want to dig a trench or hire people to do it.
An underground cable line is suitable for you if:
- The appearance of your site is important to you.
- In your area, there are strong winds and wires often break due to falling trees.
- You have large-sized agricultural equipment, and you need to power several buildings in your yard.
- The power line support is located more than 25 m from your home, and you do not want to spend money on installing an additional support.
- https://ProFazu.ru/provodka/cable-wire/kabel-dlya-vvoda-elektrichestva-v-dom.html
- https://StrojDvor.ru/elektrosnabzhenie/kak-pravilno-provesti-podzemnyj-kabel-dlya-elektrichestva/
- https://electrikmaster.ru/vvod-elektrichestva-v-dom/
- https://domikelectrica.ru/montazh-kabelya-v-zemle-20-chastyx-oshibok/
- https://ichip.ru/sovety/remont/po-vozduhu-ili-pod-zemley-kak-podvesti-elektrichestvo-k-zagorodnomu-domu-653352
How to serve input
The very first thing that needs to be done after installation is to test the resistance of the insulating layer, as well as the zero-phase loop. If the tests give a satisfactory result, then the main switchboard and input can be allowed to operate. Six months after installation, it is imperative to tighten absolutely all screw connections - start from the circuit breaker, which is installed before the meter, and end with the clamps on the ASU.
Once every five years it is necessary to reupholster, and if oxidation is detected, cleaning must be carried out. At approximately the same frequency, you need to inspect the wires to identify damage. The input can last about 30 years. After this period, it is necessary to conduct a thorough examination of the cable. If there is melting on the insulating layer, drying out, or crunching in the cable, this indicates that the conductors are not coping well with the load that is placed on them. Therefore, it is recommended to replace the input with a more powerful one.
These are approximate inspection times. If you notice damage early, it is recommended to check the condition of the entire cable and, if necessary, replace it. The best way out of the situation would be to calculate and install a new input. Moreover, you need to make a power reserve of about 25-30% so that the wires can cope with any peak loads.
Which conductor is best to use for installing underground electrical lines?
Installing an underground power line requires considerable effort and time. In order not to suffer in the future with constant repairs, it is better to immediately choose a high-quality wire that will be able to properly perform its function for many years. Therefore, the issue of selecting a cable that will be used for laying underground should be approached with maximum responsibility.
Using an armored cable from a reliable manufacturer, you can be sure of its proper and durable operation. However, the cost of such a conductor is quite high, and if a person cannot afford such a purchase, he uses simple wires of the NYM or VVG brand. To increase the reliability of such lines, you should use a double-walled corrugated hose DKS, into which the electrical wire is placed along its entire length.
In places where the likelihood of damage to wiring due to heavy loads is quite high, protective cases are recommended. These devices will protect the current-carrying conductors, taking on most of the load. When laying several cables, each of them must be equipped with a separate case.
Running power lines inside corrugated hoses or pipes has the added benefit of easy cable replacement. If the old wire has become unusable, it is enough to open the ends of the route and tie a new one to the end of the non-working cable. After this, the faulty conductor is pulled out, and a new one is installed in its place. Of course, this is only possible if a long period of time in the ground does not lead to the destruction of protective devices.
Inputting electricity into a wooden house
It is possible to operate a wooden structure only if the possibility of short circuits and overheating of the input wiring is completely eliminated. Many owners of wooden houses do not know how to increase the safety of such a structure. Before introducing electricity, it is necessary to bring the internal wiring into proper condition. When operating electrical appliances in a wooden structure, the following rules must be observed:
- Free movement of the input wiring is not allowed. In this case, it is possible that the wire insulation may chafe and form a short circuit. There is a high probability of the input wire breaking if it is accidentally caught by any object while moving. Therefore, before connecting to the power line, it is necessary to ensure a safe height of the input wire. Part of the wiring in the house must be placed in special casings, channels, sleeves that prevent the free movement of the wire.
- Follow the rules for connecting powerful devices. The use of such electricity consumers requires a dedicated electrical wiring line. When connecting high-power devices, this circuit should be equipped with a separate automatic fuse (electrical circuit breaker). The connection diagram for high-power devices should be worked out at the design stage of the house.
- Try to avoid connecting electricity with an uninsulated wire. If an uninsulated aluminum wire is connected to a wooden house, then the structures may catch fire if a short circuit occurs in the immediate vicinity of the wooden structure. To avoid the negative consequences of incorrectly connecting electricity to a wooden house, it is necessary, after bringing the internal wiring into proper condition, to make the connection using a self-supporting insulated wire (SIP) or to make an underground supply of electricity. This method of connecting electricity is the safest for this category of households.
Underground electricity input is used to connect not only private houses, but also multi-apartment buildings in urban areas are also connected in this way.
The work is carried out in the following sequence:
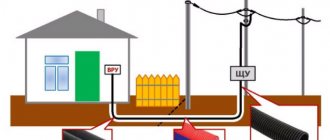
Obtain permission for underground connection of the house. Before introducing electricity into a house underground, it is necessary to make the necessary calculations and obtain permission to carry out excavation work. Specialists must calculate the cross-section of the conductor and the brand of wire used; it is also necessary to coordinate the laying of the trench from the power line support to the foundation of the house. The depth to which the cable is laid is usually 0.7 - 0.8 meters, and if there are other underground communications along the cable route, then it is necessary to coordinate the excavation work with representatives of utility services. When all the permitting documents are ready and the electrical circuit has been calculated, you can proceed to connecting the electrical current to the wooden house. A trench about 0.8 meters deep is made from the power line support to the foundation of a wooden house. The entry point of the electric cable into the ground is reinforced with the help of a metal pipe, which must be raised along the power line support to a height of up to 2 meters. Typically, introducing electricity into a wooden house does not require making holes in the foundation, so the cable in this place is freely routed under it and brought out directly outside the wall of the house. It is necessary at the point where the cable enters the building (given that groundwater may pass too close, or in cases where the soil is subject to significant deformation), to use asbestos or reinforced concrete pipes in which the cable is placed. It is necessary to carefully seal such placement of conductive material to prevent groundwater from entering the pipe. If this is not done, then when the water freezes, the current-carrying core of the cable may be damaged. If to connect electric current to a wooden household you need to punch a hole in the foundation, then the diameter of such a hole should be several times greater than the width of the cable. A thick-walled metal pipe must be installed in the hole in which the electric cable will be laid
When the cable is laid according to all the rules, the trench is buried, having previously placed tapes underground above the cable with the inscription: “Caution cable.”
See the video below for how to lay a cable in the ground:
Correct cable routing
The cable itself is laid in a “snake” trench.
SNiP 3.05.06-85 stipulates that cables in trenches should be laid with a margin of 1-2%. This reserve is precisely provided by the snake.
Just don't go overboard with the bends.
Error No. 7: It is not allowed to make a reserve in the form of rings.
Why are these extra bends needed at all? As it turns out, not for emergency repairs at all. If the CL is laid in a perfectly flat straight line, then the temperature deformations that accompany the operation of the CL will sooner or later damage the input.
Error No. 8 Before and after installation, do not forget to test the insulation of the cable cores with a megometer.
A small layer of sand is again poured on top of the laid cable.
Scheme for introducing electricity into the house
The scheme for introducing electricity into a house is strikingly different from the electrification of a home in an apartment building. Living in an apartment, you may not know anything and may not even guess about the existence of all kinds of input devices, gas grounding busbars, electrical panels and other equipment, and all issues related to electricity will be assigned to the housing office, homeowners association, etc. When dealing with it, you you will have to decide everything yourself, including delving into many of the intricacies of the operation of electrical equipment
It is also important to take into account that an apartment is a relatively small room with almost the same microclimate
A private house is literally exposed to all the elements - heat, frost, wind and precipitation, which, in turn, greatly affects the stable supply of electricity. In addition, not only the residential building, but also various outbuildings are connected to electricity at the dacha site.
As a rule, electrical installation work begins simultaneously with construction. Before building a house, you should think carefully about how to supply electricity to the site.