When electrifying a summer cottage, any owner asks the question: which cable laying method to choose - overhead or underground. Despite the fact that running electrical communications over the air is somewhat cheaper and seems simpler than laying cables underground, it has a number of disadvantages. So, if objects are located at a decent distance from each other, you will need to install additional pillars. Having wires hanging over your head isn't fun either. Therefore, in most cases, people choose the underground method. In this article we will look at how cables should be laid in a trench, and what are the features of this work.
Rules and technology for laying underground electrical communications
It is necessary to lay the electrical cable in the ground in accordance with the requirements of the Electrical Installation Rules, having previously drawn up a laying diagram. If you can lay the route in a straight line, this will allow you to get by with less electrical wire, but this is often impossible to do. Below are the basic rules for laying cables underground:
- Try to ensure that the route does not pass near large trees; it is best that this distance is at least 1-1.5 meters.
- Do not route electrical wiring through high-stress areas. These could be parking areas, pedestrian paths or places intended for access by a sewer service vehicle. Usually they are bypassed around the perimeter, but if this is not possible, then the conductor is laid inside special protective cases, which are pieces of pipes made of HDPE or metal.
These devices are also used in places where the trench intersects with water and gas mains. A protective case is also installed where it is impossible to bury the cable at least 0.5 meters or remove large and solid objects from the route.
- When laying a trench along the foundation, it is necessary to maintain a distance between them of 0.6 m. If this requirement is not met, even a slight shift of the soil or foundation can lead to damage to the electrical line.
- The wire being laid should not be allowed to intersect with others. If this is not possible, then both cables must be placed in a protective case and one cable must be run above the other. The distance between them should be 15 cm.
If the case must have a significant length, it is welded from several pieces of pipes.
Trench parameters for laying power lines
Having decided on the laying scheme, you need to dig a trench, while adhering to the following dimensions:
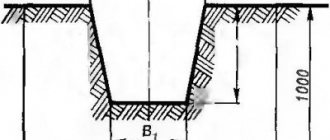
- The cable laying depth should be 0.7-0.8 m.
- If one conductor is laid, then the width of the trench used to lay the cable should be 0.2-0.3 m; if there are two or more electrical wires to be laid, it is necessary to calculate it in such a way that there is at least 0.1 m between the threads running along the bottom.
The procedure and parameters for underground cable laying in the video:
Selection of base material and basic requirements
When answering the question of which cable is best suited for a trench, certain types of protective coatings are specified that allow the installation of networks to a specified depth. Thus, it turns out that cables laid in the ground must have predominantly an armored sheath.
According to the established technology, for networks designed for voltages up to 10 kV, the trench height is 0.7 meters, taking into account. The total depth is 0.8 meters.
If the line passes through the intersection of streets or squares, the depth increases and reaches 1.1 meters. When laying cables, a certain part of the height is taken up by a leveling underlying sand layer of 0.1 meters.
The requirements reflected in SNiP state that at voltages above 1 kV, protective coatings must be installed for networks in trenches. The material is red ordinary brick or concrete slabs laid on a sand layer. The exception is the laying of networks with voltages up to 10 kV at a depth of 1 to 1.2 meters. In this case, the use of brick is not required.
The same SNiP establishes that the maximum number of cables in a trench, which is optimal, is no more than six. This is their number per trench. A device with a larger quantity is considered to be uneconomical.
The procedure for laying cables in the ground
Having dug a trench, you need to:
- Remove roots, stones and other objects with hard and sharp edges from it, otherwise they may cause damage to the insulation during installation.
- Level the bottom and then compact it. It is not necessary to achieve perfect evenness; the main thing is that there are no sudden changes.
- Fill the bottom with sand and level it so that the layer thickness is approximately 0.1 m. Ordinary quarry sand from pits will do, but it should not contain foreign objects that could damage the electrical cable, so it must be sifted before backfilling. To ensure that there are no obvious irregularities at the bottom, this material must also be compacted after being poured into the trench.
- Inspect the insulation of electrical wires to identify possible damage. If possible, test them with a megohmmeter to check for a break (in the absence of this device, you can use a regular multimeter). If damage is found, it needs to be repaired.
- Lay the cable on the sandy bottom of the trench in light waves, without tension.
In those places where necessary, protect the conductor with covers.
- Draw a plan of the laying route, mark landmarks and distances to objects on it - this will simplify future repair work if the need arises.
- Cover the laid electrical cable on top with sand, also having previously sifted the material. After this, the sand layer (approximately 0.1 m) must be compacted with feet.
- Pour the previously excavated soil into the next layer, also removing from it objects dangerous for wiring, level and compact. The thickness of this layer should be 0.15-0.2 m.
- Then the ditch is completely covered with earth slightly above the surface level. This is necessary so that after natural compaction and subsidence of the soil, depressions do not form at the installation site.
After completing the above steps, the line can be connected to the load, having first rang it to check for integrity.
Now you know how to lay a cable in the ground in compliance with established standards. Next we will look at several nuances regarding this work.
Average prices for work, as well as costs for materials
Estimated cost of stages of work on underground laying of cable power lines in pipes:
| Name of operations | Dimension | Cost, rub. |
| Trench development | linear meter | 250 |
| Laying electrical cables with a cross-section of up to 16 mm2 in a prepared trench | linear meter | 250 |
| Laying an electrical cable with a cross-section from 16 to 35 mm2 in a prepared trench | linear meter | 300 |
| Laying an electrical cable with a cross-section from 35 to 95 mm2 in a prepared trench | linear meter | 400 |
| Laying cables with a cross-section from 95 to 240 mm2 in a prepared trench | linear meter | 500 |
| Marking of current conductors | linear meter | 80 |
| Arrangement of a cushion for a cable made of sand | linear meter | 120 |
| Cutting seams in the road surface | linear meter | 1000 |
| Installation of connecting cable couplings | set | 6000 |
| Laboratory quality control of cable line installation | set | 14000 |
| Cleaning the construction site of debris and stones | in fact | negotiable |
| Installation of a cable system at the point of intersection with public infrastructure | for a unit | 2500 |
| Restoration of the road surface | linear meter | negotiable |
| Installation of a protective pipe made of asbestos cement | linear meter | 110 |
| Making holes in the structure for cable insertion | per unit of input | 4000 |
| Compacting soil layers | linear meter | 100 |
| Backfilling the trench | linear meter | 110 |
| Registration of a warrant for earthworks | for the project | 25000 |
| Invitation of a representative of the NKS to control the excavation and electrical cable | for the project | 8000 |
| Inviting tracers to design the actual route | for the project | 8000 |
| Testing an electrical cable in an electrical laboratory | set | 16000 |
| Additional work | in fact | Negotiable |
Important and useful information about laying cables in a trench is in this section.
Which conductor is best to use for installing underground electrical lines?
Installing an underground power line requires considerable effort and time. In order not to suffer in the future with constant repairs, it is better to immediately choose a high-quality wire that will be able to properly perform its function for many years. Therefore, the issue of selecting a cable that will be used for laying underground should be approached with maximum responsibility.
Using an armored cable from a reliable manufacturer, you can be sure of its proper and durable operation. However, the cost of such a conductor is quite high, and if a person cannot afford such a purchase, he uses simple wires of the NYM or VVG brand. To increase the reliability of such lines, you should use a double-walled corrugated hose DKS, into which the electrical wire is placed along its entire length.
In places where the likelihood of damage to wiring due to heavy loads is quite high, protective cases are recommended. These devices will protect the current-carrying conductors, taking on most of the load. When laying several cables, each of them must be equipped with a separate case.
Running power lines inside corrugated hoses or pipes has the added benefit of easy cable replacement. If the old wire has become unusable, it is enough to open the ends of the route and tie a new one to the end of the non-working cable. After this, the faulty conductor is pulled out, and a new one is installed in its place. Of course, this is only possible if a long period of time in the ground does not lead to the destruction of protective devices.
Lump connection
For installation, it is better to use a solid cable, but if it is not possible to find a piece of wire of the required length, it is better to connect the two wires on the surface of the ground, inside a sealed junction box. Such a connection is easy to maintain and, if necessary, rework. It is not recommended to place it in a homemade coupling and bury it in the ground - the contact will quickly be broken, and to restore it the trench will have to be dug out each time.
For comparison, the video shows the production of a full-fledged coupling that can be hidden underground:
How to choose twisted pair for an apartment
For an apartment computer network, a reasonable choice would be a twisted pair cable of 4 pairs, with a total of 8 cores. Using two pair cables does not allow network expansion and is not suitable for some protocols.
When purchasing a cable, use these tips:
1. Twisted pair cable cannot be connected by twisting or similar connections suitable for normal electrical wiring. To connect them, which should be avoided in an apartment, you need to use adapters or repeaters.
Adapters weaken (degrade) the signal. Repeaters require power and cost money. Therefore, the cable must be taken from device to device, or better yet in a coil with a reserve.
2. It is better to choose cable class 5. The higher the class of twisted pair cable, the better the signal transmission.
3. Cable shielding is not mandatory, but a desirable parameter for selecting a twisted pair cable.
4. Each cable core must be single-wire, as in the photo.
Entering electrical wiring into the house
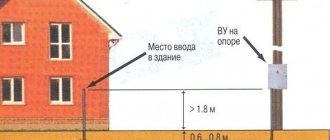
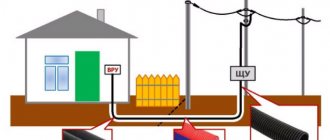
When laying a cable underground in a country house, it is necessary to take into account that when introducing a conductor into a structure (house or other building), it must not be passed under the foundation. Usually, during construction, an embed is built into the foundation strip - a piece of pipe protruding outward by a few centimeters, into which an electrical wire can be easily inserted.
If the mortgage was not made during construction work, a hole must be drilled in the foundation, into which a pipe is then inserted and fixed.
Sometimes the owners of a house with a monolithic foundation do not want to drill into the foundation to install mortgages. The solution in this case is this: the cable is inserted inside a metal pipe and rises along the wall of the structure to a certain height (usually this is the level at which the incoming cabinet is installed). At this mark, a mortgage is embedded in the wall, through which the wire is inserted into the house.
If an armored cable is used as a conductor, its sheath must be grounded. This can be done by welding or soldering an insulated wire to it, which must be set to “zero” in the electrical panel.
This should not be neglected, otherwise, if the phase breaks through, it will fall on the armored shell, touching which, the person will receive a strong electric shock, and it’s good if the matter does not end in the death of the victim. If the armor is properly grounded, then in the event of a breakdown, an automatic switch will operate, cutting off the current supply until the problem is resolved.
Conclusions and useful video on the topic
You can learn how to properly work with tools, wires and various electrical devices, as well as plan work, by watching a useful video.
Wall chipping and ceiling installation:
Interesting theory about electrical wiring and protection:
Installation of socket block:
Electrical installation work is considered complete when the wires are connected and masked, the junction boxes are covered with lids, and the electrical panel is fully equipped. You can replace a socket or install a chandelier at any time - installation of lighting fixtures and decorative elements is most often carried out after finishing work.
But when performing any manipulations with electrical equipment, remember the most important thing - the safety of human life.
Do you have significant experience in electrical installation work and have you independently designed and installed electrical wiring in your home? If you notice errors or inaccuracies in the instructions we provided, please point them out to us by leaving a comment in the block below this article.
Or are you just learning the installation rules and want to clarify some nuances? Ask your questions - we will try to help you.
Features of winter laying of underground power lines
If the circumstances are such that you have to do this work in low temperature conditions, then when performing it you need to take into account several recommendations:
- Before laying the conductor in the trench, it must be warmed in a warm room. You can do this faster by using a transformer, but only if you have the skills and experience in such work.
- The warm cable must be laid in a trench. You should work quickly to prevent it from freezing. If the temperature outside is 15-20 degrees below zero, then no more than half an hour is allotted for installation. If the frost is even stronger, the power line cannot be installed.
- It is allowed to lay an underground line without heating in the following cases:
- If a high-pressure electrical cable is used and the air temperature is -5 degrees or higher.
- If a wire with simple insulation is used, and the air temperature is -7 degrees or higher.
- If a conductor with rubber or PVC insulation is used, and the air temperature is not lower than -15 degrees.
- If the conductors are insulated with polyethylene or rubber, and in addition, have an additional sheath of lead.
In this article, we examined in detail the question of how to lay a cable underground and what are the features of this procedure in various conditions. This work, despite the labor intensity, is not too difficult in technical terms. The most important thing is to take into account the requirements of the PUE and the recommendations contained in this material.
How to lay a cable along a fence according to the rules
Owners of country houses and household plots often have to deal with the problem of supplying power to consumers located in areas remote from their homes. This could be a pumping station, greenhouse heating devices, a lighting network, as well as a number of other economic facilities.
In such cases, the homeowner is faced with the question of how to route the power cable through the site without violating the Electrical Installation Rules (ERR), complying with all electrical fire safety standards, and also avoiding claims from control organizations.
The ideal solution to the problem would be to lay the wires underground in a cable channel or in a metal pipe, as well as suspend them on supports specially equipped for this purpose. However, these installation methods are very labor-intensive and can significantly hit the family budget.
In this regard, for summer residents and homeowners, laying cables along the fence is most relevant. We have provided below the installation methods and PUE requirements for laying the conductor.
