OPEN HIDDEN EXTERNAL IN THE HOUSE AND APARTMENT
The word “electrical wiring” is familiar to everyone, but not everyone will correctly explain its meaning. For many, the concept is associated exclusively with wires. In fact, this is a whole system that includes:
- insulated wires laid in the building;
- unarmored cables;
- their protective structures;
- connecting and fastening elements.
And most importantly, this whole system called “electrical wiring in the house” has a specific purpose - to deliver electricity from the power source and distribute it to consumers.
It is also important to understand the difference.
Electrical wiring is carried out in networks with voltages up to 1000 V: in buildings and structures (inside or outside), on the territories of institutions and enterprises, in courtyards and neighborhoods, on construction sites and personal plots.
Cables and wires with voltages over 1000 V, laid in special channels, wells, and on supports are already power transmission lines (power lines).
TYPES AND TYPES OF ELECTRICAL WIRINGS
According to placement, electrical wiring is of two types:
- internal (mounted inside the rear);
- external (laid along the external walls of buildings).
According to the method of installation, both external and internal wiring are also classified into hidden and open.
How to draw an electrical wiring diagram - where to start: Watch the video
What is the difference between open and closed wiring
Modern construction solutions are entirely aimed at improving the quality of life and the convenience of households. Various ways have already been invented to hide everything that gets in the way or poses a danger. It was also invented to provide access to something important that sometimes requires inspection and repair. This works with power supply wires in two variations at once. The question between open and closed wiring remains open - does any of them take advantage, why do they use one and the other, is there any difference at all? It should be sorted out.
Open wiring
Open wiring is a way of conducting an electrical network in an apartment or house without covering the wires themselves with anything. Usually this is stretched along the walls. It is bent to the shape of the corners, sometimes stretched closer to the floor.
This option is extremely cheap to implement - you will only have to spend money on wires and holders, and, in theory, on labor, provided that the owner is not able to carry out such a repair procedure on his own. This is done quite simply. Any future repair work will also be easier.
There are a number of significant disadvantages due to which it is usually abandoned. Disadvantages include:
- The possibility of accidentally damaging wires in everyday life, because... they are not protected at all.
- Violation of the aesthetic appearance of the room, which does not please designers or even ordinary attentive housewives.
- Increased fire hazard of the premises, all for the same reason of complete unprotection and exposure of the common bundle of electrical wires.
The open type is usually not used in residential premises, but it is actively used in places of temporary stay.
Closed wiring
Closed or hidden is the method of laying the electrical network when it remains completely within the walls. All wires remain under a layer of concrete or other covering. Sometimes the bundle is secured inside the wall, interconnected or additionally insulated.
Complete isolation of wires from the outside of the room allows you to maintain an aesthetic and pleasant appearance and will make the room more comfortable. This will also allow you not to worry about accidental technical damage - the network is isolated, therefore, external factors such as accidental impacts, stretching while walking on the floor and other everyday situations do not affect it.
However, when using this option, it should be noted that getting the wires out of the wall will be much more difficult than putting them inside. Until the first breakdown or short circuit in the system, this does not scare anyone, but then problems begin. For repairs, closed wiring is the most problematic situation.
This is often used in apartments and houses for permanent residence. Closed wiring is the most fireproof, which makes it the optimal solution.
How to choose a cable for external wiring
The cable for external wiring in the apartment should be selected based on the electrical load. For simple lighting and household electrical appliances, a simple two- or three-core cable with copper or aluminum wires with a cross-section of 2.5 mm2 is quite sufficient. It is recommended to connect powerful kitchen appliances and electric stoves to separate cables with wires with a cross-section of at least 4 - 6 mm2. The wiring branch for such powerful equipment must be separate and connected to a separate 25A automatic fuse in the distribution panel. We have already talked in more detail about the electrical filling of the kitchen and the choice of electrical appliances for the bathroom in previous materials.
If you are faced with a choice of which wire to use for external wiring, take copper:
- It is more ductile than aluminum, which means it is less likely to break during installation.
- Copper is more resistant to corrosion, copper wires oxidize more slowly.
- Copper wires will last longer than aluminum wires.
- Copper wire can withstand a greater load compared to aluminum wire with the same cross-section.
The best, in our opinion, is a cable made of twisted copper wires. Each core of such a wire consists of thin copper wires twisted into a kind of cable. It has excellent flexibility, comparable to a regular cord, and bends well. Some brands of such twisted wire are specifically designed for outdoor wiring in a retro style.
What's the difference?
So, having examined the two types of possible arrangements for the home electrical network, you should compare them. First of all, you need to think about what is common. Well, with both methods it is possible to ensure the delivery of electricity to any part of the apartment. Moreover, each method will require the same length of wires.
Now let's talk about the difference:
- Aesthetic appearance of the room. A bundle of wires lying on the side, divided into different ones, going to switches and sockets, is a completely unpleasant sight for lovers of expensive and sophisticated interiors. It looks somewhat untidy and terribly careless. If you hide all the branches in the walls, or in the ceiling or floor, then it turns out much more beautiful and pleasant. Nothing takes up extra space.
- Fire hazard. In any system, overheating, accidental exposure and other troubles occur. Everyone is familiar with the situation when wires spark - this can be due to overvoltage, major breakdowns, and so on. When exposed wiring sparks, it is incredibly dangerous. There is a high risk that furniture will catch fire. With a closed one, such problems do not arise.
- Repair work. In order to get to the network laid inside the wall, you will have to at least dismantle the wall. Sometimes this will require drilling, breaking, chipping. In other words, you will need to spoil the appearance of the room, then carry out the required work and restore it. This is costly, time consuming and generally problematic. It is much easier to repair exposed wiring - it is right in sight, and you just need to approach it. There is no need to perform breaks, dismantling or other operations on the surfaces of the floor, ceiling or walls.
- Mechanical damage. The open one is in plain sight. It can be touched by feet, crushed by furniture, simply torn in any circumstances, soaked, and so on. The closed one is in isolation. And it is there in the same condition in which it was placed. It does not wrinkle or tear without directly damaging the wall. When laying a closed one, it is recommended to draw up a diagram so that with all sorts of hanging cabinets or shelves, drilling the surfaces does not result in the need for repairs.
Conclusion
For a residential premises - be it an apartment or a private house - you should use a type of hidden (closed) wiring. This will help make the premises safe, not be afraid of accidental damage and preserve the opportunity to create an interesting interior without the mistake of looking at the underside of the electrical network. But in garages or country houses you can afford to save money and ensure that the network is laid in an open type. But even then we should not forget about basic care - the wires are still live, and damage should be avoided.
Electrical » Wiring
OPEN HIDDEN EXTERNAL IN THE HOUSE AND APARTMENT
The word “electrical wiring” is familiar to everyone, but not everyone will correctly explain its meaning. For many, the concept is associated exclusively with wires. In fact, this is a whole system that includes:
- insulated wires laid in the building;
- unarmored cables;
- their protective structures;
- connecting and fastening elements.
And most importantly, this whole system called “electrical wiring in the house” has a specific purpose - to deliver electricity from the power source and distribute it to consumers.
It is also important to understand the difference.
Electrical wiring is carried out in networks with voltages up to 1000 V: in buildings and structures (inside or outside), on the territories of institutions and enterprises, in courtyards and neighborhoods, on construction sites and personal plots.
Cables and wires with voltages over 1000 V, laid in special channels, wells, and on supports are already power transmission lines (power lines).
According to placement, electrical wiring is of two types:
- internal (mounted inside the rear);
- external (laid along the external walls of buildings).
According to the method of installation, both external and internal wiring are also classified into hidden and open.
How to mark up correctly
Let's figure out how to properly build electrical wiring in a house with your own hands (step-by-step diagram). Start making markings from the panel. First, draw the lines along which the main highways will pass. Think about how wide and deep to cut the groove. Then think about where the electrical boxes will be located (they should be placed at the connection of the wires to the mains). Lower the sockets and switches from the boxes, draw markings for the lamps along the ceiling. When all the preparatory work is completed and the alignment lines are drawn, then proceed to gating. Using a grinder and a diamond disk, slits are cut to a given depth, and the second ones are cut parallel to them. Then, using a hammer drill or chisel, a groove is hollowed out into which the cables are laid. They are secured inside the grooves using ties and then sealed with cement or asbestos.
Proper connection of the shield
OPEN ELECTRICAL WIRING
With open wiring, cables and wires are laid along wall surfaces, ceilings and other building elements of the building.
There are several installation methods:
- free suspension;
- directly on the wall surface or ceiling;
- in electrical baseboards;
- on strings;
- in platbands;
- on cables;
- in trays;
- on rollerskates;
- in a flexible metal sleeve;
- on insulators;
- in boxes;
- in the pipes.
In turn, open wiring is divided into three more subtypes:
Stationary.
This is wiring that is permanently connected and cannot be disconnected without the use of a special tool.
Portable.
The contacts of such wiring are connected to each other using plug connectors (not twisted or soldered), that is, such wiring can be disconnected at any time.
Mobile.
Used to connect mobile mechanisms to the electrical network.
The advantages of open wiring are as follows:
1. It is easy to install. Not even the most experienced electrician, but an ordinary man who understands electricity, can do such electrical wiring in an apartment with his own hands.
2. No additional equipment is required (such as a power tool for cutting grooves).
3. The integrity of ceilings and walls is minimally damaged during installation.
4. The wiring is available at any time for inspection or repair of damage.
5. It is mobile; if you need to move a switch or socket to another location, this can be done without any problems.
Disadvantages of open wiring:
1. It is unattractive and does not always fit into the interior.
2. During installation, it is necessary to take into account the technical standards and requirements of the premises (it cannot be used everywhere).
3. The open installation method is the most dangerous in terms of fires. If the load exceeds the permissible limit, overheating of the wiring and a fire is possible, which will immediately spread to the wallpaper or decor.
Installation
After marking and cutting the grooves, the cables are laid in them. All connections are made in installation boxes using special plugs. You can, of course, solder the wires, but this is completely unnecessary and takes a lot of time. The plug connection is fast and reliable, the main thing is to choose original materials.
When connecting switches, you need to open the phase, not the zero. The phase comes to the bottom of the socket, and not to the side, so that you do not accidentally catch it when replacing the light bulb. These are the basic rules on how to do the wiring in the house with your own hands - remember them and follow them without fail.
After the wires are laid out, you need to connect them to the electrical panel, installing automatic circuit breakers, an RCD, and a meter in it. It can only be moved or sealed by an employee of the energy supply company, so do not rush to remove it yourself - you will be fined a large amount. It is advisable to label all cables entering the meter, stick stickers on the machines indicating what they are responsible for, or sign them with a marker. It is also advisable to stick a connection diagram on the panel door, otherwise in 5-10 years you simply will not remember what was assembled and how.
HIDDEN ELECTRICAL WIRING
Hidden electrical wiring is laid inside the structural elements of the building - in floors and foundations, in wall surfaces, under removable floors. There are several ways to lay a cable or wire:
- in pipes;
- in furrows under plaster;
- in a flexible metal sleeve;
- in the voids of a building structure;
- in the channels;
- in boxes;
- in niches of plasterboard structures.
Nowadays it is rare, but in Soviet times such a method as embedding conductors into a building structure during its manufacture was often used.
Advantages of hidden wiring:
1. It is not visible, does not spoil the interior of the room and does not interfere with any finishing work.
2. This installation method is characterized by a high level of electrical safety. All conductors are hidden, which means touching live parts and electric shock are minimized.
3. Being under a layer of plaster, hidden wiring does not have air access, as a result of which it has high fire safety.
4. Hidden wiring elements are not exposed to solar or mechanical influence, thereby increasing their service life.
Disadvantages of the hidden method of laying electrical wiring. postings:
1. It is practically impossible to repair such wiring. If a wire burns out somewhere, finding the location of the damage will be very problematic.
2. Labor-intensive installation.
3. It is necessary to immediately clearly think through the locations of sockets and switches, and the routes for laying wires, since it will be difficult to change anything in the future.
4. It will be necessary to draw up an exact wiring diagram. After all, when you need to drill a hole to attach a picture or shelves, you need to be sure that you won’t hit the wire with the drill. You can, of course, do without a circuit, but then you will have to buy a special device to detect hidden wiring.
Types of wiring
For installation indoors, two types of wiring are used: open and hidden. Each of them has its own advantages and disadvantages and this must be taken into account when choosing.
Open wiring can be stretched anywhere on the wall, since it is covered with special boxes and protective elements for convenience and safety. There is always access to it for repairs or connecting additional elements of the electrical network. However, this type does not look very aesthetically pleasing indoors, and decorating it with wallpaper or cornices is undesirable - this increases the risk of fire. This method is used only if it is not possible to lay the cables using a closed method.
Hammering with a hammer drill
Hidden wiring is hidden in special grooves that are pierced in the walls. Sometimes the nets are placed in boxes and hidden under plaster or other wall finishing. In the future, this type of electrical wiring is difficult to repair, because finding the damaged area is quite problematic; to do this, you need to carefully dismantle the covering and only then carry out repair work
If you have a closed installation, then when drilling into the walls it is important not to damage the cables. This method does not spoil the appearance of the walls during operation, but with each repair you need to be prepared for additional costs to restore the coating
Laying hidden wiring
Often a combined type of installation is used, when important connections are left in plain sight, and the remaining wires are hidden in grooves.
EXTERNAL ELECTRICAL WIRING
In another way, external electrical wiring is called street wiring. It is laid outside houses, along the walls of structures and buildings, as well as between them on special structures or supports.
Such wiring is necessary to supply voltage to lighting lamps, alarm systems, CCTV cameras and utility rooms (garage, workshop, shed, sauna, bathhouse, swimming pool).
All this must be taken into account at the stage of construction of buildings and structures.
External electrical wiring in a country house is no less important than internal wiring. In addition to the need to provide sufficient lighting in the area, at any time you may need to connect a power tool (drill, grinder, lawn mower, pump) in the yard. Don’t drag the carriers across the entire house and property; when planning the power supply, it is better to mark out places for installing 2-3 sockets.
The most important difference between external electrical wiring is that it is exposed to atmospheric factors - rain, snow, wind, sun rays. Therefore, it must be reliably protected from precipitation, from mechanical influences and accidental human contact with live parts.
General requirements for electrical wiring.
These requirements apply equally to both apartments and private houses:
1. All boxes, sockets and switches must be located in such places that they are always easily accessible.
2. All connections and branches are made only in boxes.
3. It is prohibited to install sockets in wet rooms (bathroom, sauna, bathhouse).
4. Grounding and grounding conductors are connected only by welding.
5. Grounding of stationary plates is carried out by separate conductors.
According to the PUE (Electrical Installation Rules), the following are also regulated:
- standards for the number of sockets per room;
- the distances at which sockets and switches should be placed in relation to the floor and communications;
- norms for laying wires (vertical and horizontal sections).
Tools for work
You will need the following tools for your work:
- hammer;
- ordinary screwdrivers;
- indicator screwdriver;
- wall chaser;
- perforator;
- tester;
- pliers.
In addition to the above tools, we will need materials: electrical tape, tags for marking wiring, sockets, wires with different sections, terminal blocks. You need to take the choice of electrical panel seriously, since the reliability of the future electrical network in a private house or apartment depends on it.
Installation must be carried out taking into account the requirements for the location of devices. We are talking about a bathroom, bathhouse or even sauna - the moisture level in them is too high. Switches/switches and sockets should be located on the outside - in front of these rooms.
ELECTRICAL WIRING IN THE HOUSE AND APARTMENT
Apartment wiring is not as expensive in terms of finances, effort and time as wiring in a private home. In multi-storey buildings, each apartment is already connected to an electrical network from the general distribution panel to the input circuit breaker.
Do-it-yourself wiring in apartments is within the capabilities of many and is carried out according to the following approximate plan:
- You should start by drawing up a diagram.
- Based on the diagram, you need to make markings on the walls and calculate the required amount of wire, cable, switching devices and fittings.
- Next comes the installation work - cutting grooves, laying conductors in them, installing boxes, switches and sockets, and connecting all elements.
- The final stage is checking the operation of the assembled circuit.
Electrical wiring in a private house.
Electrical wiring in a private house is also quite possible to do with your own hands for a person who understands electricity. Just keep in mind that it differs from the apartment option, since it has additional requirements.
Power supply should be supplied from a 220 V or 380 V network, with a TN-CS grounding system. It is prohibited to lay conductors along heated surfaces, as well as near a stove, chimney or fireplace (this rule is especially true for saunas and baths).
Particularly difficult when laying wiring with your own hands in a private house is the installation of the input. First you will have to go around several institutions to obtain permission and technical conditions.
There is a lot of work to be done on assembling the distribution panel and laying the input line (digging a trench for the cable or installing a tap from an overhead power line). And only then can you proceed with the internal electrical wiring according to the same plan as described above for the apartment option.
If you are not sure that you can install reliable and high-quality electricity. wiring in an apartment or private house yourself in accordance with the requirements of the PUE, it is better to invite a specialist. Remember that 65% of all electrical fires occur in the home electrical system.
Wiring Requirements
Wood is the most popular material used in the construction of private housing. Despite its advantages, wood is a fire hazardous and flammable material.
Basic requirements for electrical wiring in wooden buildings:
- Safety - Wiring must be routed in such a way as to minimize the likelihood of overheating and ignition of the cable, as well as to prevent the transmission of open flames to adjacent wooden structures.
- Design - the technical characteristics and performance of the wires and components used must correspond to the calculated peak load on a specific section of the electrical network. To prevent heating, the cable cross-section is selected with a margin of 20–30%.
- Laying method - it is preferable to carry out the electrification of wooden buildings using the open method. This allows you to easily and regularly diagnose the state of the electrical network.
- Insulation - the location of the input unit (electrical panel) must be isolated from interface with wooden structures. It is ideal if the electrical panel is installed in a room with a partition made of non-combustible materials.
- Conductor - it is better to use a three-core copper cable with insulation made of non-combustible materials as a conductor. Laying the cable in PVC corrugation is strictly prohibited.
- Automation - a circuit breaker must be installed for each group in the electrical network. The current rating of the circuit breaker is selected in accordance with the load on the site. It is highly not recommended to overestimate the current rating, as this will lead to overheating of the conductor.
It is not recommended to independently lay a power cable and install an electrical network without appropriate experience - this should be done by specialists. But every owner of a private home must know the basic rules of electrification. This will allow him to diagnose existing wiring, and will also provide an opportunity to control the quality of work of hired electricians.
Regulations
Electrical Installation Rules is the main document for electrical wiring design
General requirements and rules for electrical wiring are described in the following documents:
- PUE, edition 7 - the main document used in the design of the electrical network. It describes in detail the choice of conductor, switchgear, automation and lighting.
- SNiP 3.05–06–85 - electrical wiring in old and new houses. Methods of wiring and rules for introducing power cables into residential premises.
- SNiP 31–02 - requirements for the installation of power supply systems in residential buildings. The document complies with the norms and rules described in the PUE.
The information contained in these sources is described in technical language and may not be understandable to an unqualified person. When studying on your own, we recommend relying on the “Rules for Electrical Installations”, since this document most clearly formulates the meanings and concepts necessary for installing wiring in private homes.
Electrical wiring - closed or open: which is better to do it yourself?
One of two options for installing electrical wiring in a country house - open or closed - is chosen with reason. Having trouble with your arguments? And we will tell you!
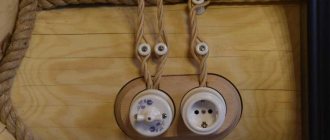
In wooden walls it is cheaper and easier to comply with safety rules when laying electrical communications in an open way (although under certain conditions it is possible to install closed wiring). Today it is no longer necessary to distance cables from the walls by 2 cm, hanging them on ceramic insulators. They are attached with plastic clips directly to wooden crowns or placed in overhead cable channels.
In a stone cottage, closed wiring is undoubtedly more convenient. It is insulated from accidental damage, does not interfere with the arrangement of furniture and does not conflict with the style of the interior. However, if you prefer a retro setting or don’t want to ditch the walls, then open wiring will provide support.
Closed wiring
Closed wiring is an important component of the life support systems of the home. In stone buildings it is installed at the final stage of construction, before finishing work begins. Channels are hollowed out in the walls, cables wrapped in corrugated pipes are placed and fixed in them, and recesses are made for mounting boxes.
The laying of canals does not tolerate chaos. Just imagine the consequences of hardware getting into the cable when trying to “drive a nail” into the wall! For this reason, experienced electricians lay wires strictly horizontally or vertically from sockets and switches. If the wiring is placed in the floor, laying is done around the perimeter of the room at a distance of 10 cm from the walls, and the cable does not interfere with the fastening of the baseboard.
In wooden houses, closed wiring is installed during the construction phase. It turns out that at this stage it is already necessary to have a design project that shows which electrical appliances will be located in the house and where.
Reference by topic: Electrical wiring and electrical diagram of the apartment
✓ Please note
When installing electricity into a house or changing wiring, it is dangerous to skimp on equipment and installation. It is better to entrust the selection of cables, protective modules, as well as sockets and switches to a specialist who will take into account all the nuances.
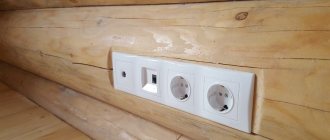
The issue of safety, especially when wiring in a wooden house, should come first. In this case, it is wrong to focus only on price; it is not an absolute indicator of quality. If for one reason or another the choice falls on retro-style sockets and switches for open wiring, you need to understand that in terms of technology and safety they are not inferior to other modern equipment.
Preparatory work
Before carrying out work indoors, you need to pay attention to the line input. Over the past couple of decades, the number and power of household electrical appliances have grown significantly, increasing energy consumption, and the old line may not be able to cope
The second reason is the constant exposure of the cable to sunlight and other external factors outside the home. Metal strands gradually become exposed, which makes the use of electrical wiring less safe.
One of the weak points is the cable entry into the house, which is often routed through the wooden wall of the attic. At one time it was believed that to ensure safety it was enough to place the wire in a rubber hose
It did not take into account that rubber is a conductive material, and as it ages, areas of sparking and local heating may appear
To install a line in a wooden house, you can use one of two methods: underground and aerial.
The first method is quite expensive. It requires excavation work, placing the cable at a depth of about a meter, and marking the security zone with appropriate signs. Thick-walled metal sleeves are installed in places where they pass through the foundation and enter the house. This method is most often used when constructing a new house.
An overhead line will require an electrical wire with a cross-section of 16 millimeters or more. The so-called SIP (self-supporting insulated wire) is often used, the service life of which exceeds 25 years. The connection of the external line to the input line is carried out exclusively outside the building. Installation of cable channels and wiring is carried out after the initial shrinkage of the house and drying of the wood of the walls. Otherwise, the slightest changes in the “geometry” will lead to deformation and destruction of the box.
Open wiring
Electrical wiring embedded in a stone wall does not pose a particular fire hazard. Of course, an outlet may spark or a faulty electrical appliance may catch fire, but that, as they say, is a completely different story.
In wooden houses, a short circuit or other electrical failure may well cause a fire. Meanwhile, hidden wiring in a country house often becomes the object of attention of rodents. In addition, wood dust accumulates in the voids of wooden houses where wiring is laid, which instantly ignites from a spark. Therefore, in accordance with current Russian standards, electrical wiring on a combustible base is carried out openly.
The advantages of open wiring are obvious. It is easy to install, maintain and control; if necessary, the route can be moved, supplemented or repaired. There are also “cons”. The open installation method eats up part of the space: you cannot hang a shelf on top of the cable, and sometimes you cannot place a cabinet close to the wall.
Reference by topic: Do-it-yourself electrical wiring repair
Making a wiring diagram
Like any business, installation of electrically conductive systems in a room should begin with design. Experts advise putting markings on the walls that will indicate where the wires, lighting fixtures, connecting conductors and sockets will be located
In addition to your own preferences in planning room lighting, you should take into account the individual characteristics of the room and the following rules:
- Conducting cables are located strictly horizontally or vertically;
- Cable turns are formed at right angles;
- The distance between cable bundles and ceilings is 150-200 mm;
- The distance between cable bundles and window or door openings is at least 100 mm;
- Light switches are located on the side of the door handle at a height of 0.8 meters or 1.5 meters from the floor;
- Electrical sockets are located at any height convenient for the user;
- The number of sockets is usually calculated from the ratio of 1 element per 4 linear meters of wall;
- The location of sockets in adjacent rooms in adjacent recesses is acceptable;
- Distribution boards are recommended to be located close to the point of entry of power cables at a level of 1500-1700 mm from the floor;
- Be sure to provide the ability to connect protective grounding to the panel body.
When you have decided on the places for laying cables and installing electrical elements, make a wiring diagram with your own hands on paper, observing the scale relative to the size of the room. This will be useful to you in the future if you need to repair electrical wiring.
Open wiring – retro + progress
Traditionally, open wiring was done with stranded wire on ceramic insulators. This is the way today. most suitable for retro style, easy to replicate using modern twisted three-core or two-core wire and ceramic holders. Styling will cost more than exposed wiring from a regular cable on plastic or metal brackets. But in any case, the distance between the holders should be no more than 50 cm, and in difficult areas they are placed more often.
To protect exposed wiring from a regular cable from accidental damage, cable ducts and plastic skirting boards are used. Their internal space may have partitions that allow both low-current and power cables to be laid inside the boxes at the same time. The removable upper part provides the ability to monitor the condition of the route and its modernization.
✓Note
The protective ground in the three-core cable must be connected to a galvanized steel ground loop buried in the ground near the house. The lightning protection system is also connected to the grounding loop. In general, this is a separate independent project that takes into account the properties of the soil, the occurrence of groundwater, and the meteorological features of the region.
Electrical wiring begins with a project
The power supply of a country house should be carried out according to a project carried out in a specialized organization that has official permission and approved by the Rosenergonadzor authorities. But before ordering a project, you need to draw up technical specifications. To do this, you will need to obtain information about the power allocated to an apartment or house (a certificate is issued by the operating company), draw a diagram of the location of sockets, switches and lighting fixtures (or order a design project), and also count the expected consumers of electricity. The power supply system installed according to the project is tested, after which it is accepted into operation by an Energonadzor inspector. Only this approach guarantees the electrical and fire safety of the house. In practice, an electrical project is often carried out by an architect-developer of the general construction part, or even a designer, who does not have not only the appropriate permits, but also the proper knowledge.
Example diagram for a private house
This section describes an example for connecting 1-phase and 3-phase power in a private house, which will allow you to understand how to proceed with installation and what is needed to develop an electrical circuit diagram. Let's start with single-phase. The power supply method for a private home (sometimes apartments) is usually chosen to be air. The phase wire goes from the overhead line to the input electrical panel, into which the working and neutral protective wires are also connected.
The power input looks like this:
In 95% of cases, air “communication” is used.
As for meters, today energy supply organizations install them in the incoming electrical panel on the street (a few years ago, installation of metering devices took place inside a private house). In addition to the meter, a switch is sometimes mounted in the switchboard.
The cable is laid from the input panel to the internal one. The supply of electricity to the building begins from the electrical panel installed inside. To add network reliability, professionals recommend dividing power consumers into groups:
- Temporary building, basement, garage - utility room. premises;
- Lighting;
- Power group (the most demanding appliances, for example, a boiler);
- Rosette group.
Consumers need to be separated in order to connect and install individual protective devices. This is what the scheme for dividing devices into groups looks like:
A mandatory requirement for drawing up a diagram is the availability of a plan for a private house. Knowing the drawing, you can independently draw up a circuit with your own hands and connect the devices, without having to resort to the help of professionals. For example, we took a simple diagram:
Having the above material in hand, you can begin to draw up a schematic diagram. This is more difficult, since it requires electrical knowledge. If it is not possible to draw up a diagram yourself, then it is better to ask a friend about it or, as a last resort, hire an electrician.
Features of 3-phase power
If your private home is supplied with 3-phase power, and not 1-phase, then the combined and working wiring, as well as three phases, are connected from the air support to the input panel. There are not many differences in the circuit for 3-phase power supply:
Protection against electric shock
Circuit breakers protect the electrical network from overloads, including short circuits. Residual current devices or RCDs disconnect the electrical circuit when there is a current leak, which can occur for various reasons. For example, due to aging insulation or mechanical damage to the cable. In addition, the RCD de-energizes the network in the event of a fire.
Modern differential circuit breakers perform two functions at once: RCDs and circuit breakers.
And if the electrical wiring is installed correctly, then 8 emergency protective devices will de-energize the network, preventing electric shock to a person and a fire in the home. If the power allocated to the house is not enough to simultaneously turn on all the necessary household appliances and heating devices, then it is recommended to install a load limit relay. A smart device will prioritize. For example, when a powerful vacuum cleaner or electric grill is running, the heated floors are temporarily turned off.
✓ Need to know
Natural shrinkage of 3 cm in a typical 2-story house in the first years after construction will lead to compression and cracking of the cable channels. The wiring will have to be redone!
Installation of panels
According to the instructions of Energonadzor, two switchboards must be installed in country houses: one outside the house, the other inside. An external one is needed for the electric meter so that regulatory authorities can check the readings at any time. The internal panel is used for installing electrical modules.
An input switch and differential circuit breakers are located on its mounting profiles or DIN rails. Each of them is responsible for a specific group. Let's say one is for lighting, the other is for sockets.
In addition to protective devices, there is also room for auxiliary modules: load limiting relays, relays that monitor the quality of incoming electricity.
The distribution board is selected in such a way that after assembly there remains at least 30% of free space, because over time the needs for power supply may increase. In wooden houses, mounted dust- and moisture-proof power panels with an impact-resistant lid that is locked with a lock are installed. In stone, as well as in city, apartments, built-in wardrobes are usually used.
✓Expert opinion
If the customer voices the task of gradually replacing the wiring in the house, then at the design stage of the distribution board it is noted which groups of consumers should be connected to the power supply at the first, and which at the second (final) stage. This is taken into account in the single-line switchboard diagram: some consumers will connect to the home’s power supply system, and for others, backup outgoing lines will be provided in the switchboard.
Then in the future it will be possible to complete the wiring and connect new groups of consumers through the “backup” lines of the input panel. But we do not recommend dividing the work of replacing electrical wiring into stages. At a minimum, shields must be installed throughout the entire house and power cables must be installed.
Preparatory work
So, you decided to create the wiring yourself. To do this you will need a set of tools:
- Multimeter.
- Test screwdriver.
- Connectors for wires.
- Pliers.
- Stripping knife.
- A hammer drill and a grinder with a diamond disc for making grooves.
After preparing the tool kit, it's time to start marking the future wiring. The wires are started from above at a height of 20 cm from the ceiling, all branches to sockets or switches are made strictly vertically. There is no need to try to save cable by pulling it across or diagonally across the room - this will lead to dire consequences when you decide to hang a cabinet or picture 5 years after the renovation.
Switches and sockets should not be placed in wet rooms. The height of their placement is regulated according to SNiP or depending on the wishes of the customer. How to conduct wiring in the house if you need to create lighting in a damp room (for example, a sauna)? A transformer is connected to the network and a voltage of no more than 36 volts is supplied, since it is safe for humans.
Hidden or exposed wiring?
Before developing an electrical project and installing it, you need to decide on the type of future wiring. It comes in two types: open and hidden. Let's look at the features, pros and cons of each of them.
Open wiring consists of insulated wires laid along the surface of the walls. Wiring is fastened to the walls using cable ducts or metal brackets.
Advantages of open wiring:
Disadvantages of open wiring:
- unaesthetic appearance. Open wiring does not always fit into the design of the room;
- bulkiness. Open wires “eat up” free space and do not allow interior items to be placed where they lie; sockets and switches protrude greatly above the wall surface.
Hidden wiring is insulated wires laid in grooves. This wiring is stationary, so the location of the wires, as well as the connection points of the devices, must be determined before installation.
Advantages of hidden wiring:
- compactness. The wiring does not take up useful space in the room and does not interfere with the free arrangement of furniture;
- aesthetics. Wires do not disturb the appearance of the room, switches and sockets are located almost in the same plane with the wall;
Disadvantages of hidden wiring:
- inability to assess the condition of the wires. Any wiring gets older and wears out over time, and this can reduce the quality of electricity and create the risk of short circuits and fires. It is not possible to assess the condition of hidden wiring without a special tool;
- inability to assess the location of the wires. If a person bought a house, apartment or office with hidden wiring, he cannot independently determine where the wires are located and risks touching them during repair work;
- stationary character. If the owners of a room with hidden wiring want to change the location of certain household appliances, sockets and switches, they will have to hollow out the walls and build up wires, which is time-consuming, labor-intensive and quite expensive.
Required materials and tools
List of tools, materials and other supplies that may be needed:
- Screwdrivers.
- Wire stripper.
- Indicator screwdriver.
- Pliers.
- Gloves.
- Drill.
- Hammer.
- Concrete bit (for drilling holes for sockets and switches of a certain diameter).
- Grinder with a disc for concrete.
- Hammer.
- Plastic dowels with self-tapping screws to secure the mounting box for the switch and socket.
- Mounting boxes.
- Pads for installing sockets and switches with external wiring.
- Wires (copper or aluminum).
- Electrical cable.
- Junction box.
- Residual current device.
- Counter.
- Machine.
Brief information
Today, only copper wires are used in homes, since aluminum wires cannot be used for hidden wiring.
There are two types of wires and cables: single-core and stranded. They differ in the number of cores isolated from each other. The cores of wires and cables can be single-wire or multi-wire. Wires are selected depending on the load.
Comment. Don't skimp on materials; cheap materials quickly break down!
Bottom wiring