Requirements for laying electrical cables are defined in the relevant regulatory and technical documents containing a complete list of procedures and measures, the implementation and adoption of which is necessary to ensure fire and electrical safety of electricity consuming facilities. In this article we will consider the main points (general rules) of the construction of indoor (indoor) and outdoor cable power lines. We will also describe some measures taken to make it possible to operate cables in various environments (conditions) - air (overhead power lines), soil, water.
Rules for the location of cable routes
The location of cable lines in the room is subject to certain rules:
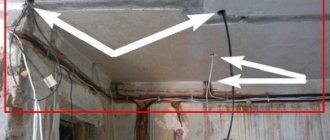
- wiring in the room must be laid in accordance with strictly horizontal or strictly vertical lines, while turning the cable route is possible only by 90° (creating all kinds of diagonals related to saving conductors is unacceptable);
- horizontal sections of wiring should lie at a distance of 10...15 cm from the ceiling;
- vertical sections of wiring must be at least 10 cm away from door and window openings.
Submarine lines
• Cable routes crossing and/or running along water bodies can be laid on the bottom and banks of both stable and erosion-prone soil. In the first case, the laying depth is 1 m, in the second - depending on the characteristics of the soil. • The cable must run along the bottom or along the shore of the reservoir in such a way that it does not become sagging in uneven areas. Such areas should be avoided or covered with crushed stone, pebbles or other materials. If there are obstacles along the route in the form of shallows, rock ridges, etc., the cable is laid in a previously prepared trench. • Information boards should be installed near bodies of water where cables are laid, notifying about the presence of electrical wiring under water. • Crossing cables during underwater installation is prohibited.
A large selection of electrical cables is presented on the website. After reading the product description, you can make a choice yourself or contact a company specialist who will competently advise you on issues of price and quality.
Wiring types
In modern buildings, it is customary to install two types of wiring: hidden and open. Hidden wiring is laid in the voids of building structures or inside walls (in channels made by gating, drilling, etc.).
Open type wiring is laid directly on the surface of the walls. The wires are either attached to special insulators or laid in standard cable channels.
When choosing the type of wiring when building a house, you should not be guided by your own preferences, because only SNiPs, GOSTs and PUE should be taken as the basis.
“Self-taught builders” have the least questions if the electrical wiring is installed on walls made of non-combustible building materials. First, let's talk about such cases.
Installation of wiring on building structures made of non-combustible materials
Modern PUE rules allow the use of wires and cables exclusively with copper conductors indoors (clause 7.1.34.).
If the room has walls and ceilings made of non-combustible materials (concrete, brick, aerated concrete blocks, ceramic blocks, GGP gypsum boards, etc.), then it is advisable to install hidden wiring in it. Firstly, it is aesthetically pleasing, secondly, it is safe in terms of accidental mechanical damage and, thirdly, the PUE rules (clause 7.1.37) completely allow for the installation of hidden wiring in walls made of non-combustible materials.
In this case we are talking about residential premises. In attics, basements (especially unheated ones) and in technical premises, it is recommended to do open wiring.
The PUE rules state: if a building structure consists of non-combustible materials, then it is allowed to lay embedded permanent wiring along it, using technological channels, grooves and voids for this. In this case, it is sufficient to use insulated cables or wires in a protective sheath (for example, VVG cables) as conductors. In this case, wiring is installed without the use of metal pipes, protective corrugations and other additional elements.
If the rough wall is subsequently planned to be plastered, then, as a rule, there is no need to resort to chiselling the walls for wiring.
station wagon 2010FORUMHOUSE member
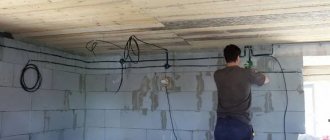
When building a new house, before plastering work, it is advisable to carry out electrical wiring. First, it’s a good idea to obtain specifications (technical conditions) from the energy supply organization and draw for yourself (and for delivery to the same energy supply organization) a single-line power supply diagram. It is possible to ditch a brick wall, but it is not worth it. You can lay the VVG by attaching a dowel-nail to the wall and fixing the cable on it with a plastic clamp such as a tie (sold in packs in electrical goods stores). By the way, it turns out that the wiring protrudes on the wall by no more than 4-5 millimeters, and the plaster completely covers the wiring, even if you plaster sparingly with special plasters (mixtures).
Of course, niches for sockets and switches will still have to be created in the wall itself. But there will be much less dust and physical work in this case than with widespread wall gating.
As for the power supply diagram: any self-respecting owner should have it. After all, it will certainly be needed in the future. The diagram is needed at least so that during the renovation of the room you do not get a drill into a wire connected to electricity.
If you are laying wiring along walls that are not planned to be plastered in the future, then gating in this case cannot be avoided. You will also have to trench the walls if the old wiring is being replaced during a major renovation, and there is no need to remove a layer of old plaster.
Is it worth or not to create horizontal grooves? Is it possible to groove load-bearing walls and concrete floors? There are no clear answers to these questions among professional builders. Of course, from the point of view of the theory of strength of materials, man-made grooves can significantly weaken the strength of building structures (similar to how a thin cut from a glass cutter weakens strong glass). However, the rules of the PUE (clause 7.1.37) allow the laying of electrical networks in grooves (in grooves) of walls, partitions and ceilings. The main thing is not to overdo it with the depth of the groove and its width.
Kostya IvanovForumHouse Member
Make one large hole to accommodate all the cables. If the lines are different, then the distances between them are not standardized in any way. The groove should be such that the cable fits into it and does not interfere with plastering. There are no other rules here.
In this case, existing technological voids (for example, in floor slabs) should be used to the maximum.
In grooves, in steel sleeves, in special trays and technological channels, joint laying of wires and cables belonging to different lines is allowed (with the exception of mutually redundant conductors).
When determining the method of laying the cable network, it is also important to consider the following nuances:
- features of natural and indoor conditions,
- the place where the line will be drawn,
- the approved diagram of the network being implemented, the size of its various sections and cross-sectional dimensions.
The influence of environmental conditions must be taken into account, since this factor can lead to the following undesirable consequences:
a) damage to the insulating material of the conductors, the material itself, of which it consists, other protections and fasteners;
b) a threat to the life and health of people servicing and repairing the electrical network, or persons who accidentally come into contact with it;
c) increased fire and explosion hazard.
Damage to the insulating material of wires and even partial corrosion of metal parts of the structure or current conductors occurs due to high humidity, toxic gases, fumes and unacceptable temperatures.
The consequences of damage to the insulating elements can be short circuits, increased danger of the network in direct contact with it, especially if the environmental conditions are characterized by increased humidity and temperature. In addition, indoor air sometimes contains some impurities that tend to ignite or lead to an explosion if sparks or unacceptable temperatures occur in electrical components.
The peculiarities of the premises in which installation work is carried out bring their own subtleties into the procedure for laying cables across the territory of production buildings. Types of premises differ in the degree of humidity (from dry to particularly damp), can be hot, dusty, have an active chemical environment, and be a fire hazard.
The beginning of the installation of power lines is necessarily preceded by the study of working documentation, which reflects the plan of the route being laid; route diagrams; There are preliminary versions of drawings of structures and structures. Complexes of sealing work are also spelled out there; plans for the transition of cables with a voltage of 35000V to an overhead line. The cable log contains information about the materials used, products, estimates and much more.
Typically, the construction of cable networks takes place in two stages: supports necessary for laying wires are installed in production buildings; then they run the cables and connect them to the electrical system. The technology of the process of laying cable wires includes some manipulations: the drum with cable winding is lifted by special mechanisms (if necessary) and secured, the protective casing of the drum is removed, then the cable is unwound by uniform rotation of the drum and laid along the designated route to the planned position.
Cable unwinding can be done either manually or using mechanical devices. When unwinding manually, cable pulling is carried out by electrical installation specialists, who occupy positions so that a maximum load of 350 N falls on one worker. This method is used when it is not possible to mechanize the process or when there is an obvious inconsistency in the use of equipment (for example, on short sections of the route with a small number of cables) . To facilitate the work of electrician workers, bypass devices, for example, can be used.
All work on laying lines is carried out strictly according to the project, along certain highways and the chosen method of laying cable lines. They are carried out taking into account the extreme exclusion of the likelihood of dangerous situations occurring during operation.
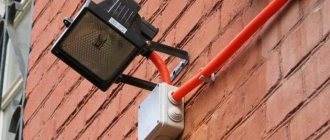
In industrial buildings, cables can be laid open or hidden to various electrical appliances and circuit breakers. In production areas, wires can also run openly: fixed to load-bearing elements, or hidden - through specialized tunnels or in the ground.
- Before starting the wiring procedure, it is necessary to check their condition as wound on the drums - conduct an external inspection. To determine the integrity of the core insulation, a megohmmeter is used.
- To conduct cables, structures are used that are assembled from perforated metal profiles and fasteners. A single cable can be mounted on hangers in the form of hooks located on racks.
Installation of wiring on building structures made of flammable materials
A lot of questions regarding the rules for installing electrical wiring arise from people who begin to independently electrify premises made of flammable building materials. We are mainly talking about frame and wooden houses. Answers to most questions can be found in the same PUE rules.
The design of houses made of combustible building materials allows for the installation of both types of wiring (hidden and open). Which one to use depends on the homeowner's preference. As for the protective elements that protect wiring from damage and the building from fire as a result of a short circuit, their choice depends on the type of cable route.
There are two ways to install open wiring indoors:
- Installation of retro wiring.
- Laying wires in cable channels.
Homemade sliding suspension
Construction stores sell a variety of hangers for cable wiring. However, with a small amount of work, you can do it on your own by creating a homemade fastener.
For this you will need:
- wire cutters;
- round nose pliers;
- galvanized steel wire (preferably more flexible);
- a rod whose diameter is higher than the given value of the cable being installed.
Using wire cutters, create several pieces of wire 25-30 cm long. Take the pliers and make an air loop in the middle of each of them. Its diameter should be equal to the size of the cable being laid, since the next step is to thread it through the “rings”.
Wrap the wire around the rod to create the components to secure the cable to the cable. First, wind one end, then the other end. The pitch of the resulting spiral should be about 20 mm. With these steps you will create a homemade cable hanger.
To lay the cable through the air, secure the cable, then place the hangers at intervals of 50-80 cm and thread the cable through them. After this, the free end of the cable is fixed to the second building.
Installation of retro wiring
The extent to which the design of retro wiring complies with the rules of the PUE is a controversial issue. In this regulation, the creation of wiring of this type is not even considered. Nevertheless, let's try to understand this issue.
FDRAFORUMHOUSE Member
PUE allows open laying of cables with a flame retardant sheath (for example, VVGng) directly over walls made of flammable material. But by no means hidden. There must be visual control.
In the case of retro wiring, a special twisted cable (“retro”) is mounted directly on the wall, to which it is attached using small insulators. Considering that such a conductor is coated with artificial silk impregnated with a non-flammable composition, it can easily be classified as a fire-retardant wire. Consequently, installation of retro wiring on walls made of combustible materials does not violate the rules of the Electrical Installation Regulations.
In accordance with the rules of the PUE, the distance from the conductor to the surface of a combustible material must be at least 10 mm, which is fully ensured by the design of insulators for retro wiring.
The distances between the various retro wiring elements are indicated in the drawing.
If the wire sags a lot, the distance between the insulators can be reduced to 50 cm.
When installing retro wiring, one important nuance should be taken into account: most modern electrical appliances must be connected to a ground loop. For this reason, a three-core cable should be used as part of the wiring (if it is not commercially available, then it is advisable to weave it yourself).
Where wiring passes through a wall or ceiling made of flammable materials (for example, wood), the cable (wire) must be laid in a metal pipe that has localization capabilities. The ends of the pipe should be sealed with a non-flammable compound (for example, fire-resistant foam).
The localization ability of a pipe is a quality that allows it to withstand short circuits in electrical wiring without burning out the walls of the pipe itself. In order for a pipe to have this ability, its walls must be of a certain thickness:
- for copper conductors with a cross section of up to 2.5 mm², the wall thickness is not standardized;
- for copper conductors with a cross section of 4 mm², the pipe must have a wall thickness of at least 2.8 mm;
- for copper conductors with a cross section of 6–10 mm², the pipe must have a wall thickness of at least 3.2 mm.
Entering the cable into the house and connecting to the pole
Entering an underground electrical line into a building can be done in various ways, but the PUE prohibits laying it directly through the foundation, without the use of additional structural elements. The following methods are available for connecting indoor wiring to underground cable.
- In a building with a basement, a hole is punched in the foundation and a piece of metal pipe of the appropriate diameter is walled into it. The length of the pipe should be slightly greater than the thickness of the foundation. The cable is pulled through it, and the internal space of the structure is filled with a sealing substance: cement mortar, polyurethane foam, and so on.
- At the entry point, a metal pipe is installed, bent in two places with the appropriate dimensions. An electrical cable is passed through this structure and brought into the house through the external wall at the required height. The bending radius of the pipe must be at least 10 of its outer diameters, which is necessary to avoid damage to the conductor.
- A shallow foundation can be bypassed by laying a line under it at a depth of 50 cm from the bottom edge, after laying a metal pipe and passing a cable through it. Entry is through the floor of the building. With a pile foundation everything is much simpler. A trench is laid to the entry point, a hole is punched in the ceiling and the line is brought into the house.
Connecting underground cable lines to a power pole will not cause any difficulties. Power engineers do not have any special requirements for this stage of underground cable laying. The upper part of the connection area, from the electrical wires to the equipment panel, should be enclosed in a corrugated plastic pipe, and the lower part is at the discretion of the user. Of course, it is advisable to pass it through a curved metal pipe to prevent accidental damage, but according to the PUE standards this is not a mandatory requirement.
Open wiring in cable channels
If open-type wiring is laid in cable ducts and electrical baseboards, then cables (wires) with high fire resistance (VVGng or NYM) should be used as conductors. At the same time, the material of the cable channels should also prevent the spread of fire.
Alexey S. FORUMHOUSE participant
I made open wiring with NYM wires in wood-look cable channels - Czech (with a certificate). Non-flammable (or correctly – self-extinguishing). I checked it myself: when the flame is applied, they begin to char and melt a little. If you turn off the fire, the process stops immediately.
When installed on walls made of flammable materials, socket boxes must have fireproof linings (for example, made of asbestos cement or gypsum mortar) 10 mm thick. Where wiring passes through combustible structures, metal sleeves with localization capability must be installed.
Materials and equipment for hidden electrical wiring
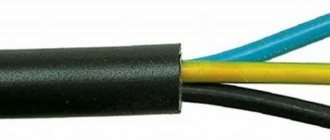
You don’t need to think long about choosing a cable: a regular one, brand VVGng, will do. If budget allows, NYM wire can be used instead. Both of them are characterized by a long service life and have high strength, due to which they can withstand wet sealing in grooves.
The cable cross-section must comply with the standard:
- lines for lighting devices - 1.5 sq. mm;
- connection of sockets - 2.5 sq. mm;
- electric stove - 4 sq. mm.
Selecting the cable cross-section for open and hidden wiring
You can take any distribution boards. Even products that are formally used in arranging open wiring are suitable. The situation is similar with switches and sockets. However, special devices for hidden installation take up much less space, look miniature and do not violate the integrity of the interior. However, in this case you will have to install socket boxes and junction boxes. There are components for solid and cavity walls.
Hidden wiring in walls made of flammable materials
The peculiarities of laying hidden wiring in walls made of flammable materials (for example, wood) boil down to the fact that wiring in the voids of such walls and partitions must run inside metal pipes that have localization capabilities (PUE rules 7.1.38.).
There is only one rule, and there can be no relaxation in relation to its implementation. All other options (the use of plastic corrugation, metal hoses and other protective elements) should be obviously excluded, because from the point of view of fire safety they are unacceptable.
IK FORUMHOUSE Member
If we approach it strictly according to the PUE, then when laying it hidden over combustible structures, a metal hose cannot be laid. Key phrase in clause 7.1.38: “in metal pipes with localization ability.” Metalsleeve does not have this ability. Therefore it is illegal.
When laying wires and cables along combustible structures (or inside them), in all cases the possibility of replacing conductors must be ensured.
By the way, electrical wiring spread over the ceilings is the most convenient way to arrange hidden wiring in rooms made of combustible materials. In this case, the grooves to sockets and switches will simply go down from the main highways.
When laying pipes and ducts for electrical wiring in technological voids of combustible structures, the ends of the pipes and ducts should be covered with quickly removable non-combustible material (for example, polyurethane foam).
In order to create a sufficient number of turns when installing replaceable wiring in metal pipes, junction boxes must be used in the corners of the electrical route. Access to these elements must always remain open.
The internal diameter of the pipe should be selected in such a way that the cable laid inside it occupies no more than 40% of the total free space. This rule applies to all protective elements (cable ducts, corrugations, trays, etc.).
It should be noted right away that creating hidden wiring in rooms with wooden walls is a labor-intensive process. After all, the channels for wiring will have to be equipped on your own. Space for pipes must be cleared by drilling, making grooves and creating recesses.
Vertical channels in the walls should be drilled during the laying of the log house. In this case, horizontal holes are made after the walls are ready. To make it more convenient to pull the cable through the pipes, an auxiliary cable for pulling (conductor) should be placed in advance into their internal clearance.
Is it possible to replace a cable with a rope?
In short, it’s impossible. The rope does not have the necessary properties and qualities, since when exposed to negative environmental factors, fabric products quickly fail. The rope is stretchable, easily frays and breaks. Due to low strength, sagging occurs, and a wire break will create an electrical and fire hazard.
Cable wiring installation technology
Theoretically, installing cables over the air is easier than organizing underground communications. However, in practice it involves meeting important requirements and performing work that only qualified and experienced electricians can do. The slightest mistakes can lead to a decrease in the safety of the cable line, so it is recommended to contact professional technicians for at least a consultation.
Cable laying under plasterboard, behind suspended and suspended ceilings
The laying of hidden wiring inside frame partitions, under plasterboard or plastic sheathing, as well as behind various types of ceilings is regulated by the set of building rules SP 31-110-2003 (clause 14.15) and the PUE rules (clause 7.1.38.). In accordance with these regulations, hidden wiring can be installed in two ways:
- If partitions, wall bases or their cladding are made of flammable materials, then conductors (for example, marked VVG) should be placed in metal pipes with localization ability, or in closed boxes.
- If building structures are made of non-flammable materials, then the wiring should consist of flame retardant wires (cables) (for example, VVGng), and it should be mechanically protected with non-flammable non-metallic boxes or pipes (for example, a corrugated self-extinguishing pipe).
In both cases, the wiring must be replaceable.
If the wiring is mounted under plasterboard sheathing, and the supporting profile is almost flush against the wall, then it is advisable to lay the wires in grooves made in the wall or plaster.
KorectorFORUMHOUSE Member
I would not make holes in the profile; you need to leave space for the wires between the profile and the wall, or ditch the wall - if there is no other way.
Recommendation from practice
If you use a tying wire to secure the cable to the cable, be careful not to over-tighten it so as not to accidentally cut the insulation or strands. To eliminate such situations, you can place a strong gasket made of insulating material between the bandage and the cable.
At all attachment points, you must adhere to the same winding pattern - at least 7 turns of the bandage. If plastic clamps are used, make sure that their operating parameters comply: they must withstand low and high temperatures, otherwise they may dry out and fall apart.
For additional line protection and cable insulation, it is recommended to use corrugated pipes. This will reduce the negative impact of bad weather conditions, reduce the financial costs of operation and subsequent possible restoration of the route.
Carrying wires through the air in a corrugated pipe
If it is not possible to collect the line from above, you can try to do it on the ground. You should attach the cable to the cable right there, and then pull it between the supports.
Wiring under the floor
Installing electrical wiring under the floor is an ideal way to create hidden cabling without resorting to horizontal grooves in the walls. In this case, the cable (main wire) is supplied directly to the locations of sockets, switches and distribution boxes.
The method of creating floor wiring directly depends on what material the floors are planned to be made from. In general, it is necessary to focus on the rules of the PUE that are already known to us.
sergey_savFORUMHOUSE Member
In the voids of building structures - read SP31-110-2003 clause 14.15 or similar - PUE 7 clause 7.1.38. That is, if something in the structure turns out to be flammable (joists, for example), then the direct path is to metal blind boxes and pipes.
If the wiring is installed in the lower layers of the cement floor, then a simple protective corrugation is sufficient for its installation. Of course, it is possible to lay a cable inside the screed without any corrugation at all, but in this case it will not be possible to replace the wiring without resorting to destroying the floor covering. By the way, the difficulty of repairing and replacing cables (wires) is the only significant drawback of floor wiring, and it should definitely be taken into account when deciding on the type of electrical wiring.
So, we have introduced you to the main methods of installing internal electrical wiring, which depend on the characteristics of the building materials in the room. You can read in more detail about the experience of laying cables on various building structures in the corresponding section of our portal. You can learn about additional features of installing wiring on walls, floors and ceilings from the corresponding video. And the article about protecting consumer electronics from sudden voltage surges will be of interest to anyone who does not want to one day face the unpleasant consequences of such a problem.
Hidden electrical wiring installation technology
After drawing up the diagram, it needs to be transferred to the surface of the walls. This applies to cable locations, sockets, switches, boxes and lighting fixtures. Be sure to mark the area where the electric stove will be placed, if one will be used. When measuring the height from the floor, take into account future work on laying tiles, laminate or other materials.
The third stage is to use a tool to make grooves for the cable and recesses for the socket boxes. Immediately after this, you can proceed to laying and fastening the wires. The latter can be easily done using dowel clamps (UW), also called “lashes”. The dimensions of the fastening element directly depend on the thickness of the insulation of the mounted conductor.
Fastening the cable using dowel clamps
They are easy to use: at the attachment point you need to drill a hole of a certain depth and appropriate diameter. Then you should wrap the cable with a dowel clamp, after which its antennae should be placed in the hole. Those who want to save money can use a simpler method: after laying the wire in the grooves at a certain distance, it is smeared with alabaster.
Before attaching the wire, it should be straightened to avoid bending or twisting. Where the line turns, the wire should bend smoothly. At the points where the boxes are located, you need to leave a cable reserve of 15–20 cm.
The fourth stage is the installation of distribution boxes and socket boxes. But first, be sure to make sure they are working. Also check that the box fits freely into the recess. It must be completely hidden. Moisten the installation site with water and spread a layer of alabaster. On the side of the box where the wire will be, remove the partition, thread the cable and insert the product into the niche.
The box should be flush with the wall. Otherwise, the switch or socket will stick out from the wall surface, which will compromise aesthetics and safety. At the end, finishing work is performed, wires are connected and power is connected.
Wall chipping
A groove is a special groove or rectangular hole in the wall in which the cable is placed. The gating process takes a lot of time and effort. For increased safety, wear goggles and a respirator mask to protect your vision and breathing, respectively.
The ideal solution to the problem would be to use a wall chaser. The tool is not cheap, so not everyone will want to buy it for repairs in one apartment. You can replace it with an electric grinder, equipping the device with diamond wheels or discs for concrete.
Chasing walls for electrical wiring
Cut two strips parallel to each other, then use a chisel and hammer to knock out the rest of the wall between the slots. The width and depth of the groove depend on the number of cables being installed. In this case, there should be a margin of about 10 mm in each direction.
When operating a hammer drill, you need to drill several holes of a suitable diameter at a distance of 5–10 mm. Then the partitions between them are removed with a hammer and chisel. For recesses under boxes and socket boxes, you need to use a hammer drill equipped with crowns with a drill in the center. If there is no crown, then use a regular drill to make several holes in a circle, and then remove the partitions.
Laying grooves using a hammer drill
Laying electrical wiring in pipes
To increase the safety of future electrical wiring, you can use special tubes. This installation method is usually used for rooms with high levels of humidity or rooms with significant temperature changes: baths, basements, bathrooms.
In addition to the high level of security, this method is also good because it provides the ability to replace the cable. The installation process is practically no different from the usual method. The only exception is the need to create wider and deeper grooves. The pipes are fastened inside them using “welds”, alabaster or staples.
Plastic pipes for cable laying
Cable laying in partitions, floors and ceilings
A suspended ceiling made of plasterboard mounted on metal structures can greatly simplify the task. In this situation, there is no need to groove the walls horizontally, and the wiring will be hidden under the finishing sheets, from where it is brought to the walls and lowered vertically to the connection points for sockets and switches.
Junction boxes can be installed in the same place, which will avoid drilling holes for them. However, this option involves installing plastic hatches with a pointer directly in the drywall, through which you can get to the boxes. The wires are attached to the ceiling using “hooks” or ordinary clamps.
Installation of wires along the ceiling in corrugated wires
The wiring can be placed in plastic pipes, which are attached to the ceiling using clips. This method increases the level of fire safety. An alternative solution is to lay the cable in the floor if it is lined with wood or gypsum fiber boards. For the first option, you can drill or cut holes directly in the joists, then insert plastic pipes with cables through them; for the second, lay the wires on the floor, secure them with brackets and cover them with expanded clay or other filler. The flooring is laid on top.
Electrical wiring can be hidden in pipes and then covered with cement screed. If the solution layer is too thin, then this option is undesirable.
Note. It is forbidden to connect wires behind cladding, partitions or in the floor. When using one of the listed methods, switching is possible strictly in junction boxes.
Installation of the junction box
When installing distribution boxes in concrete walls, making a hole with a hammer drill, use a diamond-coated drill bit. Conventional components with a pobedit drill wear out too quickly, and you will be forced to buy new ones. On the other hand, it is not possible to use diamond drill bits for finblocks.
Before you start milling, make a hole in the center of the mounting location, the diameter of which corresponds to the drill. The diameter of the installed boxes should be about 60–70 mm, which is enough for six conductors.
Distribution box for hidden electrical wiring
Installation of socket boxes
Having created the holes, install socket boxes and switch boxes. For reliable fixation, use alabaster, which ensures good fastening of the plastic to the concrete. The edges should be mounted flush to avoid difficulties in the process of decorative wall treatment.
Mounting strip for socket boxes
Finally, we emphasize that hidden wiring is done for several decades in advance, so saving on the quality of the materials used is highly not recommended. After purchase, perform a preliminary inspection to ensure there is no damage and that there are no insulation problems. Play it safe once again, since getting to the wiring in the future will be problematic. Wall, floor or ceiling cladding should be installed only after checking the functionality of the electrical network. Don't forget about safety precautions.